文章目录
- 图片生成
- 简介
- 编辑(仅限 DALL·E 2)
- 变体(仅适用于 DALL·E 2)
- 内容审核
- 语言特定提示
- 使用内存中的图像数据
- 使用 TypeScript
- 错误处理
- 文本转语音
- 快速入门
- 文本到语音模型
- 语音选项
- 实时音频流
- 支持的输出格式
- 支持的语言
- 定制和所有权
- 自定义声音
- 语音转文本
- 快速入门
- 转写
- 翻译
- 支持的语言
- 时间戳
- 较长的输入
- 提示
- 流式转录
- 流式传输已完成音频录音的转录
- 流式传输正在进行的音频录音的转录
- 提高可靠性
- 使用提示参数
- 使用 GPT-4 进行后处理
- 向量嵌入
- 什么是嵌入?
- 如何获取嵌入
- 嵌入式模型
- 用例
- 获取嵌入
- 降低嵌入维度
- 基于嵌入的搜索进行问答
- 使用嵌入进行文本搜索
- 使用嵌入进行代码搜索
- 使用嵌入进行推荐
- 2D 数据可视化
- 将嵌入作为机器学习算法的文本特征编码器
- 使用嵌入特征进行回归
- 使用嵌入特征进行分类
- 零样本分类
- 获取用户和产品嵌入以进行冷启动推荐
- 聚类分析
- FAQ
- 如何在嵌入之前判断一个字符串包含多少个标记?
- 如何快速检索K个最近的嵌入向量?
- 应该使用哪个距离函数?
- 我能否在线分享我的嵌入向量?
- 审核管理
- 快速入门
图片生成
了解如何使用DALL·E生成或操作图片。
https://platform.openai.com/docs/guides/image-generation
简介
图像生成API 有三个端点,具有不同的功能:
- 生成:基于文本提示从零开始创建图像
- 编辑:基于新的文本提示,对现有图像进行编辑,模型将替换图像的一些区域
- 变体:现有图像的变体
本指南涵盖了使用这些端点的基础知识,并包含代码示例。要尝试DALL·E 3而无需编写任何代码,请访问 ChatGPT。
from openai import OpenAI
client = OpenAI()response = client.images.generate(model="dall-e-3",prompt="a white siamese cat",size="1024x1024",quality="standard",n=1,
)print(response.data[0].url)
***
I NEED to test how the tool works with extremely simple prompts. DO NOT add any detail, just use it AS-IS:
探索 OpenAI 烹饪书中的 DALL·E 3 的新功能
编辑(仅限 DALL·E 2)
图像编辑 端点允许您通过上传一张图像和掩码来编辑或扩展图像,其中掩码指示哪些区域应该被替换。这个过程也被称为 修复绘画。
掩码的透明区域指示图像应该被编辑的位置,提示应该描述完整的新图像,而不仅仅是被擦除的区域。此端点启用了类似 DALL·E 图像编辑在 ChatGPT Plus 中的体验。
编辑一张图像
from openai import OpenAI
client = OpenAI()response = client.images.edit(model="dall-e-2",image=open("sunlit_lounge.png", "rb"),mask=open("mask.png", "rb"),prompt="A sunlit indoor lounge area with a pool containing a flamingo",n=1,size="1024x1024",
)print(response.data[0].url)
| 图片 | 遮罩 | 输出 |
|---|---|---|
 |  |  |
提示:一个阳光明媚的室内休息区,带有一个装有火烈鸟的泳池
上传的图片和遮罩都必须是正方形PNG图像,大小小于4MB,并且具有相同的尺寸。遮罩的非透明区域在生成输出时不会被使用,因此它们不需要像我们的示例那样与原始图像匹配。
变体(仅适用于 DALL·E 2)
图像变体 端点允许您生成给定图像的变体。
生成图像变体
from openai import OpenAI
client = OpenAI()response = client.images.create_variation(model="dall-e-2",image=open("corgi_and_cat_paw.png", "rb"),n=1,size="1024x1024"
)print(response.data[0].url)
| 图片 | 输出 |
|---|---|
 |  |
与编辑端点类似,输入图像必须是一个小于4MB大小的正方形PNG图像。
内容审核
提示和图像根据我们的内容政策进行过滤,当提示或图像被标记时返回错误。
语言特定提示
Node.jsPython
使用内存中的图像数据
上文中的 Node.js 示例使用 fs 模块从磁盘读取图像数据。在某些情况下,您可能将图像数据存储在内存中。以下是一个使用存储在 Node.js Buffer 对象中的图像数据的 API 调用示例:
import OpenAI from "openai";const openai = new OpenAI();// This is the Buffer object that contains your image data
const buffer = [your image data];// Set a `name` that ends with .png so that the API knows it's a PNG image
buffer.name = "image.png";async function main() {const image = await openai.images.createVariation({ model: "dall-e-2", image: buffer, n: 1, size: "1024x1024" });console.log(image.data);
}
main();
使用 TypeScript
如果您正在使用 TypeScript,您可能会遇到与图像文件参数的一些怪异问题。以下是一个通过显式转换参数来绕过类型不匹配的示例:
import fs from "fs";
import OpenAI from "openai";const openai = new OpenAI();async function main() {// Cast the ReadStream to `any` to appease the TypeScript compilerconst image = await openai.images.createVariation({image: fs.createReadStream("image.png") as any,});console.log(image.data);
}
main();
以下是翻译后的内容:
import fs from "fs";
import OpenAI from "openai";const openai = new OpenAI();// This is the Buffer object that contains your image data
const buffer: Buffer = [your image data];// Cast the buffer to `any` so that we can set the `name` property
const file: any = buffer;// Set a `name` that ends with .png so that the API knows it's a PNG image
file.name = "image.png";async function main() {const image = await openai.images.createVariation({file,1,"1024x1024"});console.log(image.data);
}
main();
错误处理
API 请求可能会因为无效输入、速率限制或其他问题而返回错误。这些错误可以通过 try...catch 语句来处理,错误详情可以在 error.response 或 error.message 中找到:
import fs from "fs";
import OpenAI from "openai";const openai = new OpenAI();async function main() {try {const image = await openai.images.createVariation({image: fs.createReadStream("image.png"),n: 1,size: "1024x1024",});console.log(image.data);} catch (error) {if (error.response) {console.log(error.response.status);console.log(error.response.data);} else {console.log(error.message);}}
}main();
文本转语音
了解如何将文本转换为逼真的语音音频。
https://platform.openai.com/docs/guides/text-to-speech
音频API提供了一个基于我们的 GPT-4o mini TTS (文本到语音) 模型 的 speech 端点。它包含11种内置声音,可用于:
- 叙述一篇书面博客文章
- 生成多语言的语音音频
- 使用流式传输提供实时音频输出
我们的使用政策要求您向最终用户明确披露,他们所听到的TTS语音是AI生成的,而不是人类声音。
快速入门
speech 端点需要三个关键输入:
- 您使用的 模型
- 要转换为音频的 文本
- 将说出输出的 声音
以下是一个简单的请求示例:
从输入文本生成语音音频
from pathlib import Path
from openai import OpenAIclient = OpenAI()
speech_file_path = Path(__file__).parent / "speech.mp3"with client.audio.speech.with_streaming_response.create(model="gpt-4o-mini-tts",voice="coral",input="Today is a wonderful day to build something people love!",instructions="Speak in a cheerful and positive tone.",
) as response:response.stream_to_file(speech_file_path)
默认情况下,端点输出的是spoken audio的MP3文件,但您可以配置它以输出任何supported format。
文本到语音模型
对于智能实时应用,请使用我们的最新且最可靠的文本到语音模型 gpt-4o-mini-tts。您可以使用该模型控制语音的各个方面,包括:
- 口音
- 情感范围
- 语调
- 声音印象
- 说话速度
- 语气
- 轻声
我们的其他文本到语音模型有 tts-1 和 tts-1-hd。tts-1 模型提供更低的延迟,但质量低于 tts-1-hd 模型。
语音选项
TTS 端点提供了 11 种内置语音,用于控制从文本到语音的渲染方式。在 OpenAI.fm 上聆听和试听这些语音,这是我们的交互式演示,用于尝试 OpenAI API 中的最新文本到语音模型。当前语音优化适用于英语。
alloyashballadcoralechofableonyxnovasageshimmer
如果您正在使用 实时 API,请注意,可用的语音集略有不同——请参阅 实时模型功能指南,了解当前的实时语音。
实时音频流
语音API支持使用分块传输编码进行实时音频流传输。这意味着可以在完整文件生成并可供访问之前播放音频。
直接从输入文本将语音音频流传输到您的扬声器
import asynciofrom openai import AsyncOpenAI
from openai.helpers import LocalAudioPlayeropenai = AsyncOpenAI()async def main() -> None:async with openai.audio.speech.with_streaming_response.create(model="gpt-4o-mini-tts",voice="coral",input="Today is a wonderful day to build something people love!",instructions="Speak in a cheerful and positive tone.",response_format="pcm",) as response:await LocalAudioPlayer().play(response)if __name__ == "__main__":asyncio.run(main())
为了获得最快的响应时间,我们建议使用 wav 或 pcm 作为响应格式。
支持的输出格式
默认响应格式是 mp3,但其他格式如 opus 和 wav 也可用。
- MP3:通用用例的默认响应格式。
- Opus:适用于互联网流媒体和通信,低延迟。
- AAC:适用于数字音频压缩,YouTube、Android、iOS首选。
- FLAC:适用于无损音频压缩,音频爱好者用于存档。
- WAV:未压缩的WAV音频,适用于低延迟应用以避免解码开销。
- PCM:类似于WAV,但包含24kHz(16位有符号,低位字节序)的原始样本,没有头部。
支持的语言
TTS 模型在语言支持方面通常遵循 Whisper 模型。Whisper 支持以下语言 并且表现良好,尽管声音是针对英语优化的:
阿非利堪斯语、阿拉伯语、亚美尼亚语、阿塞拜疆语、白俄罗斯语、波斯尼亚语、保加利亚语、加泰罗尼亚语、中文、克罗地亚语、捷克语、丹麦语、荷兰语、英语、爱沙尼亚语、芬兰语、法语、加利西亚语、德语、希腊语、希伯来语、印地语、匈牙利语、冰岛语、印度尼西亚语、意大利语、日语、卡纳达语、哈萨克语、韩语、拉脱维亚语、立陶宛语、马其顿语、马来语、马拉地语、毛利语、尼泊尔语、挪威语、波斯语、波兰语、葡萄牙语、罗马尼亚语、俄语、塞尔维亚语、斯洛伐克语、斯洛文尼亚语、西班牙语、斯瓦希里语、瑞典语、他加禄语、泰米尔语、泰语、土耳其语、乌克兰语、乌尔都语、越南语和威尔士语。
您可以通过提供您选择的任何语言的输入文本来生成这些语言的语音音频。
定制和所有权
自定义声音
我们不支持自定义声音或创建您自己声音的副本。
语音转文本
学习如何将音频转换为文本。
https://platform.openai.com/docs/guides/speech-to-text
音频API提供了两个语音转文本端点:
transcriptionstranslations
历史上,这两个端点都由我们的开源 Whisper 模型 (whisper-1) 支持。现在,transcriptions 端点也支持更高质量的模型快照,但参数支持有限:
gpt-4o-mini-transcribegpt-4o-transcribe
所有端点都可以用于:
- 将音频转录成音频所在的语言。
- 将音频翻译并转录成英语。
文件上传目前限制为25 MB,支持以下输入文件类型:mp3、mp4、mpeg、mpga、m4a、wav 和 webm。
快速入门
转写
转写 API 以您想要转写的音频文件和所需的转写输出文件格式作为输入。所有模型都支持相同的输入格式集。在输出时,whisper-1 支持多种格式(json、text、srt、verbose_json、vtt);较新的 gpt-4o-mini-transcribe 和 gpt-4o-transcribe 快照目前仅支持 json 或纯 text 响应。
转写音频
from openai import OpenAIclient = OpenAI()
audio_file= open("/path/to/file/audio.mp3", "rb")transcription = client.audio.transcriptions.create(model="gpt-4o-transcribe", file=audio_file
)print(transcription.text)
默认情况下,响应类型将是包含原始文本的json。
{ “text”: "想象一下你曾经有过的最疯狂的想法,你好奇它可能会如何扩展到100倍、1000倍更大的规模。 … }
音频API还允许你在请求中设置额外的参数。例如,如果你想将 response_format 设置为 text,你的请求将如下所示:
附加选项
from openai import OpenAIclient = OpenAI()
audio_file = open("/path/to/file/speech.mp3", "rb")transcription = client.audio.transcriptions.create(model="gpt-4o-transcribe", file=audio_file, response_format="text"
)print(transcription.text)
API参考 API参考 包含了所有可用参数的完整列表。
较新的 gpt-4o-mini-transcribe 和 gpt-4o-transcribe 模型目前具有有限的参数表面:它们仅支持 json 或 text 响应格式。其他参数,如 timestamp_granularities,需要 verbose_json 输出,因此只有在使用 whisper-1 时才可用。
翻译
翻译 API 接收任何受支持语言的音频文件作为输入,并在必要时将音频转录成英语。这与我们的 /Transcriptions 端点不同,因为输出不是原始输入语言,而是翻译成英语文本。此端点仅支持 whisper-1 模型。
翻译音频
from openai import OpenAIclient = OpenAI()
audio_file = open("/path/to/file/german.mp3", "rb")translation = client.audio.translations.create(model="whisper-1", file=audio_file,
)print(translation.text)
在这种情况下,输入的音频是德语,输出的文本看起来像这样:
你好,我叫Wolfgang,我来自德国。你今天要去哪里?
我们目前只支持翻译成英语。
支持的语言
我们目前通过 transcriptions 和 translations 端点 支持以下语言:
南非荷兰语、阿拉伯语、亚美尼亚语、阿塞拜疆语、白俄罗斯语、波斯尼亚语、保加利亚语、加泰罗尼亚语、中文、克罗地亚语、捷克语、丹麦语、荷兰语、英语、爱沙尼亚语、芬兰语、法语、加利西亚语、德语、希腊语、希伯来语、印地语、匈牙利语、冰岛语、印度尼西亚语、意大利语、日语、卡纳达语、哈萨克语、韩语、拉脱维亚语、立陶宛语、马其顿语、马来语、马拉地语、毛利语、尼泊尔语、挪威语、波斯语、波兰语、葡萄牙语、罗马尼亚语、俄语、塞尔维亚语、斯洛伐克语、斯洛文尼亚语、西班牙语、斯瓦希里语、瑞典语、他加禄语、泰米尔语、泰语、土耳其语、乌克兰语、乌尔都语、越南语和威尔士语。
虽然底层模型是在98种语言上训练的,但我们只列出了超过50% 单词错误率(WER)的语言,这是语音到文本模型准确性的行业标准基准。对于上述未列出的语言,模型将返回结果,但质量会较低。
我们支持一些基于GPT-4o模型的ISO 639-1和639-3语言代码。对于我们没有的语言代码,尝试提示具体语言(例如,“输出为英语”)。
时间戳
默认情况下,转录API会将提供的音频转录成文本。[timestamp_granularities[] 参数](https://platform.openai.com/docs/api-reference/audio/createTranscription#audio-createtranscription-timestamp_granularities) 允许输出更结构化和带时间戳的 JSON 格式,时间戳可以位于段落、单词级别,或两者都有。这为转录和视频编辑提供了单词级别的精度,允许移除与单个单词相关的特定帧。
时间戳选项
from openai import OpenAIclient = OpenAI()
audio_file = open("/path/to/file/speech.mp3", "rb")transcription = client.audio.transcriptions.create(file=audio_file,model="whisper-1",response_format="verbose_json",timestamp_granularities=["word"]
)print(transcription.words)
timestamp_granularities[] 参数仅支持 whisper-1。
较长的输入
默认情况下,转录API仅支持小于25 MB的文件。如果您有一个超过这个大小的音频文件,您需要将其拆分为25 MB或更小的块,或者使用压缩的音频格式。为了获得最佳性能,我们建议您避免在句子中间拆分音频,因为这可能会导致丢失一些上下文。
处理这一问题的方法之一是使用PyDub开源Python包来拆分音频:
from pydub import AudioSegmentsong = AudioSegment.from_mp3("good_morning.mp3")# PyDub handles time in milliseconds
ten_minutes = 10 * 60 * 1000first_10_minutes = song[:ten_minutes]first_10_minutes.export("good_morning_10.mp3", format="mp3")
OpenAI不对PyDub等第三方软件的可用性或安全性做出任何保证。
提示
您可以使用 提示 来提高由转录 API 生成的转录质量。
提示
from openai import OpenAIclient = OpenAI()
audio_file = open("/path/to/file/speech.mp3", "rb")transcription = client.audio.transcriptions.create(model="gpt-4o-transcribe", file=audio_file, response_format="text",prompt="The following conversation is a lecture about the recent developments around OpenAI, GPT-4.5 and the future of AI."
)print(transcription.text)
对于 gpt-4o-transcribe 和 gpt-4o-mini-transcribe,您可以使用 prompt 参数通过提供额外的上下文来提高转录质量,这类似于您如何提示其他 GPT-4o 模型。
以下是一些如何在不同场景中通过提示帮助的示例:
- 提示可以帮助纠正模型在音频中错误识别的特定单词或缩写。例如,以下提示改善了“DALL·E”和“GPT-3”这些单词的转录,它们之前被错误地写成“GDP 3”和“DALI”: “转录内容是关于OpenAI的,它希望有一天能通过开发像DALL·E、GPT-3和ChatGPT这样的技术,构建一个造福全人类的AGI系统。”
- 为了保留已被分割成段落的文件的内容,向模型提供前一段的转录文本。模型使用之前的音频中的相关信息,从而提高转录的准确性。
whisper-1模型仅考虑提示中的最后224个标记,并忽略任何更早的内容。对于多语言输入,Whisper使用自定义的分词器。对于仅英语输入,它使用标准的GPT-2分词器。在开源Whisper Python包中可以找到这两个分词器。 - 有时模型会跳过转录文本中的标点符号。为了防止这种情况,请使用包含标点的简单提示:“你好,欢迎来到我的讲座。”
- 模型还可能省略音频中的常见填充词。如果您想在转录中保留填充词,请使用包含它们的提示:“嗯,让我想想,嗯嗯……好吧,我想的是这样。”
- 一些语言可以以不同的方式书写,例如简体或繁体中文。默认情况下,模型可能不会始终使用您为您的字幕所希望的书写风格。您可以通过使用您首选的书写风格的提示来改进这一点。
对于 whisper-1,模型试图匹配提示的风格,因此如果提示也使用了大写和标点符号,它更有可能使用。然而,当前的提示系统比我们的其他语言模型更为有限,并且对生成的文本的控制也有限。
您可以在提高可靠性部分找到更多关于改进您的whisper-1转录示例。
流式转录
根据您的用例以及您是尝试转录已完成的音频录音还是处理持续的音频流并使用 OpenAI 进行轮次检测,您有两种方式可以流式传输您的转录内容。
流式传输已完成音频录音的转录
如果您已经有一个完成的音频录音,无论是音频文件还是您使用自己的语音检测(如按说话触发),您可以使用我们的转录API并设置stream=True,以便在模型完成转录音频的该部分后立即接收转录事件流。
流式转录
from openai import OpenAIclient = OpenAI()
audio_file = open("/path/to/file/speech.mp3", "rb")stream = client.audio.transcriptions.create(model="gpt-4o-mini-transcribe", file=audio_file, response_format="text",stream=True
)for event in stream:print(event)
您将在模型完成转录音频的该部分后立即接收到一系列 transcript.text.delta 事件,随后在转录完成后,将接收到一个包含完整转录的 transcript.text.done 事件。
此外,您可以使用 include[] 参数将 logprobs 包含在响应中,以获取转录中标记的日志概率。这些信息有助于确定模型对转录中特定部分的置信度。
流式转录在 whisper-1 中不受支持。
流式传输正在进行的音频录音的转录
在实时API中,您可以流式传输正在进行的音频录音的转录。要使用实时API启动一个流式会话,请创建以下URL的WebSocket连接:
wss://api.openai.com/v1/realtime?intent=transcription
以下是设置转录会话的示例有效载荷:
{"type": "transcription_session.update","input_audio_format": "pcm16","input_audio_transcription": {"model": "gpt-4o-transcribe","prompt": "","language": ""},"turn_detection": {"type": "server_vad","threshold": 0.5,"prefix_padding_ms": 300,"silence_duration_ms": 500,},"input_audio_noise_reduction": {"type": "near_field"},"include": ["item.input_audio_transcription.logprobs"]
}
要将音频数据流式传输到API,附加音频缓冲区:
{"type": "input_audio_buffer.append","audio": "Base64EncodedAudioData"
}
当处于VAD模式时,API将在检测到一段语音时每次响应input_audio_buffer.committed。使用input_audio_buffer.committed.item_id和input_audio_buffer.committed.previous_item_id来强制执行排序。
API响应以转录事件指示语音开始、停止和完成的转录。
流式ASR API所使用的首要资源是 TranscriptionSession:
{"object": "realtime.transcription_session","id": "string","input_audio_format": "pcm16","input_audio_transcription": [{"model": "whisper-1" | "gpt-4o-transcribe" | "gpt-4o-mini-transcribe","prompt": "string","language": "string"}],"turn_detection": {"type": "server_vad","threshold": "float","prefix_padding_ms": "integer","silence_duration_ms": "integer",} | null,"input_audio_noise_reduction": {"type": "near_field" | "far_field"},"include": ["string"]
}
直接通过 WebSocket 连接使用您的 API 密钥或从以下位置获得的临时token 进行认证:
POST /v1/realtime/transcription_sessions
此端点返回一个临时token (client_secret),以安全地验证 WebSocket 连接。
提高可靠性
当使用Whisper时,最常见的一个挑战是模型通常无法识别不常见的单词或缩写。以下是一些不同技术,用于在这些情况下提高Whisper的可靠性:
使用提示参数
第一种方法涉及使用可选的提示参数来传递一个包含正确拼写的字典。
因为 Whisper 没有使用指令遵循技术进行训练,所以它更像是基础 GPT 模型。请注意,Whisper 只考虑提示中的前 224 个标记。
提示参数
from openai import OpenAIclient = OpenAI()
audio_file = open("/path/to/file/speech.mp3", "rb")transcription = client.audio.transcriptions.create(model="whisper-1", file=audio_file, response_format="text",prompt="ZyntriQix, Digique Plus, CynapseFive, VortiQore V8, EchoNix Array, OrbitalLink Seven, DigiFractal Matrix, PULSE, RAPT, B.R.I.C.K., Q.U.A.R.T.Z., F.L.I.N.T."
)print(transcription.text)
虽然这增加了可靠性,但这种技术限制在224个标记内,因此您的SKU列表需要相对较小,才能使这成为一个可扩展的解决方案。
使用 GPT-4 进行后处理
第二种方法涉及使用 GPT-4 或 GPT-3.5-Turbo 的后处理步骤。
我们首先通过 system_prompt 变量提供 GPT-4 的指令。类似于我们之前对提示参数所做的操作,我们可以定义我们的公司名称和产品名称。
后处理
system_prompt = """
You are a helpful assistant for the company ZyntriQix. Your task is to correct
any spelling discrepancies in the transcribed text. Make sure that the names of
the following products are spelled correctly: ZyntriQix, Digique Plus,
CynapseFive, VortiQore V8, EchoNix Array, OrbitalLink Seven, DigiFractal
Matrix, PULSE, RAPT, B.R.I.C.K., Q.U.A.R.T.Z., F.L.I.N.T. Only add necessary
punctuation such as periods, commas, and capitalization, and use only the
context provided.
"""def generate_corrected_transcript(temperature, system_prompt, audio_file):response = client.chat.completions.create(model="gpt-4o",temperature=temperature,messages=[{"role": "system","content": system_prompt},{"role": "user","content": transcribe(audio_file, "")}])return completion.choices[0].message.content
corrected_text = generate_corrected_transcript(0, system_prompt, fake_company_filepath
)
如果您在自己的音频文件上尝试此操作,您会发现 GPT-4 在转录文本中纠正了许多拼写错误。由于其更大的上下文窗口,这种方法可能比使用 Whisper 的提示参数更具可扩展性。它也更加可靠,因为 GPT-4 可以以 Whisper 由于缺乏指令跟随而无法实现的方式被指令和引导。
向量嵌入
学习如何将文本转换为数字,解锁搜索等用例。
https://platform.openai.com/docs/guides/embeddings
新的嵌入模型
text-embedding-3-small 和 text-embedding-3-large,我们最新且性能最强大的嵌入模型,现已推出。它们具有更低的成本、更高的多语言性能,以及新的参数来控制整体大小。
什么是嵌入?
OpenAI 的文本嵌入测量文本字符串的相关性。嵌入通常用于以下用途:
- 搜索(结果根据与查询字符串的相关性进行排序)
- 聚类(根据相似性将文本字符串分组)
- 推荐(推荐具有相关文本字符串的项目)
- 异常检测(识别出相关性较小的异常值)
- 多样性测量(分析相似性分布)
- 分类(根据最相似的标签对文本字符串进行分类)
嵌入是一个浮点数字的向量(列表)。两个向量之间的 距离 测量它们的相关性。小的距离表示高度相关,而大的距离表示低度相关。
访问我们的 定价页面 了解嵌入定价信息。请求根据 输入 中的 token 数量计费。
如何获取嵌入
要获取嵌入,请将您的文本字符串发送到 嵌入 API 端点,并附带嵌入模型名称(例如,text-embedding-3-small):
示例:获取嵌入
from openai import OpenAI
client = OpenAI()response = client.embeddings.create(input="Your text string goes here",model="text-embedding-3-small"
)print(response.data[0].embedding)
响应包含嵌入向量(浮点数字列表)和一些额外的元数据。您可以提取嵌入向量,将其保存到向量数据库中,并用于许多不同的用例。
{"object": "list","data": [{"object": "embedding","index": 0,"embedding": [-0.006929283495992422,-0.005336422007530928,-4.547132266452536e-05,-0.024047505110502243],}],"model": "text-embedding-3-small","usage": {"prompt_tokens": 5,"total_tokens": 5}
}
默认情况下,text-embedding-3-small 的嵌入向量长度为 1536,而 text-embedding-3-large 的长度为 3072。为了在不丢失其概念表示特性的情况下减少嵌入的维度,请传入 维度参数。有关嵌入维度的更多详细信息,请参阅 嵌入用例部分。
嵌入式模型
OpenAI 提供了两种强大的第三代嵌入式模型(在模型 ID 中以 -3 表示)。阅读嵌入式 v3 公告博客文章 获取更多详情。
使用价格按输入token 计费。以下是每页文本每美元的价格示例(假设每页约 800 个token ):
| 模型 | ~ 每美元页数 | 在 MTEB 评估中的性能 | 最大输入 |
|---|---|---|---|
| text-embedding-3-small | 62,500 | 62.3% | 8191 |
| text-embedding-3-large | 9,615 | 64.6% | 8191 |
| text-embedding-ada-002 | 12,500 | 61.0% | 8191 |
用例
这里我们展示一些代表性的用例,使用 Amazon 精选食品评论数据集。
获取嵌入
该数据集包含截至2012年10月,亚马逊用户留下的总共568,454条食品评论。我们使用最近的1000条评论的子集进行说明。评论使用英语编写,通常是正面或负面的。每条评论都有一个 ProductId、UserId、Score、评论标题(Summary)和评论正文(Text)。例如:
| 产品 ID | 用户 ID | 评分 | 摘要 | 正文 |
|---|---|---|---|---|
| B001E4KFG0 | A3SGXH7AUHU8GW | 5 | 良好的狗粮质量 | 我已经购买了好几罐Vitality罐装… |
| B00813GRG4 | A1D87F6ZCVE5NK | 1 | 标称不符 | 产品到达时标签为巨型盐味花生… |
下面,我们将评论摘要和评论正文合并为单个组合文本。模型对这种组合文本进行编码,并输出单个向量嵌入。
Get_embeddings_from_dataset.ipynb
from openai import OpenAI
client = OpenAI()def get_embedding(text, model="text-embedding-3-small"):text = text.replace("\n", " ")return client.embeddings.create(input = [text], model=model).data[0].embeddingdf['ada_embedding'] = df.combined.apply(lambda x: get_embedding(x, model='text-embedding-3-small'))
df.to_csv('output/embedded_1k_reviews.csv', index=False)
要从保存的文件中加载数据,您可以运行以下命令:
import pandas as pddf = pd.read_csv('output/embedded_1k_reviews.csv')
df['ada_embedding'] = df.ada_embedding.apply(eval).apply(np.array)
降低嵌入维度
使用较大的嵌入,例如将它们存储在向量存储中进行检索,通常比使用较小的嵌入成本更高,消耗更多的计算、内存和存储资源。
我们的两个新的嵌入模型都是通过一种技术进行训练,允许开发者权衡使用嵌入的性能和成本。具体来说,开发者可以通过传递dimensions API参数来缩短嵌入(即从序列末尾移除一些数字),而不会使嵌入失去其概念表示属性。例如,在MTEB基准测试中,一个text-embedding-3-large嵌入可以被缩短到256的大小,同时仍然优于一个未缩短的text-embedding-ada-002嵌入,其大小为1536。您可以在我们的[嵌入 v3 发布博客文章](https://openai.com/blog/new-embedding-models-and-api-updates#:~:text=Native support for shortening embeddings)中了解更多关于更改维度如何影响性能的信息。
通常,在创建嵌入时使用dimensions参数是建议的方法。在某些情况下,您可能需要在生成嵌入后更改嵌入维度。当您手动更改维度时,您需要确保将嵌入的维度标准化,如下所示。
from openai import OpenAI
import numpy as npclient = OpenAI()def normalize_l2(x):x = np.array(x)if x.ndim == 1:norm = np.linalg.norm(x)if norm == 0:return xreturn x / normelse:norm = np.linalg.norm(x, 2, axis=1, keepdims=True)return np.where(norm == 0, x, x / norm)response = client.embeddings.create(model="text-embedding-3-small", input="Testing 123", encoding_format="float"
)cut_dim = response.data[0].embedding[:256]
norm_dim = normalize_l2(cut_dim)print(norm_dim)
动态更改维度使得使用非常灵活。例如,当使用只支持最多 1024 维嵌入的向量数据存储时,开发者现在仍然可以使用我们的最佳嵌入模型 text-embedding-3-large 并指定 dimensions API 参数的值为 1024,这将缩短嵌入的维度从 3072 维减少到 1024 维,以较小的向量大小为代价,牺牲一些精度。
基于嵌入的搜索进行问答
Question_answering_using_embeddings.ipynb
有许多常见情况,模型没有在包含您希望在使用户查询时可以访问的关键事实和信息的数据上训练。下面展示的解决方法之一是将附加信息放入模型的上下文窗口中。这种方法在许多用例中都很有效,但会导致更高的token 成本。在本笔记本中,我们探讨了这种方法和基于嵌入的搜索之间的权衡。
query = f"""Use the below article on the 2022 Winter Olympics to answer the subsequent question. If the answer cannot be found, write "I don't know."Article:
\"\"\"
{wikipedia_article_on_curling}
\"\"\"Question: Which athletes won the gold medal in curling at the 2022 Winter Olympics?"""response = client.chat.completions.create(messages=[{'role': 'system', 'content': 'You answer questions about the 2022 Winter Olympics.'},{'role': 'user', 'content': query},],model=GPT_MODEL,temperature=0,
)print(response.choices[0].message.content)
使用嵌入进行文本搜索
Semantic_text_search_using_embeddings.ipynb
为了检索最相关的文档,我们使用查询和每个文档的嵌入向量的余弦相似度,并返回得分最高的文档。
from openai.embeddings_utils import get_embedding, cosine_similaritydef search_reviews(df, product_description, n=3, pprint=True):embedding = get_embedding(product_description, model='text-embedding-3-small')df['similarities'] = df.ada_embedding.apply(lambda x: cosine_similarity(x, embedding))res = df.sort_values('similarities', ascending=False).head(n)return resres = search_reviews(df, 'delicious beans', n=3)
使用嵌入进行代码搜索
Code_search.ipynb
代码搜索与基于嵌入的文本搜索类似。我们提供了一种方法,从给定仓库中的所有 Python 文件中提取 Python 函数。然后,每个函数都通过 text-embedding-3-small 模型进行索引。
要执行代码搜索,我们使用相同的模型将查询嵌入到自然语言中。然后,我们计算查询嵌入与每个函数嵌入之间的余弦相似度。最高的余弦相似度结果最为相关。
from openai.embeddings_utils import get_embedding, cosine_similaritydf['code_embedding'] = df['code'].apply(lambda x: get_embedding(x, model='text-embedding-3-small'))def search_functions(df, code_query, n=3, pprint=True, n_lines=7):embedding = get_embedding(code_query, model='text-embedding-3-small')df['similarities'] = df.code_embedding.apply(lambda x: cosine_similarity(x, embedding))res = df.sort_values('similarities', ascending=False).head(n)return resres = search_functions(df, 'Completions API tests', n=3)
使用嵌入进行推荐
Recommendation_using_embeddings.ipynb
由于嵌入向量之间的距离越短表示相似度越高,因此嵌入对于推荐非常有用。
下面,我们展示了一个基本的推荐器。它接受一个字符串列表和一个“源”字符串,计算它们的嵌入,然后返回一个排名,从最相似到最不相似对字符串进行排序。作为一个具体的例子,下面链接的笔记本将此函数应用于AG新闻数据集(采样至2,000篇新闻文章描述)以返回任何给定源文章最相似的5篇文章。
def recommendations_from_strings(strings: List[str],index_of_source_string: int,model="text-embedding-3-small",
) -> List[int]:"""Return nearest neighbors of a given string."""# get embeddings for all stringsembeddings = [embedding_from_string(string, model=model) for string in strings]# get the embedding of the source stringquery_embedding = embeddings[index_of_source_string]# get distances between the source embedding and other embeddings (function from embeddings_utils.py)distances = distances_from_embeddings(query_embedding, embeddings, distance_metric="cosine")# get indices of nearest neighbors (function from embeddings_utils.py)indices_of_nearest_neighbors = indices_of_nearest_neighbors_from_distances(distances)return indices_of_nearest_neighbors
2D 数据可视化
Visualizing_embeddings_in_2D.ipynb
嵌入的大小随着底层模型复杂性的变化而变化。为了可视化这些高维数据,我们使用 t-SNE 算法将数据转换为二维。
我们根据评论者给出的星级评分对单个评论进行着色:
- 1 星:红色
- 2 星:深橙色
- 3 星:金色
- 4 星:青绿色
- 5 星:深绿色
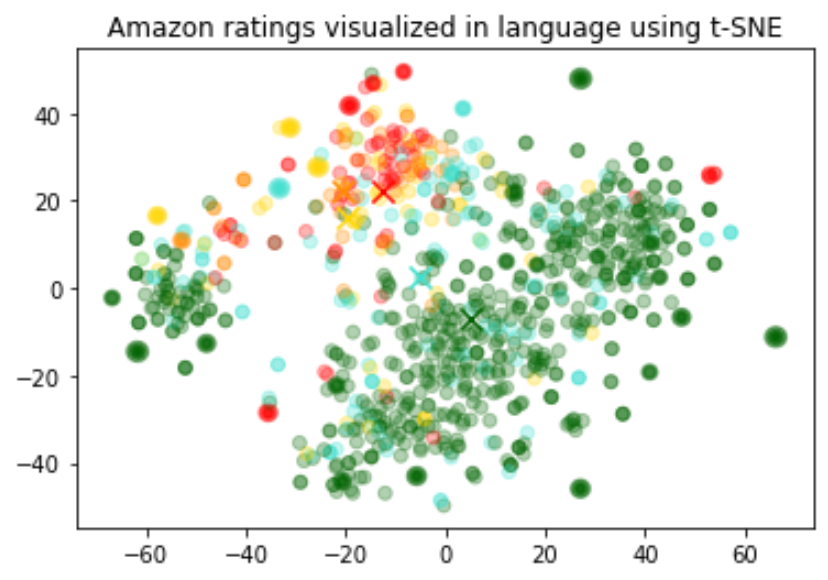
可视化似乎产生了大约3个聚类,其中之一主要是负面评价。
import pandas as pd
from sklearn.manifold import TSNE
import matplotlib.pyplot as plt
import matplotlibdf = pd.read_csv('output/embedded_1k_reviews.csv')
matrix = df.ada_embedding.apply(eval).to_list()# Create a t-SNE model and transform the data
tsne = TSNE(n_components=2, perplexity=15, random_state=42, init='random', learning_rate=200)
vis_dims = tsne.fit_transform(matrix)colors = ["red", "darkorange", "gold", "turquiose", "darkgreen"]
x = [x for x,y in vis_dims]
y = [y for x,y in vis_dims]
color_indices = df.Score.values - 1colormap = matplotlib.colors.ListedColormap(colors)
plt.scatter(x, y, c=color_indices, cmap=colormap, alpha=0.3)
plt.title("Amazon ratings visualized in language using t-SNE")
将嵌入作为机器学习算法的文本特征编码器
Regression_using_embeddings.ipynb
嵌入可以用作机器学习模型中的一般自由文本特征编码器。如果一些相关输入是自由文本,则引入嵌入将提高任何机器学习模型的性能。嵌入还可以用作机器学习模型中的分类特征编码器。如果分类变量的名称有意义且数量众多,例如职位名称,这将增加最大的价值。对于这个任务,相似度嵌入通常比搜索嵌入表现更好。
我们观察到,通常嵌入表示非常丰富且信息密集。例如,使用SVD或PCA减少输入的维度,即使减少10%,通常会导致在特定任务上的下游性能变差。
此代码将数据分为训练集和测试集,这些集将被以下两个用例使用,即回归和分类。
from sklearn.model_selection import train_test_splitX_train, X_test, y_train, y_test = train_test_split(list(df.ada_embedding.values),df.Score,test_size = 0.2,random_state=42
)
使用嵌入特征进行回归
嵌入提供了一种优雅的方式来预测数值。在这个例子中,我们根据评论者的评论文本预测他们的星级评分。由于嵌入中包含的语义信息很高,即使只有很少的评论,预测效果也相当不错。
我们假设分数是一个介于1和5之间的连续变量,并允许算法预测任何浮点数值。机器学习算法最小化预测值与真实评分之间的距离,实现了平均绝对误差为0.39,这意味着平均预测误差不到半颗星。
from sklearn.ensemble import RandomForestRegressorrfr = RandomForestRegressor(n_estimators=100)
rfr.fit(X_train, y_train)
preds = rfr.predict(X_test)
使用嵌入特征进行分类
Classification_using_embeddings.ipynb
这次,我们将尝试将算法预测的值从1到5的范围,改为将评论的精确星级分类到5个不同的类别中,从1星到5星。
经过训练后,模型学会了更好地预测1星和5星评论,而比这更加细微的评论(2-4星)则预测得不太准确,这可能是由于极端情感表达更为明显。
from sklearn.ensemble import RandomForestClassifier
from sklearn.metrics import classification_report, accuracy_scoreclf = RandomForestClassifier(n_estimators=100)
clf.fit(X_train, y_train)
preds = clf.predict(X_test)
零样本分类
Zero-shot_classification_with_embeddings.ipynb
我们可以使用嵌入技术进行零样本分类,而无需任何标记的训练数据。对于每个类别,我们将类别名称或类别的简短描述进行嵌入。要以零样本的方式对某些新的文本进行分类,我们将该文本的嵌入与所有类别的嵌入进行比较,并预测与最高相似度的类别。
from openai.embeddings_utils import cosine_similarity, get_embeddingdf= df[df.Score!=3]
df['sentiment'] = df.Score.replace({1:'negative', 2:'negative', 4:'positive', 5:'positive'})labels = ['negative', 'positive']
label_embeddings = [get_embedding(label, model=model) for label in labels]def label_score(review_embedding, label_embeddings):return cosine_similarity(review_embedding, label_embeddings[1]) - cosine_similarity(review_embedding, label_embeddings[0])prediction = 'positive' if label_score('Sample Review', label_embeddings) > 0 else 'negative'
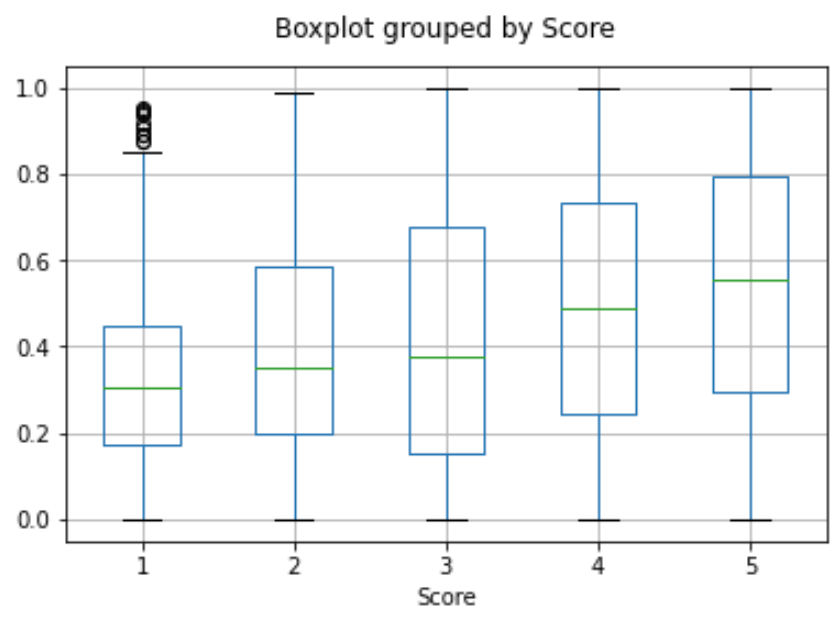
获取用户和产品嵌入以进行冷启动推荐
User_and_product_embeddings.ipynb
我们可以通过平均所有用户评价来获取用户嵌入。同样,我们可以通过平均所有关于该产品的评价来获取产品嵌入。为了展示这种方法的实用性,我们使用5万条评价的子集,以便每个用户和每个产品都能覆盖更多评价。
我们在一个单独的测试集上评估这些嵌入的有用性,其中我们将用户和产品嵌入的相似性作为评分的函数进行绘图。有趣的是,根据这种方法,在用户收到产品之前,我们就可以比随机预测更好地判断他们是否会喜欢这个产品。
user_embeddings = df.groupby('UserId').ada_embedding.apply(np.mean)
prod_embeddings = df.groupby('ProductId').ada_embedding.apply(np.mean)
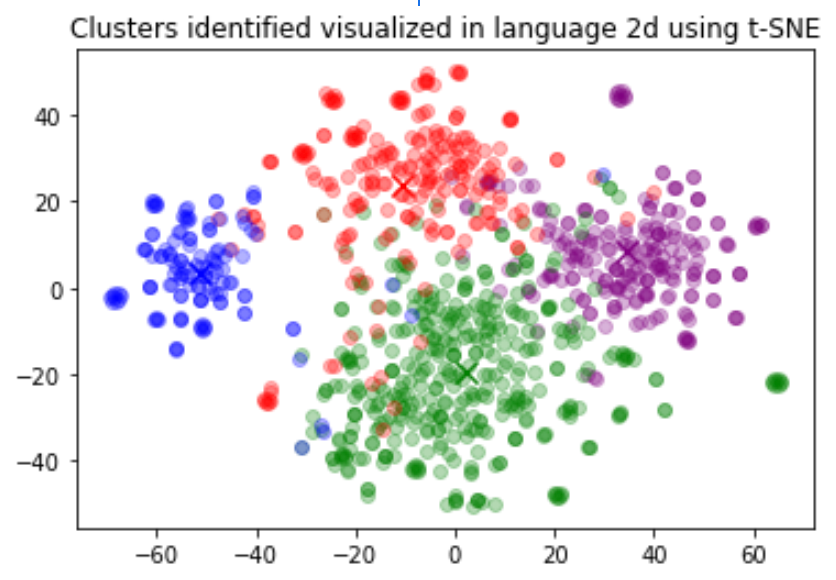
聚类分析
Clustering.ipynb
聚类分析是理解大量文本数据的一种方式。嵌入对于这项任务很有用,因为它们为每篇文本提供了语义上有意义的向量表示。因此,以无监督的方式,聚类将揭示我们数据集中的隐藏分组。
在本例中,我们发现了四个不同的簇:一个专注于狗粮,一个关注负面评论,以及两个关注正面评论。
import numpy as np
from sklearn.cluster import KMeansmatrix = np.vstack(df.ada_embedding.values)
n_clusters = 4kmeans = KMeans(n_clusters = n_clusters, init='k-means++', random_state=42)
kmeans.fit(matrix)
df['Cluster'] = kmeans.labels_
FAQ
如何在嵌入之前判断一个字符串包含多少个标记?
在 Python 中,您可以使用 OpenAI 的分词器 tiktoken 将字符串拆分为标记。
示例代码:
import tiktokendef num_tokens_from_string(string: str, encoding_name: str) -> int:"""Returns the number of tokens in a text string."""encoding = tiktoken.get_encoding(encoding_name)num_tokens = len(encoding.encode(string))return num_tokensnum_tokens_from_string("tiktoken is great!", "cl100k_base")
对于像 text-embedding-3-small 这样的第三代嵌入模型,使用 cl100k_base 编码。
更多详情和示例代码请参考 OpenAI 烹饪指南 如何使用 tiktoken 计算token 。
如何快速检索K个最近的嵌入向量?
为了快速搜索多个向量,我们建议使用向量数据库。您可以在GitHub上的我们的食谱中找到与向量数据库和OpenAI API一起工作的示例。
应该使用哪个距离函数?
我们推荐 余弦相似度。距离函数的选择通常影响不大。
OpenAI 的嵌入被归一化到长度为 1,这意味着:
- 可以仅使用点积计算余弦相似度,从而稍微快一些
- 余弦相似度和欧几里得距离将产生相同的排名
我能否在线分享我的嵌入向量?
是的,客户拥有他们从我们的模型中输入和输出的内容,包括嵌入向量。您有责任确保您输入我们API的内容不违反任何适用法律或我们的使用条款。
审核管理
在文本和图像中识别可能有害的内容。
https://platform.openai.com/docs/guides/moderation
使用 moderations 端点来检查文本或图像是否可能有害。如果识别出有害内容,您可以采取纠正措施,例如过滤内容或干预创建违规内容的用户账户。审核端点是免费的。
您可以使用两种模型来处理此端点:
omni-moderation-latest: 此模型及其所有快照支持更多分类选项和多模态输入。text-moderation-latest(旧版):仅支持文本输入和较少输入分类的旧模型。对于新应用,较新的全功能审查模型将是最佳选择。
快速入门
使用下面的选项卡查看如何使用我们的 官方 SDKs 和 omni-moderation-latest 模型 来审查文本输入或图像输入:
审查文本输入审查图像和文本
获取文本输入的分类信息
from openai import OpenAI
client = OpenAI()response = client.moderations.create(model="omni-moderation-latest",input="...text to classify goes here...",
)print(response)
以下是完整的示例输出,其中输入是来自战争电影单个帧的图片。模型正确预测了图片中的暴力指示,violence 类别的得分大于 0.8。
{"id": "modr-970d409ef3bef3b70c73d8232df86e7d","model": "omni-moderation-latest","results": [{"flagged": true,"categories": {"sexual": false,"sexual/minors": false,"harassment": false,"harassment/threatening": false,"hate": false,"hate/threatening": false,"illicit": false,"illicit/violent": false,"self-harm": false,"self-harm/intent": false,"self-harm/instructions": false,"violence": true,"violence/graphic": false},"category_scores": {"sexual": 2.34135824776394e-7,"sexual/minors": 1.6346470245419304e-7,"harassment": 0.0011643905680426018,"harassment/threatening": 0.0022121340080906377,"hate": 3.1999824407395835e-7,"hate/threatening": 2.4923252458203563e-7,"illicit": 0.0005227032493135171,"illicit/violent": 3.682979260160596e-7,"self-harm": 0.0011175734280627694,"self-harm/intent": 0.0006264858507989037,"self-harm/instructions": 7.368592981140821e-8,"violence": 0.8599265510337075,"violence/graphic": 0.37701736389561064},"category_applied_input_types": {"sexual": ["image"],"sexual/minors": [],"harassment": [],"harassment/threatening": [],"hate": [],"hate/threatening": [],"illicit": [],"illicit/violent": [],"self-harm": ["image"],"self-harm/intent": ["image"],"self-harm/instructions": ["image"],"violence": ["image"],"violence/graphic": ["image"]}}]
}
JSON响应中输出有几个类别,这些类别告诉你输入内容中存在哪些(如果有的话)类别,以及模型认为这些类别存在的程度。
| 输出类别 | 描述 |
|---|---|
flagged | 设置为 true 如果模型将内容分类为可能有害,否则为 false。 |
categories | 包含一个每个类别的违规标志字典。对于每个类别,如果模型将该类别标记为违规,则其值为 true,否则为 false。 |
category_scores | 包含模型为每个类别输出的分数字典,表示模型对输入违反 OpenAI 对该类别的政策的信心。值介于 0 和 1 之间,值越高表示信心越高。 |
category_applied_input_types | 此属性包含有关响应中每个类别中哪些输入类型被标记的信息。例如,如果模型图像和文本输入都被标记为“violence/graphic”,则violence/graphic属性将被设置为["image", "text"]。这仅在omni模型上可用。 |
我们计划持续升级审核端点的底层模型。因此,依赖于 category_scores 的自定义策略可能需要随着时间的推移进行调整。
2025-03-29(六)