一、说明
PyScada,一个基于Python和Django框架的开源SCADA(数据采集与监视控制系统)系统,采用HTML5技术打造人机界面(HMI)。它兼容多种工业协议,如Modbus TCP/IP、RTU、ASCII等,并具备系统统计、文件操作、网络服务等多项功能。PyScada对服务器硬件要求不高,可灵活适用于各类工业环境。
SCADA系统的核心功能包括自动数据采集、智能分析、高效存储以及实时推送。这些功能使得它在电力、冶金、石油化工等多个领域发挥着重要作用。作为开源项目,PyScada赋予用户自由定制和修改源代码的权利,从而满足不同的工业需求。
尽管PyScada已相当完善,但仍有一些功能仍在开发中,如BACNet、OPC-UA和MeterBus等。详细的安装指南和项目文档可在其官方网站查阅。在云计算日益普及的今天,SCADA系统正不断演变,以适应新的信息技术和工业需求,特别是在数据处理能力、系统灵活性和可扩展性方面。
二、安装
1、安装说明
ubuntu版本为24.04.2 LTS,系统干净,如果以前玩过pyscada 需要删除
数据库使用mysql8,redis6 , Gunicorn as WSGI HTTP Server and nginx as HTTP Server.
开发工具用vscode 直接远程连接测试服务器开发,
参考:https://blog.csdn.net/jiangkp/article/details/141328574?spm=1011.2415.3001.5331
2、脚本选择
安装脚本选择,这个在执行install.sh时可以选择,我们选择system而不是docker,未来生产部署可以选择docker
根据脚本内容会调用install_system.sh,由于安装过程中发生了很多问题,所以我们做了一些更改,不过大致是差不多的
3、下载Pyscada源码
#确认安装了git
sudo apt install git
sudo mkdir -p /home/work
sudo chown  -R t400:t400 /home/work
cd /home/work
sudo git clone https://github.com/pyscada/PyScada.git
cd PyScada
4、打包PyScada
# 打包一般用不上
t400@t400:/home/work/PyScada$ python3 -V
Python 3.12.3# 安装必要的包
sudo apt update
sudo apt upgrade
sudo apt install python3-venvsudo python3 -m venv /home/work/PyScada/.venv# 激活虚拟环境
source /home/work/PyScada/.venv/bin/activate(.venv) t400@t400:/home/work/PyScada$ python -V
Python 3.12.3# 安装打包工具
python -m pip install --upgrade pip setuptools wheel# 打包命令
python setup.py sdist bdist_wheel# 退出虚拟环境
(.venv) t400@t400:/home/work/PyScada$ deactivate
t400@t400:/home/work/PyScada$

5、安装mysql和redis
我们用docker和docker-compose安装mysql8,和redis6.2.7
参考
https://blog.csdn.net/jiangkp/article/details/145995259
6、安装Miniconda
由于服务器自带python版本不一样,比方ubuntu20 就是3.8 ubuntu 22好像还是3.8,ubuntu24 是3.12
所以我们安装了conda,保证python 版本一致
sudo apt update && sudo apt upgrade -y
wget https://repo.anaconda.com/miniconda/Miniconda3-latest-Linux-x86_64.sh
chmod +x Miniconda3-latest-Linux-x86_64.sh
./Miniconda3-latest-Linux-x86_64.sh#安装过程交互
按回车查看许可协议,按 q 退出阅读。
输入 yes 同意协议。
设置安装路径(默认:/home/用户名/miniconda3,直接回车使用默认路径)。
提示是否初始化时,输入 yes(这会自动将conda添加到环境变量)#激活与验证
source ~/.bashrc
conda --version  # 应显示版本号(如 `conda 24.5.0`)
conda list       # 查看已安装的包
# 配置国内源
conda config --add channels https://mirrors.tuna.tsinghua.edu.cn/anaconda/pkgs/main/
conda config --add channels https://mirrors.tuna.tsinghua.edu.cn/anaconda/pkgs/free/
conda config --set show_channel_urls yes
#安装虚拟环境
conda create -n myenv python=3.12  # 创建名为myenv的环境
conda activate myenv             # 激活环境
conda deactivate                 # 退出环境
conda env list                   # 列出所有环境
7、install.sh说明
该文件就是选择venv安装还是docker安装,我们选择venv
#!/bin/bash# check if the script is run from script directory
SOURCE=${BASH_SOURCE[0]}
while [ -L "$SOURCE" ]; do # resolve $SOURCE until the file is no longer a symlinkDIR=$( cd -P "$( dirname "$SOURCE" )" >/dev/null 2>&1 && pwd )SOURCE=$(readlink "$SOURCE")[[ $SOURCE != /* ]] && SOURCE=$DIR/$SOURCE # if $SOURCE was a relative symlink, we need to resolve it relative to the path where the symlink file was located
done
DIR=$( cd -P "$( dirname "$SOURCE" )" >/dev/null 2>&1 && pwd )
# 以上从第4行到10行的代码作用就是获取本脚本存储位置的绝对路径,在前面加了这么多代码,
# 可以完美解决别名、链接、source、bash -c 等导致的问题#判断上面得到的路径与当前目录是否一致,要保持一致
if [[ "$DIR" != "$PWD" ]]; thenecho "You must run this script from $DIR"exit 1
fi# Make sure only root can run our script
# 确保root运行
if [[ $EUID -ne 0 ]]; thenecho "This script must be run as root" 1>&2exit 1
fi# Choose the config method (venv or docker)
# 下面所有代码就完成一个任务,输入1 就是调用 install_venv.sh
# 输入2 调用install_docker.sh
answer_config=""
echo "choose your installation"while [[ "$answer_config" == "" ]]; doread -p "1: venv, 2: docker : " answer_configcase $answer_config in"1")#remove logs file if exist (to avoid appending)if [ -f logs_install.txt ]; thenrm logs_install.txtfi#execute the install_venv.sh script and output error in logs filesource install_venv.sh 2>&1 | tee -a logs_install.txt 1>&2 | { while IFS= read -r line; do echo "$line"; done; };;"2")#remove logs file if exist (to avoid appending)if [ -f logs_docker.txt ]; thenrm logs_docker.txtfisource install_docker.sh 2>&1 | tee -a logs_docker.txt 1>&2  | { while IFS= read -r line; do echo "$line"; done; };;*)echo "choose a valid configuration"answer_config="";;esac#statements
done
8、install_venv.sh说明以及修改
该文档包括了不少东西,我们在下面源码中注释
说明:
1、数据库我们不用mariadb,而是用mysql8 已经安装
2、redis6也已经安装
3、一些配置常量,有交互输入变为直接写死,主要是为了调试方便,也是为了保证输入的一致性
4、python 版本是3.12,保证conda activate myenv激活myenv
5、django 版本为5.1,老版本的Pyscada是4.2
#!/bin/bash# todo : add inputs for django admin name, password# check if the script is run from script directory
SOURCE=${BASH_SOURCE[0]}
while [ -L "$SOURCE" ]; do # resolve $SOURCE until the file is no longer a symlinkDIR=$( cd -P "$( dirname "$SOURCE" )" >/dev/null 2>&1 && pwd )SOURCE=$(readlink "$SOURCE")[[ $SOURCE != /* ]] && SOURCE=$DIR/$SOURCE # if $SOURCE was a relative symlink, we need to resolve it relative to the path where the symlink file was located
done
DIR=$( cd -P "$( dirname "$SOURCE" )" >/dev/null 2>&1 && pwd )if [[ "$DIR" != "$PWD" ]]; thenecho "You must run this script from $DIR"exit 1
fi# Make sure only root can run our script
if [[ $EUID -ne 0 ]]; thenecho "This script must be run as root"exit 1
fi#安装部署路径,服务器部署后台项目就在这里
INSTALL_ROOT=/var/www/pyscada
# log存放位置
log_file_dir="/var/log/pyscada/"
# 后面会建立一个django服务项目,放在这里,服务项目的名字也为PyScadaServer
SERVER_ROOT=$INSTALL_ROOT/PyScadaServer
# pyscada 存放文件的目录,包括虚拟环境
pyscada_home=/home/pyscada
# 安装虚拟环境路径
pyscada_venv=$pyscada_home/.venv# VAR 变量,以前是交互,现在直接在这里修改,因为容易输错,所以写死# ubuntu设置时区
#  sudo cp /usr/share/zoneinfo/Asia/Shanghai /etc/localtime# 时间是否正确,主要是时区,如果设置为n,会退出,所以这里必须是y,所以必须先检查系统时间是否正常
answer_date="y"
# 代理配置,我们没有用这个
answer_proxy="n"
# 没有用到,这个已经在install.sh里选了
# answer_config=""
# 数据库的名字,默认是PyScada_db
answer_db_name="PyScada_db"   # 数据库用户,会创建,默认PyScada-user,不是root,用户自己建立,并分配权限
answer_db_user="PyScada-user"
#数据库密码,用户设置的对应answer_db_user的密码
answer_db_password="PyScada-user-password"
#是否安装redis和channels,本来原始代码是在这里安装redis,但是因为redis还是要测试的,或者说也有可能会用外部的redis
# 所以我们这里redis的安装在运行这个脚本之前就安装好了,这里只是安装依赖包,注意和settings.py有所关联。
answer_channels="y"
# 是否全新安装还是更新安装
# 如果为n就是全新安装,为y就是更新一下项目
# 全新安装:
# 1、会重新要求输入这里这些常量,由于我们已经写死了,所以这个功能就没有了,我们就在这里改
# 2、会创建数据库,用户名或者密码,但是如果数据库名称没有变化那么改数据库存在,我们是没有删除后再建立数据库的,
#     就是说数据库还是第一次建立的数据库,这样数据库不会丢失,如果你想全部重建,改个数据库名称就行了
# 3、用户名密码是可以重新设置的,设置有效
# 4、我们知道PyScadaServer项目是一个用来部署的项目,如果这些和settings.py相关的配置变化了,PyScadaServer项目
#      是不会更新的,就算重建也不会更新,试过了,所以我们在重建时会全部删除掉PyScadaServer项目源码,然后再重建
# 5、如果需要更改配置文件,比方说配置email服务器,在这个脚本里没有设置项,那么就需要在模板文件
#     /home/work/PyScada/tests/project_template/project_name/settings.py-tpl 里修改,然后再重建PyScadaServer项目
#     这样就要重新运行install.sh
# 6、三遍提醒不要在PyScadaServer项目里修改代码,很危险,所以我们要修改模板,然后用模板重建,模板在./tests/project_template
# 7、数据库和redis必须安装并测试好,要不然安装项目会报错,在运行install.sh是后面会建立数据表,如果redis不用,可以不装
#   但是answer_channels需要配置为n,我们这里是把redis安装与依赖包安装分开,而在settings.py判断是否需要redis,就是根据是否安装了
#   channels来判断的,if util.find_spec('channels') is not None: 这条语句就是来查询channels的信息
answer_update="n" # 为True就是自动安装,False就是手动安装
# 所谓自动安装就是你通过pip install或uninstall安装和卸载了插件,那么你在重新运行项目时,在加载settings.py里的配置时,
# 会通过【importlib.metadata.distributions()函数用于获取当前环境中所有已安装的Python包及其元数据信息】重新判断是否安装
# 哪些插件,具体代码在settings.py里
# 手动安装就是你你通过pip install或uninstall安装和卸载了插件,在settings.py不会自动判断你是否安装了插件,这时候需要你把安装的插件
# 添加在settings.py里,在下面数组里添加,
# INSTALLED_APPS = [
#   .......
#    'pyscada',
#    'pyscada.core',
#    'pyscada.hmi',
#    'pyscada.export',
#   #在这里添加或删除
#]#其实这个就是如果你通过pip install或uninstall安装和卸载了插件,那么你重新运行pyscada ,gunicorn,否则需要自己到settings里去添加
answer_auto_add_apps="True"
# 错误输出到用户名,在settings.py中使用,需要配置邮件服务器才有效
answer_admin_name="jkp258"
# 错误输出到email
answer_admin_mail="jkp258@qq.com"
#这里是创建超级用户名
answer_web_name="superadmin"
# web interface admin password,这里是超级用户对应的密码
answer_web_password="123456"   echo -e "\nPyScada python packages will be installed in the virtual environment $pyscada_venv"function debug(){message=$1echo ""echo $message 1>&2echo ""
}# called in questions_setup
# 用正则表达式判断代理是否正确
function regex_proxy(){echo "regex_proxy" 1>&2regex='^(https?|ftp)://[0-9a-zA-Z.-]+:[0-9]+$';while true; do# read -p "Use proxy? [http://proxy:port or n]: " answer_proxyif [[ $answer_proxy == "n" || $answer_proxy =~ $regex ]]; thenbreakelseecho "Choose a valid proxy"fidoneecho "regex_proxy end" 1>&2
}
# pip3 的代理,不用就相当于 pip3
function pip3_proxy(){if [[ "$answer_proxy" == "n" ]]; thenpip3 $*elseecho "pip3 using" $answer_proxy "for" $* > /dev/ttypip3 --proxy=$answer_proxy $*fi
}
# 安装有关
function pip3_proxy_not_rust(){if [[ "$answer_proxy" == "n" ]]; thenCRYPTOGRAPHY_DONT_BUILD_RUST=1 pip3 install cryptography==3.4.6 --no-cache-dirpip3 $*elseecho "pip3 using" $answer_proxy "for" $* > /dev/ttyCRYPTOGRAPHY_DONT_BUILD_RUST=1 pip3 --proxy=$answer_proxy install cryptography==3.4.6 --no-cache-dirpip3 --proxy=$answer_proxy $*fi
}
# 不用代理,就是apt
function apt_proxy(){if [[ "$answer_proxy" == "n" ]]; thenapt-get $*elseecho "apt using" $answer_proxy "for" $* > /dev/ttyexport http_proxy=$answer_proxyapt-get $*unset http_proxyfi
}
# 正则判断email是否合规
# called in questions_clean_inst_setup
function regex_mail(){debug "regex_mail"regex='^[a-zA-Z0-9._%+-]+@[a-zA-Z0-9.-]+\.[a-zA-Z]{2,}$';while true; do# read -p "admin mail ? " answer_admin_mailif [[ $answer_admin_mail =~ $regex ]]; thenbreakelseecho "Choose a valid mail"fidonedebug "regex_mail end"
}
# called in questions_clean_inst_setup
function admin_name_setup(){debug "admin_name_setup"while true; do# read -p "admin name ? " answer_admin_nameif [[ "$answer_admin_name" == "" ]]; thenecho "Choose a valid name"elsebreakfidonedebug "admin_name_setup end"
}# called in questions_setup
function questions_clean_install_setup(){debug "questions_clean_install_setup"#数据库名称密码用户名#read -p "DB name ? [PyScada_db]: " answer_db_name#read -p "DB user ? [PyScada-user]: " answer_db_user#read -sp "DB password ? [PyScada-user-password]: " answer_db_password#echo ""#  名称,就是后台管理系统的登录名 answer_admin_name,我们就叫noknow,就是现在忘了是哪里用了#admin_name_setup# email 就是noknow@qq.comregex_mailproject_admins=$(echo "('${answer_admin_name}', '${answer_admin_mail}' )")echo $project_adminsecho $answer_db_name#定义的超级用户,后面有用到#read -p "web interface admin name [pyscada]: " answer_web_name#read -p "web interface admin password [password]: " answer_web_passwordif [[ "$answer_db_name" == "" ]]; thenanswer_db_name="PyScada_db"fiif [[ "$answer_db_user" == "" ]]; thenanswer_db_user="PyScada-user"fiif [[ "$answer_db_password" == "" ]]; thenanswer_db_password="PyScada-user-password"fiif [[ "$answer_web_name" == "" ]]; thenanswer_web_name="pyscada"fiif [[ "$answer_web_password" == "" ]]; thenanswer_web_password="password"fiwhile true; do#read -p "Auto load pyscada plugins installed ? If False, you need to edit the settings.py file manually to load a plugin. [True/False]: " answer_auto_add_appsif [[ "$answer_auto_add_apps" == "True" ]]; thenecho 'You need to restart pyscada and gunicorn after (un)installing any pyscada plugin.'break;elif [[ "$answer_auto_add_apps" == "False" ]]; thenecho 'You need manually add a plugin to the django project settings and restart pyscada and gunicorn after (un)installing any pyscada plugin.'break;elseecho "Please answer True or False."fidonedebug "questions_clean_install_setup end"
}# called in the core of the script
function questions_setup(){debug "questions_setup"# Date verification#时间是否正确,主要是时区echo 'date :'echo $(date)# read -p "Is the date and time correct ? [y/n]: " answer_dateif [[ "$answer_date" != "y" ]]; thenecho "please set the date correctly or enter 'y'"exit 1fi# Proxy setupregex_proxy# Channels and redis#read -p "Install channels and redis to speed up inter pyscada process communications ? [y/n]: " answer_channels# Clean installation or not# 这里是全新安装,就是更新while true; do#read -p "Update only : if 'y' it will not create DB, superuser, copy services, settings and urls... On a fresh install you should answer 'n' ? [y/n]: " answer_updateif [[ "$answer_update" == "y" ]]; thenbreakelif [[ "$answer_update" == "n" ]]; thenbreakelseecho "Please answer y or n."fidoneif [[ "$answer_update" == "n" ]]; thenquestions_clean_install_setupfidebug "questions_setup end"
}# called in the core of the script
# 安装依赖,有系统的,有虚拟环境的
function install_dependences(){debug "install_dependences"apt_proxy install -y python3-pipecho 'Some python3 packages installed:'# Install prerequisites# 这里去掉   mariadb-server,把libhdf5-103去掉DEB_TO_INSTALL="libatlas-base-devlibffi-devlibhdf5-devlibjpeg-devlibmariadb-devlibopenjp2-7nginxpython3-devpython3-mysqldbpython3-pippython3-venvzlib1g-devpkg-config"apt_proxy install -y $DEB_TO_INSTALL# 删除virtual environmentsudo rm -rf $pyscada_venv# Create virtual environmentsudo -u pyscada python3 -m venv $pyscada_venv# activatesource $pyscada_venv/bin/activatePIP_TO_INSTALL="cffiCythondocutilsgunicornlxmlmysqlclientnumpy"pip3_proxy install --upgrade $PIP_TO_INSTALLdebug "install_dependences end"
}# called in pyscada_init
function web_setup(){debug "web_setup"(cd $SERVER_ROOT# 创建了超级用户sudo -u pyscada -E env PATH=${PATH} python3 manage.py shell << EOF
try:from django.contrib.auth import get_user_modelfrom django.db.utils import IntegrityErrorUser = get_user_model()User.objects.create_superuser('$answer_web_name','team@pyscada.org','$answer_web_password')
except IntegrityError:print('User pyscada already exist')
EOF)# 前面已经安装了Nginx,这里做了配置,包括ssl,并且设置开机启动# Nginxcp extras/nginx_sample.conf /etc/nginx/sites-available/pyscada.confln -sf ../sites-available/pyscada.conf /etc/nginx/sites-enabled/rm -f /etc/nginx/sites-enabled/defaultmkdir -p /etc/nginx/ssl# the certificate will be valid for 5 Years,openssl req -x509 -nodes -days 1780 -newkey rsa:2048 -keyout /etc/nginx/ssl/pyscada_server.key -out /etc/nginx/ssl/pyscada_server.crt -subj '/CN=www.mydom.com/O=My Company Name LTD./C=US'systemctl enable nginx.service # enable autostart on bootsystemctl restart nginx#配置了两个服务gunicorn和pyscada两个服务# Gunicorn and PyScada as systemd unitscp extras/service/systemd/{gunicorn.{socket,service},pyscada_daemon.service} /etc/systemd/system# Rename PyScada service filemv /etc/systemd/system/pyscada_daemon.service /etc/systemd/system/pyscada.service# Fix if gunicorn installed in /usr/bin and not /usr/local/bin -> create symbolic linkif [[ $(which gunicorn) != /usr/local/bin/gunicorn ]] && [[ ! -f /usr/local/bin/gunicorn ]] && [[ -f /usr/bin/gunicorn ]]; thenecho "Creating symcolic link to gunicorn" ;ln -s /usr/bin/gunicorn /usr/local/bin/gunicorn;fidebug "web_setup end"
}# called in the core of the script
#安装redis,redis不用装,但是依耐包还是要装的,注释掉apt_proxy -y install redis-server
function install_channel_redis(){debug "install_channel_redis"#apt_proxy -y install redis-serverif grep -R "Raspberry Pi 3"  "/proc/device-tree/model" ; thenecho "Don't install Rust for RPI3"pip3_proxy_not_rust install --upgrade channels channels-redis asgirefelsepip3_proxy install --upgrade cryptography==3.4.6 channels channels-redis asgireffidebug "install_channel_redis end"
}# called in the core of the script
function pyscada_init(){debug "pyscada_init"(cd $SERVER_ROOT# Migration and static files,数据迁移sudo -u pyscada -E env PATH=${PATH} python3 manage.py migrate#收集静态数据,staic目录下sudo -u pyscada -E env PATH=${PATH} python3 manage.py collectstatic --noinput#收集静态数据,staic目录下# Load fixtures with default configuration for chart lin colors and unitssudo -u pyscada -E env PATH=${PATH} python3 manage.py loaddata colorsudo -u pyscada -E env PATH=${PATH} python3 manage.py loaddata units# Initialize the background service system of pyscada,后台服务sudo -u pyscada -E env PATH=${PATH} python3 manage.py pyscada_daemon init)if [[ "$answer_update" == "n" ]]; thenweb_setupfi# enable the services for autostartsystemctl enable gunicornsystemctl restart gunicornsystemctl enable pyscadasystemctl restart pyscadasleep 1systemctl --quiet is-active pyscadaif [ $? != 0 ] ; thenecho "Can't start pyscada systemd service." > /dev/stderrexit 1fiif [[ "$answer_update" == "n" ]]; thenecho "PyScada installed"echo "Connect to http://127.0.0.1 using :"echo "username : $answer_web_name"echo "password : $answer_web_password"elseecho "PyScada updated"fidebug "pyscada_init end"
}# called in the core of the script
# 创建数据库,已经为改数据库创建用户及权限,这里不是安装数据库,我们用docker-compose单独装了
function db_setup(){debug "db_setup"# CREATE DATABASE IF NOT EXISTS testtest CHARACTER SET utf8;# Create DBsudo docker exec -i mysql8 mysql -u root -p123456 << EOFCREATE DATABASE IF NOT EXISTS ${answer_db_name} CHARACTER SET utf8mb4;CREATE USER '${answer_db_user}'@'%' IDENTIFIED BY '${answer_db_password}';GRANT ALL PRIVILEGES ON ${answer_db_name}.* TO '${answer_db_user}'@'%';FLUSH PRIVILEGES;
EOFdebug "db_setup end"
}#called in the core of the script
# 利用模板创建PyScadaServer,部署运行就是靠这个,Pyscada只是他其中的一个,就当是插件
function template_setup(){debug "template_setup"# add db informations to django templaterm -r ./tests/project_template_tmp/cp -r ./tests/project_template ./tests/project_template_tmp/chmod a+w ./tests/project_template_tmp/project_name/settings.py-tplsudo -u pyscada -E env PATH=${PATH} python3 << EOF
import django
from django.conf import settings
from django.template.loader import render_to_stringsettings.configure(TEMPLATES=[{'BACKEND': 'django.template.backends.django.DjangoTemplates','DIRS': ['./'],  # script dir'OPTIONS': {'string_if_invalid': '{{ %s }}'}, # prevents the other template tags to be replaced by ''}]
)django.setup()
from django.template import Template, Context
with open("./tests/project_template_tmp/project_name/settings.py-tpl", "r+") as f:template = Template(f.read())context = Context({"db_name": "${answer_db_name}","db_user": "${answer_db_user}","db_password": "${answer_db_password}","project_root": "${INSTALL_ROOT}","pyscada_home": "${pyscada_home}","log_file_dir": "${log_file_dir}","project_admins": "${project_admins}","auto_add_apps": "${answer_auto_add_apps}","additional_apps": "","additional_settings": "",})f.seek(0)f.write(template.render(context))f.truncate()
EOF# 先删除,不然修改了,也不变啊sudo -u pyscada rm -rf $SERVER_ROOTsudo -u pyscada mkdir -p $SERVER_ROOTsudo -u pyscada -E env PATH=${PATH} django-admin startproject PyScadaServer $SERVER_ROOT --template ./tests/project_template_tmprm -rf ./tests/project_template_tmpdebug "template_setup end"
}# called in the core of the script
# 用户有关的目录创建,给予权限等等
function user_setup(){debug "user_setup"# Create pyscada userecho "Creating system user pyscada..."useradd -r pyscadamkdir -p $pyscada_homechown -R pyscada:pyscada $pyscada_homemkdir -p $INSTALL_ROOTchown -R pyscada:pyscada $INSTALL_ROOTmkdir -p $pyscada_home/measurement_data_dumpschown -R pyscada:pyscada $pyscada_home/measurement_data_dumpsmkdir ${log_file_dir}chown pyscada:pyscada ${log_file_dir}touch ${log_file_dir}pyscada_{daemon,debug}.logchown pyscada:pyscada ${log_file_dir}pyscada_{daemon,debug}.log# Add rights for usb, i2c and serialadduser www-data pyscadaadduser pyscada dialoutdebug "user_setup end"
}# stop pyscada and show some python3 packages installed
function stop_pyscada(){debug "stop_pyscada"echo "Stopping PyScada"systemctl stop pyscada gunicorn gunicorn.socketsleep 1 # Give systemd time to shutdownsystemctl --quiet is-active pyscadaif [ $? == 0 ] ; thenecho "Can't stop pyscada systemd service. Aborting."exit 1fiecho "PyScada stopped"debug "stop_pyscada end"
}# install process: * means depending on the user answer
: <<'END'
- questions_setup- regex_proxy- *questions_clean_install_setup- admin_name_setup- regex_mail
- stop_pyscada
- user_setup
- install_dependences- apt_proxy- pip3_proxy
- pyscada install
- *install_channel_redis- apt_proxy- pip3_proxy_not_rust- pip3_proxy
- *db_setup
- *template_setup
- pyscada_init- *web_setup
ENDquestions_setupstop_pyscadauser_setupinstall_dependences
# 我们在这里安装前面打包的PyScada-0.8.3-py3-none-any.whl
# pip3_proxy install /home/work/PyScada/dist/pyscada-0.8.3-py3-none-any.whl
# Install PyScada
pip3_proxy install --upgrade .if [[ "$answer_channels" == "y" ]]; theninstall_channel_redis
fiif [[ "$answer_update" == "n" ]]; thendb_setuptemplate_setup
fipyscada_init# fix owner in /home/pyscada
chown -R pyscada:pyscada $pyscada_home
9、模板settings.py-tpl修改
DATABASES = {'default': {'ENGINE':   'django.db.backends.mysql','NAME':     '{{ db_name }}','USER':     '{{ db_user }}','PASSWORD': '{{ db_password }}',#修改部分'HOST': '127.0.0.1','PORT': '3306','OPTIONS': {'init_command': "SET sql_mode='STRICT_TRANS_TABLES'",}}
}# LANGUAGE_CODE = 'en-us'
LANGUAGE_CODE = "zh-hans"#TIME_ZONE = 'UTC'
TIME_ZONE = "Asia/Shanghai"#添加修改,配置QQ邮件服务器,可以用喔,不过是我的,请改过来
# email settings
EMAIL_BACKEND = 'django.core.mail.backends.smtp.EmailBackend'
DEFAULT_FROM_EMAIL = 'jkp258@qq.com'  #设置发件人,改为管理员的邮件
EMAIL_HOST = 'smtp.qq.com'  # QQ邮箱SMTP服务器(邮箱需要开通SMTP服务)
EMAIL_PORT = 587  # QQ邮箱SMTP服务端口
EMAIL_HOST_USER = 'jkp258@qq.com'  #改为改为管理员的邮件
EMAIL_USE_TLS = True
EMAIL_USE_SSL = False
EMAIL_HOST_PASSWORD = '*********************'  # 授权码  不是你的QQ密码,qq邮箱里可以去申请
EMAIL_PREFIX = 'A Message From PyScada'
# for admins and managers
SERVER_EMAIL=DEFAULT_FROM_EMAIL
EMAIL_SUBJECT_PREFIX=EMAIL_PREFIX
EMAIL_TIMEOUT=5
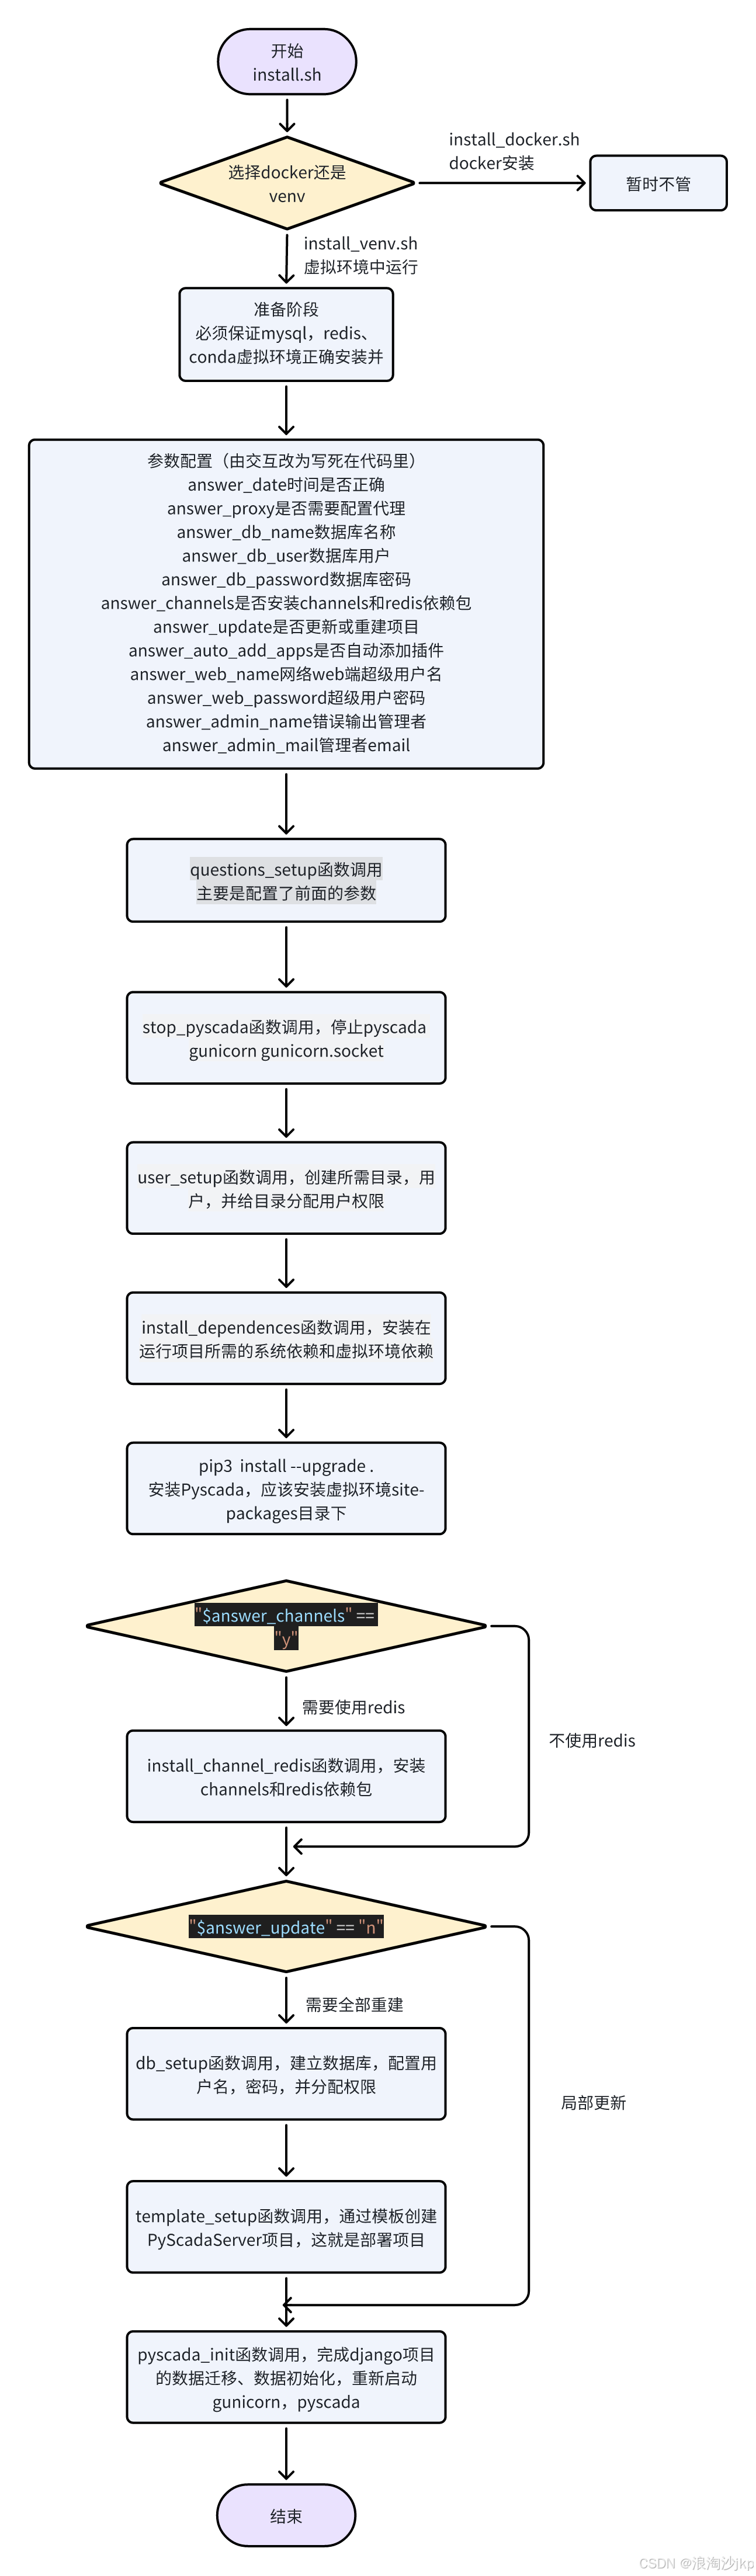
10、安装流程图
 11、安装
11、安装
#确定conda activate myen
sudo ./install.sh
运行过程:
错误:
E: Package 'libhdf5-103' has no installation candidate
ERROR: Could not find a version that satisfies the requirement cffi (from versions: none)
ERROR: No matching distribution found for cffi
注释掉这个就可以了'libhdf5-103吧,有libhdf5-dev就行
安装结束:
PyScada installed
Connect to http://127.0.0.1 using :
username : superadmin
password : 123456
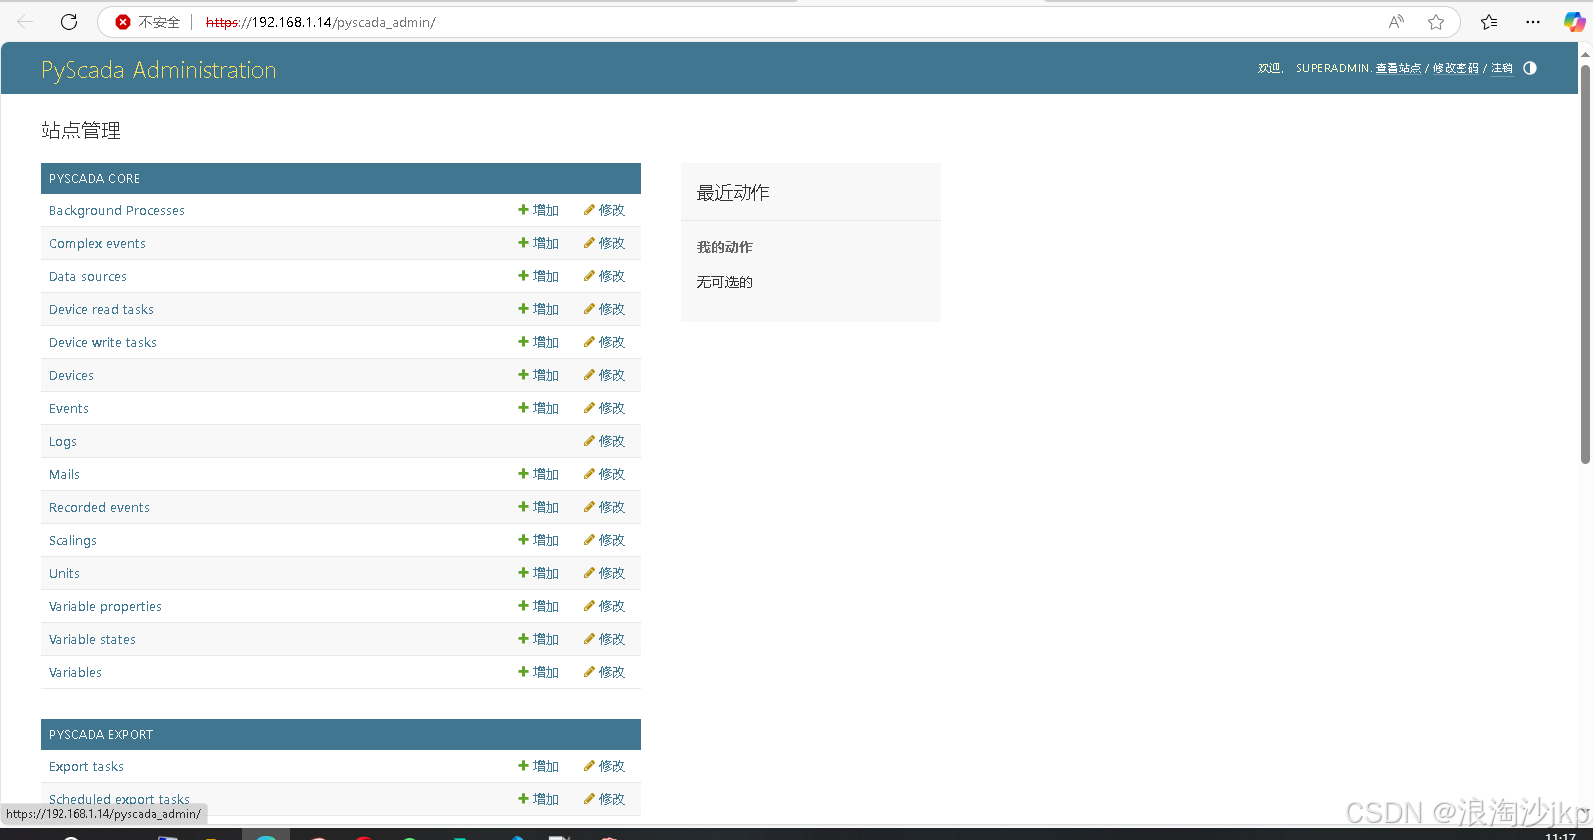
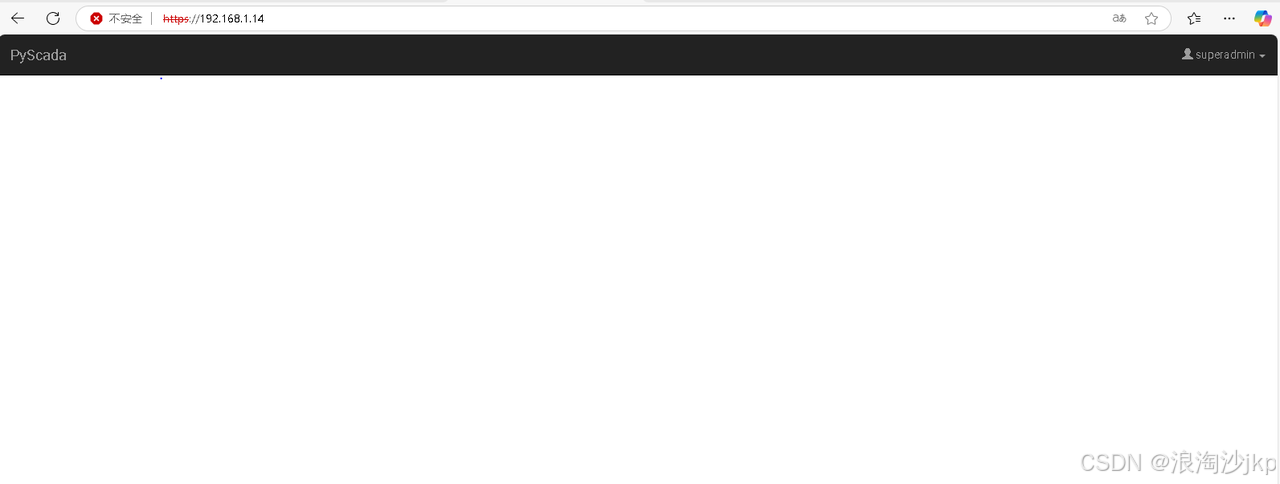
12、界面展示
我的服务器是192.168.1.14,初始界面
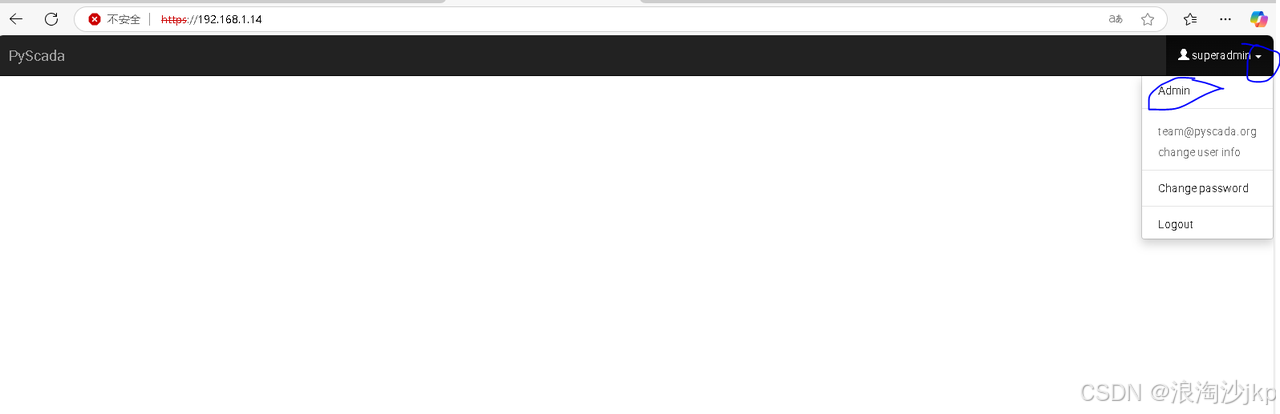
选择点击Admin进入另一个界面