官方文档:
Get started | Entities | 1.4.0-exp.2
前菜
这里就不介绍ECS这个概念了,只介绍怎么在Unity的ECS框架下进行开发。
Unity把以前那种面向对象的世界系统叫做SceneSytem(场景系统),这个叫ECS。Scenes overview | Entities | 1.4.0-exp.2
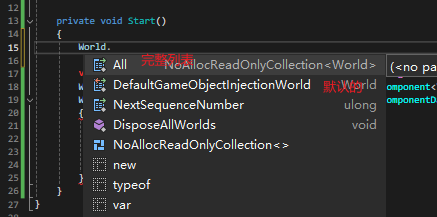
首先要了解的是,Unity的ECS和场景系统是两个独立的系统。Unity用World这个词称呼一个运行的ECS,还是很贴切的。可以同时运行多个World,也就是ECS。可以通过World类获取运行的World列表。
ECS是Component(数据)+System(逻辑)的工作方式,常规系统就是各种面向对象。常规系统里的对象不能直接拿到ECS里用,需要进行转换,但是不用手动转换,unity会自动转,这个自动转换过程就叫Baking(烘焙)。比如常规的Transform组件如果转换到ECS里,父子关系分别由Parent和Child组件处理,坐标在LocalToWorld组件(里面是一个4x4的矩阵)等等,手动转的话工作量颇大。
两个系统虽然独立运行,可以互相访问,都是运行在主线程里的。
ECS也有对应的查看运行中的Enitity、System、Component的窗口,在Windows =>Entities菜单里。EntityHierachy窗口里,六边形是Entity。
代码里处理Enitity的就是Entity类,这个很好懂,后面写代码了一看便知。
下面开始正餐。
一、创建SubScene
Subscene是为了ECS搞出的新东西,并不是一个xxx.unity这样的场景,同时Unity也搞出来了Authoring scene(创作场景),Entity scene(实体场景)这两个概念。
Scenes overview | Entities | 1.4.0-exp.2
- Subscene:就是一个GameObject上挂上Subscene.cs脚本,作为一个转换容器,里面的子节点自动Bake成Entity。
- Authoring scene:制作ECS场景的普通场景,Subscene看起来是一个子场景位于这个制作场景中。因为有Subscene这个功能,我们可以像制作普通场景一样编辑制作一个ECS场景,然后由Unity自动Bake成ECS场景。
- Entity scene:Authoring scene烘焙后结果就是一堆Entity和Component构成的场景,Unity会把这个场景存到一个文件里,游戏运行的时候就直接加载这个场景。估计是存在Library文件夹里了,比较自动化了。
烘焙只会在编辑器中进行,不会在游戏运行中执行,就像导入资源一样,因为过程很费。
关于在常规场景里创作然后烘焙成ECS场景,Unity又搞了2个概念:
- Authoring data (创作数据): 编辑常规场景时,编辑器中创建的所有脚本、资源以及其他游戏相关的数据,比如我们熟悉的MonoBehavior。这些我们都可以方便的编辑。
- Runtime data (运行时数据: ECS运行时处理的数据,各种Component,还都是结构体,对CPU友好,对人类不友好。一方面Authoring data转到Runtime data后会变得稀碎,System运行时只取自己需要的数据,不需要整个数据,可以大大避免缓存命中失败;另一方面数据格式会发生变化,比如Transform的位置坐标旋转在ECS里就是一个矩阵。
编辑器中,用来放创作数据的GameObject就被叫做AuthoringGameObject,上面的常规组件被叫做AuthoringComponent,用来区分ECS Component。AuthoringComponent编辑后会自动Bake到ECS里,相当于我们修改AuthoringComponent来修改ECS Component,而不是直接修改ECS Component。(这段话现在估计理解有点云里雾里,第三节肯定就会云破天开)
关于烘焙的一点细节门径在第三节介绍。
有说了一堆,接下来终于到实操了,新建一个场景作为Authoring scene,然后新建一个Subscene,名字随意。
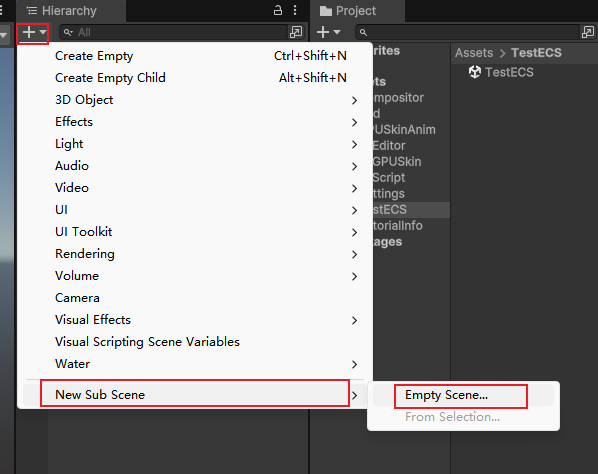
结果如下:

然后再新建一个Cub放到Subscene下面
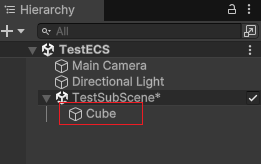
这个Cub会自动Bake成Entity,选中这个Cube,在Inspector窗口底部,可以看到烘焙出的Entity和Component。
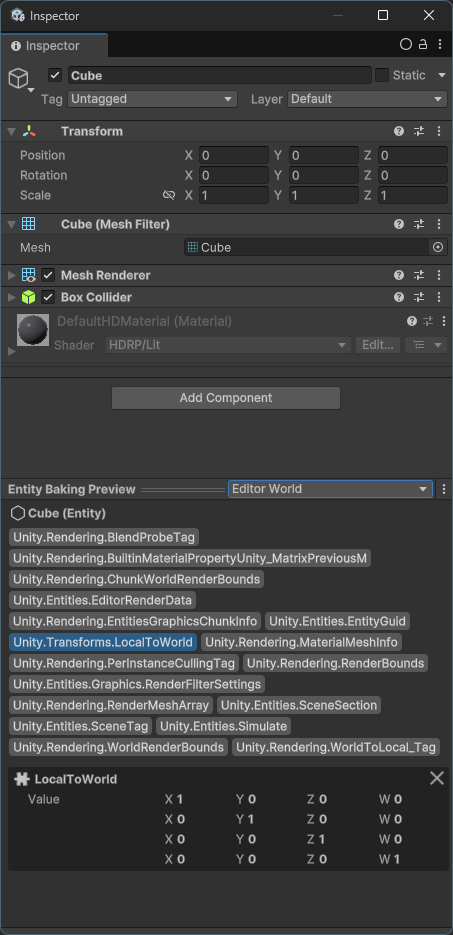
如果你那没有显示,那么预览世界选项应该选了EditorWorld,并且没有安装Entity Graphic包。

安装Entity Graphic包或者切换到Converted Scene: XXX这个选项。
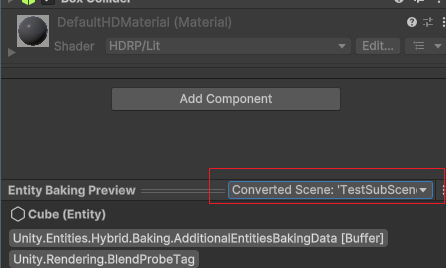
Inspector中可以看到Unity添加了一堆Componet,有一些是运行时用的,有一些是编辑用的。在Inspector中修改Cub的属性,ECS那边也跟着生效,这就是Bake系统的功劳。这里就不细说了,文档中有详细的介绍。
Baking | Entities | 1.4.0-exp.2
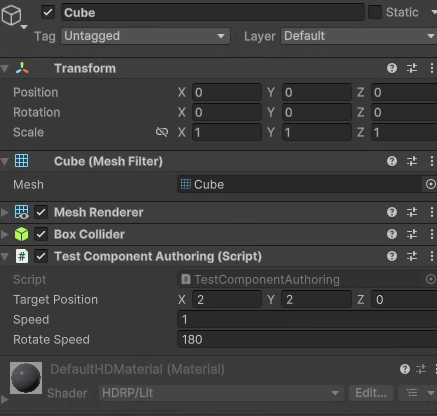
注意截图中我选中了LocalToWorld这个组件,如前菜中所说这就是一个矩阵,不适合人工编辑,但是cpu喜欢。接下来我们创建一个Sytem,通过修改这个组件中的矩阵让Cub旋转起来。
二、创建System
using Unity.Entities;
using Unity.Mathematics;
using Unity.Transforms;
using UnityEngine;public partial struct TestSystem : ISystem
{public void OnCreate(ref SystemState state){}public void OnDestroy(ref SystemState state){}public void OnUpdate(ref SystemState state){//获取所有LocalTransform组件//注意Component都是结构体,如果要修改的话,需要用RW这个访问foreach(var trans in SystemAPI.Query<RefRW<LocalToWorld>>()){//math.mul才是矩乘法,float4x4 * float4x4不是//绕Y轴旋转,1秒180度trans.ValueRW.Value = math.mul(trans.ValueRW.Value, float4x4.EulerXYZ(0, Mathf.PI * SystemAPI.Time.DeltaTime, 0));}}
}
编译运行就能看到效果了,还可以增加几个cube,都会旋转。

新建脚本继承ISystem或者Systembase,然后在Update里写代码就行了。SystemAPI.Query用来获取要处理的Componenet。如果在ECS系统内部,我们就是在System里写代码实现自己想要的逻辑。创建/删除Entity,增删改Component的方法都在EntityMananger里,可以通过stage.EntityManager获取到EntityMananger,后面的例子会有些用到,都比较简单熟悉即可。
这里因为LocalToWorld是个矩阵,所以用了矩阵操作不太直观。可以用LocalTransform组件,就可以像常规Transform组件一样操作了。但是Unity没有自动加这个Componnet避免浪费资源,需要用的人手动添加。这个第三节介绍。这一节就这样。
更多详情请看文档[狗头]。
Systems comparison | Entities | 1.4.0-exp.2
三、自定义Component
Organize data with components | Entities | 1.4.0-exp.2
using Unity.Entities;
using Unity.Mathematics;public struct TestComponent : IComponentData
{//目标位置public float3 targetPosition;//速度public float speed;//转速 rad/spublic float rotateSpeed;
}
新建一个结构体继承自IcomponentData就行了。里面不能包含引用类型,会有编译报错提示。更多详情请看文档[doge]
Organize data with components | Entities | 1.4.0-exp.2
这里我要让刚才的Cub朝向指定位置移动,所以了这样一些参数。
那么问题来了,这个TestComponent怎么加到Cub的Entity上。答案是通过Bake自动添加,或者通过代码EntityManager.AddComponent添加。
在这之前先把System的代码写一下。只要熟悉一些基本的API就行了,没什么难度。
using Unity.Entities;
using Unity.Mathematics;
using Unity.Transforms;
using UnityEngine;public partial struct TestSystem : ISystem
{public void OnCreate(ref SystemState state){}public void OnDestroy(ref SystemState state){}public void OnUpdate(ref SystemState state){//这里用了LocalTransform,默认不会加这个组件,创建Entity的时候如果指定TransformUsageFlags.Dynamic,会自动添加这个组件。手动添加也是可以的。foreach(var cmps in SystemAPI.Query<RefRW<LocalTransform>, RefRW<TestComponent>>()){var trans = cmps.Item1.ValueRW;var move = cmps.Item2.ValueRW;//移动var dist = move.targetPosition - trans.Position;var delta = SystemAPI.Time.DeltaTime * move.speed;if(delta * delta >= dist.x * dist.x + dist.y * dist.y + dist.z * dist.z){trans.Position += dist;}else{trans.Position += delta * math.normalize(dist);}//旋转var targetRotation = quaternion.LookRotation(dist, new float3(0, 1, 0));var angle = math.angle(trans.Rotation, targetRotation);if(angle > 0.002f){var deltaAngle = Mathf.Deg2Rad * move.rotateSpeed * SystemAPI.Time.DeltaTime;var f = math.clamp(deltaAngle / angle, 0, 1);//不要用float4.lerp,那个不是向量差值。trans.Rotation = new quaternion(math.lerp(trans.Rotation.value, targetRotation.value, f));}//用了临时变量,结构体是拷贝的,要赋值改回去。cmps.Item1.ValueRW = trans;cmps.Item2.ValueRW = move;}}//之前的旋转代码,不用了//public void OnUpdate(ref SystemState state)//{//    //获取所有LocalTransform组件//    //注意Component都是结构体,如果要修改的话,需要用RW这个访问//    //绕Y轴旋转,1秒180度//    foreach(var trans in SystemAPI.Query<RefRW<LocalToWorld>>())//    {//        //math.mul才是矩乘法,float4x4 * float4x4不是//        trans.ValueRW.Value = math.mul(trans.ValueRW.Value, float4x4.EulerXYZ(0, Mathf.PI * SystemAPI.Time.DeltaTime, 0));//    }//}
}
1.通过Bake添加
只需要创建一个Authoring脚本和Baker脚本。为什么叫Authoring脚本和Baker脚本,可以结合第1节的前戏和这里的代码感受一下。
using Unity.Entities;
using UnityEngine;public class TestComponentAuthoring : MonoBehaviour
{public Vector3 targetPosition;public float speed;public float rotateSpeed;
}class TestComponentAuthoringBaker : Baker<TestComponentAuthoring>
{public override void Bake(TestComponentAuthoring authoring){var entity = GetEntity(TransformUsageFlags.Dynamic);AddComponent(entity, new TestComponent(){targetPosition = authoring.targetPosition,speed = authoring.speed,rotateSpeed = authoring.rotateSpeed});}
}
就是将TestComponentAuthoring的属性搞到ECS Component里去。TestComponentAuthoring这个就是起到一个编辑器的作用,Unity官方也是建议大家都用Authoring后缀来命名这样的脚本。
执行烘焙操作的这个东西就叫Baker,烘焙的时候会创建一个对象。具体可以看文档。也不细说了。
现在再来看第一节的这段话就很好理解了:
编辑器中,用来放创作数据的GameObject就被叫做AuthoringGameObject,上面的常规组件被叫做AuthoringComponent,用来区分ECS Component。AuthoringComponent编辑后会自动Bake到ECS里,相当于我们修改AuthoringComponent来修改ECS Component,而不是直接修改ECS Component。
Unity的那些内置组件应该是直接作为AuthoringComponent,然后写了Baker代码,虽然我没找到在哪儿。
把这个代码添加的Cub上。Inspector里设置好参数,运行起来Cube就会动了。

2.通过代码添加
通过代码添加的问题就在于如果有多个Cube,并且只要给其中一个添加的话,怎么知道哪个是我们的目标呢?要解决这个,还是得用Bake处理一下,先加一个记录Id等等的Component,System中给指定Id的Component处理。
这里我给出两种代码,一种是在ECS System代码中添加,一种是在Scene系统的MonoBehavior中,通过访问ECS系统添加。
在ECS System中添加
这里偷懒加完之后系统一直运行了,仅仅展示一下工作原理。
using Unity.Collections;
using Unity.Entities;
using Unity.Mathematics;
using Unity.Transforms;public partial struct TestAddComponentSystem : ISystem
{public void OnCreate(ref SystemState state){}public void OnDestroy(ref SystemState state){}public void OnUpdate(ref SystemState state){var entityManager = state.EntityManager;var list = entityManager.GetAllEntities(Allocator.Temp);foreach (var entity in list){//有几个系统自带的entity,先这样简单过滤一下if (!entityManager.HasComponent<LocalToWorld>(entity)){continue;}if (!entityManager.HasComponent<TestComponent>(entity)){entityManager.AddComponent<TestComponent>(entity);entityManager.SetComponentData(entity, new TestComponent(){targetPosition = new float3(-2, -2, 0),speed = 1,rotateSpeed = 180,});//这个组件TestComponent要用,需要加一下entityManager.AddComponent<LocalTransform>(entity);entityManager.SetComponentData(entity, LocalTransform.Identity);}}list.Dispose();}
}
编译运行就能看到效果,记得删除Cub上的AuthoringComponent
在MonoBehaviour中访问ECS添加
using Unity.Collections;
using Unity.Entities;
using Unity.Mathematics;
using Unity.Transforms;
using UnityEngine;public class TestAddComponentMono : MonoBehaviour
{private float t = 1;private void Update(){t -= Time.deltaTime;if (t <= 0){enabled = false;var entityManager = World.DefaultGameObjectInjectionWorld.EntityManager;//下面的代码和TestAddComponentSystem中的一样var list = entityManager.GetAllEntities(Allocator.Temp);foreach(var entity in list){//有几个系统自带的entity,先这样简单过滤一下if(!entityManager.HasComponent<LocalToWorld>(entity)){continue;}if(!entityManager.HasComponent<TestComponent>(entity)){entityManager.AddComponent<TestComponent>(entity);entityManager.SetComponentData(entity, new TestComponent(){targetPosition = new float3(-2, -2, 0),speed = 1,rotateSpeed = 180,});//这个组件TestComponent要用,需要加一下entityManager.AddComponent<LocalTransform>(entity);entityManager.SetComponentData(entity, LocalTransform.Identity);}}list.Dispose();}}
}
新建一个GameObject,放在Subscene外面,挂上这个脚本就能看到效果了。

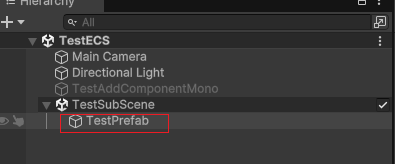
四、引用Prefab
如果AuthoringComponnet引用了Prefab,Bake会自动将引用的Prefab转换成一个EntityPrefab。Baker中,我们只需要这个接口就可以获得EntityPrefab:Entity GetEntity(GameObject authoring, TransformUsageFlags flags)。
Prefabs in baking | Entities | 1.4.0-exp.2
举个例子,隔几秒钟就Instantiate一个Prefab,和官方的例子差不多,我简化了一下。
using Unity.Entities;public struct TestPrefabComponent : IComponentData
{public Entity prefab;public float time;//用来倒计时,倒计时到0就Instantiate一个
}
using Unity.Entities;
using UnityEngine;public class TestPrefabComponentAuthoring : MonoBehaviour
{public GameObject prefab;
}class TestPrefabComponentAuthoringBaker : Baker<TestPrefabComponentAuthoring>
{public override void Bake(TestPrefabComponentAuthoring authoring){var entity = GetEntity(TransformUsageFlags.None);//不需要用到Transform,用None选项。AddComponent(entity, new TestPrefabComponent(){prefab = GetEntity(authoring.prefab, TransformUsageFlags.Dynamic) //创建EntityPrefab});}
}using Unity.Collections;
using Unity.Entities;
using Unity.Transforms;
using Random = UnityEngine.Random;public partial struct TestPrefabSystem : ISystem
{public void OnCreate(ref SystemState state){}public void OnDestroy(ref SystemState state){}public void OnUpdate(ref SystemState state){var entityManager = state.EntityManager;//entity列表不能一边遍历一边增删,所以搞了这个CommanderBuffer,先记录操作,遍历之后应用。var ecb = new EntityCommandBuffer(Allocator.Temp);foreach(var cmp in SystemAPI.Query<RefRW<TestPrefabComponent>>()){cmp.ValueRW.time -= SystemAPI.Time.DeltaTime;if (cmp.ValueRW.time <= 0){//三秒复制一个cmp.ValueRW.time = 3f;var entity = ecb.Instantiate(cmp.ValueRW.prefab);ecb.SetComponent(entity, LocalTransform.FromPosition(Random.Range(-2, 2), Random.Range(-2, 2), 0));}}ecb.Playback(entityManager);ecb.Dispose();}}
效果如下:


五、结束
有了这些基本上可以进行一些实际应用了。官方文档里的知识还是不少,比如Bake的实现细节、System的细节、Componenet的细节、Transform的细节、性能优化等等,我以后尽量补充一点皮毛在这里。
ECS使用Assetbundle理论上是没问题的,烘焙后已经是不变的东西,从bundle加载和从硬盘加载就是位置不一样而已,就看打包是不是没问题了。目前没用过有待测试。
谢谢观赏,再会。