目录
分页
封装分页组件
1. 创建数据源
2. 使用
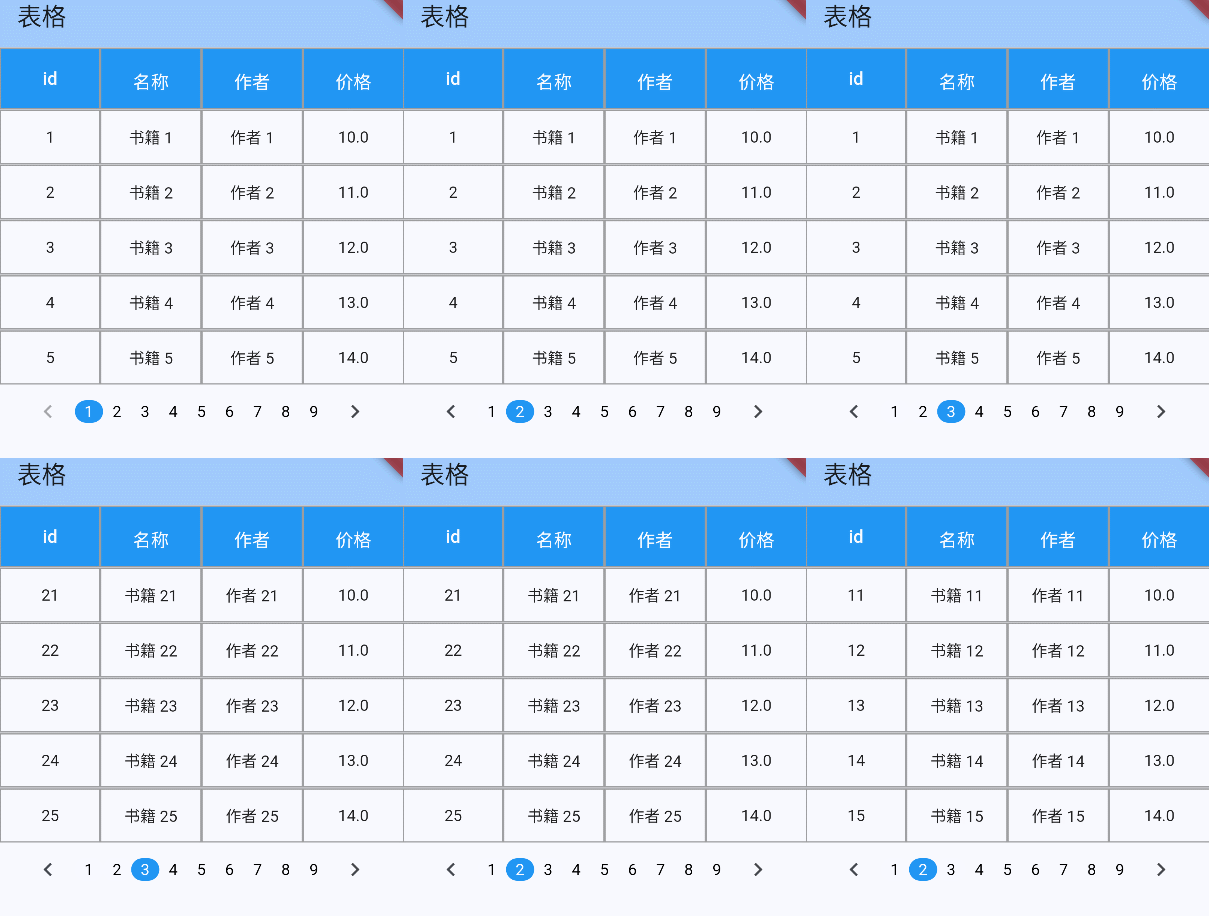
3. 效果演示
上拉刷新|下拉加载更多
1. 修改请求逻辑
2. 数据渲染
3. 效果演示
总结
在上一章中我们基本入门了SfDataGrid的使用,从无到有渲染数据表格,了解它的常见API、以及对表格的个性化和数据的操作,在本章中我们将继续探究SfDataGrid数据表格。
分页
SfDataGrid并没有为我们提供分页功能,但是我们可以自己封装一个分页组件,然后通过数据交互到达分页切换的效果
封装分页组件
import 'package:flutter/material.dart';class Pagination extends StatefulWidget {// 总页数final int totalPages;// 当前页final int currentPage;// 切换页码回调函数final Function(int) onPageChanged;const Pagination({super.key,required this.totalPages,required this.currentPage,required this.onPageChanged});@override_PaginationState createState() => _PaginationState();
}class _PaginationState extends State<Pagination> {late int _currentPage;@overridevoid initState() {super.initState();// 初始化当前页面 为外部传入的页码_currentPage = widget.currentPage;}// 修改页面回调函数void _changePage(int page) {// 如果 点击的页码 != 当前页码 & 点击的页码 >= 1 && 点击的页码达到最大页码 才会更新当前页码if (page != _currentPage && page >= 1 && page <= widget.totalPages) {setState(() {_currentPage = page;});// 触发回调,向外部传递 更新后的页码widget.onPageChanged(page);}}// 获取当前可展示的 页码,页码最多显示 9个List<int> _getVisiblePages() {// 可见页码 数组List<int> visiblePages = [];// 起始页码int startPage = _currentPage - 4;// 结束页码int endPage = _currentPage + 4;// 如果起始页码小于1if (startPage < 1) {// 重新计算 结束页码值endPage += (1 - startPage);startPage = 1;}// 如果结束页码 大于总页码if (endPage > widget.totalPages) {startPage -= (endPage - widget.totalPages);endPage = widget.totalPages;}// 防止 起始 | 结束 页码越界startPage = startPage < 1 ? 1 : startPage;endPage = endPage > widget.totalPages ? widget.totalPages : endPage;// 存储可见页码for (int i = startPage; i <= endPage; i++) {visiblePages.add(i);}return visiblePages;}@overrideWidget build(BuildContext context) {List<int> visiblePages = _getVisiblePages();return SizedBox(width: MediaQuery.of(context).size.width,child: Row(mainAxisAlignment: MainAxisAlignment.center,children: [IconButton(icon: const Icon(Icons.chevron_left),onPressed: _currentPage > 1 ? () => _changePage(_currentPage - 1) : null,),...visiblePages.map((page) {// 标识是否为当前页bool flag = page == _currentPage;return GestureDetector(onTap: () {_changePage(page);},child: Container(width: 25,alignment: Alignment.center,decoration: BoxDecoration(color: flag ? Colors.blue : Colors.transparent,borderRadius: BorderRadius.circular(35)),child: Text(page.toString(),textAlign: TextAlign.center,style: TextStyle(color: flag ? Colors.white : Colors.black,),),),);}),IconButton(icon: const Icon(Icons.chevron_right),onPressed: _currentPage < widget.totalPages ? () => _changePage(_currentPage + 1) : null,),],),);}
}
实现效果

1. 创建数据源
在创建数据源中,我们使用Future模拟网络请求数据
import 'package:flutter/material.dart';
import 'package:syncfusion_flutter_datagrid/datagrid.dart';
import 'package:table_demo/book.dart';class BookTableSource extends DataGridSource {// 每页数量int _pageSize = 10;// 页码int _currentPage = 1;// 标识数据是否正在加载bool _isLoading = false;// 表格数据List<Book> books = [];BookDataSource() {_loadData();}void _loadData() {if (_isLoading) return;_isLoading = true;// 模拟从服务器或数据库加载数据Future.delayed(const Duration(seconds: 2), () {final newBooks = List.generate(_pageSize,(index) => Book(id: (_currentPage - 1) * _pageSize + index + 1,bookName: '书籍 ${(_currentPage - 1) * _pageSize + index + 1}',author: '作者 ${(_currentPage - 1) * _pageSize + index + 1}',price: 10.0 + index,publicTime: '时间 ${(_currentPage - 1) * _pageSize + index + 1}',),);books = newBooks;_isLoading = false;notifyListeners();});}@overrideList<DataGridRow> get rows => books.map<DataGridRow>((book) {return DataGridRow(cells: [DataGridCell(columnName: "id", value: book.id),DataGridCell(columnName: "bookName", value: book.bookName),DataGridCell(columnName: "author", value: book.author),DataGridCell(columnName: "price", value: book.price),DataGridCell(columnName: "publicTime", value: book.publicTime),]);}).toList();@overrideDataGridRowAdapter? buildRow(DataGridRow row) {// 具体的渲染return DataGridRowAdapter(cells: row.getCells().map<Widget>((cell) {return Container(alignment: Alignment.center,decoration: BoxDecoration(color: Colors.white10,// 添加边框border: Border.all(color: Colors.grey),),child: Text(cell.value.toString(),// 文字样式style: const TextStyle(fontSize: 14, color: Colors.black87),),);}).toList());}void loadPage(int page) {_currentPage = page;_loadData();}
}
2. 使用
联合SfDataGrid使用,布局为表格在上面,分页在下方,在切换页码时,会触发请求数据的方法,然后返回对应的数据
class MyHomePage extends StatefulWidget {const MyHomePage({super.key});@overrideState<MyHomePage> createState() => _MyHomePageState();
}class _MyHomePageState extends State<MyHomePage> {late BookTableSource _bookDataSource;int currPage = 1;@overridevoid initState() {super.initState();_bookDataSource = BookTableSource();_bookDataSource.loadPage(currPage);}@overrideWidget build(BuildContext context) {return Scaffold(appBar: AppBar(backgroundColor: Theme.of(context).colorScheme.inversePrimary,title: const Text("表格"),),body: SingleChildScrollView(child: Column(children: [SfDataGrid(// 数据源source: _bookDataSource,// 表格列:注意 数据源的 列数 一定要与 表格列数 一致columns: [GridColumn(// 字段名(field):与数据源的字段名要保持一致columnName: "id",// 字段名称(label)label: Container(padding: const EdgeInsets.all(16.0),alignment: Alignment.center,decoration: BoxDecoration(color: Colors.blue,border: Border.all(color: Colors.grey),),child: const Text('id',style: TextStyle(fontSize: 16, color: Colors.white),))),GridColumn(columnName: "bookName",label: Container(padding: const EdgeInsets.all(16.0),alignment: Alignment.center,decoration: BoxDecoration(color: Colors.blue,border: Border.all(color: Colors.grey),),child: const Text('名称',style: TextStyle(fontSize: 16, color: Colors.white),))),GridColumn(columnName: "author",label: Container(padding: const EdgeInsets.all(16.0),alignment: Alignment.center,decoration: BoxDecoration(color: Colors.blue,border: Border.all(color: Colors.grey),),child: const Text('作者',style: TextStyle(fontSize: 16, color: Colors.white),))),GridColumn(columnName: "price",label: Container(padding: const EdgeInsets.all(16.0),alignment: Alignment.center,decoration: BoxDecoration(color: Colors.blue,border: Border.all(color: Colors.grey),),child: const Text('价格',style: TextStyle(fontSize: 16, color: Colors.white),))),GridColumn(columnName: "publicTime",label: Container(padding: const EdgeInsets.all(16.0),alignment: Alignment.center,decoration: BoxDecoration(color: Colors.blue,border: Border.all(color: Colors.grey),),child: const Text('发布时间',style: TextStyle(fontSize: 16, color: Colors.white),))),]),Pagination(totalPages: 20,currentPage: currPage,onPageChanged: (page) {currPage = page;_bookDataSource.loadPage(page);setState(() {});},),],),),);}
}
3. 效果演示

上拉刷新|下拉加载更多
1. 修改请求逻辑
要实现这个功能,要把之前的分页请求逻辑稍微修改一下,需要知道当前操作是刷新还是加载更多,故需要请求方法新增参数isLoadMore:true为加载更多,false为刷新
import 'package:flutter/material.dart';
import 'package:syncfusion_flutter_datagrid/datagrid.dart';
import 'package:table_demo/book.dart';class BookTableSource extends DataGridSource {// 每页数量int _pageSize = 10;// 页码int _currentPage = 0;// 标识是否在请求数据bool _isLoading = false;// 表格数据List<Book> books = [];bool get isLoading => _isLoading;/// page:请求页码 isLoadMore:是否加载更多,控制要合并新数据还是替换,true为合并,false替换Future<void> loadData({bool? isLoadMore = true}) async {if (_isLoading) return;_isLoading = true;_currentPage = isLoadMore == true ? ++_currentPage : 1;// 模拟从服务器或数据库加载数据Future.delayed(const Duration(seconds: 2), () {// 根据 当前页码 和 每页数量 生成新数据final newBooks = List.generate(_pageSize,(index) => Book(id: (_currentPage - 1) * _pageSize + index + 1,bookName: '书籍 ${(_currentPage - 1) * _pageSize + index + 1}',author: '作者 ${(_currentPage - 1) * _pageSize + index + 1}',price: 10.0 + index,publicTime: '时间 ${(_currentPage - 1) * _pageSize + index + 1}',),);// 合并新数据books = isLoadMore == true ? [...books, ...newBooks] : newBooks;_isLoading = false;notifyListeners();});}@overrideList<DataGridRow> get rows => books.map<DataGridRow>((book) {return DataGridRow(cells: [DataGridCell(columnName: "id", value: book.id),DataGridCell(columnName: "bookName", value: book.bookName),DataGridCell(columnName: "author", value: book.author),DataGridCell(columnName: "price", value: book.price),DataGridCell(columnName: "publicTime", value: book.publicTime),]);}).toList();@overrideDataGridRowAdapter? buildRow(DataGridRow row) {// 具体的渲染return DataGridRowAdapter(cells: row.getCells().map<Widget>((cell) {return Container(alignment: Alignment.center,decoration: BoxDecoration(color: Colors.white10,// 添加边框border: Border.all(color: Colors.grey),),child: Text(cell.value.toString(),// 文字样式style: const TextStyle(fontSize: 14, color: Colors.black87),),);}).toList());}
}
2. 数据渲染
在修改完数据源之后,再来修改表格的渲染,为表格新增属性verticalScrollController,通过它可以为表格添加滚动事件,了解表格是否滚动到底部或者滚动到顶部,具体代码如下
class _BookTablePageState extends State<BookTablePage> {late BookTableSource _bookDataSource;ScrollController controller = ScrollController();@overridevoid initState() {super.initState();_bookDataSource = BookTableSource();// 初始化加载数据_bookDataSource.loadData();// 为表格添加滚动事件controller.addListener(onScroll);}// 表格滚动事件void onScroll() {// 判断是否滚动到顶部if (controller.position.atEdge && controller.position.pixels == 0) {// 请求数据_bookDataSource.loadData(isLoadMore: false);} else if (controller.position.pixels ==controller.position.maxScrollExtent &&!_bookDataSource.isLoading) {// 如果表格滚动到底部 且 未处在表格加载状态// 记载更多数据_bookDataSource.loadData();}setState(() {});}@overrideWidget build(BuildContext context) {return Scaffold(appBar: AppBar(backgroundColor: Theme.of(context).colorScheme.inversePrimary,title: const Text("表格"),),body: SingleChildScrollView(child: Column(children: [SfDataGrid(// 数据源source: _bookDataSource,// 竖向滚动控制器verticalScrollController: controller,// 定义表格底部组件:数据在加载中展示 加载组件,反之不展示任何内容footer: _bookDataSource.isLoading? Container(alignment: Alignment.center,child: const CircularProgressIndicator(),): Container(),// 表格列:注意 数据源的 列数 一定要与 表格列数 一致columns: [GridColumn(// 字段名(field):与数据源的字段名要保持一致columnName: "id",// 字段名称(label)label: Container(padding: const EdgeInsets.all(16.0),alignment: Alignment.center,decoration: BoxDecoration(color: Colors.blue,border: Border.all(color: Colors.grey),),child: const Text('id',style: TextStyle(fontSize: 16, color: Colors.white),))),GridColumn(columnName: "bookName",label: Container(padding: const EdgeInsets.all(16.0),alignment: Alignment.center,decoration: BoxDecoration(color: Colors.blue,border: Border.all(color: Colors.grey),),child: const Text('名称',style: TextStyle(fontSize: 16, color: Colors.white),))),GridColumn(columnName: "author",label: Container(padding: const EdgeInsets.all(16.0),alignment: Alignment.center,decoration: BoxDecoration(color: Colors.blue,border: Border.all(color: Colors.grey),),child: const Text('作者',style: TextStyle(fontSize: 16, color: Colors.white),))),GridColumn(columnName: "price",label: Container(padding: const EdgeInsets.all(16.0),alignment: Alignment.center,decoration: BoxDecoration(color: Colors.blue,border: Border.all(color: Colors.grey),),child: const Text('价格',style: TextStyle(fontSize: 16, color: Colors.white),))),GridColumn(columnName: "publicTime",label: Container(padding: const EdgeInsets.all(16.0),alignment: Alignment.center,decoration: BoxDecoration(color: Colors.blue,border: Border.all(color: Colors.grey),),child: const Text('发布时间',style: TextStyle(fontSize: 16, color: Colors.white),))),]),],),),);}
}
3. 效果演示

总结
该插件还有更多的功能值得探索,这里笔者只是整理了日常开发中遇到的一些需求,如果有什么不对的,欢迎评论区指正哈!谢谢
