ESP8266作为AVR编程器( ISP programmer)的使用介绍
- 🌿ESP8266自带库例程:
https://github.com/esp8266/Arduino/tree/master/libraries/ESP8266AVRISP - 📍支持ESP8266/32的ESP_AVRISP其它开源工程(个人没有再去验证):
https://github.com/lbernstone/ESP_AVRISP - 🔧 AVR命令行烧录工具avrdude:
https://github.com/avrdudes/avrdude
📘制作流程介绍
- 通过Arduino IDE给ESP8266将
Arduino_Wifi_AVRISP程序编译并烧录进去。让其成为一个网络烧录端口的AVR编程器。
- esp8266固件库自带的例程:

C:\Users\Administrator\AppData\Local\Arduino15\packages\esp8266\hardware\esp8266\3.1.2\libraries\ESP8266AVRISP\examples\Arduino_Wifi_AVRISP
- 程序:
#include <SPI.h>
#include <ESP8266WiFi.h>
#include <ESP8266mDNS.h>
#include <ESP8266AVRISP.h>#ifndef STASSID
#define STASSID "########"//填写自己的wifi信息
#define STAPSK "********"
#endifconst char* host = "ESP8266-avrisp";
const char* ssid = STASSID;
const char* pass = STAPSK;
const uint16_t port = 328;
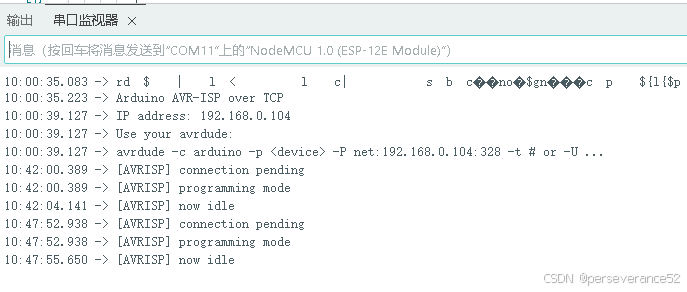
const uint8_t reset_pin = 5;ESP8266AVRISP avrprog(port, reset_pin);void setup() {Serial.begin(115200);Serial.println("");Serial.println("Arduino AVR-ISP over TCP");avrprog.setReset(false); // let the AVR runWiFi.mode(WIFI_STA);WiFi.begin(ssid, pass);while (WiFi.waitForConnectResult() != WL_CONNECTED) {WiFi.begin(ssid, pass);Serial.println("WiFi failed, retrying.");}MDNS.begin(host);MDNS.addService("avrisp", "tcp", port);IPAddress local_ip = WiFi.localIP();Serial.print("IP address: ");Serial.println(local_ip);Serial.println("Use your avrdude:");Serial.print("avrdude -c arduino -p <device> -P net:");Serial.print(local_ip);Serial.print(":");Serial.print(port);Serial.println(" -t # or -U ...");// listen for avrdudesavrprog.begin();
}void loop() {static AVRISPState_t last_state = AVRISP_STATE_IDLE;AVRISPState_t new_state = avrprog.update();if (last_state != new_state) {switch (new_state) {case AVRISP_STATE_IDLE:{Serial.printf("[AVRISP] now idle\r\n");// Use the SPI bus for other purposesbreak;}case AVRISP_STATE_PENDING:{Serial.printf("[AVRISP] connection pending\r\n");// Clean up your other purposes and prepare for programming modebreak;}case AVRISP_STATE_ACTIVE:{Serial.printf("[AVRISP] programming mode\r\n");// Stand by for completionbreak;}}last_state = new_state;}// Serve the clientif (last_state != AVRISP_STATE_IDLE) { avrprog.serve(); }if (WiFi.status() == WL_CONNECTED) { MDNS.update(); }
}- 程序烧录后查看ESP8266/32的网络IP地址和端口号:
net:192.168.0.104:328
- ✨需要注意:ESP8266/32设备的网络IP段必须同电脑端的IP同段,只要电脑端所连接的WiFi与ESP8266/32设备在同一个路由器上一般没有问题。如果不同端的IP地址访问需要进行电脑设置,具体教程可以网上找相关不同IP地址段访问方法的内容。
- 使用AVR命令行烧录工具:avrdude烧录:
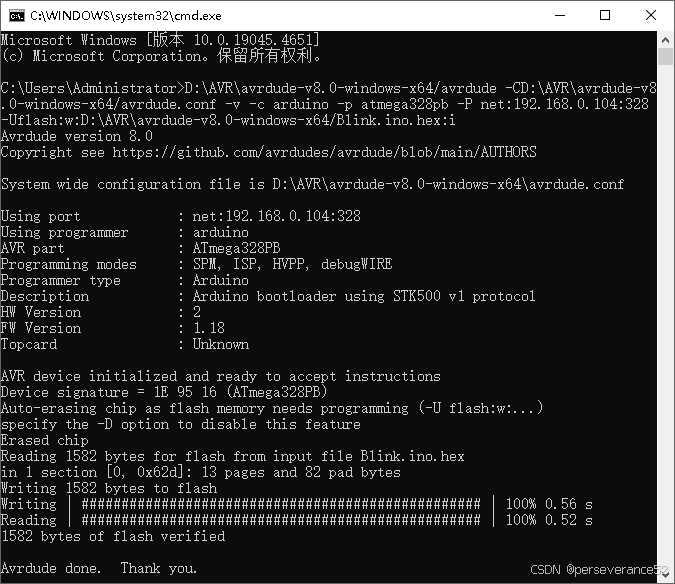
- 通过cmd窗口,定位在
avrdude工具文件位置的烧录方法:
avrdude -CD:\AVR\avrdude-v8.0-windows-x64/avrdude.conf -v -c arduino -p atmega328pb -P net:192.168.0.104:328 -Uflash:w:D:\AVR\avrdude-v8.0-windows-x64/Blink.ino.hex:i

- 通过cmd窗口,在默认位置使用:
D:\AVR\avrdude-v8.0-windows-x64/avrdude -CD:\AVR\avrdude-v8.0-windows-x64/avrdude.conf -v -c arduino -p atmega328pb -P net:192.168.0.104:328 -Uflash:w:D:\AVR\avrdude-v8.0-windows-x64/Blink.ino.hex:i
- 🔗ESP8266制作的AVRISP与烧录目标AVR单片机连接引脚说明
+-----------+-----------+
| ESP8266   |    AVR    |
+----------------+-----------+
| GPIO12(D6)   | MISO      |
| GPIO13(D7)   | MOSI      |
| GPIO14(D5)   | SCK       |
| GPIO5 (D1)   | RESET     |
+----------------+-----------+
- 考虑到对ESP8266 IO端口的保护,建议通讯引脚串联一个1K的电阻。
📘批处理文件烧录执行文件制作
一般程序烧录,基本上烧录工具的文件位置(avrdude)基本都是固定的,只要不重装系统。我们可以制作一个批处理文件,将批处理文件和要烧录的程序文件(.hex),放置在同一个文件夹内,双击即可完成程序烧录。这样可以简化使用命令行烧录的操作。
- 需要根据自己的
avrdude文件路径进行修改。 - 网络端口,需要根据自己烧录的ESP32/8266 AVRISP进行提前设置好。
Wifi_AVRISP_Programmer.bat:
该批处理默认优先检索
Blink.ino.hex文件下载,而不是Blink.ino.with_bootloader.hex,如果再生产的烧录文件夹中删除了``Blink.ino.hex文件,则会加载Blink.ino.with_bootloader.hex下载。
@echo off
setlocal:: 设置 avrdude 路径和配置文件路径
set AVRDUDE_PATH=D:\AVR\avrdude-v8.0-windows-x64\avrdude.exe
set CONFIG_PATH=D:\AVR\avrdude-v8.0-windows-x64\avrdude.conf:: 检查 avrdude.exe 是否存在
if not exist "%AVRDUDE_PATH%" (echo 错误:未找到 avrdude 程序,请检查路径是否正确pauseexit /b 1
):: 检查配置文件是否存在
if not exist "%CONFIG_PATH%" (echo 错误:未找到 avrdude.conf 配置文件,请检查路径是否正确pauseexit /b 1
):: 查找当前目录下的 .hex 文件
set HEX_FILE=
for %%f in (*.hex) do (set HEX_FILE=%%fgoto :found_hex
):found_hex
if not defined HEX_FILE (echo 错误:当前目录下未找到 .hex 文件pauseexit /b 1
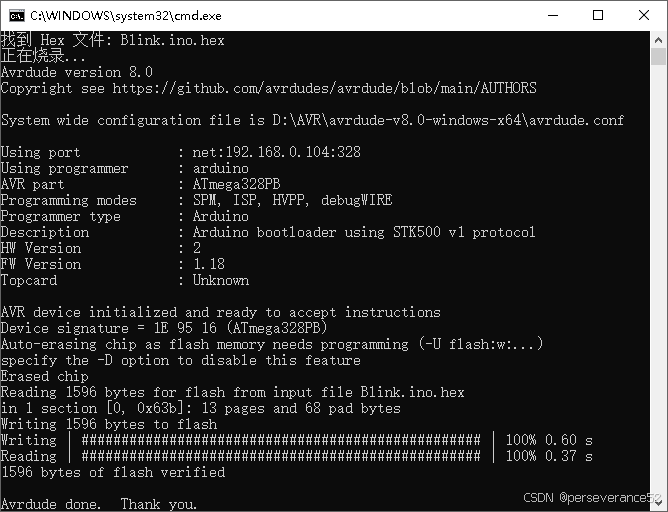
)echo 找到 Hex 文件: %HEX_FILE%
echo 正在烧录...:: 执行烧录命令(调整后的格式,确保路径正确)
"%AVRDUDE_PATH%" -C"%CONFIG_PATH%" -v -c arduino -p atmega328pb -P net:192.168.0.104:328 -Uflash:w:"%CD%\%HEX_FILE%":iif %errorlevel% equ 0 (echo 烧录成功完成!
) else (echo 烧录过程中出现错误!
)pause
- ✨注意:以上代码内容,保存时,选择
ANSI编码格式,不然执行的时候,中文会显示乱码。
- 在生成的烧录文件夹内,双击执行批处理文件,默认选择
Blink.ino.hex烧录过程:
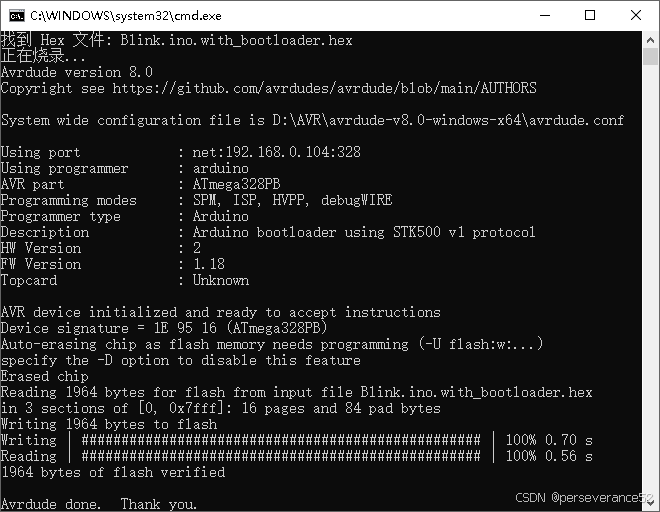
- 在生成的烧录文件夹内,手动删除了
Blink.ino.hex文件后,双击执行批处理文件,自动选择Blink.ino.with_bootloader.hex文件进行烧录过程:
📒Arduino IDE烧录文件导出和文件说明
- Arduino IDE烧录文件导出方法:
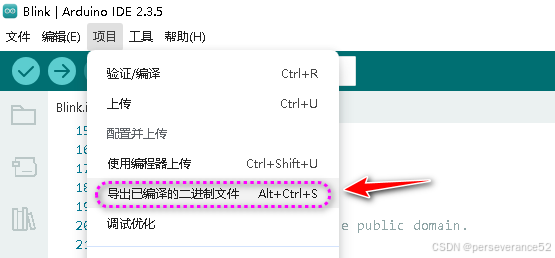
- 编译成功后,会在项目文件夹下,自动建立一个
build文件夹,如果是AVR单片机,里面会有生成的相关文件:

Blink.ino.hex//不带Bootloader程序的烧录文件,文件烧录后,就不再支持使用串口烧录,后续再烧录,只能通过ISP烧录方式Blink.ino.with_bootloader.hex//带Bootloader程序的烧录文件,文件烧录后,后续再烧录,可以继续使用串口烧录。
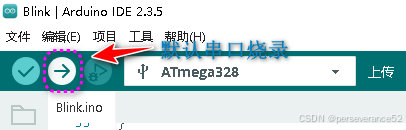
- Arduino IDE 默认的串口烧录方式:
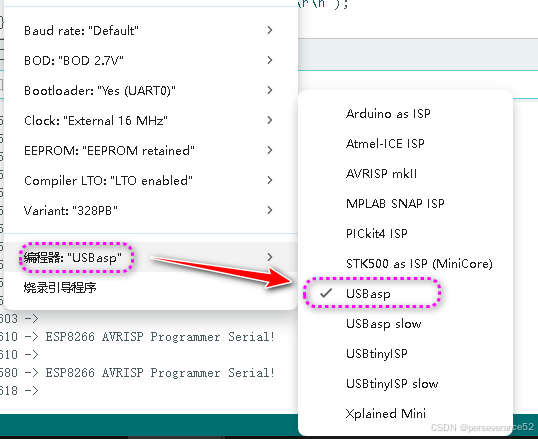
- AVR ISP编程器烧录方式选择和烧录:
- 配置编程器
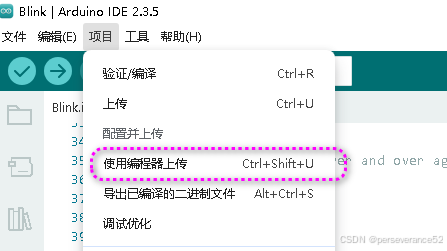
- 使用编程上传: