反向代理:reverse proxy,指的是代理外网用户的请求到内部的指定的服务器,并将数据返回给用户的一种方式,这是用的比较多的一种方式。
Nginx 除了可以在企业提供高性能的web服务之外,另外还可以将 nginx 本身不具备的请求通过某种预定义的协议转发至其它服务器处理,不同的协议就是Nginx服务器与其他服务器进行通信的一种规范,主要在不同的场景使用以下模块实现不同的功能
ngx_http_proxy_module: #将客户端的请求以http协议转发至指定服务器进行处理 7层代理
ngx_http_upstream_module #用于定义为proxy_pass,fastcgi_pass,uwsgi_pass等指令引用的后端服务器分组 负载均衡
ngx_stream_proxy_module:#将客户端的请求以tcp协议转发至指定服务器处理 4层代理
ngx_http_fastcgi_module:#将客户端对php的请求以fastcgi协议转发至指定服务器助理
ngx_http_uwsgi_module: #将客户端对Python的请求以uwsgi协议转发至指定服务器处理
单台反向代理

代理服务器:172.16.88.8
真实服务器:172.16.88.9客户机:172.16.88.7
客户端去访问代理服务器,跳到真实服务器真实服务器:
[root@node2 ~]# yum install httpd -y
[root@node2 ~]# systemctl start httpd //此处服务起不来记得检查防火墙、nginx是否关闭
[root@node2 ~]# cd /var/www/html/
[root@node2 html]# echo "7-2 7-2 7-2" > index.html
[root@node2 html]# ls
index.html客户机验证:
[root@node3 ~]# curl 172.16.88.9
7-2 7-2 7-2代理服务器:
[root@node1 conf.d]# vim pc.conf
server {
listen 80;
server_name www.pc.com;
root /data/html;
location / {
proxy_pass http://192.168.204.20; //因为是7层必须把协议写上,写7-2真实服务器的ip
}
}
[root@node1 conf.d]# nginx -s reload
客户机验证:
[root@node3 ~]# curl 172.16.88.8
7-2 7-2 7-2
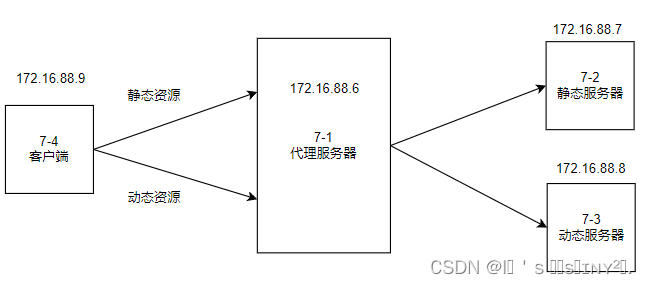
动静分离

7-1 代理服务器:172.16.88.6
7-2 静态服务器:172.16.88.7
7-3 动态服务器:172.16.88.8
7-4 客户端:172.16.88.9
`7-1 代理服务器:` [root@node1 ~]# vim /apps/nginx/conf.d/pc.confserver { listen 80; server_name www.pc.com; root /data/html;location /api { //动态资源proxy_pass http://172.16.88.7;}location ~* \.(jpg|png|bmp|gif)$ { //静态资源proxy_pass http://172.16.88.8;} }[root@node1 ~]# nginx -t [root@node1 ~]# nginx -s reload
7-2 静态服务器:[root@node2 ~]# systemctl stop firewalld [root@node2 ~]# setenforce 0 [root@node2 ~]# systemctl stop nginx [root@node2 ~]# systemctl start httpd [root@node2 ~]# cd /var/www/html [root@node2 html]# rz //准备图片[root@node2 html]# ls a.jpg7-3 动态服务器:
[root@node3 ~]#  systemctl stop firewalld
[root@node3 ~]#  setenforce 0
[root@node3 ~]#  systemctl stop nginx
[root@node3 ~]#  systemctl start httpd
[root@node3 ~]#  cd /var/www/html/
[root@node3 html]#  ls
[root@node3 html]#  echo "7-3 dongtaifuwuqi" > index.html    //准备页面
[root@node3 html]#  ls
index.html
`7-4 客户端验证:
[root@localhost ~]#  curl 172.16.88.7/api        //动态
7-3 dongtaifuwuqi
[root@localhost ~]#  curl 172.16.88.8/a.jpg   //静态
负载均衡
nginx 代理服务器的 调度算法:
- 轮询:一人一次
- 加权轮询:根据权重 分配次数
- hash算法
- ip hash :根据ip地址来决定客户端访问的服务器
- url hash :根据客户端访问的url来决定访问的服务器
- cookie hash :根据cookie的值来决定访问的服务器
- 一致性 hash
- 最小连接算法
- fair算法:根据响应时间来进行分配
轮询:默认一人一次
7-1 :172.16.88.7
7-2 :172.16.88.8
7-3 :172.16.88.97-2:
[root@node2 ~]#  yum install httpd -y
[root@node2 ~]#  systemctl start httpd
[root@node2 ~]#  cd /var/www/html/
[root@node2 html]#  ls
[root@node2 html]#  echo  222222  > index.html   //生成页面
7-3:
[root@node3 ~]#  yum install httpd -y
[root@node3 ~]#  systemctl start httpd
[root@node3 ~]#  cd /var/www/html/
[root@node3 html]#  ls
[root@node3 html]#  echo  333333  > index.html   //生成页面
7-1:[root@node1 ~]# vim /apps/nginx/conf/nginx.conf //编辑主配置文件 http {include mime.types;upstream web { //自定义一组服务器,配置在http块内server 172.16.88.8;server 172.16.88.9;} [root@node1 ~]# nginx -s reload[root@node1 ~]# vim /apps/nginx/conf.d/pc.conf //编辑子配置文件 server { listen 80; server_name www.pc.com; root /data/html;location / {proxy_pass http://web/;} } [root@node1 ~]# nginx -s reload客户端访问172.16.88.7进行验证
