ninja跟gn都是比较时髦的东西,由歪果仁维护,如果走下载源码并编译这种流程的话需要走github跟google官网下载,国内的用网环境相信各位傻瓜都知道,github跟google这几年基本是属于连不上的状态,好在你看的鸿蒙项目跟国内的一些软件大厂已经帮你爬过梯子了,ninja工具跟gn工具已经被他们搬到国内来了
一.安装ninja
关于ninja的介绍网上还是比较多的,这里就不多讲了.贴一个写的不错的帖子各位可以去看看
ninja
相信你看过上面的帖子,对ninja基本上算是有个不错的概念认知,各个社区都集成了ninja,那么为什么大家都集成ninja呢?ninja专注于构建速度,最关键的是ninja可以配合cmake一起使用且ninja极其的小巧轻便
ninja的安装比较简单
$ sudo apt install ninja-build
使用如下指令查看安装的ninja版本,能查出版本即证明ninja安装成功
$ ninja --version![]()
二.安装gn,源码编译
gn的安装稍微有点麻烦,gn需要前置clang,我当前的虚拟机是ubuntu20.04lts版本

这个版本的ubuntu apt源中配置了clang,直接通过如下指令下载
sudo apt install clang因为我这台虚拟机已经安装过了clang,如下提示表示我的clang已经是最新版本了

使用
$ clang --version
查看当前clang版本

gn的源码编译需要clang-8以上的支持,各位根据自己当前系统情况善用百度安装clang-8以上版本
下载gn源码
gn的源码可以从多个地方下载,google官方的跟GitHub上有fork的仓库的需要科学上网,唯一能用的就是鸿蒙提供的Gitee的仓库
鸿蒙gitee
但是鸿蒙gitee下载的有点问题,下载下来后编译出来的测试程序有问题,我就没有继续了,具体什么原因还不太清楚
刚好我手里有开源鸿蒙4.1主干版本,我从主干上复制出来了gn源码,现已上传到csdn下载
gn 源码下载
将源码复制到ubuntu系统里面
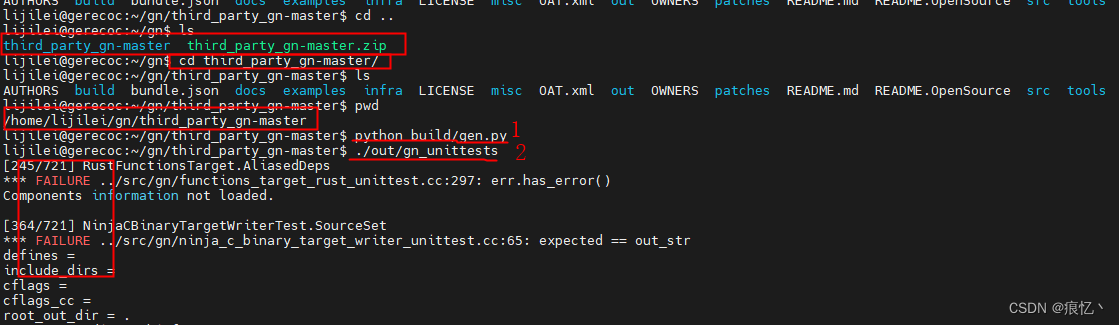
进入gn目录
$ cd gn
$ python build/gen.py
$ ninja -C out
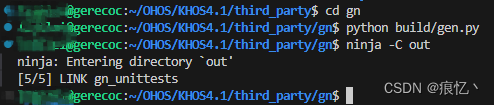
如上表示编译执行成功,跑一下测试代码
$ ./out/gn_unittests
如上表示测试成功
编译成功后,将gn复制到/usr/bin目录下
$ sudo cp ./out/gn /usr/bin

/usr/bin 目录就是系统默认添加环境变量的目录,将gn放到这个目录后可以在任一新建终端测试gn是否可用
新建终端:输入 gn help

如上表示gn安装成功
三.简单的测试
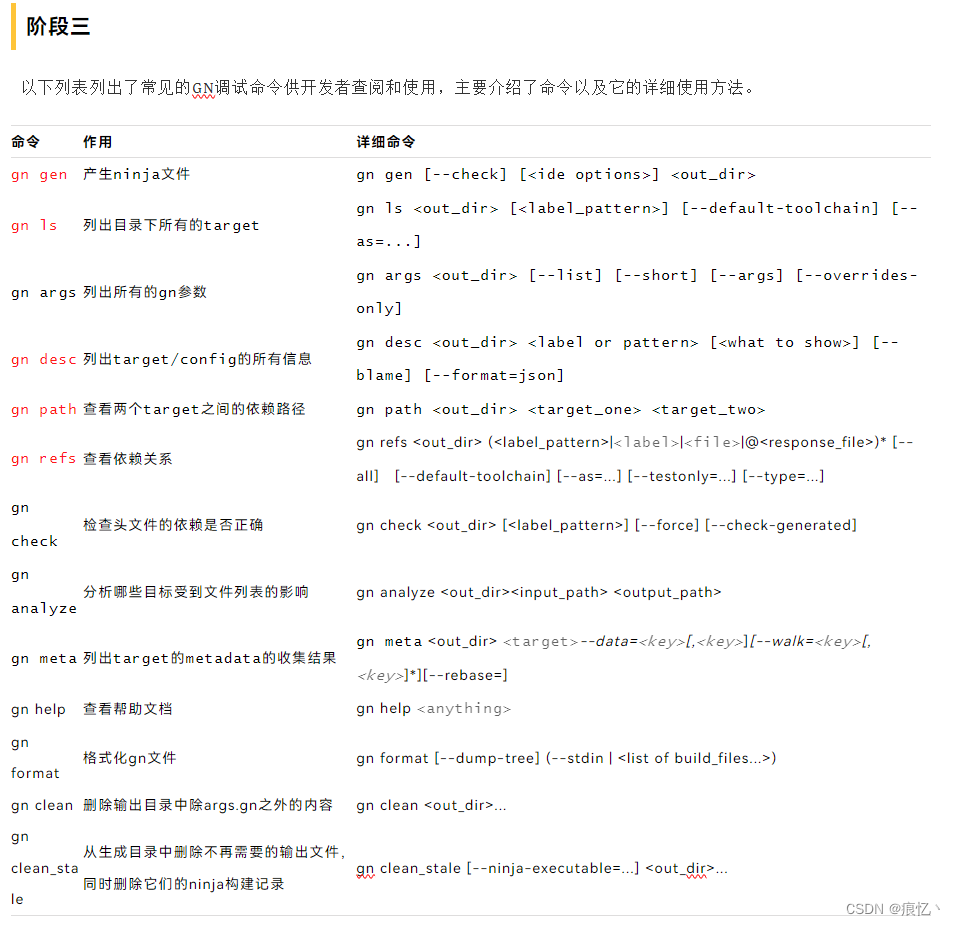
gn测试命令
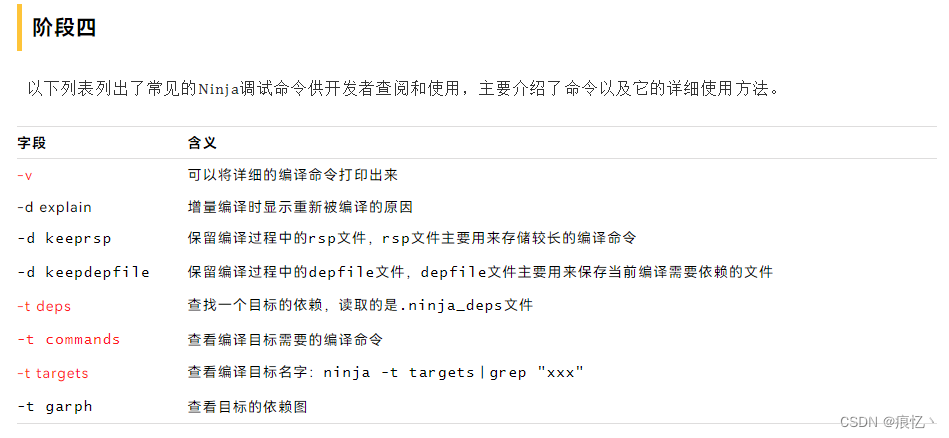
ninja命令
建议初学者以gn仓为例进行学习,首先进入gn/examples/simple_build文件夹,该文件夹下BUILD.GN描述了一个最基本的C++文件的编译配置,如下可执行程序hello依赖了动态库文件hello_shared以及静态库hello_static。
# Copyright 2014 The Chromium Authors. All rights reserved.
# Use of this source code is governed by a BSD-style license that can be
# found in the LICENSE file.
executable("hello") {sources = [ "hello.cc" ]deps = [":hello_shared",":hello_static",]
}
shared_library("hello_shared") {sources = ["hello_shared.cc","hello_shared.h",]defines = [ "HELLO_SHARED_IMPLEMENTATION" ]
}
static_library("hello_static") {sources = ["hello_static.cc","hello_static.h",]
}
在目录下执行gn gen -C out同时进入out文件夹下,分别执行以下命令。
-
gn ls out
//:hello
//:hello_shared
//:hello_static
该命令列出了gn编译过程中的所有target列表,可以看出,包含一个可执行程序//:hello、一个动态库//:hello_shared和一个静态库//:hello_static。
-
gn refs out //:hello_shared
//:hello
gn refs列出了哪些目标依赖了目标//:hello_shared,从上面可以看出目标//:hello依赖了目标//:hello_shared,从GN配置文件也可以看出来。
-
gn desc out //:hello_shared
Target //:hello_shared
type: shared_library
toolchain: //build/toolchain:gccvisibility*metadata{}testonlyfalsecheck_includestrueallow_circular_includes_fromsources//hello_shared.cc//hello_shared.hpublic[All headers listed in the sources are public.]configs (in order applying, try also --tree)//build:compiler_defaultsoutputs//out/libhello_shared.socflags-fPIC-pthreaddefinesHELLO_SHARED_IMPLEMENTATIONDirect dependencies (try also "--all", "--tree", or even "--all --tree")externs
gn desc查看目标//:hello_shared的所有信息,这个命令非常实用,记录了目标的visibility、metadata、cflags、defines等重要信息,建议开发者多使用该功能进行调试。
-
gn path out //:hello //:hello_shared
//:hello --[private]-->
//:hello_shared1 non-data path found. It is not public.
查看两个目标之间的依赖路径。从上面我们可以看出,//:hello和//:hello_shared是私有依赖的关系,且两者是直接依赖的。
-
gn args --list out
current_cpuCurrent value (from the default) = ""(Internally set; try `gn help current_cpu`.)current_osCurrent value (from the default) = ""(Internally set; try `gn help current_os`.)host_cpuCurrent value (from the default) = "x64"(Internally set; try `gn help host_cpu`.)host_osCurrent value (from the default) = "linux"(Internally set; try `gn help host_os`.)target_cpuCurrent value (from the default) = ""(Internally set; try `gn help target_cpu`.)target_osCurrent value (from the default) = ""(Internally set; try `gn help target_os`.)查看编译过程中的gn参数列表。
-
gn check out
Header dependency check OK查看编译过程中的头文件依赖是否正确。
-
gn format
find . -name "*.gni" -o -name "*.gn"上述命令可以格式化当前文件夹下的所有GN文件,包括.gni文件和.gn文件。
下面是ninja命令测试 在simple_build目录下执行如下指令
-
ninja -C out -v
ninja: Entering directory `out'
[1/6] g++ -MMD -MF obj/libhello_static.hello_static.o.d   -fPIC -pthread  -c ../hello_static.cc -o obj/libhello_static.hello_static.o
[2/6] g++ -MMD -MF obj/libhello_shared.hello_shared.o.d -DHELLO_SHARED_IMPLEMENTATION  -fPIC -pthread  -c ../hello_shared.cc -o obj/libhello_shared.hello_shared.o
[3/6] g++ -MMD -MF obj/hello.hello.o.d   -fPIC -pthread  -c ../hello.cc -o obj/hello.hello.o
[4/6] rm -f obj/libhello_static.a && ar rcs obj/libhello_static.a obj/libhello_static.hello_static.o
[5/6] g++ -shared  -o ./libhello_shared.so -Wl,-soname=libhello_shared.so @libhello_shared.so.rsp
[6/6] g++ -Wl,-rpath=\$ORIGIN/ -Wl,-rpath-link= -o hello -Wl,--start-group @hello.rsp  -Wl,--end-group
该命令可以查看所有编译目标的详细编译命令,可以看出,首先编译出了libhello_static.hello_static.o、libhello_shared.hello_shared.o、hello.hello.o三个目标文件,并将目标文件放在obj文件夹下,最后链接成hello的可执行程序。
-
ninja -t deps
obj/libhello_static.hello_static.o: #deps 2, deps mtime 1681441611760382343 (VALID)../hello_static.cc../hello_static.hobj/libhello_shared.hello_shared.o: #deps 2, deps mtime 1681441611760382343 (VALID)../hello_shared.cc../hello_shared.hobj/hello.hello.o: #deps 3, deps mtime 1681441611768382257 (VALID)../hello.cc../hello_shared.h../hello_static.h查看目标的依赖关系,如obj/libhello_static.hello_static.o目标文件依赖了../hello_static.cc源文件和../hello_static.h头文件。
-
ninja -t targets all
build.ninja: gn
obj/hello.hello.o: cxx
hello: link
obj/libhello_shared.hello_shared.o: cxx
libhello_shared.so: solink
obj/libhello_static.hello_static.o: cxx
obj/libhello_static.a: alink
hello_shared: phony
hello_static: phony
:hello: phony
:hello_shared: phony
:hello_static: phony
all: phony
列出ninja阶段的所有编译目标以及编译使用的工具。
-
ninja -t commands hello
g++ -MMD -MF obj/hello.hello.o.d   -fPIC -pthread  -c ../hello.cc -o obj/hello.hello.o
g++ -MMD -MF obj/libhello_shared.hello_shared.o.d -DHELLO_SHARED_IMPLEMENTATION  -fPIC -pthread  -c ../hello_shared.cc -o obj/libhello_shared.hello_shared.o
g++ -shared  -o ./libhello_shared.so -Wl,-soname=libhello_shared.so @libhello_shared.so.rsp
g++ -MMD -MF obj/libhello_static.hello_static.o.d   -fPIC -pthread  -c ../hello_static.cc -o obj/libhello_static.hello_static.o
rm -f obj/libhello_static.a && ar rcs obj/libhello_static.a obj/libhello_static.hello_static.o
g++ -Wl,-rpath=\$ORIGIN/ -Wl,-rpath-link= -o hello -Wl,--start-group @hello.rsp  -Wl,--end-group
查看编译单个目标的详细编译命令。
第一个hello world
进入out目录,运行hello
