实验目的
掌握SSM框架整合。
实验环境
硬件:PC机
操作系统:Windows
开发工具:idea
实验内容
整合SSM框架。
实验步骤
- 搭建SSM环境:构建web项目,导入需要的jar包,通过单元测试测试各层框架搭建的正确性。
2
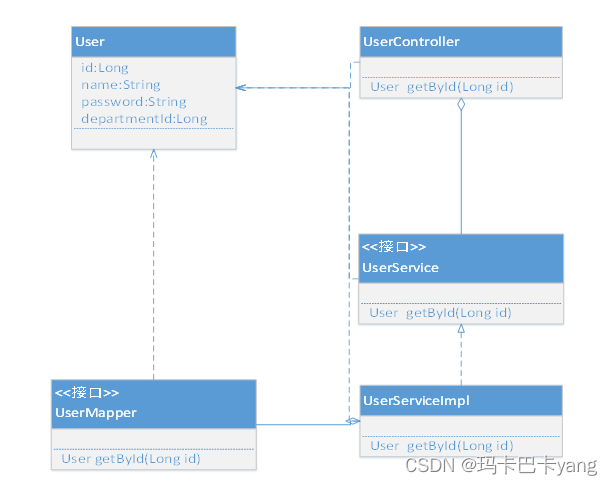
Mapper编写User详情查询;service编写详情查询业务逻辑控制 controller层控制页面的跳转,在详情页面渲染用户详情。
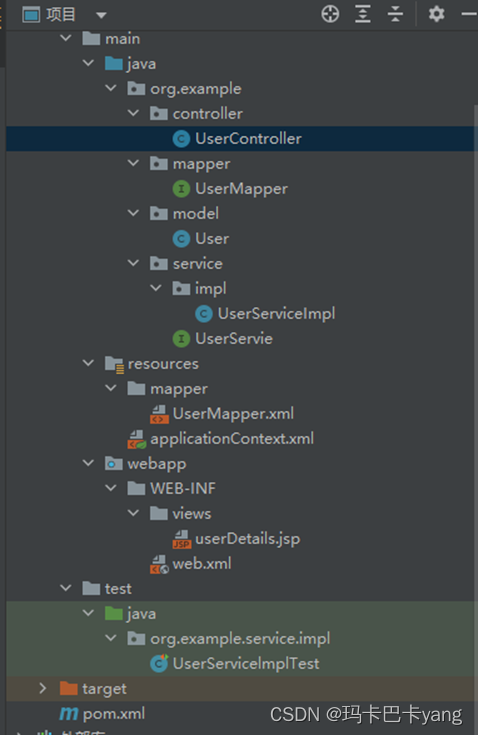
项目结构:
Pom.xml配置文件
注意完成这部分后需要重新加载项目,这里创建了一个maven项目
<?xml version="1.0" encoding="UTF-8"?><project xmlns="http://maven.apache.org/POM/4.0.0" xmlns:xsi="http://www.w3.org/2001/XMLSchema-instance" xsi:schemaLocation="http://maven.apache.org/POM/4.0.0 http://maven.apache.org/xsd/maven-4.0.0.xsd"><modelVersion>4.0.0</modelVersion><groupId>com.example</groupId><artifactId>SpringMVC1</artifactId><version>1.0-SNAPSHOT</version><packaging>war</packaging><properties><maven.compiler.source>8</maven.compiler.source><maven.compiler.target>8</maven.compiler.target></properties><dependencies><!-- Spring核心依赖 --><dependency><groupId>org.springframework</groupId><artifactId>spring-core</artifactId><version>5.3.10</version></dependency><dependency><groupId>org.springframework</groupId><artifactId>spring-context</artifactId><version>5.3.10</version></dependency><dependency><groupId>org.springframework</groupId><artifactId>spring-web</artifactId><version>5.3.10</version></dependency><!-- Spring MVC依赖 --><dependency><groupId>org.springframework</groupId><artifactId>spring-webmvc</artifactId><version>5.3.10</version></dependency><!-- MyBatis依赖 --><dependency><groupId>org.mybatis</groupId><artifactId>mybatis</artifactId><version>3.5.7</version></dependency><dependency><groupId>org.mybatis</groupId><artifactId>mybatis-spring</artifactId><version>2.0.7</version></dependency><!-- 数据库驱动和连接池 --><dependency><groupId>mysql</groupId><artifactId>mysql-connector-java</artifactId><version>8.0.28</version></dependency><dependency><groupId>org.springframework</groupId><artifactId>spring-jdbc</artifactId><version>5.3.10</version></dependency><!-- Servlet API --><dependency><groupId>javax.servlet</groupId><artifactId>javax.servlet-api</artifactId><version>4.0.1</version><scope>provided</scope></dependency><!-- JUnit测试 --><dependency><groupId>junit</groupId><artifactId>junit</artifactId><version>4.13.2</version><scope>test</scope></dependency><dependency><groupId>org.springframework</groupId><artifactId>spring-test</artifactId><version>5.3.10</version><scope>test</scope></dependency></dependencies><build><!-- 加入tomcat插件--><plugins><plugin><groupId>org.apache.tomcat.maven</groupId><artifactId>tomcat7-maven-plugin</artifactId><version>2.2</version><configuration><uriEncoding>utf-8</uriEncoding><port>8080</port> <!-- 访问端口--><!--虚拟项目名--><path>/SSM测试</path> <!-- 访问路径,一般就是你的项目名注意前面有个‘/’--></configuration></plugin></plugins></build></project>
UserController
package org.example.controller;
import org.example.model.User;
import org.example.service.UserServie;
import org.springframework.beans.factory.annotation.Autowired;
import org.springframework.stereotype.Controller;
import org.springframework.web.bind.annotation.PathVariable;
import org.springframework.web.bind.annotation.RequestMapping;
import org.springframework.web.bind.annotation.RequestMethod;
import org.springframework.web.servlet.ModelAndView;@Controller
@RequestMapping("/user")
public class UserController {@Autowiredprivate UserServie userServie;@RequestMapping(value = "/{id}", method = RequestMethod.GET)public ModelAndView getUserById(@PathVariable("id") Long id) {ModelAndView mav = new ModelAndView();User user = userServie.getById(id);// 添加user对象到ModelAndView中mav.addObject("user", user);// 设置视图名称为userDetails,对应userDetails.jsp页面mav.setViewName("userDetails");return mav;}
}
UserMapper
package org.example.mapper;
import org.example.model.User;
public interface UserMapper {User getById(Long id);User getByUsername(String username); // 添加根据username查询的方法
}
User
package org.example.model;
public class User {private Long id;private String username;private String password;private Long departmentId;public User() {}public User(Long id, String username, String password, Long departmentId) {this.id = id;this.username = username;this.password = password;this.departmentId = departmentId;}public Long getId() {return id;}public void setId(Long id) {this.id = id;}public String getusername() {return username;}public void setusername(String username) {this.username = username;}public String getPassword() {return password;}public void setPassword(String password) {this.password = password;}public Long getDepartmentId() {return departmentId;}public void setDepartmentId(Long departmentId) {this.departmentId = departmentId;}
}
UserServiceImpl
package org.example.service.impl;import org.example.mapper.UserMapper;
import org.example.model.User;
import org.example.service.UserServie;
import org.springframework.beans.factory.annotation.Autowired;
import org.springframework.stereotype.Service;@Service
public class UserServiceImpl implements UserServie {@Autowiredprivate UserMapper userMapper;@Overridepublic User getById(Long id) {return userMapper.getById(id);}@Overridepublic User getByUsername(String username) {return userMapper.getByUsername(username);}
}
UserServie
package org.example.service;
import org.example.model.User;
public interface UserServie {User getById(Long id);User getByUsername(String username); // 添加根据username查询的方法声明
}
编写UserMapper.xml
注意:s_user是数据库mydb中的一个数据表
<?xml version="1.0" encoding="UTF-8" ?>
<!DOCTYPE mapperPUBLIC "-//mybatis.org//DTD Mapper 3.0//EN""http://mybatis.org/dtd/mybatis-3-mapper.dtd"><mapper namespace="org.example.mapper.UserMapper"><select id="getById" parameterType="long" resultType="org.example.model.User">SELECT id, username, password, dept_id AS departmentIdFROM  s_userWHERE id = #{id}</select><select id="getByUsername" resultType="org.example.model.User"></select>
</mapper>
编写applicationContext.xml
<?xml version="1.0" encoding="UTF-8"?>
<beans xmlns="http://www.springframework.org/schema/beans"xmlns:context="http://www.springframework.org/schema/context"xmlns:mvc="http://www.springframework.org/schema/mvc"xmlns:xsi="http://www.w3.org/2001/XMLSchema-instance"xsi:schemaLocation="http://www.springframework.org/schema/beanshttp://www.springframework.org/schema/beans/spring-beans.xsdhttp://www.springframework.org/schema/contexthttp://www.springframework.org/schema/context/spring-context.xsdhttp://www.springframework.org/schema/mvchttp://www.springframework.org/schema/mvc/spring-mvc.xsd"><!-- 开启注解扫描 --><context:component-scan base-package="org.example"/><!-- 配置MyBatis数据源(这里要结合具体mysql情况修改) --><bean id="dataSource" class="org.springframework.jdbc.datasource.DriverManagerDataSource"><property name="driverClassName" value="com.mysql.cj.jdbc.Driver"/><property name="url" value="jdbc:mysql://localhost:3306/数据库名"/><property name="username" value="root"/><property name="password" value="root"/></bean><!-- 配置SqlSessionFactory --><bean id="sqlSessionFactory" class="org.mybatis.spring.SqlSessionFactoryBean"><property name="dataSource" ref="dataSource"/><property name="mapperLocations" value="classpath*:mapper/*.xml"/></bean><!-- 扫描MyBatis的Mapper接口 --><bean class="org.mybatis.spring.mapper.MapperScannerConfigurer"><property name="basePackage" value="org.example.mapper"/></bean><!-- 配置事务管理器 --><bean id="transactionManager" class="org.springframework.jdbc.datasource.DataSourceTransactionManager"><property name="dataSource" ref="dataSource"/></bean><!-- 启用注解驱动 --><mvc:annotation-driven/><!-- 配置视图解析器 --><bean class="org.springframework.web.servlet.view.InternalResourceViewResolver"><property name="prefix" value="/WEB-INF/views/"/><property name="suffix" value=".jsp"/></bean>
</beans>
编写user Details.jsp
<%@ page language="java" contentType="text/html; charset=UTF-8" pageEncoding="UTF-8"%>
<!DOCTYPE html>
<html>
<head><meta charset="UTF-8"><title>User Details</title>
</head>
<body>
<h2>User Details</h2>
<table border="1"><tr><th>ID</th><th>Name</th><th>Password</th><th>Department ID</th></tr><tr><td>${user.id}</td><td>${user.username}</td><td>${user.password}</td><td>${user.departmentId}</td></tr>
</table>
</body>
</html>
编写web.xml
<?xml version="1.0" encoding="UTF-8"?>
<web-app xmlns="http://xmlns.jcp.org/xml/ns/javaee"xmlns:xsi="http://www.w3.org/2001/XMLSchema-instance"xsi:schemaLocation="http://xmlns.jcp.org/xml/ns/javaeehttp://xmlns.jcp.org/xml/ns/javaee/web-app_4_0.xsd"version="4.0"><!-- Spring MVC前端控制器 --><servlet><servlet-name>dispatcher</servlet-name><servlet-class>org.springframework.web.servlet.DispatcherServlet</servlet-class><init-param><param-name>contextConfigLocation</param-name><param-value>classpath:applicationContext.xml</param-value></init-param><load-on-startup>1</load-on-startup></servlet><servlet-mapping><servlet-name>dispatcher</servlet-name><url-pattern>/</url-pattern></servlet-mapping>
</web-app>
编写一个测试类用于测试整合情况
UserServicelmplTest.java
package org.example.service.impl;import org.example.model.User;
import org.example.service.UserServie;
import org.junit.Test;
import org.junit.runner.RunWith;
import org.springframework.beans.factory.annotation.Autowired;
import org.springframework.test.context.ContextConfiguration;
import org.springframework.test.context.junit4.SpringJUnit4ClassRunner;
import static org.junit.Assert.*;@RunWith(SpringJUnit4ClassRunner.class)
@ContextConfiguration(locations = {"classpath:applicationContext.xml"})
public class UserServicelmplTest {@Autowiredprivate UserServie userService;@Testpublic void testGetById() {Long userId = 11L;User user = userService.getById(userId);assertNotNull("The user should not be null", user);assertEquals("The user ID should match the expected ID", userId, user.getId());System.out.println("Retrieved user: " + user.toString());}
}
测试结果

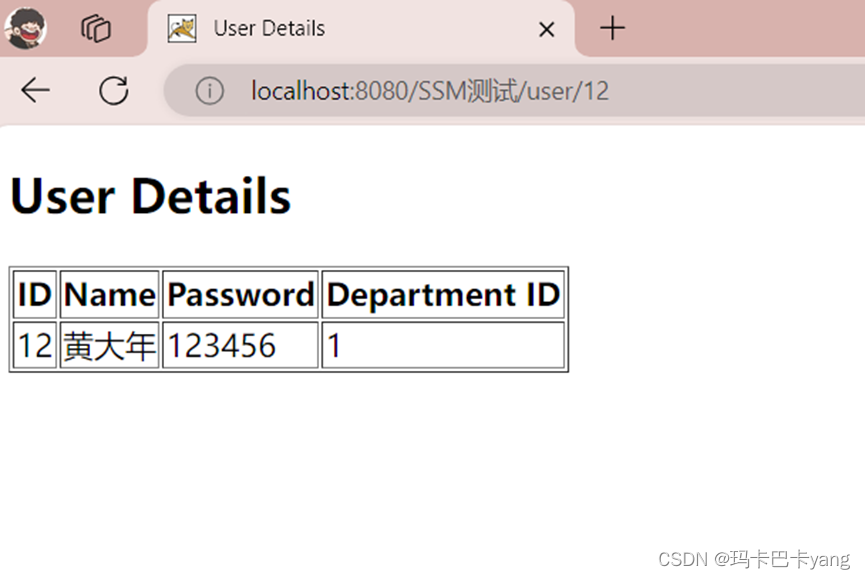
运行效果
部署本地后在本地浏览器的运行地址为:localhost:8080/SSM测试/user/12,其中12为响应的id