文章目录
- 一、概述
- 1、什么是Helm
- 2、特点
- 3、工作流程
- 4、核心概念
- 二、安装Helm
- 1、二进制版本安装
- 1.1、下载需要的版本
- 1.2、解压
- 1.3、将helm移动到指定路径
- 1.4、验证
- 三、Helm安装资源顺序
- 四、`--set` 的格式和限制
- 1、最简单的name/value对
- 2、多个name/value对
- 3、更复杂的表达式
- 4、列表的表达
- 5、name/key可以设置为`null`或者空数组
- 6、使用数组下标的语法来访问列表中的元素
- 7、多个值得数组下标语法
- 8、特殊字符转义
- 9、转义.
- 五、values文件
- 六、实例
- 1、创建Chart
- 1.1、在本地创建一个wordpress的Chart
- 1.2、查看目录结构
- 2、编辑Chart配置
- 2.1、Chart.yaml
- 2.2、values.yaml
- 2.3、templates
- 3、打包Chart
- 4、发布Chart
- 5、安装Release
- 6、查看当前运行的Release列表
- 7、升级版本
- 7.1、格式
- 7.2、指定'--values'/'-f'参数
- 7.3、指定'--set'参数
- 7.4、修改nginx镜像版本为1.27.0
- 8、回滚
- 8.1、查看发布历史
- 8.2、回滚到第一个版本
- 9、删除Chart
- 七、查询Helm命令的帮助信息
一、概述
1、什么是Helm
Helm是Kubernetes的一个包管理工具,它为Kubernetes提供了一种管理和标准化的部署方式。在Kubernetes生态系统中,Helm扮演着类似于我们在 Ubuntu 中使用的apt、Centos中使用的 yum 或者Python中的 pip 一样,它使用户能够轻松地查找、共享和重复使用复杂的容器化应用程序部署配置。
Helm的核心概念是图表(Chart),这是一个封装了完整Kubernetes应用的软件包。一个Helm图表通常包含一组Kubernetes资源模板,比如Deployment、Service、ConfigMap等,以及用于定制这些资源的参数文件。通过这种方式,Helm图表可以作为可重用的应用程序模板,允许用户在不同的环境和需求下灵活地部署和管理复杂的应用程序。
2、特点
- 简化部署 :Helm允许使用单个命令轻松部署和管理应用程序,从而简化了整个部署过程;
- 高度可配置:Helm Charts提供了高度可配置的选项,可以轻松自定义和修改应用程序的部署配置;
- 版本控制 :Helm允许管理应用程序的多个版本,从而轻松实现版本控制和回滚;
- 模板化:Helm Charts使用YAML模板来定义Kubernetes对象的配置,从而简化了配置过程,并提高了可重复性和可扩展性;
- 应用程序库:Helm具有应用程序库的概念,可以轻松地共享和重用Helm Charts,从而简化了多个应用程序的部署和管理;
- 插件系统:Helm拥有一个强大的插件系统,允许您扩展和定制Helm的功能,以满足特定的需求和要求。
3、工作流程
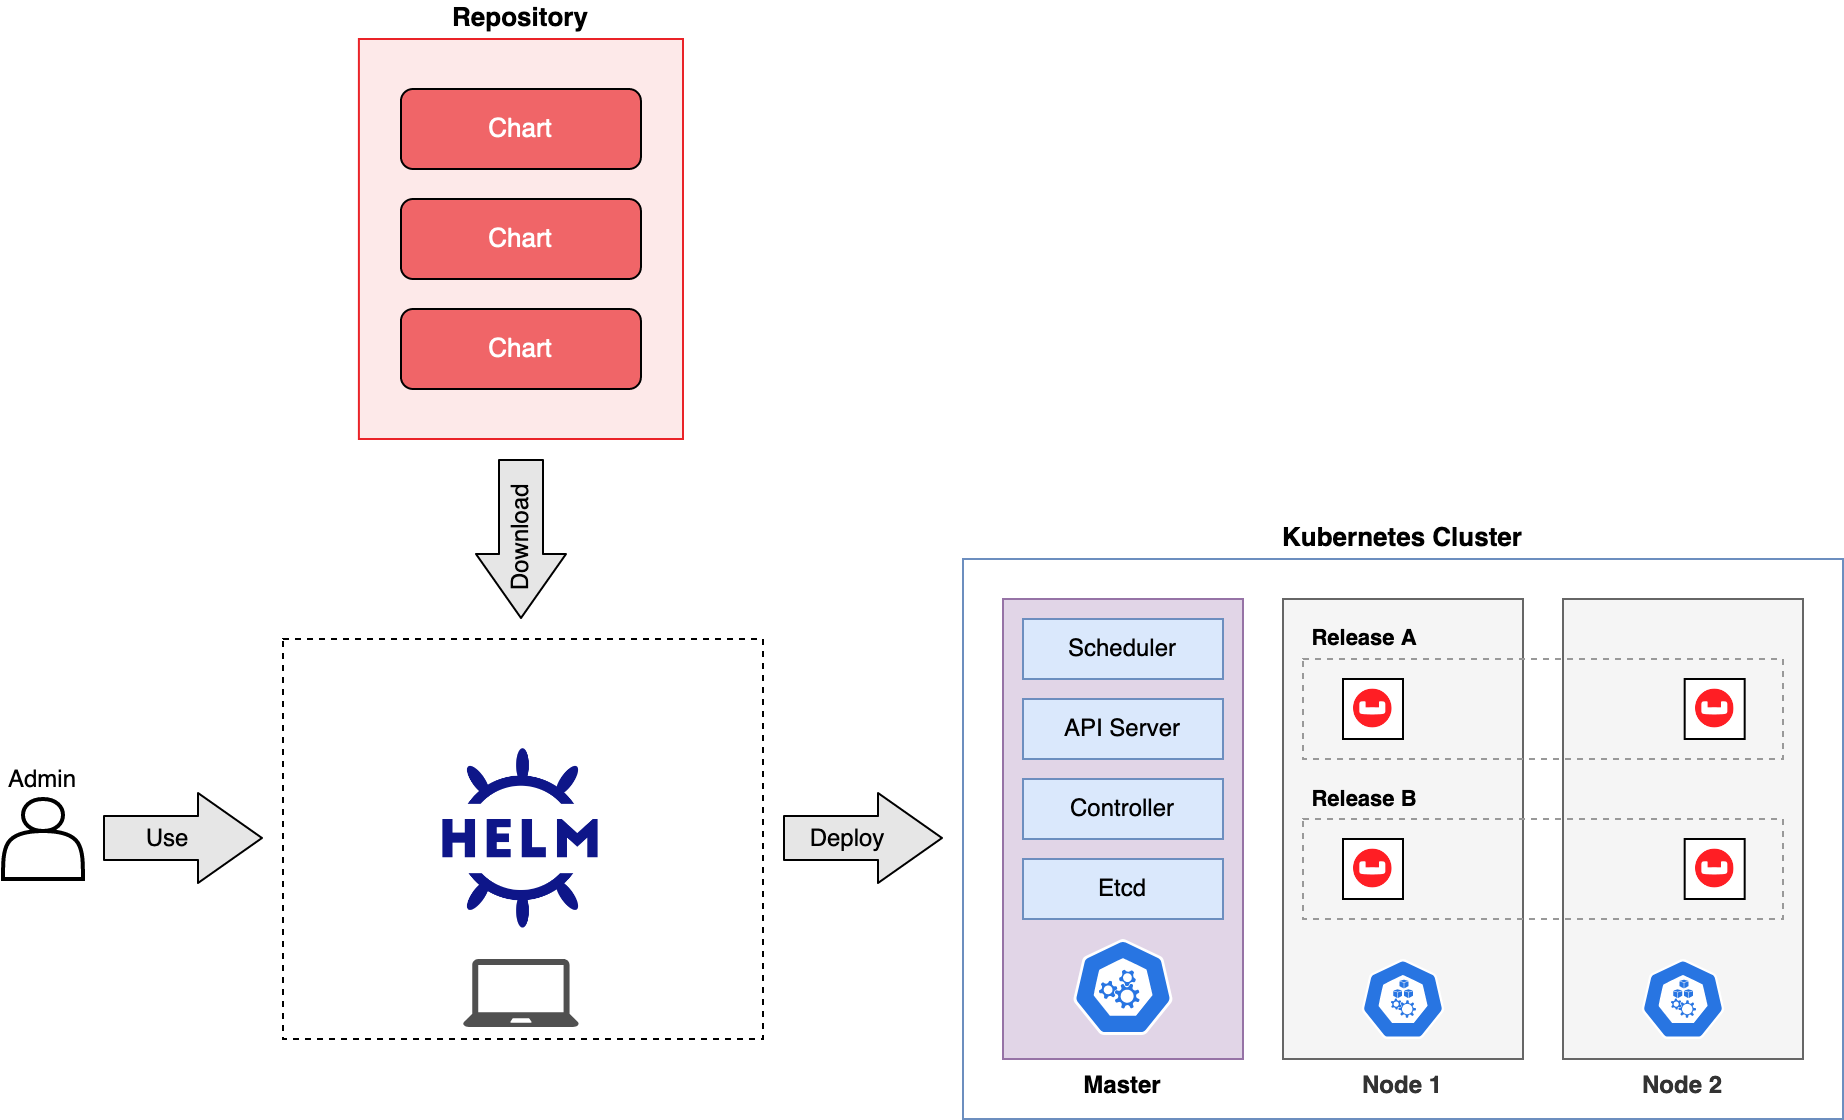
这里使用的是Helm的v3版本,该版本没有了
tiller并并使用更加简单和灵活的架构,直接通过kubeconfig连接apiserver,简化安全模块

- 开发者首先创建并编辑chart的配置;
- 接着打包并发布至Helm的仓库(Repository);
- 当管理员使用helm命令安装时,相关的依赖会从仓库下载;
- 接着helm会根据下载的配置部署资源至k8s;
4、核心概念
| 概念 | 描述 |
|---|---|
| Chart | Chart是Helm的基本单位,它是一个打包好的Kubernetes应用模板集合,包含了一组Kubernetes资源的描述文件(如Deployment、Service、ConfigMap等)。Chart还包括一个Chart.yaml文件,用于描述Chart的元数据,如版本、描述、维护者等。Chart还包含一个values.yaml文件,用于存储默认的可配置参数。 |
| Repository | Repository是一个存储和分发Helm Charts的地方。Charts可以被上传到仓库,供用户搜索、下载和安装。Helm支持多种类型的仓库,包括本地文件系统、HTTP服务器或专用的Helm仓库服务。仓库通常包含一个索引文件,列出所有可用的Charts及其版本。 |
| Release | Release是指使用Helm安装Chart到Kubernetes集群上的一次实例化操作。每次使用helm install命令安装Chart时,都会创建一个新的Release。Release有自己的名称,且在同一个命名空间内必须唯一。通过Release,用户可以追踪和管理部署的应用实例。 |
| Values | Values是Helm用来参数化Chart的方式。Chart中可能包含多个values.yaml文件,它们用于存储可以由用户修改的变量。在安装Chart时,用户可以通过传递额外的值或覆盖默认值来定制部署。Values的合并遵循一定的规则,以确定最终的配置。 |
| Template | Templates是Chart中用于生成Kubernetes资源定义的文件。它们使用Go模板语言编写,可以包含变量、条件和循环等结构。在安装Chart时,Helm会渲染这些模板,并根据提供的值生成具体的Kubernetes资源定义。 |
| Tiller | Tiller是Helm的服务器端组件,负责接收来自Helm客户端的请求,并在Kubernetes集群上执行相应的操作。在早期版本的Helm中,Tiller作为一个守护进程运行在Kubernetes集群中。但在Helm 3中,Tiller已被移除,Helm 3采用了无守护进程的设计,所有操作都在客户端执行,与Kubernetes API Server直接通信。 |
| rollback | 回滚,每一次发布会更新chart或者配置。当生成发布历史后,一次发布也可以被 rolled back 之前的发布版本号。 回滚使用 helm rollback 命令实现。 |
二、安装Helm
本篇只介绍二进制安装,其他的安装教程:
Helm | 安装Helm
1、二进制版本安装
1.1、下载需要的版本
Helm-GitHub
1.2、解压
tar -zxvf helm-v3.15.2-linux-amd64.tar
1.3、将helm移动到指定路径
mv linux-amd64/helm /usr/local/bin/helm
1.4、验证
helm version

三、Helm安装资源顺序
- Namespace
- NetworkPolicy
- ResourceQuota
- LimitRange
- PodSecurityPolicy
- PodDisruptionBudget
- ServiceAccount
- Secret
- SecretList
- ConfigMap
- StorageClass
- PersistentVolume
- PersistentVolumeClaim
- CustomResourceDefinition
- ClusterRole
- ClusterRoleList
- ClusterRoleBinding
- ClusterRoleBindingList
- Role
- RoleList
- RoleBinding
- RoleBindingList
- Service
- DaemonSet
- Pod
- ReplicationController
- ReplicaSet
- Deployment
- HorizontalPodAutoscaler
- StatefulSet
- Job
- CronJob
- Ingress
- APIService
四、--set 的格式和限制
--set选项使用0或多个 name/value 对
1、最简单的name/value对
--set name=value
等价于
name: value
2、多个name/value对
--set a=b,c=d
等价于
a: b
c: d
3、更复杂的表达式
--set outer.inner=value
等价于
outer:inner: value
4、列表的表达
--set name={a, b, c}
等价于
name:- a- b- c
5、name/key可以设置为null或者空数组
--set name=[],a=null
由
name:- a- b- c
a: b
变为了
name: []
a: null
6、使用数组下标的语法来访问列表中的元素
从 2.5.0 版本开始支持
--set servers[0].port=80
等价于
servers:- port: 80
7、多个值得数组下标语法
--set servers[0].port=80,servers[0].host=example
等价于
servers:- port: 80host: example
8、特殊字符转义
--set name=value1\,value2
等价于
name: "value1,value2"
9、转义.
--set nodeSelector."kubernetes\.io/role"=master
等价于
nodeSelector:kubernetes.io/role: master
五、values文件
优先级为
values.yaml最低,--set参数最高。
对应的官网链接
六、实例
1、创建Chart
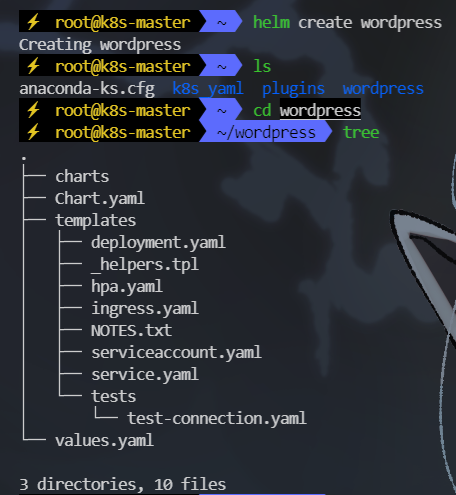
1.1、在本地创建一个wordpress的Chart
helm create wordpress

1.2、查看目录结构
cd wordpresstree

2、编辑Chart配置
2.1、Chart.yaml
Chart.yaml包含Chart的元数据和依赖项
- 各字段解释
apiVersion: chart API 版本 (必需)  #必须有
name: chart名称 (必需)     # 必须有
version: 语义化2 版本(必需) # 必须有kubeVersion: 兼容Kubernetes版本的语义化版本(可选)
description: 一句话对这个项目的描述(可选)
type: chart类型 (可选)
keywords:- 关于项目的一组关键字(可选)
home: 项目home页面的URL (可选)
sources:- 项目源码的URL列表(可选)
dependencies: # chart 必要条件列表 (可选)- name: chart名称 (nginx)version: chart版本 ("1.2.3")repository: (可选)仓库URL ("https://example.com/charts") 或别名 ("@repo-name")condition: (可选) 解析为布尔值的yaml路径,用于启用/禁用chart (e.g. subchart1.enabled )tags: # (可选)- 用于一次启用/禁用 一组chart的tagimport-values: # (可选)- ImportValue 保存源值到导入父键的映射。每项可以是字符串或者一对子/父列表项alias: (可选) chart中使用的别名。当你要多次添加相同的chart时会很有用maintainers: # (可选) # 可能用到- name: 维护者名字 (每个维护者都需要)email: 维护者邮箱 (每个维护者可选)url: 维护者URL (每个维护者可选)icon: 用做icon的SVG或PNG图片URL (可选)
appVersion: 包含的应用版本(可选)。不需要是语义化,建议使用引号
deprecated: 不被推荐的chart (可选,布尔值)
annotations:example: 按名称输入的批注列表 (可选)
从 v3.3.2,不再允许额外的字段。推荐的方法是在 annotations 中添加自定义元数据。
- 编写我们自己的Chart.yaml
name: nginx-helm
apiVersion: v1
version: 1.0.0
2.2、values.yaml
values文件被定义为YAML格式。chart会包含一个默认的values.yaml文件。 Helm安装命令允许用户使用附加的YAML values覆盖这个values:
helm install --generate-name --values=myvals.yaml wordpress
- 各字段解释
# Default values for wordpress.
# This is a YAML-formatted file.
# Declare variables to be passed into your templates.replicaCount: 1	#控制部署的Pod副本数量,默认为1。这适用于StatefulSet或Deployment类型的Kubernetes资源。image:	#用于配置容器镜像的相关信息repository: nginx	#镜像仓库地址。pullPolicy: IfNotPresent	#拉取镜像的策略,可以是Always, IfNotPresent, 或 Never。# Overrides the image tag whose default is the chart appVersion.tag: ""	#镜像的标签,如果没有指定,则默认使用Chart的版本。imagePullSecrets: []	#列出拉取私有镜像所需的密钥名称。
nameOverride: ""
fullnameOverride: ""	#用于覆盖生成的资源名称的部分或全部。serviceAccount:	#配置服务账户的选项。# Specifies whether a service account should be createdcreate: true	#是否自动创建服务账户。# Automatically mount a ServiceAccount's API credentials?automount: true	#是否自动挂载服务账户的API凭证。# Annotations to add to the service accountannotations: {}	#附加到服务账户的注解。# The name of the service account to use.# If not set and create is true, a name is generated using the fullname templatename: ""	#使用的服务账户名称。podAnnotations: {}	#附加到Pod的注解。
podLabels: {}	#附加到Pod的标签。podSecurityContext: {}	# fsGroup: 2000securityContext: {}	#定义Pod和容器的安全上下文。# capabilities:#   drop:#   - ALL# readOnlyRootFilesystem: true# runAsNonRoot: true# runAsUser: 1000service:	#配置Service资源type: ClusterIP	#Service的类型,例如ClusterIP, NodePort, LoadBalancer等。port: 80	#Service监听的端口。ingress:	#Ingress资源的配置。enabled: false	#是否启用Ingress。className: ""	#Ingress控制器的类名。annotations: {}	#附加到Ingress的注解。# kubernetes.io/ingress.class: nginx# kubernetes.io/tls-acme: "true"hosts:	#定义Ingress的主机名和路径。- host: chart-example.localpaths:- path: /pathType: ImplementationSpecifictls: []	# TLS配置。#  - secretName: chart-example-tls#    hosts:#      - chart-example.localresources: {}	#Pod的资源限制和请求。# We usually recommend not to specify default resources and to leave this as a conscious# choice for the user. This also increases chances charts run on environments with little# resources, such as Minikube. If you do want to specify resources, uncomment the following# lines, adjust them as necessary, and remove the curly braces after 'resources:'.# limits:#   cpu: 100m#   memory: 128Mi# requests:#   cpu: 100m#   memory: 128MilivenessProbe:	httpGet:path: /port: http
readinessProbe:	#定义容器的存活探针和就绪探针,用于健康检查。httpGet:path: /port: httpautoscaling:	 #水平自动扩缩容的配置。enabled: falseminReplicas: 1maxReplicas: 100targetCPUUtilizationPercentage: 80# targetMemoryUtilizationPercentage: 80# Additional volumes on the output Deployment definition.
volumes: []
# - name: foo
#   secret:
#     secretName: mysecret
#     optional: false# Additional volumeMounts on the output Deployment definition.
volumeMounts: []	#Pod的卷和卷挂载配置。
# - name: foo
#   mountPath: "/etc/foo"
#   readOnly: truenodeSelector: {}	#选择运行Pod的节点的标签。tolerations: []	#允许Pod容忍节点的污点。affinity: {}	#节点亲和性和反亲和性配置,用于控制Pod在哪些节点上运行。
- 编写我们自己的values.yaml
image:repository: nginxtag: latest
2.3、templates
在模板中引入values.yaml里的配置,在模板文件中可以通过 .VAlues对象访问到
deployment.yaml
apiVersion: apps/v1
kind: Deployment
metadata:name: nginx-helm-{{ .Values.image.repository }}
spec:replicas: 1selector:matchLabels:app: nginx-helmtemplate:metadata:labels:app: nginx-helmspec:containers:- name: nginx-helmimage: {{ .Values.image.repository }}:{{ .Values.image.tag }}ports:- containerPort: 80protocol: TCP
3、打包Chart
使用helm package命令将Chart打包为一个tarball文件
helm package wordpress/

这将生成一个名为
nginx-helm-1.0.0.tgz的tarball文件。
4、发布Chart
将打包好的Chart发布到一个Helm Repository中。可以使用helm repo add命令添加一个Repository,然后使用helm push命令将Chart推送到Repository中
helm repo add myrepo https://example.com/charts
helm push nginx-helm-1.0.0.tgz myrepo
5、安装Release
使用helm install命令安装Chart的Release,可以通过命令行选项或指定values.yaml文件来配置Release
helm install my-nginx ./nginx-helm-1.0.0.tgz

6、查看当前运行的Release列表
helm list 与 helm ls 命令执行的效果是一致的
helm list
helm ls

7、升级版本
7.1、格式
helm upgrade [RELEASE] [CHART] [flags]
7.2、指定’–values’/'-f’参数
可以多次指定’–values’/'-f’参数,最后(最右边)指定的文件优先级最高。比如如果myvalues.yaml和override.yaml同时包含了名为 'Test’的key,override.yaml中的设置会优先使用:
helm upgrade -f myvalues.yaml -f override.yaml redis ./redis
7.3、指定’–set’参数
可以多次指定’–set’参数,最后(最右边)指定的优先级最高。比如’bar’ 和 'newbar’都设置了一个名为’foo’的可以, 'newbar’的值会优先使用:
helm upgrade --set foo=bar --set foo=newbar redis ./redis
7.4、修改nginx镜像版本为1.27.0
helm upgrade my-nginx nginx-helm-1.0.0.tgz --set image.tag=1.27.0

kubectl get podskubectl get pods nginx-helm-nginx-5b97c9f87d-ggbgw -o yaml | grep image

8、回滚
8.1、查看发布历史
helm history my-nginx

8.2、回滚到第一个版本
helm rollback my-nginx 1

kubectl get pods kubectl get pods nginx-helm-nginx-868dbb969-p9k5t -o yaml | grep image

9、删除Chart
helm uninstall my-nginx

七、查询Helm命令的帮助信息
helm --help
The Kubernetes package managerCommon actions for Helm:- helm search:    search for charts
- helm pull:      download a chart to your local directory to view
- helm install:   upload the chart to Kubernetes
- helm list:      list releases of chartsEnvironment variables:| Name                               | Description                                                                                                |
|------------------------------------|------------------------------------------------------------------------------------------------------------|
| $HELM_CACHE_HOME                   | set an alternative location for storing cached files.                                                      |
| $HELM_CONFIG_HOME                  | set an alternative location for storing Helm configuration.                                                |
| $HELM_DATA_HOME                    | set an alternative location for storing Helm data.                                                         |
| $HELM_DEBUG                        | indicate whether or not Helm is running in Debug mode                                                      |
| $HELM_DRIVER                       | set the backend storage driver. Values are: configmap, secret, memory, sql.                                |
| $HELM_DRIVER_SQL_CONNECTION_STRING | set the connection string the SQL storage driver should use.                                               |
| $HELM_MAX_HISTORY                  | set the maximum number of helm release history.                                                            |
| $HELM_NAMESPACE                    | set the namespace used for the helm operations.                                                            |
| $HELM_NO_PLUGINS                   | disable plugins. Set HELM_NO_PLUGINS=1 to disable plugins.                                                 |
| $HELM_PLUGINS                      | set the path to the plugins directory                                                                      |
| $HELM_REGISTRY_CONFIG              | set the path to the registry config file.                                                                  |
| $HELM_REPOSITORY_CACHE             | set the path to the repository cache directory                                                             |
| $HELM_REPOSITORY_CONFIG            | set the path to the repositories file.                                                                     |
| $KUBECONFIG                        | set an alternative Kubernetes configuration file (default "~/.kube/config")                                |
| $HELM_KUBEAPISERVER                | set the Kubernetes API Server Endpoint for authentication                                                  |
| $HELM_KUBECAFILE                   | set the Kubernetes certificate authority file.                                                             |
| $HELM_KUBEASGROUPS                 | set the Groups to use for impersonation using a comma-separated list.                                      |
| $HELM_KUBEASUSER                   | set the Username to impersonate for the operation.                                                         |
| $HELM_KUBECONTEXT                  | set the name of the kubeconfig context.                                                                    |
| $HELM_KUBETOKEN                    | set the Bearer KubeToken used for authentication.                                                          |
| $HELM_KUBEINSECURE_SKIP_TLS_VERIFY | indicate if the Kubernetes API server's certificate validation should be skipped (insecure)                |
| $HELM_KUBETLS_SERVER_NAME          | set the server name used to validate the Kubernetes API server certificate                                 |
| $HELM_BURST_LIMIT                  | set the default burst limit in the case the server contains many CRDs (default 100, -1 to disable)         |
| $HELM_QPS                          | set the Queries Per Second in cases where a high number of calls exceed the option for higher burst values |Helm stores cache, configuration, and data based on the following configuration order:- If a HELM_*_HOME environment variable is set, it will be used
- Otherwise, on systems supporting the XDG base directory specification, the XDG variables will be used
- When no other location is set a default location will be used based on the operating systemBy default, the default directories depend on the Operating System. The defaults are listed below:| Operating System | Cache Path                | Configuration Path             | Data Path               |
|------------------|---------------------------|--------------------------------|-------------------------|
| Linux            | $HOME/.cache/helm         | $HOME/.config/helm             | $HOME/.local/share/helm |
| macOS            | $HOME/Library/Caches/helm | $HOME/Library/Preferences/helm | $HOME/Library/helm      |
| Windows          | %TEMP%\helm               | %APPDATA%\helm                 | %APPDATA%\helm          |Usage:helm [command]Available Commands:completion  generate autocompletion scripts for the specified shellcreate      create a new chart with the given namedependency  manage a chart's dependenciesenv         helm client environment informationget         download extended information of a named releasehelp        Help about any commandhistory     fetch release historyinstall     install a chartlint        examine a chart for possible issueslist        list releasespackage     package a chart directory into a chart archiveplugin      install, list, or uninstall Helm pluginspull        download a chart from a repository and (optionally) unpack it in local directorypush        push a chart to remoteregistry    login to or logout from a registryrepo        add, list, remove, update, and index chart repositoriesrollback    roll back a release to a previous revisionsearch      search for a keyword in chartsshow        show information of a chartstatus      display the status of the named releasetemplate    locally render templatestest        run tests for a releaseuninstall   uninstall a releaseupgrade     upgrade a releaseverify      verify that a chart at the given path has been signed and is validversion     print the client version informationFlags:--burst-limit int                 client-side default throttling limit (default 100)--debug                           enable verbose output-h, --help                            help for helm--kube-apiserver string           the address and the port for the Kubernetes API server--kube-as-group stringArray       group to impersonate for the operation, this flag can be repeated to specify multiple groups.--kube-as-user string             username to impersonate for the operation--kube-ca-file string             the certificate authority file for the Kubernetes API server connection--kube-context string             name of the kubeconfig context to use--kube-insecure-skip-tls-verify   if true, the Kubernetes API server's certificate will not be checked for validity. This will make your HTTPS connections insecure--kube-tls-server-name string     server name to use for Kubernetes API server certificate validation. If it is not provided, the hostname used to contact the server is used--kube-token string               bearer token used for authentication--kubeconfig string               path to the kubeconfig file-n, --namespace string                namespace scope for this request--qps float32                     queries per second used when communicating with the Kubernetes API, not including bursting--registry-config string          path to the registry config file (default "/root/.config/helm/registry/config.json")--repository-cache string         path to the file containing cached repository indexes (default "/root/.cache/helm/repository")--repository-config string        path to the file containing repository names and URLs (default "/root/.config/helm/repositories.yaml")Use "helm [command] --help" for more information about a command.
