常见的触发更新的方式
- 创建 React 应用的根对象
ReactDOM.creatRoot().render(); - 类组件
this.setState(); - 函数组件
useState useEffect;
我们希望实现一套统一的更新机制,他的特点是:
- 兼容上述触发更新的方式
- 方便后续拓展(优先级机制)
更新机制的组成部分
- 代表更新的数据结构
Update - 消费update的数据结构——
UpdateQueue

实现 Update 和 UpdateQueue
在 packages/react-reconciler/src/ 目录下新建 updateQueue.ts 文件:
 // packages/react-reconciler/src/updateQueue.ts
import { Action } from '@/shared/ReactTypes'
import { Update } from './fiberFlags'export interface Update<State> {action: Action<State>
}export interface UpdateQueue<State> {shared: {pending: Update<State> | null}
}/** 创建 Update */
export const createUpdate = <State>(action: Action<State>): Update<State> => {return {action,}
}/** 创建 UpdateQueue */
export const createUpdateQueue = <Action>() => {return {shared: {pending: null,},} as UpdateQueue<Action>
}/** updateQueue添加update */
export const enqueueUpdate = <Action>(updateQueue: UpdateQueue<Action>,update: Update<Action>
) => {updateQueue.shared.pending = update
}/** updateQueue消费update */
export const processUpdateQueue = <State>(baseState: State, // 初始状态pendingUpdate: Update<State> | null // 要消费的Update
): { memoizedState: State } => {const result: ReturnType<typeof processUpdateQueue<State>> = {memoizedState: baseState,}if (pendingUpdate !== null) {const action = pendingUpdate.actionif (action instanceof Function) {// baseState:1, update:(x)=>4*x  ——> memoizedState:4result.memoizedState = action(baseState)} else {// baseState:1, update:2  ——>  memoizedState:2result.memoizedState = action}}return result
}
 // packages/shared/ReactTypes.ts
// .../** useState支持的两种dispatch参数 */
export type Action<State> = State | ((prevState: State) => State)
实现触发更新
接下来的工作包括:
- 实现
ReactDOM.createRoot().render()时调用的API - 将该API接入上述更新机制中
需要考虑的事情:
- 更新可能发生于任意组件,而更新流程是从根节点递归
- 需要一个统一的根节点保存通用信息

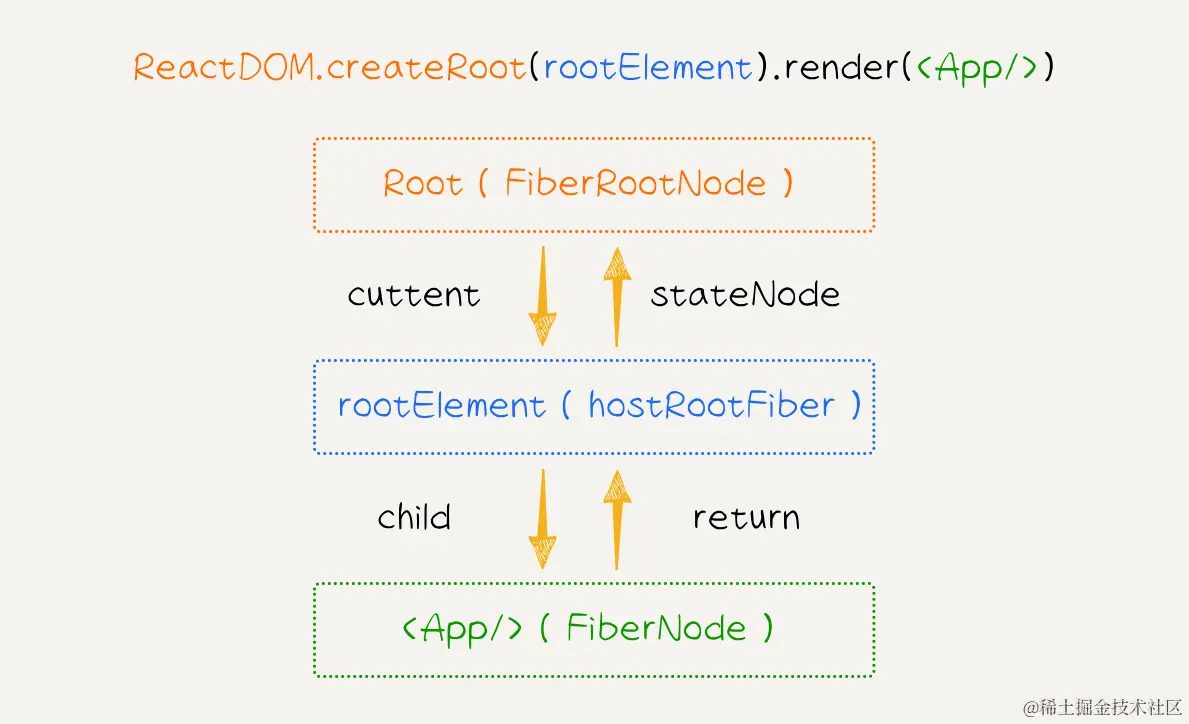
ReactDOM.createRoot()函数生成一个新的Root对象,它在源码中是FiberRootNode类型,充当了 React 应用的根节点。rootElement则是要渲染到的 DOM 节点,它在源码中是hostRootFiber类型,作为 React 应用的根 DOM 节点。render()方法将组件<App/>渲染到根节点上。在这个过程中,React 会创建一个代表<App/>组件的FiberNode,并将其添加到Root对象的 Fiber 树上。
实现 FiberRootNode
根据上图,我们先来实现 FiberRootNode 类型:
 // packages/react-reconciler/src/fiber.ts// ...
export class FiberRootNode {container: Container  // 保存挂载节点 FiberRootNodecurrent: FiberNode // 指向 hostRootFiberfinishedWork: FiberNode | null // 最后递归完成的 fiberconstructor(container: Container, hostRootFiber: FiberNode) {this.container = containerthis.current = hostRootFiberhostRootFiber.stateNode = thisthis.finishedWork = null}
}
实现 render 调用的 API
接着我们来实现 ReactDOM.createRoot().render() 过程中调用的 API:
- createContainer 函数: 用于创建一个新的容器(container),该容器包含了 React 应用的根节点以及与之相关的一些配置信息。
createContainer函数会创建一个新的Root对象,该对象用于管理整个 React 应用的状态和更新。 - updateContainer 函数: 用于更新已经存在的容器中的内容。在内部,
updateContainer函数会调用scheduleUpdateOnFiber等方法,通过 Fiber 架构中的协调更新过程,将新的 React 元素(element)渲染到容器中,并更新整个应用的状态。
新建文件 fiberReconciler.ts,里面有 createContainer 和 updateContainer 两个函数
import { Container } from 'hostConfig'
import { FiberNode, FiberRootNode } from './fiber'
import { HostRoot } from './workTags'
import {UpdateQueue,createUpdate,createUpdateQueue,enqueueUpdate,
} from './updateQueue'
import { ReactElementType } from 'shared/ReactTypes'export function createContainer(container: Container) {// 1.新建 hostRootFiberconst hostRootFiber = new FiberNode(HostRoot, {}, null)// 2.新建 fiberRootNodeconst root = new FiberRootNode(container, hostRootFiber)// 3.初始化hostRootFiber的updateQueuehostRootFiber.updateQueue = createUpdateQueue()return root
}export function updateContainer(element: ReactElementType | null,root: FiberRootNode
) {// 1.获取 hostRootFiberconst hostRootFiber = root.current// 2.新建 updateconst update = createUpdate<ReactElementType | null>(element)// 3.将该 update 插入到 hostRootFiber的updateQueue中enqueueUpdate(hostRootFiber.updateQueue as UpdateQueue<ReactElementType | null>,update)return element
}
实现在 updateContainer后进入wordLoop更新流程
将updateContainer方法与wordLoop的renderRoot更新流程连接:
在 workLoop.ts 文件中实现 scheduleUpdateOnFiber函数:
/** 实现在 updateContainer后进入wordLoop更新流程 */
export function scheduleUpdateOnFiber(fiber: FiberNode) {// TODO 调度功能// 先找到触发更新节点的根节点const root = markUpdateFromFiberToRoot(fiber)// 然后执行 renderRootrenderRoot(root)
}
然后在updateContainer中执行scheduleUpdateOnFiber(hostRootFiber)
export function updateContainer(element: ReactElementType | null,root: FiberRootNode
) {// ...// 进入wordLoop更新流程scheduleUpdateOnFiber(hostRootFiber)return element
}
另外,在上一节中,我们在实现 prepareFreshStack 函数时,直接将 root 作为参数赋值给了 workInProgress,但现在我们知道了,root 其实是 FiberRootNode 类型的,不能直接赋值给 FiberNode 类型的 workInProgress,所以需要写一个 createWorkInProgress 函数处理一下:
// fiber.ts
/** 创建 WorkInProgress*/
export const createWorkInProgress = (current: FiberNode,pendingProps: Props
): FiberNode => {let wip = current.alternateif (wip === null) {// mountwip = new FiberNode(current.tag, pendingProps, current.key)wip.stateNode = current.stateNodewip.alternate = currentcurrent.alternate = wip} else {// updatewip.pendingProps = pendingPropswip.flags = NoFlags // 清除副作用}wip.type = current.typewip.updateQueue = current.updateQueuewip.children = current.childrenwip.memoizedProps = current.memoizedPropswip.memoizedState = current.memoizedStatereturn wip
}
然后更新wordLoop初始化:
// workLoop.ts
/** 初始化 */
function prepareFreshStack(root: FiberRootNode) {workInProgress = createWorkInProgress(root.current, {})
}
至此,我们已经实现了 React 应用在首次渲染或后续更新时的大致更新流程,一起来回顾一下:
- 首先,我们通过
createContainer函数创建了 React 应用的根节点FiberRootNode,并将其与 DOM 节点(hostFiberRoot)连接起来;
- 然后,通过
updateContainer函数创建了一个更新(update),并将其加入到更新队列(updateQueue)中,启动了首屏渲染或后续更新的机制; - 接着会调用
scheduleUpdateOnFiber函数开始调度更新,从触发更新的节点开始向上遍历,直到达到根节点FiberRootNode; - 接着会调用
renderRoot函数,初始化workInProgress变量,生成与hostRootFiber对应的workInProgress; - 接着就开始
Reconciler的更新流程,即workLoop函数,对 Fiber 树进行深度优先遍历(DFS); - 在向下遍历阶段会调用
beginWork方法,在向上返回阶段会调用completeWork方法,这两个方法负责 Fiber 节点的创建、更新和处理,具体实现会在下一节会讲到。