简介
repmgr 由 EDB 与其他个人和组织的贡献一起开发,安装部署相对较为简单
安装
repmgr官网上传对应的安装到服务器上
安装前/etc/hosts IP映射、始终同步、免密通信本文忽略
repmgr的安装相对较为简单,目前repmgr-5仅仅支持到postgresql-15
postgresql必要参数配置
shared_preload_libraries = 'repmgr'
wal_log_hints = on
synchronous_standby_names = '*'
archive_mode = on
archive_command = 'test ! -f /home/postgres/archivedir/%f && cp %p /home/postgres/archivedir/%f'
安装必要依赖
yum install -y 	flex libselinux-devel libxml2-devel libxslt-devel openssl-devel pam-devel readline-devel
# 或使用以下指令sudo yum check-update -ysudo yum groupinstall "Development Tools" -ysudo yum install yum-utils openjade docbook-dtds docbook-style-dsssl docbook-style-xsl -ysudo yum-builddep postgresql96 -y
# 安装repmgr
tar -zxvf repmgr-5.4.1.tar.gz
cd repmgr-5.4.1/
./configure && make install
# 数据库创建repmgr数据库createuser -s repmgrcreatedb repmgr -O repmgr
# 修改repmgr用户的seach_path
ALTER USER repmgr SET search_path TO repmgr, "$user", public;#  配置repmgr配置项目node_id=134
node_name='vm134'
conninfo='host=vm134 user=repmgr dbname=repmgr'
data_directory='/home/postgres/pg/data'
replication_user='repmgr'
use_replication_slots=true
pg_bindir='/home/postgres/pg/bin'
ssh_options='-q -o ConnectTimeout=10'	## 测试链接参数是否正常  使用
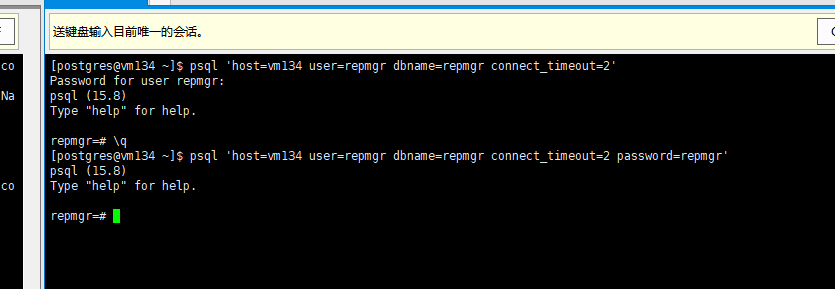
psql 'host=vm134 user=repmgr dbname=repmgr connect_timeout=2' 链接测试
postgresql白名单配置
repmgr需要设置trust 登录
# "local" is for Unix domain socket connections only
local   all             all                                     trust
# IPv4 local connections:
host    repmgr     repmgr          10.0.0.136/32     trust
host    repmgr     repmgr          10.0.0.135/32     trust
host    repmgr     repmgr          10.0.0.134/32     trust
host    all             all             0.0.0.0/0       scram-sha-256
# IPv6 local connections:
host    all             all             ::1/128       scram-sha-256
# Allow replication connections from localhost, by a user with the
# replication privilege.
local   replication     all                                     trust
host    replication     repmgr          10.0.0.136/32     trust
host    replication     repmgr          10.0.0.135/32     trust
host    replication     repmgr          10.0.0.134/32     trust
host    replication     all             0.0.0.0/0     scram-sha-256
host    replication     repmgr          ::1/128       scram-sha-256
创建postgresql守护进程
## sudo vim /etc/systemd/system/postgresql.service
[Unit]
Description=PostgreSQL database server
After=network.target[Service]
Type=forking
User=postgres
Group=postgres# 设置环境变量(可选,根据需要修改)
Environment=PGDATA=/home/postgres/pg/data
ExecStart=/home/postgres/pg/bin/pg_ctl start -D ${PGDATA}
ExecStop=/home/postgres/pg/bin/pg_ctl stop -D ${PGDATA}
ExecReload=/home/postgres/pg/bin/pg_ctl reload -D ${PGDATA}# 重启策略
Restart=on-failure
RestartSec=5s[Install]
WantedBy=multi-user.target
注册主节点
repmgr -f  repmgr.conf primary register
# 查看集群状态
repmgr -f  repmgr.conf cluster show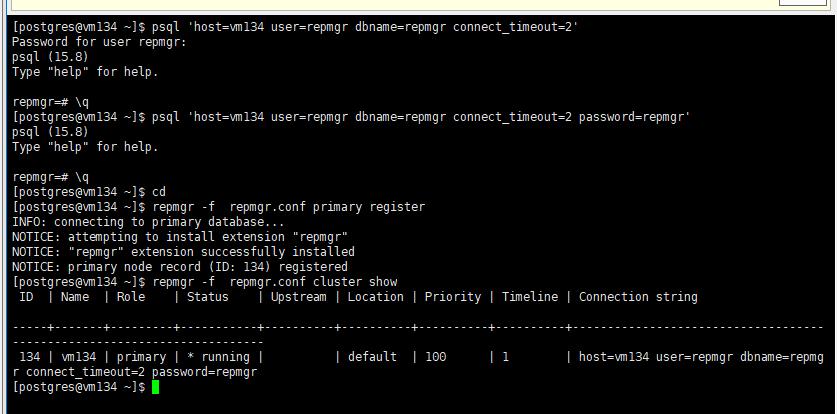
注册克隆节点
repmgr -h vm134 -U repmgr -d repmgr -f  repmgr.conf standby clone --dry-runrepmgr -h vm134 -U repmgr -d repmgr -f  repmgr.conf standby clone## 启动数据库
pg_ctl start
#进行注册
repmgr -f  repmgr.conf standby register
查看集群状态
repmgr -f  repmgr.conf cluster show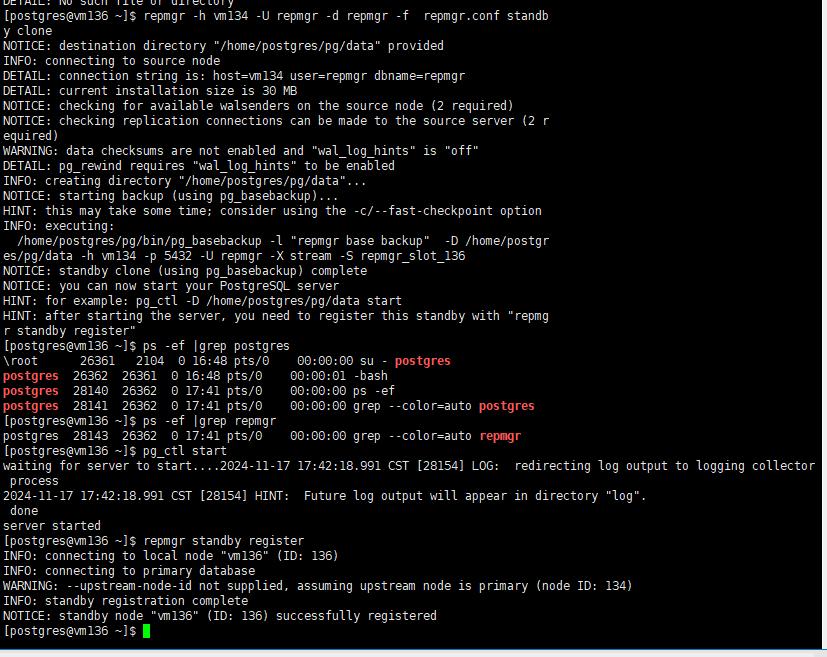

修改配置文件路径
将repmgr.conf文件移动到以下路径,可以避免每一次指令添加-f的繁琐
[root@vm134 ~]# pg_config --sysconfdir
/home/postgres/pg/etc
常用指令
查看集群状态
repmgr cluster show克隆节点(也可做备份)
repmgr -h vm135 -U repmgr -d repmgr standby clone 移除集群节点
repmgr standby unregister --force --node-id=136加入集群
 repmgr standby register --force ## 以备库身份加入
repmgr witness register     ## 以见证者身份加入
repmgr primary register    ## 以主库身份加入
手工主从切换
当前主库停库
pg_ctl stop 新主库进行升主
repmgr   standby promote其余从库follow新主库repmgr standby follow 旧主库rewind追日志
repmgr  node rejoin -d 'host=10.0.0.134 dbname=repmgr user=repmgr ' --force-rewindrewind  执行失败的时候使用以下指令组合,将旧的主节点注销重新以备节点身份加入移除节点
repmgr  primary unregister --force --node-id=136
重新克隆
repmgr -h vm135 -U repmgr -d repmgr   standby clone
重新加入repmgr standby register --force
使用pg_rewind 的时候可以使用pg_checksums -e 打开–data-checksums功能
[postgres@vm134 ~]$ pg_checksums  -e
Checksum operation completed
Files scanned:   1254
Blocks scanned:  3834
Files written:  1035
Blocks written: 3834
pg_checksums: syncing data directory
pg_checksums: updating control file
Checksums enabled in cluster
配置autofailover
配置repmgr守护进程
#vim /usr/lib/systemd/system/repmgr.service[Unit]
Description=A replication manager, and failover management tool for PostgreSQL
After=syslog.target
After=network.target
[Service]
Type=forking
User=postgres
Group=postgres
# PID file
PIDFile=/home/postgres/pg/data/repmgrd.pid
# Location of repmgr conf file:
Environment=REPMGRDCONF=/home/postgres/pg/etc/repmgr.conf
Environment=PIDFILE=/home/postgres/pg/data/repmgrd.pid
# Where to send early-startup messages from the server
# This is normally controlled by the global default set by systemd
# StandardOutput=syslog
ExecStart=/home/postgres/pg/bin/repmgrd -f ${REPMGRDCONF} --pid-file ${PIDFILE} -d --verbose
ExecStop=/usr/bin/kill -TERM $MAINPID
ExecReload=/usr/bin/kill -HUP $MAINPID
# Give a reasonable amount of time for the server to start up/shut down
TimeoutSec=300
[Install]
WantedBy=multi-user.target
修改配置文件内容
node_id=136			 ## 每个主机唯一整数
node_name='vm136'		## 每个主机唯一字符
conninfo='host=vm136 user=repmgr dbname=repmgr connect_timeout=2 password=repmgr'	## 链接到本地数据库
data_directory='/home/postgres/pg/data'
config_directory='/home/postgres/pg/data/postgresql.conf'
replication_user='repmgr'
replication_type='physical'
location='ShangHai'		  ## 此参数与主库同名的会优先升主,优于priority
use_replication_slots=true
log_level='INFO'
log_facility='STDERR'
log_file='/home/postgres/repmgrd.log'
pg_bindir='/home/postgres/pg/bin'
ssh_options='-q -o ConnectTimeout=10'
restore_command='cp /home/postgres/archivedir/%f %p'
shutdown_check_timeout=3
standby_reconnect_timeout=3
wal_receive_check_timeout=3
node_rejoin_timeout=3
failover='automatic'
priority=100		 ## 	升主的优先等级值越高,优先级别越高
connection_check_type='query'
reconnect_attempts=3
reconnect_interval=3
promote_command='/home/postgres/pg/bin/repmgr standby promote -f /home/postgres/pg/etc/repmgr.conf --log-to-file && /home/postgres/pg/etc/repmgr_manage_vip.sh add'
follow_command='/home/postgres/pg/bin/repmgr standby follow -f home/postgres/pg/etc/repmgr.conf  --upstream-node-id=%n '
monitoring_history=true
monitor_interval_secs=2
degraded_monitoring_timeout=-1
standby_disconnect_on_failover=true
sibling_nodes_disconnect_timeout=3
primary_visibility_consensus=false
always_promote=true
failover_validation_command='/home/postgres/pg/etc/repmgr_manage_vip.sh  del'
election_rerun_interval=3
service_start_command = 'sudo systemctl start postgresql'
service_stop_command = 'sudo systemctl stop postgresql'
service_restart_command = 'sudo systemctl restart postgresql'
service_reload_command = 'sudo systemctl reload postgresql'
repmgrd_service_start_command = 'sudo systemctl start repmgr.service'
repmgrd_service_stop_command = 'sudo systemctl stop repmgr.service'
新增VIP管理脚本repmgr_manage_vip.sh
#!/bin/bashVIP="10.0.0.133"
NETMASK="24"
INTERFACE="ens33"
REMOTE_USER="postgres"
LOG_FILE="/home/postgres/repmgrd.log"# 检查本地是否已绑定 VIP
function is_vip_on_local() {ip addr show dev "$INTERFACE" | grep -q "$VIP/$NETMASK"return $? # 返回 0 表示已绑定,非零表示未绑定
}# 检查 VIP 是否可达
function is_vip_pingable() {ping -c 1 -W 1 "$VIP" &>/dev/nullreturn $? # 返回 0 表示可达,非零表示不可达
}# 删除远程主机上的 VIP
function remove_vip_remote() {local remote_host="$1"for i in {1..3}; do# 通过 SSH 在远程主机删除 VIPssh "$REMOTE_USER@$remote_host" "sudo ip addr del '$VIP/$NETMASK' dev '$INTERFACE'" && {echo "$(date '+%Y-%m-%d %H:%M:%S') - VIP $VIP 从 $remote_host 上移除成功" >> "$LOG_FILE"return 0}echo "$(date '+%Y-%m-%d %H:%M:%S') - 尝试从 $remote_host 移除 VIP 失败,重试中..." >> "$LOG_FILE"sleep 1doneecho "$(date '+%Y-%m-%d %H:%M:%S') - VIP $VIP 从 $remote_host 上移除失败" >> "$LOG_FILE"return 1
}# 注册 VIP 到本地
function add_vip_local() {sudo ip addr add "$VIP/$NETMASK" dev "$INTERFACE"if [ $? -eq 0 ]; thenecho "$(date '+%Y-%m-%d %H:%M:%S') - VIP $VIP 成功注册到本地 $INTERFACE." >> "$LOG_FILE"return 0elseecho "$(date '+%Y-%m-%d %H:%M:%S') - VIP $VIP 注册到本地失败." >> "$LOG_FILE"return 1fi
}# 主逻辑
case "$1" inadd)if is_vip_on_local; then# 如果 VIP 已经绑定到本地,则什么也不做,返回状态 0echo "VIP $VIP 已经注册在本地主机,无需重复操作."exit 0else# 如果 VIP 不在本地,尝试远程删除并本地注册if is_vip_pingable; thenremote_host=$(ping -c 1 "$VIP" | grep -oP '\d+\.\d+\.\d+\.\d+')remove_vip_remote "$remote_host" && add_vip_localelse# 如果 VIP 不可达,直接在本地注册add_vip_localfiexit $? # 返回 add_vip_local 或 remove_vip_remote 的退出状态fi;;del)if is_vip_on_local; then# 如果 VIP 在本地,什么也不做,返回状态 0echo "VIP $VIP 已经绑定到本地主机,无需删除."exit 0else# 如果 VIP 不在本地,尝试远程删除if is_vip_pingable; thenremote_host=$(ping -c 1 "$VIP" | grep -oP '\d+\.\d+\.\d+\.\d+')remove_vip_remote "$remote_host"elseecho "VIP $VIP 不可达,无法删除."exit 1fiexit $? # 返回 remove_vip_remote 的退出状态fi;;*)echo "无效的操作参数。请使用 'add' 或 'del' 参数。"exit 1;;
esac
为postgres配置sudo免密权限
postgres ALL=(ALL) NOPASSWD: /bin/systemctl * postgresql, \/bin/systemctl * repmgr, \
/usr/sbin/ip addr * \
配置相关路径
创建归档路径
mkdir -p /home/postgres/archiver/
使用指令调试路径是否正确
repmgrd -f /home/postgres/pg/etc/repmgr.conf --pid-file /home/postgres/pg/data/repmgrd.pid --verbose查看日志  启动正常时,使用守护进程启动。
在repmgr安装完成后会创建一个repmgr、repmgrd两个工具,repmgr主要是对集群的管理工具,repmgrd主要是管理进程管理工具。
相关运维指令
单节点指定指令
查看集群状态
repmgr service status
repmgr cluster show 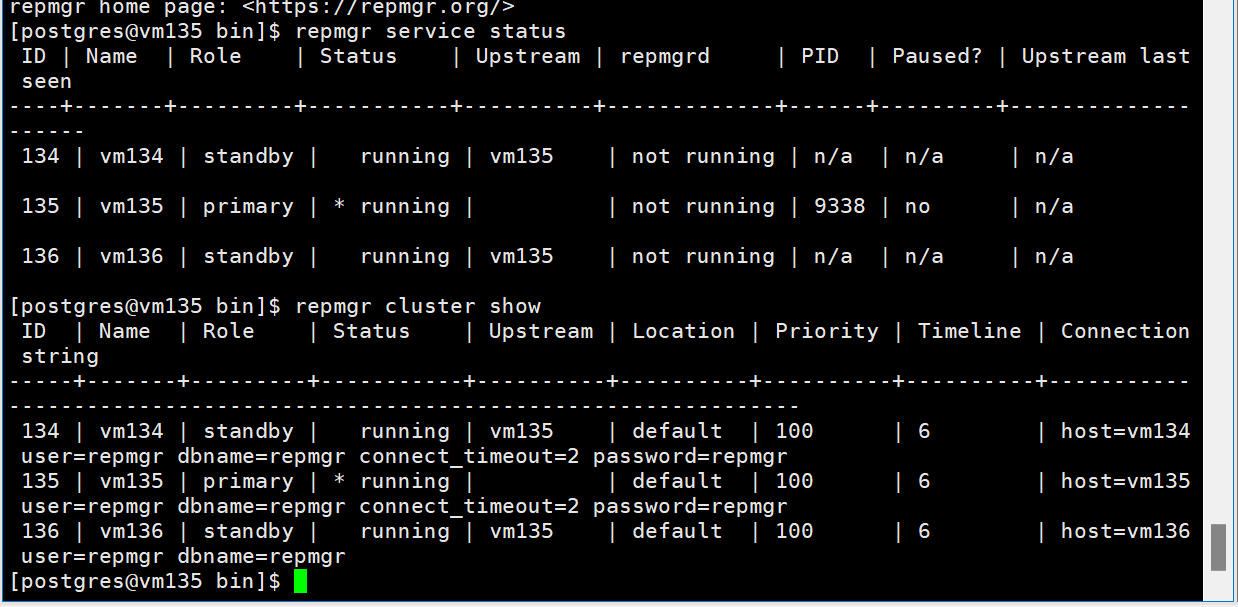
暂停服务
repmgr service pause
#此时集群不会发生故障切换,流传输仍然保持正常查看暂停状态,此时的Paused并不会马上展示出来
repmgr service status  repmgr service unpause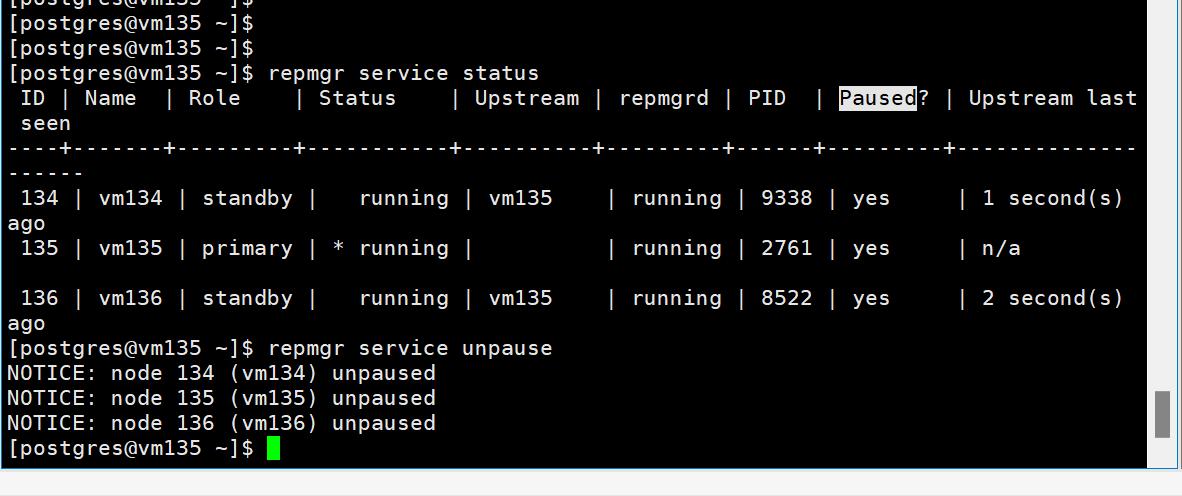
阶段运行状态检查
 repmgr node check repmgr node status
## 输出信息可用于故障排查的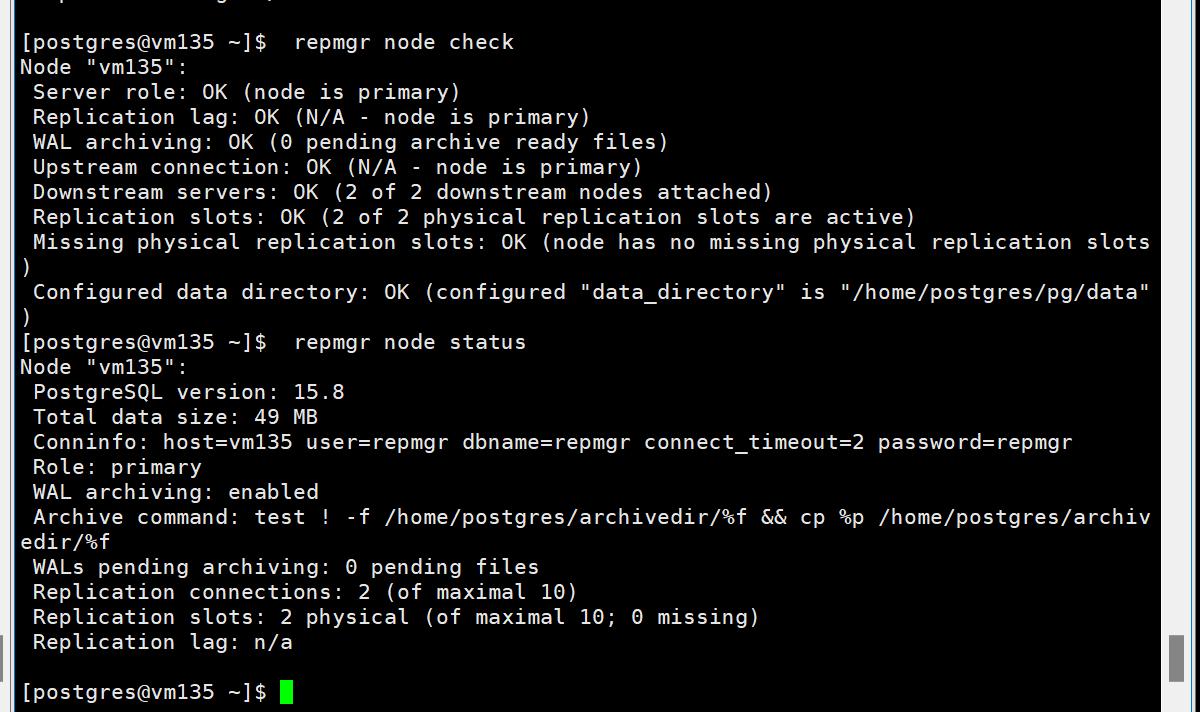
执行checkpoint
repmgr node service --action=restart --checkpoint
## action 可以是"start", "stop", "restart" or "reload",避免停服导致的数据丢失
停止,启动repmgr
 repmgr daemon  stop repmgr daemon  start
## 调用参数配置的repmgrd_service_stop_command 、repmgrd_service_stop_command 指令。默认情况下是停留15秒之后才会执行参数的指令   repmgr daemon  stop --no-wait   repmgr daemon  start 	--no-wait
使用--no-wait  会立即停止或者启动
启停postgresql
重启postgresql,要求配置service_restart_command
repmgr node service --action=restart
启动postgresql,要求配置service_start_command
repmgr node service --action=start
停止postgresql,要求配置service_stop_command
repmgr node service --action=stop
加载postgresql,要求配置service_reload_command
repmgr node service --action=reload指令后缀增加--list-actions参数,可以查看对应指令指向的配置参数值repmgr node service --action=restart  --list-actions
repmgr node service  --list-actions

备库升主
## 备库升主有以下两个指令,不推荐使用promote ,执行切换前使用 --dry-run进行预检查,执行切换都需要停掉当前的主库
repmgr standby promote --dry-run
等价于repmgr node service   --action=promote --dry-run
使用node service的时候 增加--list-actions --dry-run  预先查看参数配置是否齐全##promote 需要预先停掉当前主库,使用repmgr node service --action=stop --checkpoint ,升主成功之后,使用repmgr node rejoin -d'host=vm136 user=repmgr dbname=repmgr' 在此加入到新的主库中去。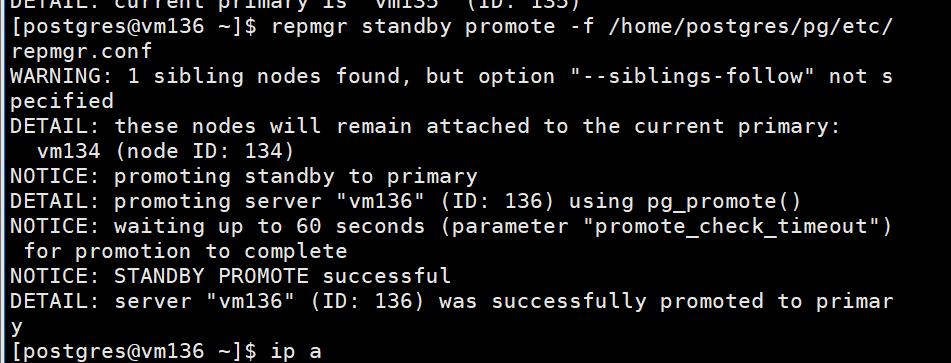
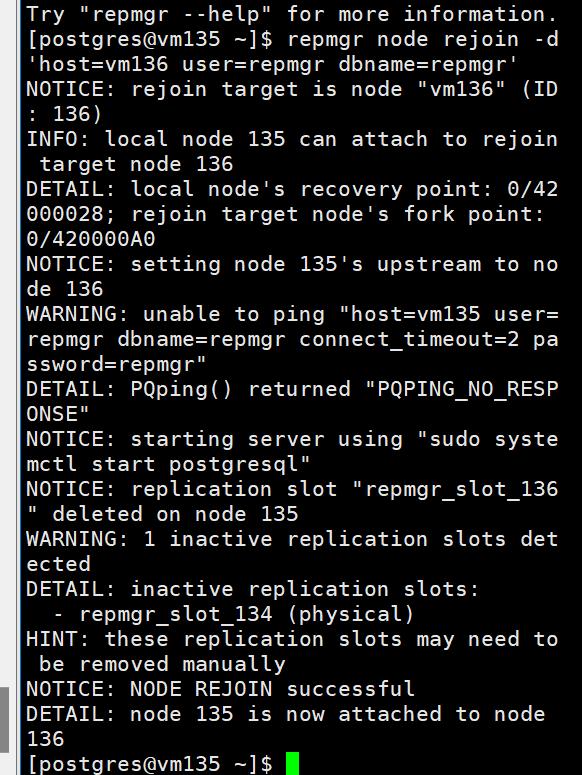
切换后的状态

使用switchover 进行切换
repmgr standby switchover --siblings-follow --force-rewind --dry-run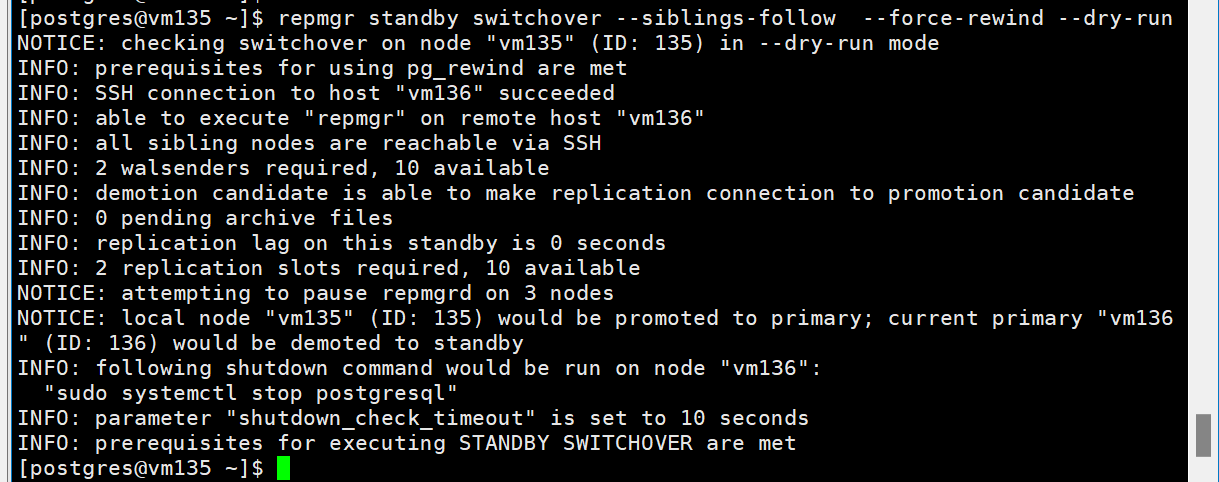
去掉dry-run 之后正式执行切换。
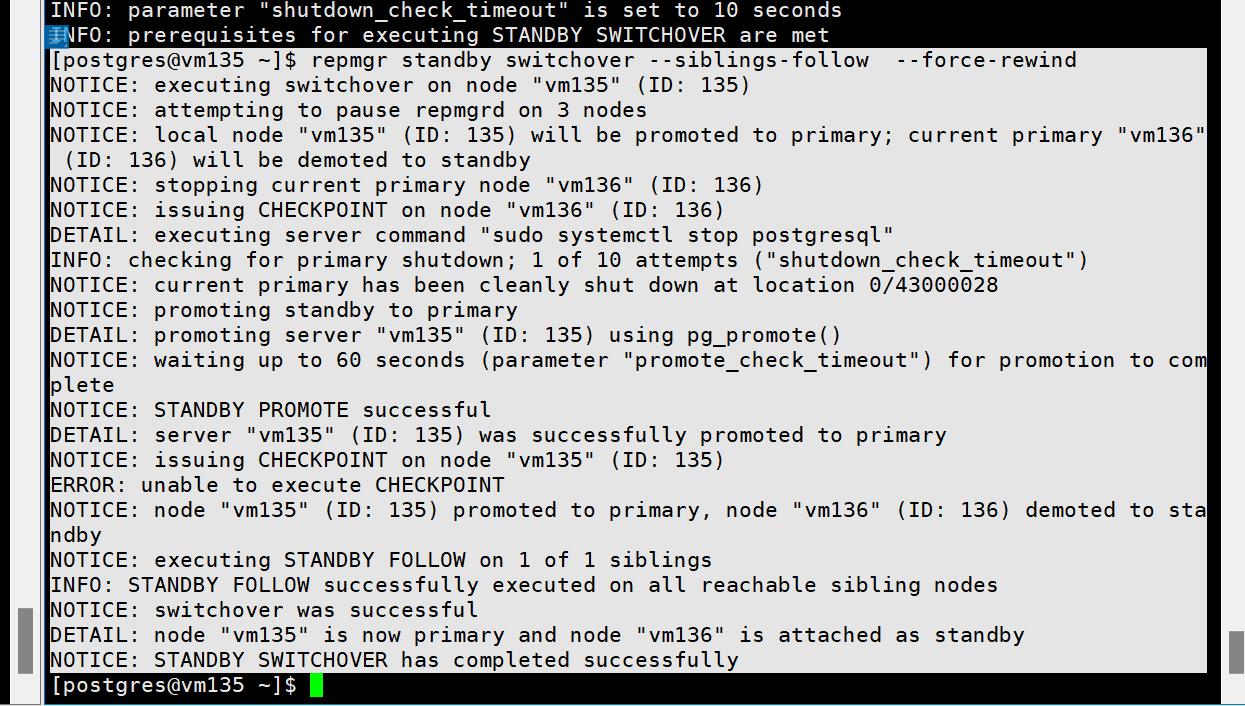
使用–siblings-follow 参数会自动将其余备库更新follow新的主库
更新配置信息表
repmgr standby register --force  ## 强制再次注册才会更新配置文件路径
## 该库下会存放着集群的监控信息以及元数据信息。该库信息不可轻易变动
\c repmgr repmgr 
