简介
patroni+etcd,算是目前比较主流的PG高可用搭配了。
patroni都出4.0版本了,一直没时间,断断续续写了好久,最近有人问到,那就当作一个笔记发表吧,自行搭建一个测试库做测试吧。来来回回改了好几遍。文中可能不妨地方没有同步修改的遗漏点。
集群规划
| hostname/ip | 部署软件 | 备注 | 配置 |
|---|---|---|---|
| etcd1/10.0.0.131 | etcd | dcs一致性保障 | 2G 2C |
| etcd2/10.0.0.132 | etcd | dcs一致性保障 | 2G 2C |
| etcd3/10.0.0.133 | etcd | dcs一致性保障 | 2G 2C |
| patroni1/10.0.0.134 | pg+patroni | 数据库高可用、自动failover | 4G 2C |
| patroni2/10.0.0.135 | pg+patroni | 数据库高可用、自动failover | 4G 2C |
| patroni3/10.0.0.136 | pg+patroni | 数据库高可用、自动failover | 4G 2C |
| haproxy/10.0.0.137 | HAProxy | 负载均衡 | 2G 2C |
| 10.0.0.138 | vip |
基础操作所有节点关闭防火墙、ssh通信配置、postgres用户组添加、selinux临时关闭、hostname配置、IP映射文件hosts配置本文不再赘述。
同步服务器时区
## 生产机器请用对应的时间同步工具进行时间同步
sudo timedatectl set-timezone Asia/Shanghai
etcd安装
可以通过ETCD下载地址进行下载安装包,也可以通过yum install etcd 进行安装。本文使用yum源安装方式进行演示。读者自行下载对应的yum安装包
yum install etcd -y
etcd --version
使用centos7 yum 安装默认的etcd版本是3.3.11
本文使用源码包进行安装
配置etcd.conf文件内容
yum 安装的ETCD 其配置文件路径默认存放在 /etc/etcd/etcd.conf
cp  /etc/etcd/etcd.conf  /etc/etcd/etcd.conf_bak
vim  /etc/etcd/etcd.conf
本文演示一下源码安装部署方式,配置文件的变量名称有所不同, etcd节点同步以下操作
tar -zxvf etcd-v3.5.15-linux-amd64.tar.gz -C /etc
cd /etc/etcd-v3.5.15-linux-amd64/
mv etcd-v3.5.15-linux-amd64/   etcd/
配置环境变量
## vim /etc/profile
export ETCD=/etcd/etcd/
PATH=$ETCD:$PATH
加载环境变量 测试环境变量是否生效
[root@vm132 ~]# source /etc/profile
[root@vm132 ~]# etcd -version
etcd Version: 3.5.15
Git SHA: 9a5533382
Go Version: go1.21.12
Go OS/Arch: linux/amd64
[root@vm132 ~]# etcdctl  version
etcdctl version: 3.5.15
API version: 3.5
[root@vm132 ~]#
以下是在使用yum 安装的时候 官网的一个etcd.conf模板,在etcd的最新版本中不再支持以下变量名称,3.3版本的ETCD还可以将以下变量创建环境变量编排进/etcd/profile文件中,在3.5版本不再支持该环境变量的设置方法。
[root@vm132 etcd-v3.5.15-linux-amd64]# cat etcd.conf
#[Member]
#ETCD_CORS=""
ETCD_DATA_DIR="/var/lib/etcd/default.etcd"
#ETCD_WAL_DIR=""
#ETCD_LISTEN_PEER_URLS="http://localhost:2380"
ETCD_LISTEN_CLIENT_URLS="http://localhost:2379"
#ETCD_MAX_SNAPSHOTS="5"
#ETCD_MAX_WALS="5"
ETCD_NAME="default"
#ETCD_SNAPSHOT_COUNT="100000"
#ETCD_HEARTBEAT_INTERVAL="100"
#ETCD_ELECTION_TIMEOUT="1000"
#ETCD_QUOTA_BACKEND_BYTES="0"
#ETCD_MAX_REQUEST_BYTES="1572864"
#ETCD_GRPC_KEEPALIVE_MIN_TIME="5s"
#ETCD_GRPC_KEEPALIVE_INTERVAL="2h0m0s"
#ETCD_GRPC_KEEPALIVE_TIMEOUT="20s"
#
#[Clustering]
#ETCD_INITIAL_ADVERTISE_PEER_URLS="http://localhost:2380"
ETCD_ADVERTISE_CLIENT_URLS="http://localhost:2379"
#ETCD_DISCOVERY=""
#ETCD_DISCOVERY_FALLBACK="proxy"
#ETCD_DISCOVERY_PROXY=""
#ETCD_DISCOVERY_SRV=""
#ETCD_INITIAL_CLUSTER="default=http://localhost:2380"
#ETCD_INITIAL_CLUSTER_TOKEN="etcd-cluster"
#ETCD_INITIAL_CLUSTER_STATE="new"
#ETCD_STRICT_RECONFIG_CHECK="true"
#ETCD_ENABLE_V2="true"
#
#[Proxy]
#ETCD_PROXY="off"
#ETCD_PROXY_FAILURE_WAIT="5000"
#ETCD_PROXY_REFRESH_INTERVAL="30000"
#ETCD_PROXY_DIAL_TIMEOUT="1000"
#ETCD_PROXY_WRITE_TIMEOUT="5000"
#ETCD_PROXY_READ_TIMEOUT="0"
#
#[Security]
#ETCD_CERT_FILE=""
#ETCD_KEY_FILE=""
#ETCD_CLIENT_CERT_AUTH="false"
#ETCD_TRUSTED_CA_FILE=""
#ETCD_AUTO_TLS="false"
#ETCD_PEER_CERT_FILE=""
#ETCD_PEER_KEY_FILE=""
#ETCD_PEER_CLIENT_CERT_AUTH="false"
#ETCD_PEER_TRUSTED_CA_FILE=""
#ETCD_PEER_AUTO_TLS="false"
#
#[Logging]
#ETCD_DEBUG="false"
#ETCD_LOG_PACKAGE_LEVELS=""
#ETCD_LOG_OUTPUT="default"
#
#[Unsafe]
#ETCD_FORCE_NEW_CLUSTER="false"
#
#[Version]
#ETCD_VERSION="false"
#ETCD_AUTO_COMPACTION_RETENTION="0"
#
#[Profiling]
#ETCD_ENABLE_PPROF="false"
#ETCD_METRICS="basic"
#
#[Auth]
#ETCD_AUTH_TOKEN="simple"
这里变量名称在不同版本有所不同,以下是3.5版本官方给出的参考配置文档内容,并给出了可能的参数以及参数解释
本文使用的是3.5版本安装。
# This is the configuration file for the etcd server.# Human-readable name for this member.
name: 'default'# Path to the data directory.
data-dir:# Path to the dedicated wal directory.
wal-dir:# Number of committed transactions to trigger a snapshot to disk.
snapshot-count: 10000# Time (in milliseconds) of a heartbeat interval.
heartbeat-interval: 100# Time (in milliseconds) for an election to timeout.
election-timeout: 1000# Raise alarms when backend size exceeds the given quota. 0 means use the
# default quota.
quota-backend-bytes: 0# List of comma separated URLs to listen on for peer traffic.
listen-peer-urls: http://localhost:2380# List of comma separated URLs to listen on for client traffic.
listen-client-urls: http://localhost:2379# Maximum number of snapshot files to retain (0 is unlimited).
max-snapshots: 5# Maximum number of wal files to retain (0 is unlimited).
max-wals: 5# Comma-separated white list of origins for CORS (cross-origin resource sharing).
cors:# List of this member's peer URLs to advertise to the rest of the cluster.
# The URLs needed to be a comma-separated list.
initial-advertise-peer-urls: http://localhost:2380# List of this member's client URLs to advertise to the public.
# The URLs needed to be a comma-separated list.
advertise-client-urls: http://localhost:2379# Discovery URL used to bootstrap the cluster.
discovery:# Valid values include 'exit', 'proxy'
discovery-fallback: 'proxy'# HTTP proxy to use for traffic to discovery service.
discovery-proxy:# DNS domain used to bootstrap initial cluster.
discovery-srv:# Comma separated string of initial cluster configuration for bootstrapping.
# Example: initial-cluster: "infra0=http://10.0.1.10:2380,infra1=http://10.0.1.11:2380,infra2=http://10.0.1.12:2380"
initial-cluster:# Initial cluster token for the etcd cluster during bootstrap.
initial-cluster-token: 'etcd-cluster'# Initial cluster state ('new' or 'existing').
initial-cluster-state: 'new'# Reject reconfiguration requests that would cause quorum loss.
strict-reconfig-check: false# Enable runtime profiling data via HTTP server
enable-pprof: true# Valid values include 'on', 'readonly', 'off'
proxy: 'off'# Time (in milliseconds) an endpoint will be held in a failed state.
proxy-failure-wait: 5000# Time (in milliseconds) of the endpoints refresh interval.
proxy-refresh-interval: 30000# Time (in milliseconds) for a dial to timeout.
proxy-dial-timeout: 1000# Time (in milliseconds) for a write to timeout.
proxy-write-timeout: 5000# Time (in milliseconds) for a read to timeout.
proxy-read-timeout: 0client-transport-security:# Path to the client server TLS cert file.cert-file:# Path to the client server TLS key file.key-file:# Enable client cert authentication.client-cert-auth: false# Path to the client server TLS trusted CA cert file.trusted-ca-file:# Client TLS using generated certificatesauto-tls: falsepeer-transport-security:# Path to the peer server TLS cert file.cert-file:# Path to the peer server TLS key file.key-file:# Enable peer client cert authentication.client-cert-auth: false# Path to the peer server TLS trusted CA cert file.trusted-ca-file:# Peer TLS using generated certificates.auto-tls: false# Allowed CN for inter peer authentication.allowed-cn:# Allowed TLS hostname for inter peer authentication.allowed-hostname:# The validity period of the self-signed certificate, the unit is year.
self-signed-cert-validity: 1# Enable debug-level logging for etcd.
log-level: debuglogger: zap# Specify 'stdout' or 'stderr' to skip journald logging even when running under systemd.
log-outputs: [stderr]# Force to create a new one member cluster.
force-new-cluster: falseauto-compaction-mode: periodic
auto-compaction-retention: "1"# Limit etcd to a specific set of tls cipher suites
cipher-suites: [TLS_ECDHE_RSA_WITH_AES_128_GCM_SHA256,TLS_ECDHE_RSA_WITH_AES_256_GCM_SHA384
]# Limit etcd to specific TLS protocol versions
tls-min-version: 'TLS1.2'
tls-max-version: 'TLS1.3'
使用以下配置内容进行配置
131节点执行指令
####    131节点执行指令
sudo tee -a /etc/etcd/etcd.yaml <<EOF
# 本机的会员名称
name: etcd1
# 数据目录
data-dir: /etc/etcd/data
# 配置etcd的客户端监听地址
listen-client-urls: http://0.0.0.0:2379
# 配置 etcd 服务器用于广告、公示给客户端的URL
advertise-client-urls: http://10.0.0.131:2379
# 配置etcd集群中的节点之间进行通信的URL地址。这些地址用于集群间的数据同步和心跳信号等。
listen-peer-urls: http://10.0.0.131:2380
# 配置集群中其他etcd实例访问当前实例的URL地址。
initial-advertise-peer-urls: http://10.0.0.131:2380
# 这个参数用于指定etcd集群中所有成员的初始配置。它的值是一个由多个成员组成的列表,每个成员由名称和对>等通信URL组成,用逗号分隔。
initial-cluster: etcd1=http://10.0.0.131:2380,etcd2=http://10.0.0.132:2380,etcd3=http://10.0.0.133:2380
# 指定etcd集群的令牌。令牌是一个用于标识特定集群的字符串。当你创建一个新的etcd集群时,你需要为它指定>一个唯一的令牌
initial-cluster-token: etcd-cluster
# 指定etcd集群的初始状态。它有两个可能的值:new和existing。当你创建一个新的etcd集群时,你需要将这个参数设置为new,表示集群处于初始状态。
# 当你将一个已有的etcd节点添加到现有集群时,你需要将这个参数设置为existing,表示集群已经存在。
initial-cluster-state: new
EOF
132节点执行指令
sudo tee -a /etc/etcd/etcd.yaml <<EOF
# 本机的会员名称
name: etcd2
# 数据目录
data-dir: /etc/etcd/data
# 配置etcd的客户端监听地址
listen-client-urls: http://0.0.0.0:2379
# 配置 etcd 服务器用于广告、公示给客户端的URL
advertise-client-urls: http://10.0.0.132:2379
# 配置etcd集群中的节点之间进行通信的URL地址。这些地址用于集群间的数据同步和心跳信号等。
listen-peer-urls: http://10.0.0.132:2380
# 配置集群中其他etcd实例访问当前实例的URL地址。
initial-advertise-peer-urls: http://10.0.0.132:2380
# 这个参数用于指定etcd集群中所有成员的初始配置。它的值是一个由多个成员组成的列表,每个成员由名称和对等通信URL组成,用逗号分隔。
initial-cluster: etcd1=http://10.0.0.131:2380,etcd2=http://10.0.0.132:2380,etcd3=http://10.0.0.133:2380
# 指定etcd集群的令牌。令牌是一个用于标识特定集群的字符串。当你创建一个新的etcd集群时,你需要为它指定一个唯一的令牌
initial-cluster-token: etcd-cluster
# 指定etcd集群的初始状态。它有两个可能的值:new和existing。当你创建一个新的etcd集群时,你需要将这个参数设置为new,表示集群处于初始状态。
# 当你将一个已有的etcd节点添加到现有集群时,你需要将这个参数设置为existing,表示集群已经存在。
initial-cluster-state: new
EOF
133节点执行指令
sudo tee -a /etc/etcd/etcd.yaml <<EOF
# 本机的会员名称
name: etcd3
# 数据目录
data-dir: /etc/etcd/data
# 配置etcd的客户端监听地址
listen-client-urls: http://0.0.0.0:2379
# 配置 etcd 服务器用于广告、公示给客户端的URL
advertise-client-urls: http://10.0.0.133:2379
# 配置etcd集群中的节点之间进行通信的URL地址。这些地址用于集群间的数据同步和心跳信号等。
listen-peer-urls: http://10.0.0.133:2380
# 配置集群中其他etcd实例访问当前实例的URL地址。
initial-advertise-peer-urls: http://10.0.0.133:2380
# 这个参数用于指定etcd集群中所有成员的初始配置。它的值是一个由多个成员组成的列表,每个成员由名称和对等通信URL组成,用逗号分隔。
initial-cluster: etcd1=http://10.0.0.131:2380,etcd2=http://10.0.0.132:2380,etcd3=http://10.0.0.133:2380
# 指定etcd集群的令牌。令牌是一个用于标识特定集群的字符串。当你创建一个新的etcd集群时,你需要为它指定一个唯一的令牌
initial-cluster-token: etcd-cluster
# 指定etcd集群的初始状态。它有两个可能的值:new和existing。当你创建一个新的etcd集群时,你需要将这个参数设置为new,表示集群处于初始状态。
# 当你将一个已有的etcd节点添加到现有集群时,你需要将这个参数设置为existing,表示集群已经存在。
initial-cluster-state: new
EOF
可以使用yamllint进行效验文件yaml格式正确性
yamllint  /etc/etcd/etcd.yaml
## yamlint 对yaml的格式检查会更为严格
查看是否能运行成功
etcd --config-file=/etc/etcd/etcd.yaml &
## 注意观察其刷在前台得日志信息 是否用warnning error 之类得日志信息
配置守护进程(所有节点同步)
## vi /usr/lib/systemd/system/etcd.service[Unit]
Description=etcd key-value store
After=network.target[Service]
ExecStart=/etc/etcd/etcd --config-file=/etc/etcd/etcd.yaml
Restart=always
RestartSec=10s[Install]
WantedBy=multi-user.target
启动etcd 集群并查看状态
source /etc/profile
systemctl daemon-reload
systemctl start etcd
查看节点运行状态是否正常
etcdctl --endpoints=10.0.0.131:2379,10.0.0.132:2379,10.0.0.133:2379 endpoint status --write-out=table

isLeader=true表示该节点为主节点。
查看etcd节点的性能情况,使用以下指令
[root@vm132 ~]# etcdctl check perf59 / 60 Boooooooooooooooooooooooooooooooooooooooooooooooooooooooooooooooooooooooooooooooooooooooooooooooooooooooooooooooooooooooooooooooooooooooooooooom  !  98.33%FAIL: Throughput too low: 110 writes/s
PASS: Slowest request took 0.181640s
PASS: Stddev is 0.017988s
FAIL
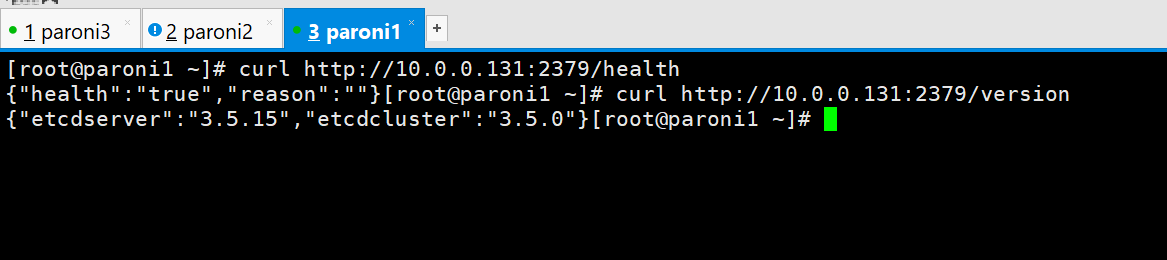
在patroni任一节点进行测试是否能etcd集群正常通信
curl http://10.0.0.131:2379/health
curl http://10.0.0.131:2379/version
postgresql+patroni集群节点配置
| hostname/ip | 部署软件 | 备注 |
|---|---|---|
| vm131/10.0.0.131 | pg+patroni | 数据库高可用、自动failover |
| vm132/10.0.0.132 | pg+patroni | 数据库高可用、自动failover |
| vm133/10.0.0.133 | pg+patroni | 数据库高可用、自动failover |
使用yum安装其依赖,因为postgresql-16开始,如果需要with-python编译,其需要python3以上的安装包。这里我们python安装python3.11,我们使用得patroni4.0需要python3.8以上得支持,这里yum 安装了python3-devel和python3后,后续源码安装python3.11将其替换,同学们根据个人情况选择解决办法
yum remove python-devel python3-devel -y
yum install -y bison flex readline-devel zlib-devel zlib gcc systemd-devel gcc-c++ watchdog python3 python3-devel tcl tcl-devel perl-ExtUtils-Embed perl-ExtUtils-MakeMaker libicu libicu-devel libnfnetlink  python-yaml libevent-devel libyaml-devel libdbi* openssl-devel bzip2-devel *bsddb* sqlite-devel gdbm-devel ncurses-devel tk-devel db4-devel libpcap-devel xz-devel libffi-devel --下载安装数据库基本依赖包,根据个人需要编译的选项进行选择。
python 安装
tar -zxvf Python-3.11.9.tgz
cd Python-3.11.9/
./configure --prefix=/usr/local/python3
make && make install
mv /usr/bin/python /usr/bin/python_bak
mv /usr/bin/pip  /usr/bin/pip_bak
ln -s /usr/local/python3/bin/python3.11 /usr/bin/python
ln -s /usr/local/python3/bin/pip3.11 /usr/bin/pip
解压postgresql源码包并进行安装
su - postgres
tar -zxvf postgresql-16.3.tar.gz
cd postgresql-16.3
./configure --prefix=/home/postgres/pg --with-openssl  --with-python  --without-icu --with-systemd  --with-tcl --with-perl    ##根据个人需求,选择数据库运行时所需要的支持项目。
echo $?
##返回值是0说明编译过程无报错
进行构建
mkdir /home/postgres/pg  --创建装载所需文件夹
make world
make check ##进行回归测试,非必要。回归测试是一个用于验证PostgreSQL在你的系统上是否按照开发人员设想的那样运行的测试套件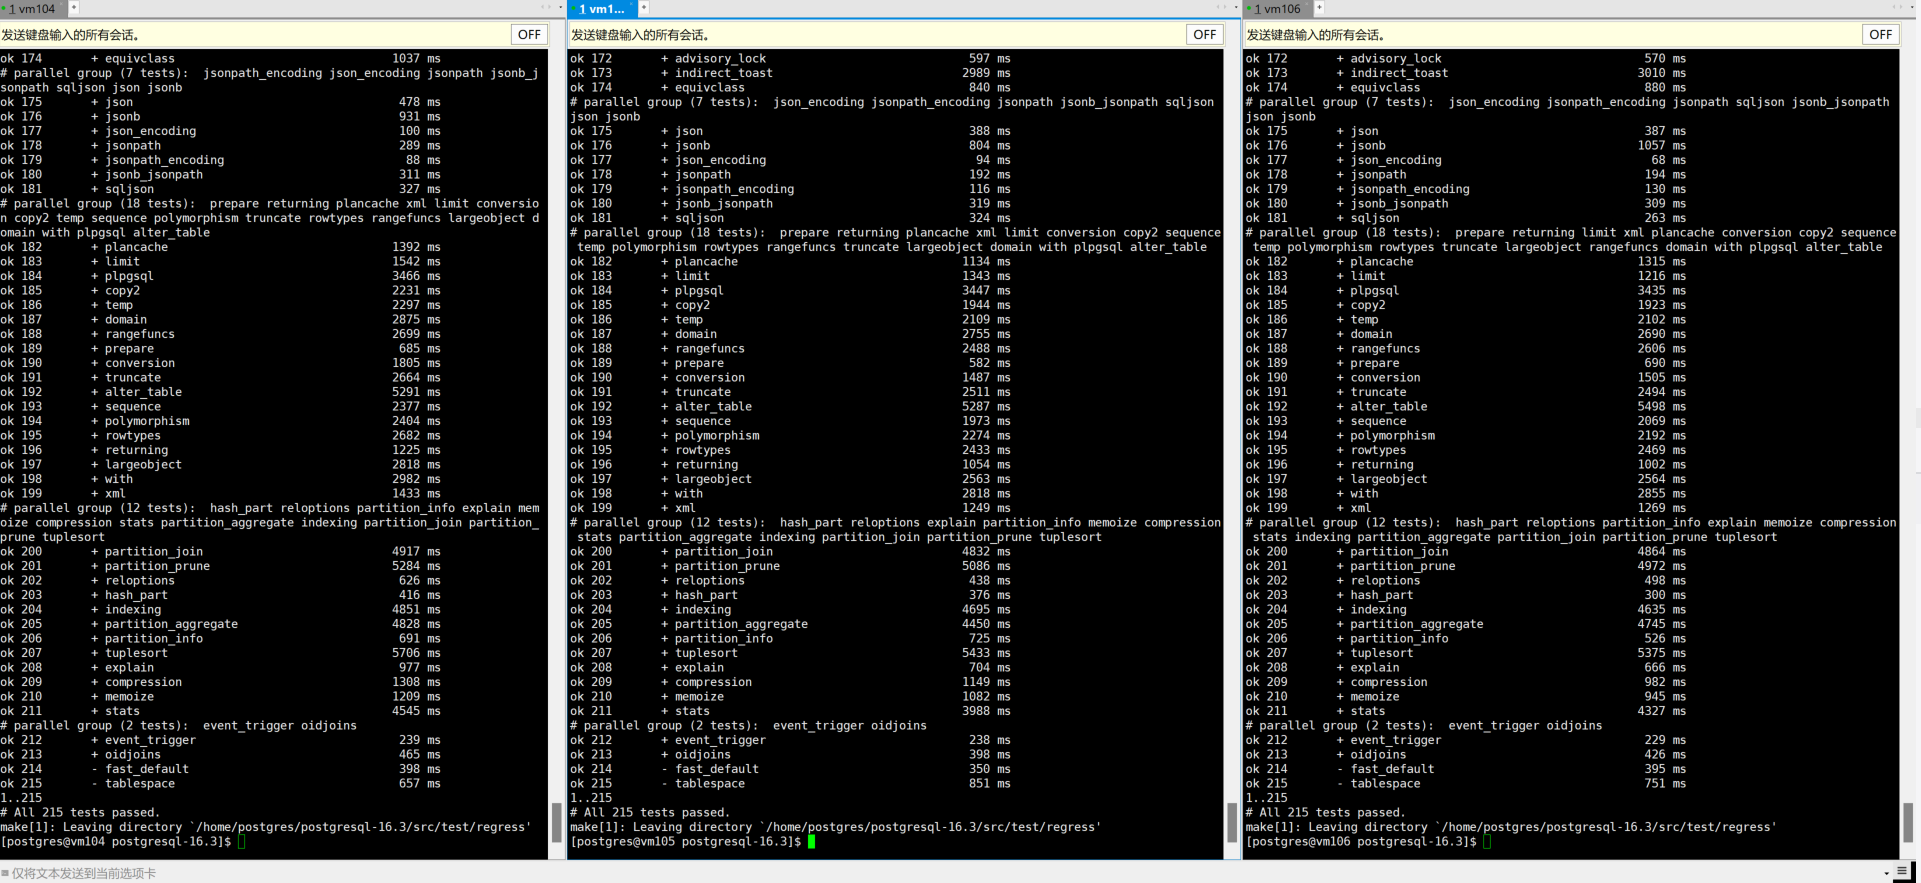
进行构建安装
make install-world配置数据库环境变量
备注:另外我使用yum安装时候发生eprl源损坏的情况 可以使用以下方法更换eprl源
bash <(curl -sSL https://linuxmirrors.cn/main.sh)更换yum源
配置环境变量
#vim ~/.bash_profile
export PATH
export PGDATA=/home/postgres/pg/data
export PGHOME=/home/postgres/pg
export LD_LIBRARY_PATH=$PGHOME/lib:/lib64:/lib:/usr/lib:/usr/lib64:/usr/local/lib:/usr/local/lib64:$LD_LIBRARY_PATH
export PATH=$PGHOME/bin:$PATH
export MANPATH=$PGHOME/share/man:$MANPATH
加载环境变量
source ~/.bash_profile
patroni安装配置
本文使用pip进行下载,
pip install patroni[etcd3,psycopg3] --user -i https://pypi.tuna.tsinghua.edu.cn/simple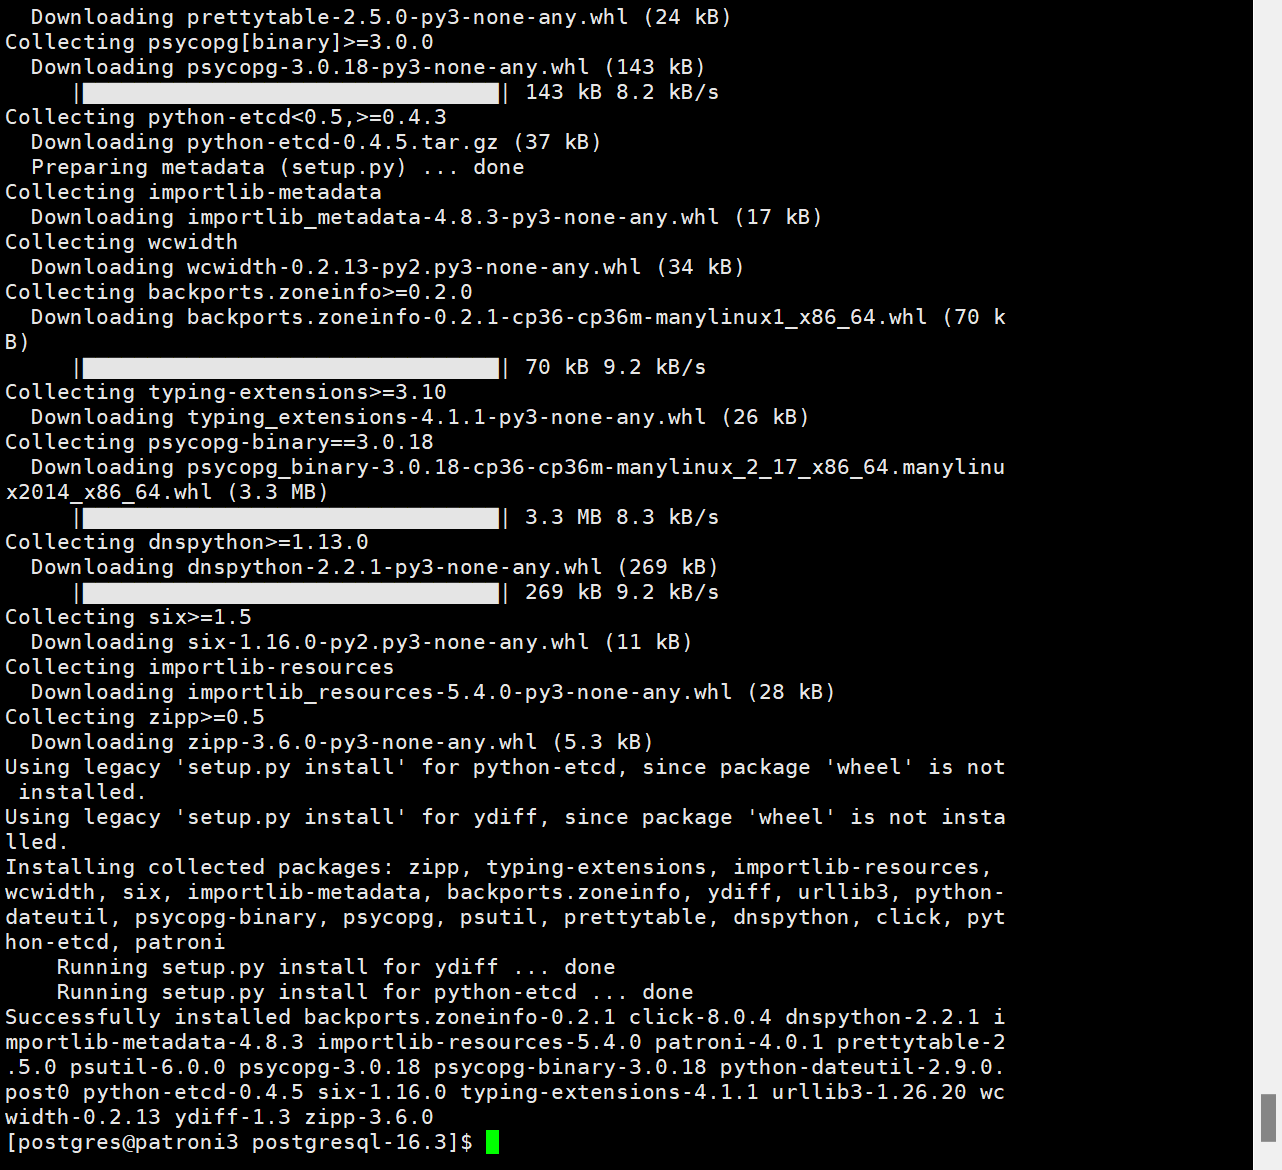
初始化数据库,只需要其中一个节点在进行数据库初始,本文以vm132为例,其余节点在启动patroni的时候会自动进行远程pg_basebackup拉取备份,作为从库。
initdb -D $PGDATA --locale=C -U postgres -W
#输入postgres超级用户密码
chmod -R 0700 $PGDATA
进入数据库创建指定用户
create user  patroni login replication encrypted password 'patroni ';
--haproxy 用于负载均衡的检查用户
create user  haproxy login encrypted password 'haproxy';
GRANT CONNECT ON DATABASE postgres TO haproxy;
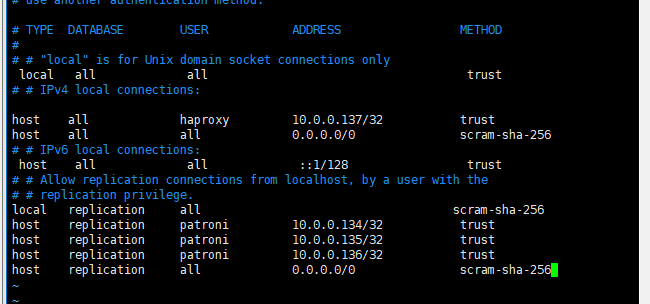
修改pg_hba.conf 配置信息
# # "local" is for Unix domain socket connections onlylocal   all             all                                     trust
# # IPv4 local connections:host    all             haproxy         10.0.0.137/32           trust
host    all             all             0.0.0.0/0               scram-sha-256
# # IPv6 local connections:host    all             all             ::1/128                 trust
# # Allow replication connections from localhost, by a user with the
# # replication privilege.
local   replication     all                                    scram-sha-256
host    replication     patroni         10.0.0.134/32           trust
host    replication     patroni         10.0.0.135/32           trust
host    replication     patroni         10.0.0.136/32           trust
host    replication     all             0.0.0.0/0               scram-sha-256
## 为初始主库添加VIP
sudo /sbin/ip addr add 10.0.0.138/24 brd 10.0.0.255 dev ens33 label ens33:1## 为初始主库删除VIP
sudo /sbin/ip addr del 10.0.0.138/24 brd 10.0.0.255 dev ens33 label ens33:1## 清楚etcd在namespace 路径存在的同名集群信息,避免冲突etcdctl --endpoints="http://10.0.0.131:2379,http://10.0.0.132:2379,http://10.0.0.133:2379" get /patroni_metadata/ --prefix --keys-onlyetcdctl --endpoints="http://10.0.0.131:2379,http://10.0.0.132:2379,http://10.0.0.133:2379" del /patroni_metadata/pg_patroni/ --prefixetcdctl --endpoints="http://10.0.0.131:2379,http://10.0.0.132:2379,http://10.0.0.133:2379" get /patroni_metadata/ --prefix --keys-only
patroni配置文件属性
这里136作为异步备库 所以不将其作为选主备选,其也就不需要配置callback,
vm134节点配置(使用os-postgres用户)
### vim ~/patroni.yaml
---
scope: pg_patroni
namespace: /patroni_metadata/
name: patroni1
restapi:listen: 10.0.0.134:8008connect_address: 10.0.0.134:8008
etcd3:host:10.0.0.131:2379etcd3: true
bootstrap:dcs:ttl: 30loop_wait: 10retry_timeout: 10maximum_lag_on_failover: 1048576initdb:- encoding: UTF8- data-checksumspostgresql:use_pg_rewind: truepg_hba:- local   all             all                                     trust- host    all             haproxy         10.0.0.137/32           trust- host    all             all             0.0.0.0/0               scram-sha-256- host    all             all             ::1/128                 scram-sha-256- local   replication     all                                     scram-sha-256- host    replication     patroni         10.0.0.134/32           trust- host    replication     patroni         10.0.0.135/32           trust- host    replication     patroni         10.0.0.136/32           trust- host    replication     all             0.0.0.0/0               scram-sha-256use_slots: trueparameters:primary_conninfo: 'host=10.0.0.138 port=5432 user=patroni password=patroni'wal_level: logicalhot_standby: onmax_connections: 100max_wal_senders: 10max_replication_slots: 10max_prepared_transactions: 0max_locks_per_transaction: 64wal_log_hints: ontrack_commit_timestamp: offarchive_mode: onarchive_command: 'mkdir -p /home/postgres/wal_archive && test ! -f /home/postgres/wal_archive/%f && cp %p /home/postgres/wal_archive/%f'master_start_timeout: 300synchronous_mode: truesynchronous_mode_strict: falsesynchronous_node_count: 1
postgresql:listen: '*'connect_address: 10.0.0.134:5432data_dir: /home/postgres/pg/databin_dir: /home/postgres/pg/binauthentication:replication:username: patronipassword: patronisuperuser:username: postgrespassword: postgresparameters:listen_addresses: '*'port: 5432max_connections: 200superuser_reserved_connections: 10shared_buffers: 512MBwal_level: logicalhot_standby: onmax_wal_senders: 10max_replication_slots: 10wal_log_hints: on
tags:nofailover: falsenoloadbalance: falseclonefrom: falsenosync: false
callbacks:on_start: /home/postgres/vip_manager.shon_stop: /home/postgres/vip_manager.shon_role_change: /home/postgres/vip_manager.sh
vm135配置
### vim ~/patroni.yaml
---
scope: pg_patroni
namespace: /patroni_metadata/
name: patroni2
restapi:listen: 10.0.0.135:8008connect_address: 10.0.0.135:8008
etcd3:host:10.0.0.132:2379etcd3: true
bootstrap:dcs:ttl: 30loop_wait: 10retry_timeout: 10maximum_lag_on_failover: 1048576initdb:- encoding: UTF8- data-checksumspostgresql:use_pg_rewind: truepg_hba:- local   all             all                                     trust- host    all             haproxy         10.0.0.137/32           trust- host    all             all             0.0.0.0/0               scram-sha-256- host    all             all             ::1/128                 scram-sha-256- local   replication     all                                     scram-sha-256- host    replication     patroni         10.0.0.134/32           trust- host    replication     patroni         10.0.0.135/32           trust- host    replication     patroni         10.0.0.136/32           trust- host    replication     all             0.0.0.0/0               scram-sha-256use_slots: trueparameters:primary_conninfo: 'host=10.0.0.138 port=5432 user=patroni password=patroni'wal_level: logicalhot_standby: onmax_connections: 100max_wal_senders: 10max_replication_slots: 10max_prepared_transactions: 0max_locks_per_transaction: 64wal_log_hints: ontrack_commit_timestamp: offarchive_mode: onarchive_command: 'mkdir -p /home/postgres/wal_archive && test ! -f /home/postgres/wal_archive/%f && cp %p /home/postgres/wal_archive/%f'master_start_timeout: 300synchronous_mode: truesynchronous_mode_strict: falsesynchronous_node_count: 1
postgresql:listen: '*'connect_address: 10.0.0.135:5432data_dir: /home/postgres/pg/databin_dir: /home/postgres/pg/binauthentication:replication:username: patronipassword: patronisuperuser:username: postgrespassword: postgresparameters:listen_addresses: '*'port: 5432max_connections: 200superuser_reserved_connections: 10shared_buffers: 512MBwal_level: logicalhot_standby: onmax_wal_senders: 10max_replication_slots: 10wal_log_hints: on
tags:nofailover: falsenoloadbalance: falseclonefrom: falsenosync: false
callbacks:on_start: /home/postgres/vip_manager.shon_stop: /home/postgres/vip_manager.shon_role_change: /home/postgres/vip_manager.sh
vm136节点配置
### vim ~/patroni.yaml
---
scope: pg_patroni
namespace: /patroni_metadata/
name: patroni3
restapi:listen: 10.0.0.136:8008connect_address: 10.0.0.136:8008
etcd3:host:10.0.0.133:2379etcd3: true
bootstrap:dcs:ttl: 30loop_wait: 10retry_timeout: 10maximum_lag_on_failover: 1048576initdb:- encoding: UTF8- data-checksumspostgresql:use_pg_rewind: truepg_hba:- local   all             all                                     trust- host    all             haproxy         10.0.0.137/32           trust- host    all             all             0.0.0.0/0               scram-sha-256- host    all             all             ::1/128                 scram-sha-256- local   replication     all                                     scram-sha-256- host    replication     patroni         10.0.0.134/32           trust- host    replication     patroni         10.0.0.135/32           trust- host    replication     patroni         10.0.0.136/32           trust- host    replication     all             0.0.0.0/0               scram-sha-256parameters:primary_conninfo: 'host=10.0.0.138 port=5432 user=patroni password=patroni'wal_level: logicalhot_standby: onmax_connections: 100max_wal_senders: 10max_replication_slots: 10max_prepared_transactions: 0max_locks_per_transaction: 64wal_log_hints: ontrack_commit_timestamp: offarchive_mode: onarchive_command: 'mkdir -p /home/postgres/wal_archive && test ! -f /home/postgres/wal_archive/%f && cp %p /home/postgres/wal_archive/%f'master_start_timeout: 300synchronous_mode: truesynchronous_mode_strict: falsesynchronous_node_count: 1
postgresql:listen: '*'connect_address: 10.0.0.136:5432data_dir: /home/postgres/pg/databin_dir: /home/postgres/pg/binauthentication:replication:username: patronipassword: patronisuperuser:username: postgrespassword: postgresparameters:listen_addresses: '*'port: 5432max_connections: 200superuser_reserved_connections: 10shared_buffers: 512MBwal_level: logicalhot_standby: onmax_wal_senders: 10max_replication_slots: 10wal_log_hints: on
tags:nofailover: truenoloadbalance: falseclonefrom: falsenosync: true
这里配置文件中有bootstrap.postgresql.parameters 这个地方配置的是动态参数,
postgresql.parameters主要争对对应的节点的独立参数,edit-config指令主要修改的是bootstrap.postgresql.parameters的动态参数
创建callback脚本,
## vim /home/postgres/vip_manager.sh#!/bin/bash
readonly cb_name=$1
readonly role=$2
readonly scope=$3VIP=10.0.0.138
VIPBRD=10.0.0.255
VIPNETMASK=255.255.255.0
VIPNETMASKBIT=24
VIPDEV=ens33
VIPLABEL=1PATH=$PATH:/sbin:/usr/sbinfunction usage() {echo "Usage: $0 <on_start|on_stop|on_role_change> <role> <scope>"exit 1
}function addvip(){echo "`date +%Y-%m-%d\ %H:%M:%S,%3N` INFO: Adding VIP ${VIP} to ${VIPDEV}"sudo /sbin/ip addr add ${VIP}/${VIPNETMASKBIT} brd ${VIPBRD} dev ${VIPDEV} label ${VIPDEV}:${VIPLABEL} || echo "Failed to add VIP"sudo /usr/sbin/arping -q -A -c 1 -I ${VIPDEV} ${VIP} || echo "Failed to send ARP"
}function delvip(){echo "`date +%Y-%m-%d\ %H:%M:%S,%3N` INFO: Deleting VIP ${VIP} from ${VIPDEV}"sudo /sbin/ip addr del ${VIP}/${VIPNETMASKBIT} dev ${VIPDEV} label ${VIPDEV}:${VIPLABEL} || echo "Failed to delete VIP"sudo /usr/sbin/arping -q -A -c 1 -I ${VIPDEV} ${VIP} || echo "Failed to send ARP"
}echo "`date +%Y-%m-%d\ %H:%M:%S,%3N` WARNING: patroni callback $cb_name $role $scope"case $cb_name inon_stop)delvip;;on_start);;on_role_change)if [[ $role == 'master' ]]; thenaddvipelif [[ $role == 'slave' ]] || [[ $role == 'replica' ]] || [[ $role == 'logical' ]]; thendelvipfi;; *)usage;;
esac
对以上脚本授予执行权限
授予 postgres  sudo权限
chmod +x /home/postgres/vip_manager.sh
以上指令用于清空防火墙规则 如果停用了防火墙,可以将其清除掉
#sudo /sbin/iptables -F启动patroni 进行测试
# 启动前 停止PG运行
pg_ctl stop
# 启动 patroni
patroni ~/patroni.yaml
查看集群运行状态
# 使用API
curl -s http://10.0.0.135:8008/patroni
curl -s http://10.0.0.135:8008/health
# 使用patronictl 查看
patronictl -c /home/postgres/patroni.yaml list 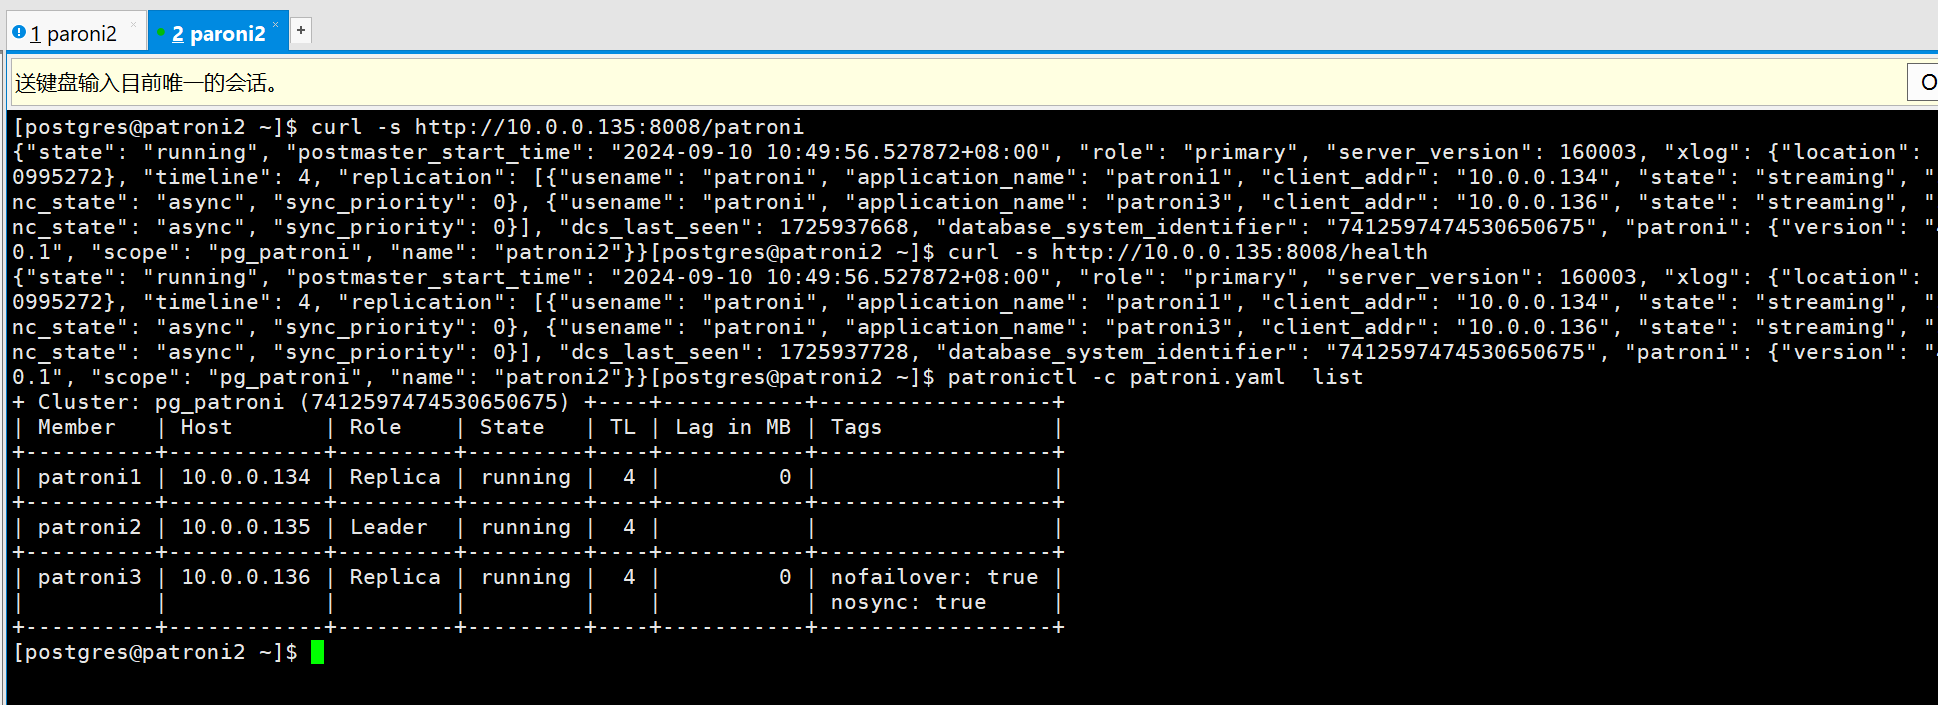
创建开机自启动
## vim /usr/lib/systemd/system/patroni.service[Unit]
Description=Patroni PostgreSQL High Availability
After=network.target[Service]
Type=simple
User=postgres
Group=postgres
ExecStart=/home/postgres/.local/bin/patroni   /home/postgres/patroni.yaml
Restart=on-failure
RestartSec=5TimeoutSec=300[Install]
WantedBy=multi-user.target
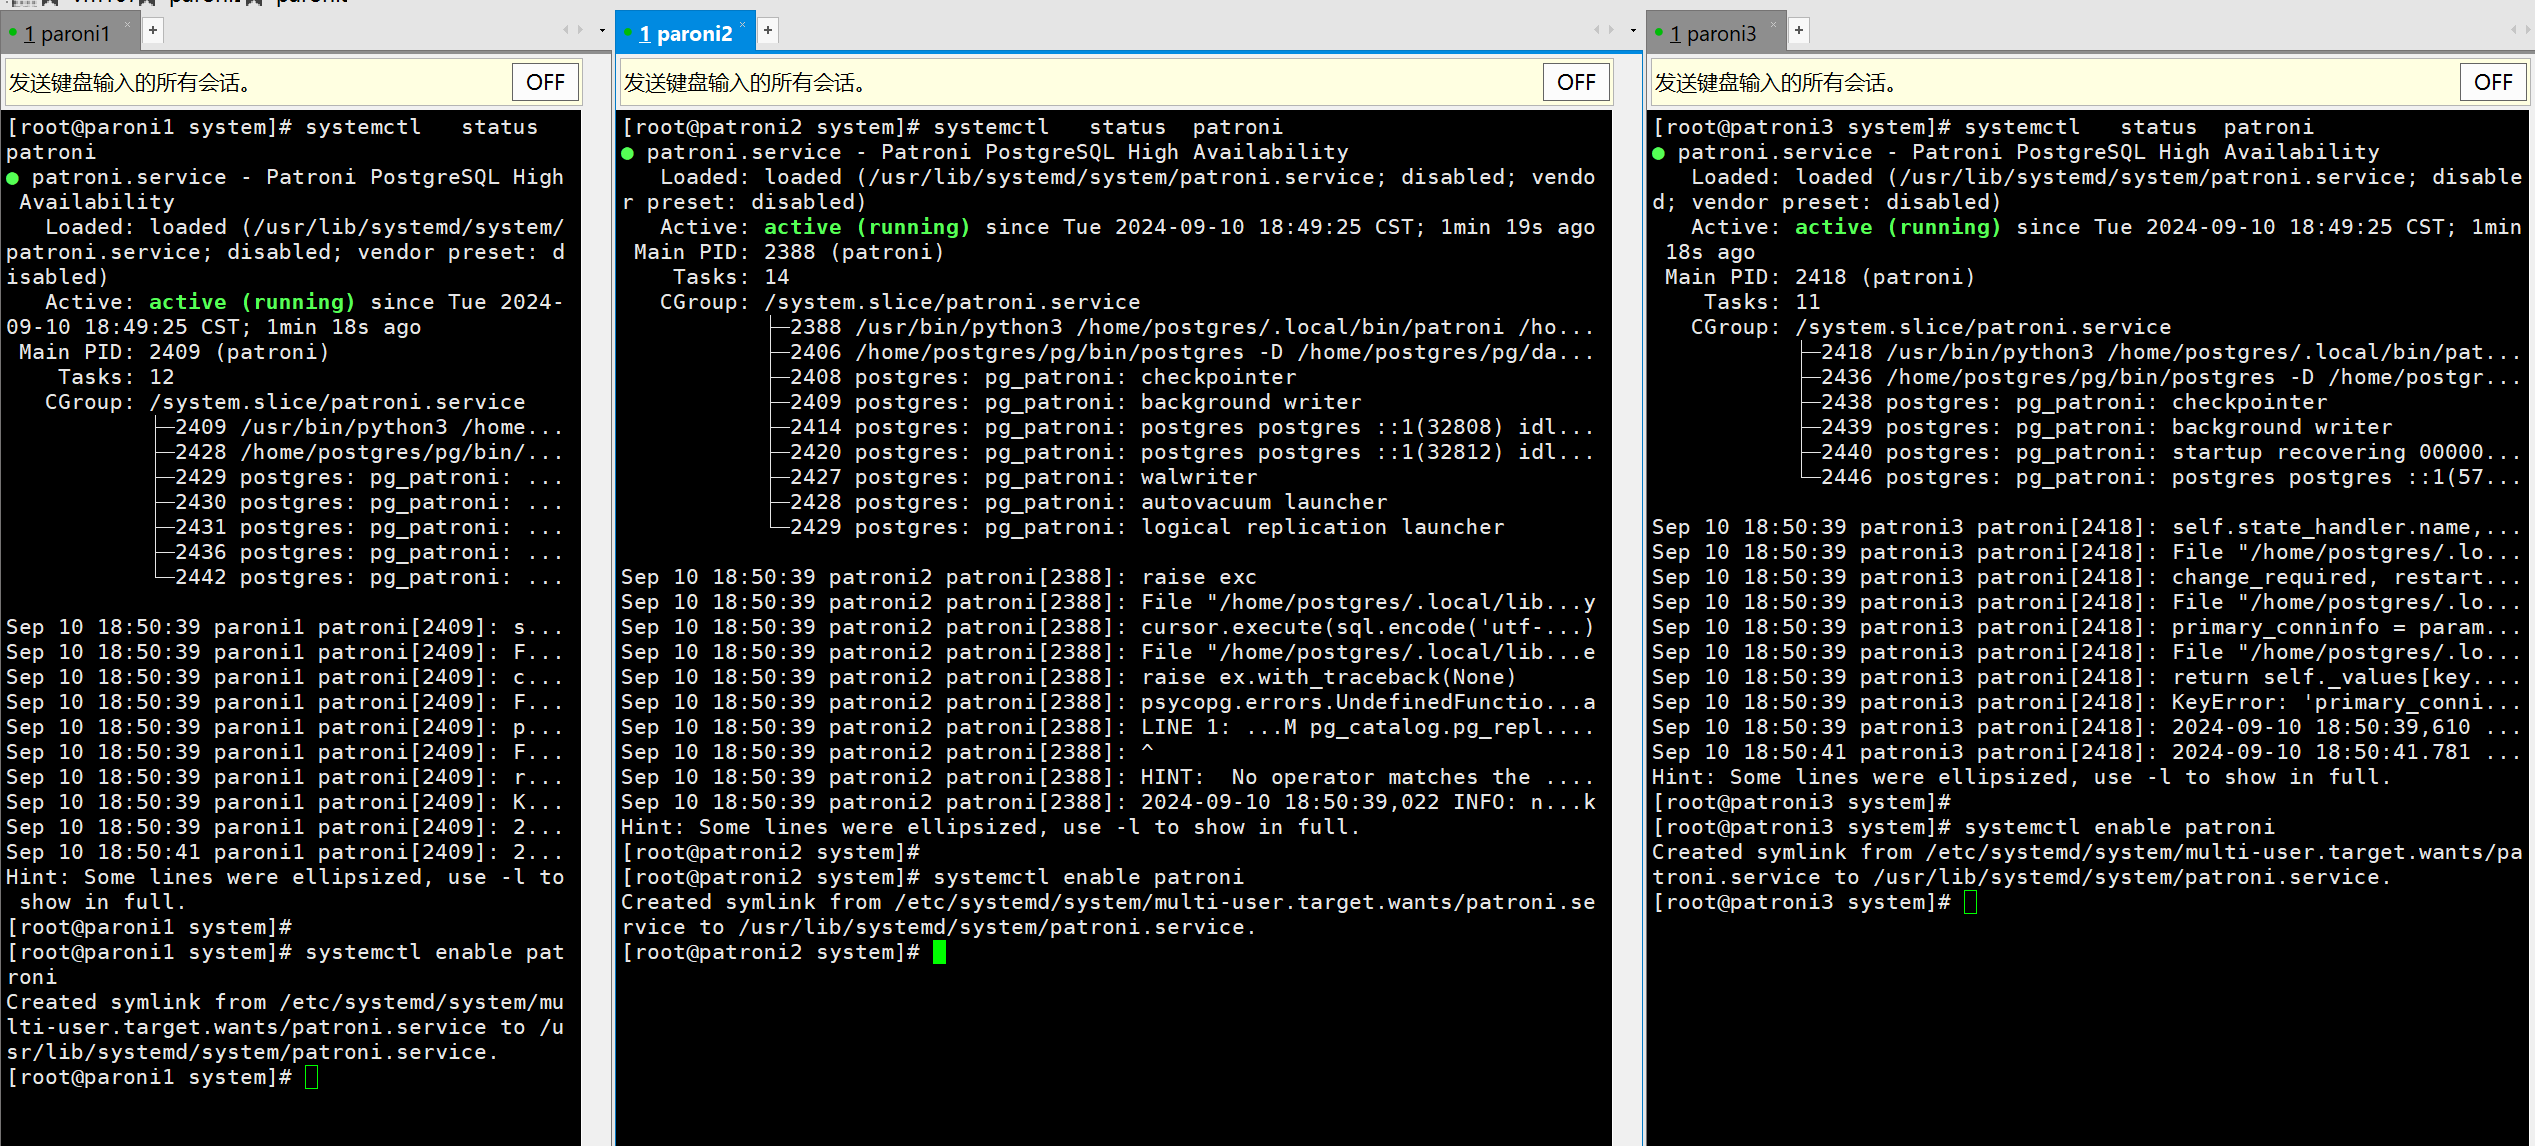
停掉patroni 之后 使用systemctl 在root用户下启动所有patroni节点
systemctl daemon-reload
systemctl start patroni
systemctl status patroni
systemctl enable patroni
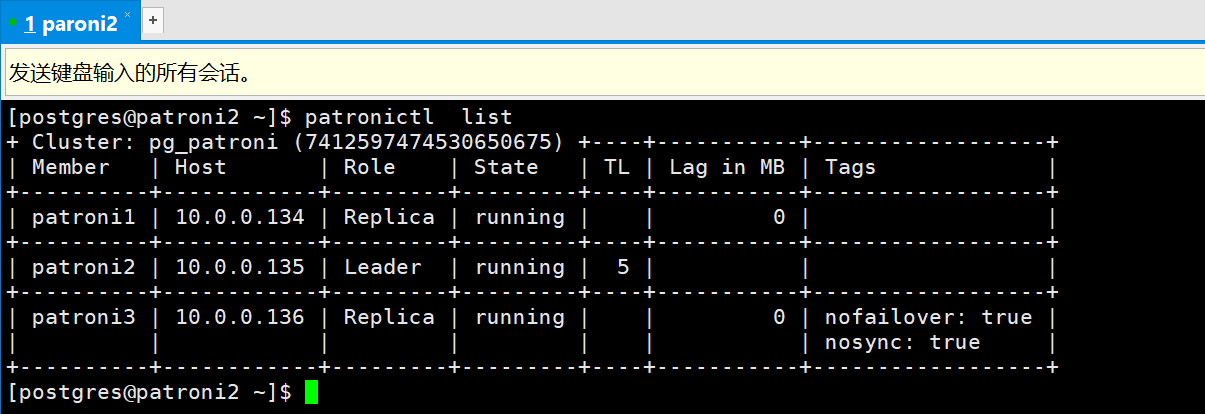
为了 方便操作 创建一个alias
## vim ~/.bash_profile
alias patronictl='patronictl  -c /home/postgres/patroni.yaml'
## 或者设置环境变量
export PATRONI_CONFIGURATION=/home/postgres/patroni.yaml
以上两种方法都可以简化每一次执行patronictl 的指令长度。省略-c /home/postgres/patroni.yaml 的指定。
配置haproxy
对于haproxy,我个人更推荐使用pgbouncer作为负载均衡的配置,部署和变更以及参数调整相对更为简单,两者工作原理仍然又较大区别。最终都可以实现分散负载的作用。
添加依赖包
yum -y install gcc automake autoconf libtool make
useradd haproxy
su - haproxy
tar -zxvf haproxy-3.0.0.tar.gz
cd haproxy-3.0.0/
make PREFIX=/haproxy TARGET=linux-glibc
make install PREFIX=/haproxy
sudo mkdir -p /run/haproxy
sudo mkdir -p /var/lib/haproxy
sudo chown haproxy:haproxy /run/haproxy
sudo chown haproxy:haproxy  /var/lib/haproxy
编辑haproxy 配置文件
vim /haproxy/sbin/haproxy.cfg
globallog /dev/log local0log /dev/log local1 noticechroot /var/lib/haproxystats socket /run/haproxy/admin.sock mode 660 level adminstats timeout 30suser haproxygroup haproxydaemondefaultslog globaloption tcplogoption dontlognulltimeout connect 5000mstimeout client 50000mstimeout server 50000msfrontend postgres_frontendbind 10.0.0.138:5432  # 确保这个 IP 地址在网络接口上可用acl is_write path_beg /writeuse_backend pg_master if is_writedefault_backend pg_slavesbackend pg_mastermode tcpoption tcp-checkserver pg_master 10.0.0.135:5432 checkbackend pg_slavesmode tcpoption tcp-checkbalance roundrobinserver pg_slave_1 10.0.0.134:5432 check port 5432 weight 100server pg_slave_2 10.0.0.135:5432 check port 5432 weight 100server pg_slave_3 10.0.0.136:5432 check port 5432 weight 100# Stats page configuration
frontend statsbind *:8404  # 监听所有接口的 8404 端口mode http  # 设置为 HTTP 模式stats enablestats uri /statsstats auth admin:adminstats refresh 10sstats show-nodestats show-legends
以上配置文件内容,最后一行一定要保留换行符。
创建开机自启动项目
## vim /usr/lib/systemd/system/haproxy.service[Unit]Description=HAProxy Load BalancerAfter=network.target[Service]ExecStart=/haproxy/sbin/haproxy -f /haproxy/sbin/haproxy.cfgExecReload=/bin/kill -USR2 $MAINPIDUser=haproxyGroup=haproxyRestart=always[Install]WantedBy=multi-user.target启动haproxy
sudo systemctl daemon-reload
sudo systemctl start haproxy
sudo systemctl status haproxy
sudo systemctl enable haproxy
访问haproxy 监控页面
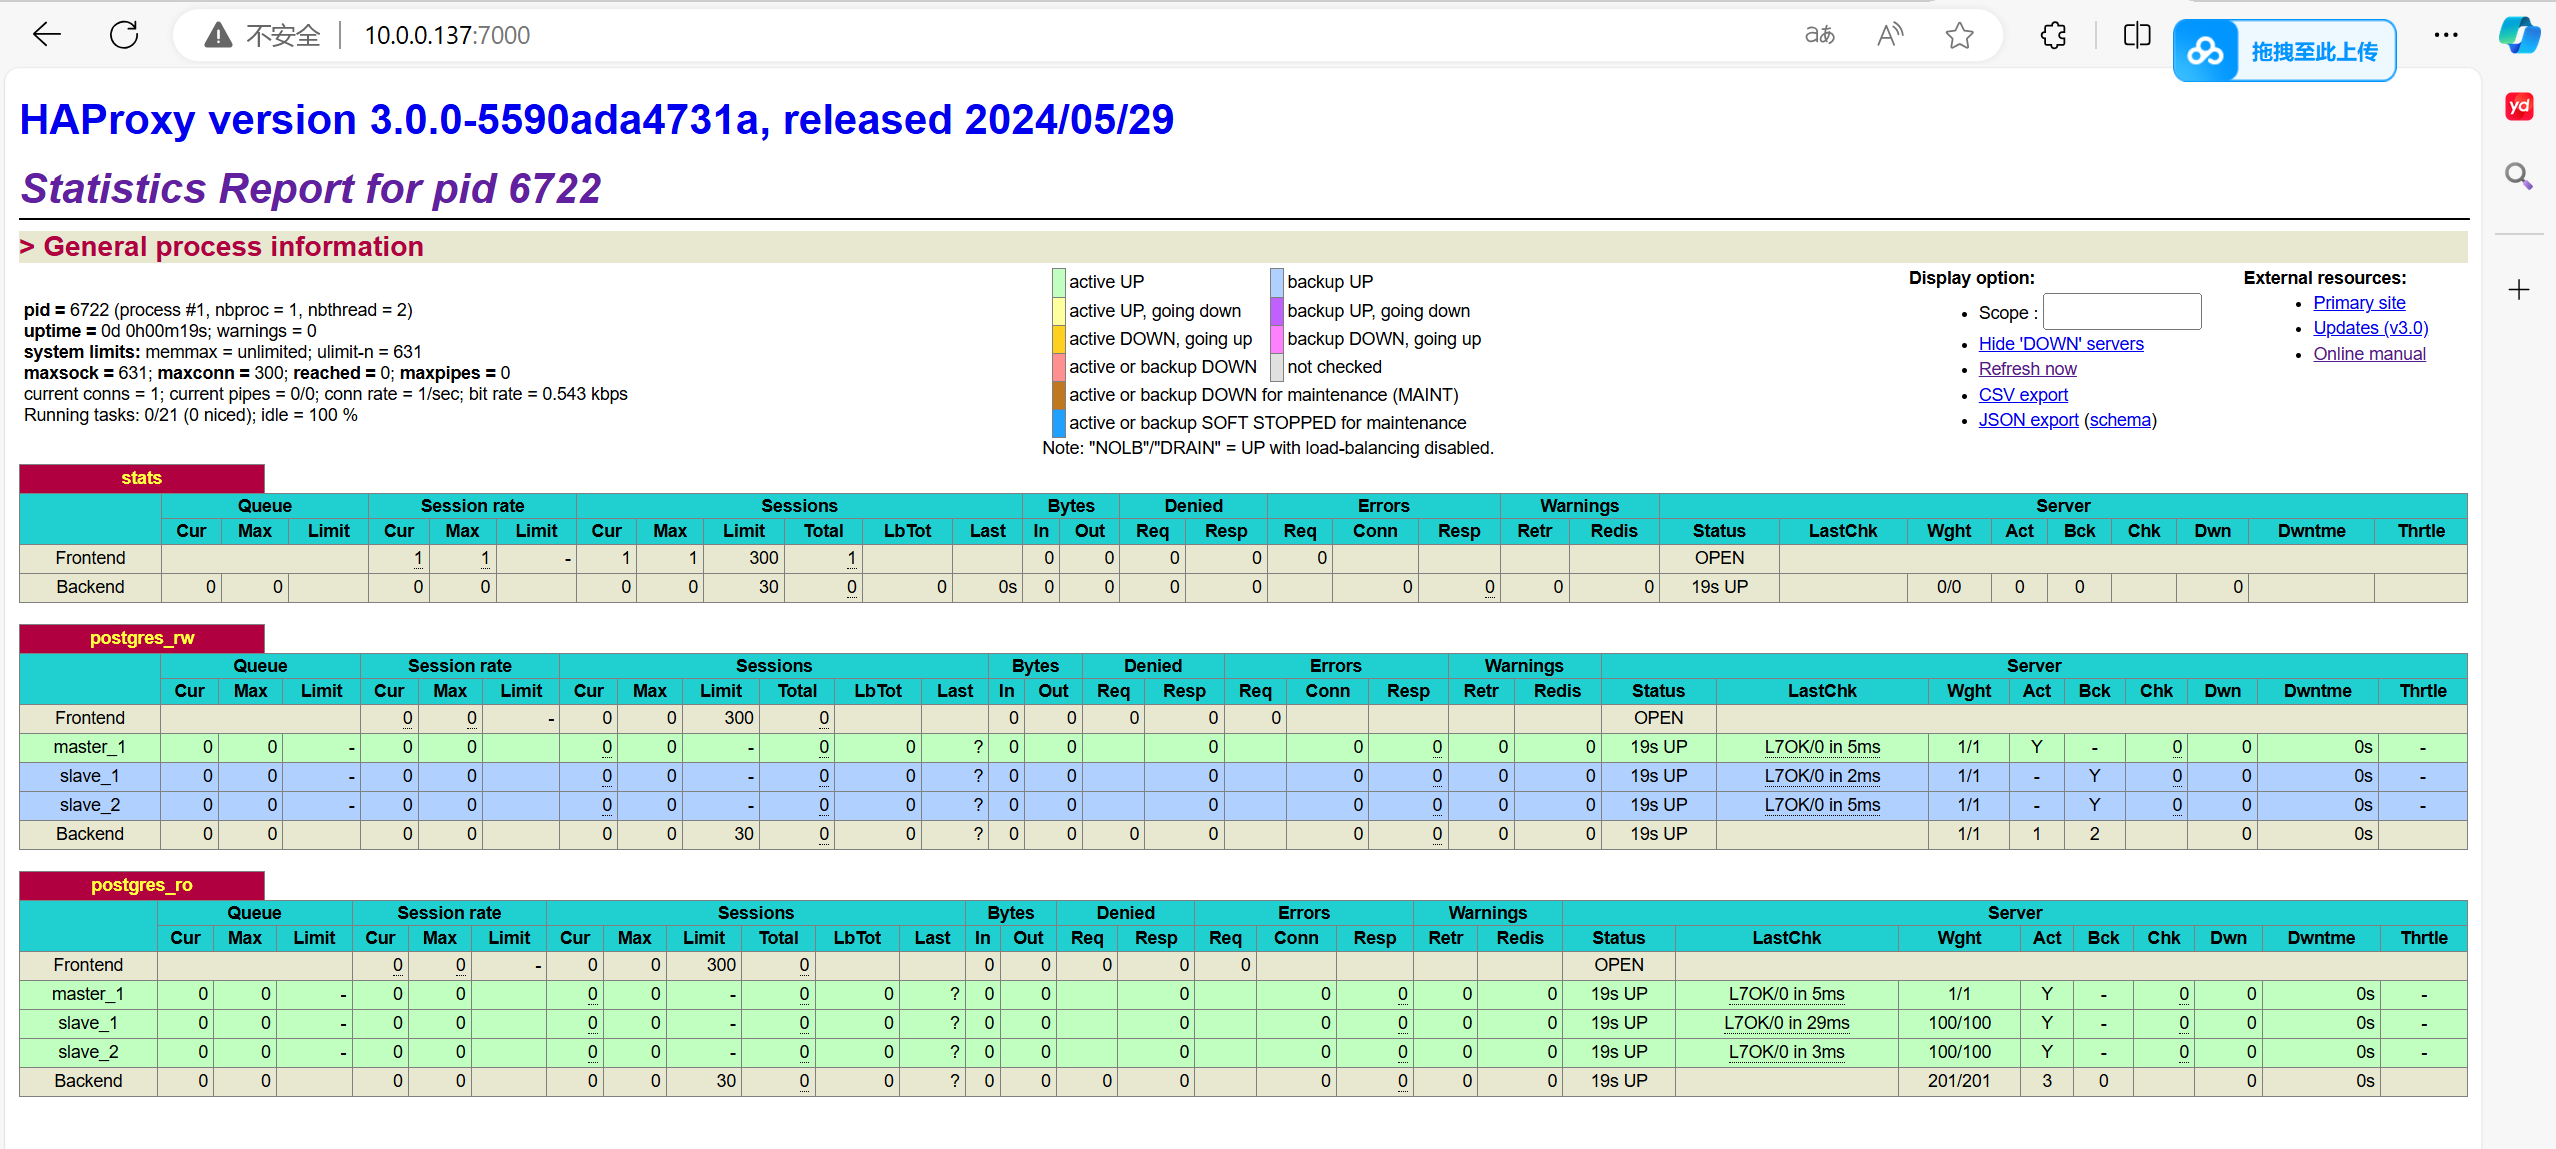
参数解释
proxies:代理配置段
defaults:为frontend,backend,listen提供默认配置
frontend:前端,相当于nginx中的server{}
backend:后端,相当于nginx中的upstream0
listen:同时拥有前端和后端配置,配置简单,生产推荐使用