一. 为什么后端需要配置Swagger
在前后端分离的项目中,后端配置swagger可以很好的帮助前端人员了解后端接口参数和数据传输。
Swagger是一个用于设计,构建和文档化API的开源框架。在Go语言中,Swagger可以帮助后端开发人员快速创建和定义RESTful API,并提供自动生成接口文档的功能,这些文档包含了API的详细信息以及如何使用他们的说明。
RESTful API:
RESTful是一个网络应用程序的设计风格,基于HTTP协议。使用XML或JSON格式定义统一标准接口。强调资源,统一接口,URL和无状态的设计风格。
总的来说,RESTful就是一个资源定位,资源操作的风格。不是标准也不是协议,只是一种风格。
- 资源:互联网所有的事务都可以抽象为资源
- 资源操作:分为POST,DELETE,PUT,GET四种方法,使用不同的方法对资源进行操作(增,删,改,查)
传统风格与RESTful风格对比:
- 传统风格:通过不同的参数实现不同的效果,方法单一。
http://127.0.0.1/item/queryItem.action?id=1 (查询,GET) http://127.0.0.1/item/saveItem.action (新增,POST) http://127.0.0.1/item/updateItem.action (更新,POST) http://127.0.0.1/item/deleteItem.action?id=1 (删除,GET或POST)
- RESTful方式操作资源:通过不同的请求方式来实现不同的效果。
如下:请求资源地址相同,但是功能不同。
http://127.0.0.1/item/1 (查询,GET)
http://127.0.0.1/item (新增,POST)
http://127.0.0.1/item (更新,PUT)
http://127.0.0.1/item/1 (删除,DELETE)
现在的网络上基本上全是RESTful风格。
二. 基本使用
2.1 安装
安装最新swagger库:
go install github.com/swaggo/swag/cmd/swag@latest
测试是否安装成功:

2.2 使用步骤
以Gin框架为例,需要用到gin-swagger库。安装:
go get -u github.com/swaggo/gin-swagger //gin-swagger中间件
go get -u github.com/swaggo/files //swagger嵌入文件
gin-swagger使用步骤:
- 按照swagger要求给接口代码添加声明式注释,具体参照声明式注释格式。
- 使用swag工具扫描代码自动生成API接口文档数据
- 使用gin-swagger渲染在线接口文档页面
2.3 添加注释
在程序入口main函数上以注释的方式写下项目相关介绍信息。
// @title Swagger Example API
// @version 1.0
// @description this is a sample server celler server
// @termsOfService https://www.swagger.io/terms/// @contact.name 氷
// @contact.url http://www.swagger.io/support
// @contact.email abc.xyz@qq.com// @license.name Apache 2.0
// @license.url http://www.apache.org/licenses/LICENSE-2.0.html// @host 127.0.0.1:8080
// @BasePath /api/v1- title:文档标题
- version:版本
- description,termsOfService,contact.name contact.url,contact.email都是一些声明,可不写。
- license:是必须的
- host,BasePath:如果你想直接swagger调试API,这两项需要填写正确。前者为服务文档的端口,ip。后者为基础路径,像我们这里就是"/api/v1"。
- 在原文档中还有securityDefinitions.basic , securityDefinitions.apikey等,这些都是用来做认证的。
// @Summary 测试sayHello
// @Description 向你说hello
// @Tags 测试
// @Accept json
// @Param name query string true "人名"
// @Success 200 {string} string "{"msg": "hello wy"}"
// @Failure 400 {string} string "{"msg": "who are you"}"
// @Router /hello [get]
通用API信息:
| 注释 | 描述 |
|---|---|
| Accept | Accept字段仅适用于带有request body的请求,例如POST、PUT和PATCH。只有使用这些请求方法的接口才需要定义接收的 MIME 类型列表。 |
| Produce | 定义接口返回的 MIME 类型列表。 |
MIME类型
| 别名 | MIME Type |
| json | application/json |
| xml | text/xml |
| plain | text/plain |
| html | text/html |
| mpfd | multipart/form-data |
| x-www-form-urlencoded | application/x-www-form-urlencoded |
| json-api | application/vnd.api+json |
| json-stream | application/x-json-stream |
| octet-stream | application/octet-stream |
| png | image/png |
| jpeg | image/jpeg |
| gif | image/gif |
API操作:
- @Summary 接口功能的简要概述。
- @Description 接口的详细说明。
- @Tags 接口的标签列表,可以有多个标签,每个标签用英文的逗号分隔。这样接口会按照标签进行分类。
- @Param 接口接收的数据,参数用空格分隔。参数分别是:“参数名” “参数类型” “数据类型” “是否必须” “参数的描述” “其它属性”。
- @Success 接口的成功响应语法格式:“响应的状态码” “响应参数类型” “响应数据类型” “描述信息”。
- @Failure 接口的故障响应语法格式:“响应的状态码” “响应参数类型” “响应数据类型” “描述信息”。
- @Response 与@Success和@Failure的作用相同。
- @Router 接口的路由定义,用空格隔开路径和请求方法。 path [httpMethod]
- @Security 定义接口的安全性
Param
参数类型
- query:该类型参数直接拼接在URL中。URL中后面的参数
- path:该类型参数一般组合在URL中。如:/api/v1/:id
- header:
- body
- formData:该类型参数一般是POST,PUT方法所用。
数据类型
- string (string)
- integer (int, uint, uint32, uint64)
- number (float32)
- boolean (bool)
- object (struct)
如果你是上传文件可以使用file,但参数类型一定是formData
其它属性:
除了上面这些属性外,我们还可以为该参数填写一些额外的属性,如枚举,默认值,值范围等。
枚举
// @Param enumstring query string false "string enums" Enums(A, B, C)
// @Param enumint query int false "int enums" Enums(1, 2, 3)
// @Param enumnumber query number false "int enums" Enums(1.1, 1.2, 1.3)值添加范围
// @Param string query string false "string valid" minlength(5) maxlength(10)
// @Param int query int false "int valid" mininum(1) maxinum(10)设置默认值// @Param default query string false "string default" default(A)
Success/Failure
响应状态码:也就是200,400,500这些
响应参数类型:整个数据类型。string表示字符串,object表示自定义类型,anrry表示数组
响应数据类型:具体当个数据的类型。
描述信息:其它说明。
例如:
表示响应状态码200 响应是参数字符串类型,数据也是字符串类型
// @Success 200 {string} string表示响应状态码200 响应是参数自定义类型,数据也是自定义类型为main包中的File类型
// @Success 200 {object} main.File表示响应状态码200 响应是参数数组类型,数据类型表示数组中单个元素类型为main包中的File类型
//@Success 200 {anrry} main.File表示响应状态码200 响应是参数字符串类型,数据类型字符串表示的是json类型// @Success 200 {string} json ""
Router
格式:
不需要加基础路径。
//Router /path/to/handle [http方法]2.4 测试示例
自动生成swagger文档
package mainimport ("net/http""github.com/gin-gonic/gin"swaggerFiles "github.com/swaggo/files"ginSwagger "github.com/swaggo/gin-swagger"
)// @title Swagger Example API
// @version 1.0
// @description this is a sample server celler server
// @termsOfService https://www.swagger.io/terms/// @contact.name 氷
// @contact.url http://www.swagger.io/support
// @contact.email abc.xyz@qq.com// @license.name Apache 2.0
// @license.url http://www.apache.org/licenses/LICENSE-2.0.html// @host 127.0.0.1:8080
// @BasePath /api/v1
func main() {r := gin.Default()//注册swagger api相关路由r.GET("/swagger/*any", ginSwagger.WrapHandler(swaggerFiles.Handler))v := r.Group("/api/v1"){v.GET("/hello", helloHandler)}r.Run()
}// helloHandler
// @Summary 测试sayHello
// @Description 向你说hello
// @Tags 测试
// @Accept json
// @Param name query string true "人名"
// @Success 200 {string} string "{"msg": "hello wy"}"
// @Failure 400 {string} string "{"msg": "who are you"}"
// @Router /hello [get]
func helloHandler(c *gin.Context) {name := c.Query("name")if name == "" {c.JSON(http.StatusBadRequest, gin.H{"msg": "who are you"})return}c.JSON(http.StatusOK, gin.H{"msg": "hello" + name})
}
在main.go目录下执行swag init就可以当前目录下自动生成文档:

然后我们在main.go中导入自动生成的docs包,运行:
package mainimport ("net/http""github.com/gin-gonic/gin"swaggerFiles "github.com/swaggo/files"ginSwagger "github.com/swaggo/gin-swagger"_ "sample-app/swagger/docs"
)//...
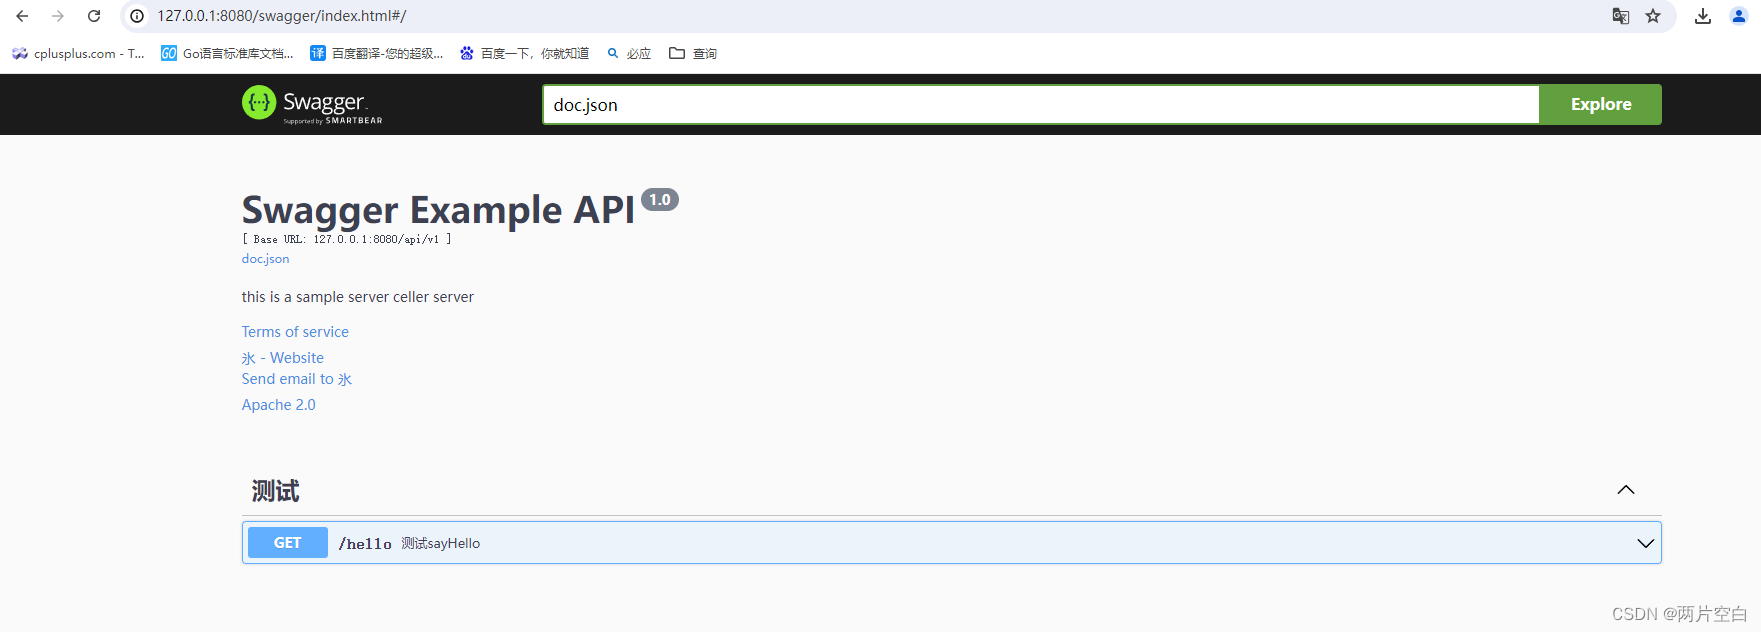
浏览器打开http://127.0.0.1:8080/swagger/index.html,我们可以看到对于接口文档。

介绍:

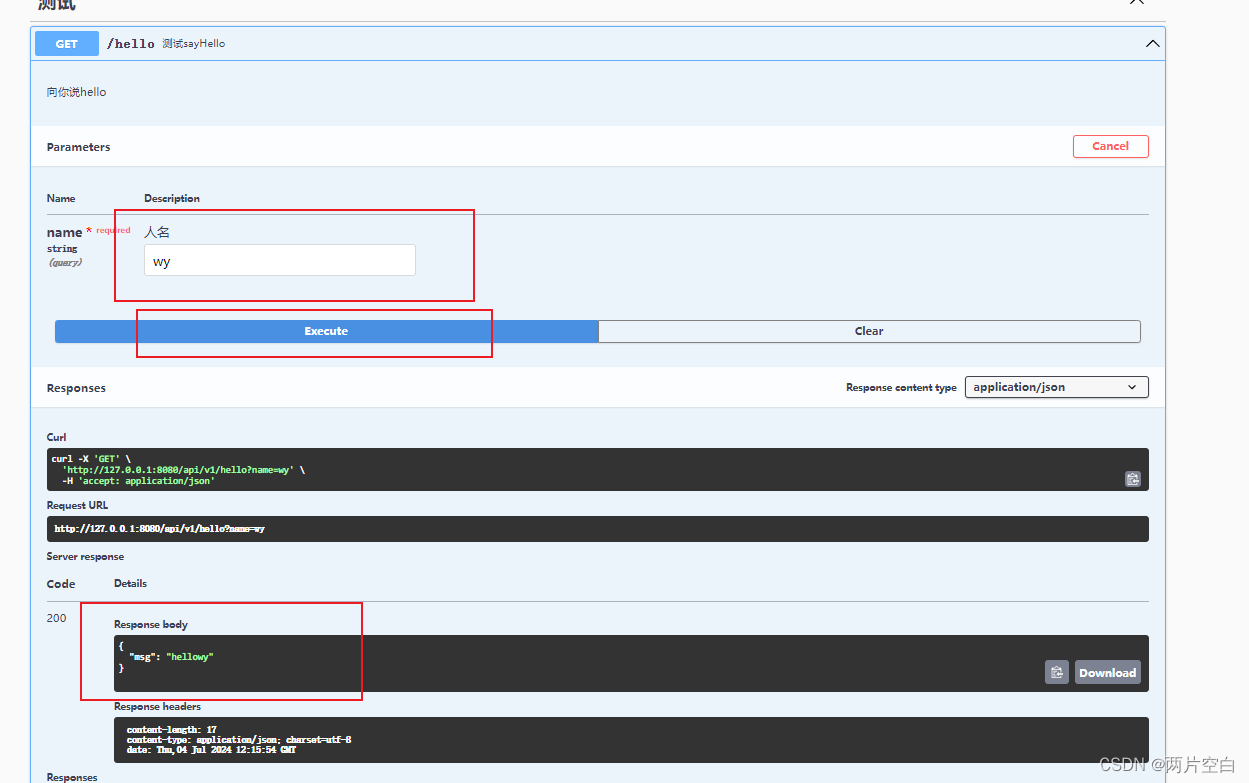
点击Try it out就可以进行测试:

2.5 多个tags
package mainimport ("net/http""github.com/gin-gonic/gin"swaggerFiles "github.com/swaggo/files"ginSwagger "github.com/swaggo/gin-swagger"_ "sample-app/swagger/docs"
)// @title Swagger Example API
// @version 1.0
// @description this is a sample server celler server
// @termsOfService https://www.swagger.io/terms/// @contact.name 氷
// @contact.url http://www.swagger.io/support
// @contact.email abc.xyz@qq.com// @license.name Apache 2.0
// @license.url http://www.apache.org/licenses/LICENSE-2.0.html// @host 127.0.0.1:8080
// @BasePath /api/v1
func main() {r := gin.Default()//注册swagger api相关路由r.GET("/swagger/*any", ginSwagger.WrapHandler(swaggerFiles.Handler))v := r.Group("/api/v1"){v.GET("/hello", helloHandler)v.GET("/hello1", helloHandler1)v.GET("/load", loadHandler)}r.Run()
}// @Summary 测试sayHello
// @Description 向你说hello
// @Tags 测试
// @Accept json
// @Param name query string true "人名"
// @Success 200 {string} string "{"msg": "hello wy"}"
// @Failure 400 {string} string "{"msg": "who are you"}"
// @Router /hello [get]
func helloHandler(c *gin.Context) {name := c.Query("name")if name == "" {c.JSON(http.StatusBadRequest, gin.H{"msg": "who are you"})return}c.JSON(http.StatusOK, gin.H{"msg": "hello" + name})
}// @Summary 测试sayHello other
// @Description 向你说hello
// @Tags 测试
// @Accept json
// @Param name query string true "人名"
// @Success 200 {string} string "{"msg": "hello wy"}"
// @Failure 400 {string} string "{"msg": "who are you"}"
// @Router /hello1 [get]
func helloHandler1(c *gin.Context) {name := c.Query("name")if name == "" {c.JSON(http.StatusBadRequest, gin.H{"msg": "who are you"})return}c.JSON(http.StatusOK, gin.H{"msg": "hello" + name})
}// @Summary 加载账号密码
// @Description 加载账号密码
// @Tags 加载
// @Accept json
// @Param id query string true "账号"
// @Param passwd query string true "密码"
// @Success 200 {string} json "{"msg": "id:asd passwd:2123"}"
// @Failure 400 {string} json "{"msg": "账号或密码错误"}"
// @Router /load [get]
func loadHandler(c *gin.Context) {name := c.Query("id")passwd := c.Query("passwd")if name == "" || passwd == "" {c.JSON(http.StatusBadRequest, gin.H{"msg": "账号或密码错误"})return}c.JSON(http.StatusOK, gin.H{"msg": "id:" + name + " passwd:" + passwd})
}
重新在命令行输入swag init。生成swag文档,运行main.go。访问为:http://127.0.0.1:8080/swagger/index.html

三. 优化
swagger文档只是我们测试的时候需要,当我们产品上线后,接口文档是不应该给用户的,并且带有接口文档的包会大很多(swaggo是直接build到二进制中的)
想处理这种情况,我们可以在编译的时候优化一下。比如利用build -tags来控制是否编译文档。
go build -tags是一个 Go 语言的命令行选项,用于在构建过程中启用或禁用特定的编译标签。这些标签通常用于控制代码的特定行为,例如启用或禁用某些功能、优化等比如:下面表示,
tag1和tag2是你想要启用的标签。你可以根据需要添加更多的标签,用空格分隔。go build -tags "tag1 tag2"在你的 Go 代码中,你可以使用
// +build注释来指定哪些文件应该在特定的标签下编译。
在main.go声明swagHandler变量,并在该参数不为空时才加入路由。编译带docs标签的swagHandler才不会为空。才可以使用swagger接口文档。
docs.go
//go:build docs
// +build docspackage mainimport (_ "sample-app/swagger/docs"swaggerFiles "github.com/swaggo/files"ginSwagger "github.com/swaggo/gin-swagger"
)func init() {swagHandler = ginSwagger.WrapHandler(swaggerFiles.Handler)
}
main.go
package mainimport ("net/http""github.com/gin-gonic/gin"_ "sample-app/swagger/docs"
)var swagHandler gin.HandlerFunc// @title Swagger Example API
// @version 1.0
// @description this is a sample server celler server
// @termsOfService https://www.swagger.io/terms/// @contact.name 氷
// @contact.url http://www.swagger.io/support
// @contact.email abc.xyz@qq.com// @license.name Apache 2.0
// @license.url http://www.apache.org/licenses/LICENSE-2.0.html// @host 127.0.0.1:8080
// @BasePath /api/v1
func main() {r := gin.Default()//不为空,才会加入swagger路由if swagHandler != nil {//注册swagger api相关路由r.GET("/swagger/*any", swagHandler)}v := r.Group("/api/v1"){v.GET("/hello", helloHandler)}r.Run()
}// @Summary 测试sayHello
// @Description 向你说hello
// @Tags 测试
// @Accept json
// @Param name query string true "人名"
// @Success 200 {string} string "{"msg": "hello wy"}"
// @Failure 400 {string} string "{"msg": "who are you"}"
// @Router /hello [get]
func helloHandler(c *gin.Context) {name := c.Query("name")if name == "" {c.JSON(http.StatusBadRequest, gin.H{"msg": "who are you"})return}c.JSON(http.StatusOK, gin.H{"msg": "hello" + name})
}
带标签比不带标签编译出来的文件大小大很多。

