一直再找VisionMaster 脚本获取sol自身路径的办法.无奈一直没找到.今天无聊看文档 发现了一个点,于是紧跟着尝试了一下 发现可以用 所以记录一下过程.
还是老生常谈介绍一下创作背景: 先说VM的模式
1. VM 应用 简单应用场景,VM 能够实现业务逻辑,无定制界面需求,无外围(数据库、图表统计)功能需求。该模式无需任何开发,轻松上手,调参方便。
2. VM SDK 开发(亦称 VM 二次开发) 用户希望部分业务逻辑由自己实现(例如定位计算等),有定制界面和外围功能需求,或希望把 VM嵌入客户开发的软件中。该开发模式代码量少、开发周期较短,且 VM 提供各类流程与参数编辑控件,能够满足绝大多数应用需求,是最为推荐的开发模式。
3. 算子 SDK 开发 用户希望全部业务逻辑由自己实现,该开发模式代码量大、开发周期长,海康只提供算子库和少量界面控件,能够满足部分应用需求。
4. 算子模块开发(只支持 C++) 用户希望将自己开发的算子封装成模块并能在 VM 中使用(例如拖拽、订阅等),补充项目所需的算子功能。该模式需要开发者有一定的算法开发经验和编程功底。
上面的是官方说辞咱自己也感受了 说一下:
首先4就是自己做一个VM的模块
1就是直接VM拖拉拽托界面 完事直接用VM运行. 我叫它纯VM
2.就是给拖拉拽套一个框该拖拉拽还是一样的,输入输出控制层面暴露出来给外面这个框.
3.类似opencv这种模式.
今天不说2/3/4;说一下1:
一般初级应用都是"纯VM"就部署到现场了,因为现在传统常见应用都要求短平快 你根本没别的时间干其他.
但是纯VM获取自己的路径还是比较棘手的:
获取自己的路径的意义在于 方便管理参数和配置文件;
什么 模板 各种标定文件 存图路径之类的 散乱的存放在机器的各个地方.
得到方案路径的好处:就可以把 工程依赖的所有文件 统一管理.
首先:全局脚本:
using VM.Core;
using VM.PlatformSDKCS;
public int Getpath(){/*using System;using System.IO;using VM.Core;using VM.PlatformSDKCS;string strPath = VmSolution.Instance.SolutionPath;*/VmProcedure pro1 = (VmProcedure)VmSolution.Instance["流程1"];if (pro1 != null){ProcedureParam proParam = pro1.ModuParams;if (proParam != null){string filePath;// 获取当前VM 的.sol文件 路径(完整) @"C:\Users\Administrator\Desktop\获取方案路径.sol"filePath = VmSolution.Instance.SolutionPath;// 流程输入需要设置对应的 变量//设置流程输入string 流程输入 "SOLPath" proParam.SetInputString("SOLPath0", new InputStringData[] { new InputStringData() { strValue = filePath} }); }}return 0;}在初始化和处理函数里面调用一下:
public int Init(){Getpath();return InitSDK();}public int Process(){Getpath();....................}算了我还是把整个全局脚本放出来吧:
using System;
using VM.GlobalScript.Methods;
using System.Windows.Forms;
using iMVS_6000PlatformSDKCS;
using System.Runtime.InteropServices;using VM.Core;
using VM.PlatformSDKCS;public class UserGlobalScript : UserGlobalMethods,IScriptMethods
{public int Getpath(){/*using System;using System.IO;using VM.Core;using VM.PlatformSDKCS;string strPath = VmSolution.Instance.SolutionPath;*/VmProcedure pro1 = (VmProcedure)VmSolution.Instance["流程1"];if (pro1 != null){ProcedureParam proParam = pro1.ModuParams;if (proParam != null){string filePath;// 获取当前VM 的.sol文件 路径(完整) @"C:\Users\Administrator\Desktop\获取方案路径.sol"filePath = VmSolution.Instance.SolutionPath;// 流程输入需要设置对应的 变量//设置流程输入string    流程输入 "SOLPath" proParam.SetInputString("SOLPath0", new InputStringData[] { new InputStringData() { strValue = filePath} });	}}return 0;}/// <summary>/// Init/// </summary>/// <returns>Success:return 0</returns>public int Init(){Getpath();return InitSDK();}/// <summary>/// execute function/// Single run:the function execute once/// Continuous run:Repeat the function at regular intervals/// 运行函数/// 单次执行:该函数执行一次/// 连续执行:以一定时间间隔重复执行该函数/// </summary>/// <returns>Success:return 0</returns>public int Process(){Getpath();//m_operateHandle SDK handleif (m_operateHandle == IntPtr.Zero){return ImvsSdkPFDefine.IMVS_EC_NULL_PTR;}//All processes are executed by default//If execute in your own define logic,please remove the function :DefaultExecuteProcess, Create your own logic function.//默认执行全部流程,//如果自定义流程执行逻辑,请移除DefaultExecuteProcess方法,编写自定义流程执行逻辑代码int nRet = DefaultExecuteProcess();return nRet;}/// <summary>/// SDK callback function /// </summary>public override void ResultDataCallBack(IntPtr outputPlatformInfo, IntPtr puser){base.ResultDataCallBack(outputPlatformInfo, puser);ImvsSdkPFDefine.IMVS_PF_OUTPUT_PLATFORM_INFO struInfo = (ImvsSdkPFDefine.IMVS_PF_OUTPUT_PLATFORM_INFO)Marshal.PtrToStructure(outputPlatformInfo, typeof(ImvsSdkPFDefine.IMVS_PF_OUTPUT_PLATFORM_INFO));switch (struInfo.nInfoType){//Get module result//获取模块结果数据case (uint)ImvsSdkPFDefine.IMVS_CTRLC_OUTPUT_PlATFORM_INFO_TYPE.IMVS_ENUM_CTRLC_OUTPUT_PLATFORM_INFO_MODULE_RESULT:{ImvsSdkPFDefine.IMVS_PF_MODULE_RESULT_INFO_LIST_P resultInfo = (ImvsSdkPFDefine.IMVS_PF_MODULE_RESULT_INFO_LIST_P)Marshal.PtrToStructure(struInfo.pData, typeof(ImvsSdkPFDefine.IMVS_PF_MODULE_RESULT_INFO_LIST_P));break;}///Get process execute state//获取流程运行状态case (uint)ImvsSdkPFDefine.IMVS_CTRLC_OUTPUT_PlATFORM_INFO_TYPE.IMVS_ENUM_CTRLC_OUTPUT_PLATFORM_INFO_WORK_STATE:{ImvsSdkPFDefine.IMVS_PF_MODULE_WORK_STAUS stWorkStatus = (ImvsSdkPFDefine.IMVS_PF_MODULE_WORK_STAUS)Marshal.PtrToStructure(struInfo.pData, typeof(ImvsSdkPFDefine.IMVS_PF_MODULE_WORK_STAUS));break;}default:break;}}
}
这时 工程中只有一个流程名叫 "流程1"
在"流程1"输入设置里面新建一个string"SOLPath0"变量
稍微解释一下:这里只有1个关键点2行程序2个注意事项
filePath = VmSolution.Instance.SolutionPath;//获取sol文件完整路径
//设置流程输入string    流程输入 "SOLPath"
proParam.SetInputString("SOLPath0", new InputStringData[] { new InputStringData() { strValue = filePath} });
// 当然 还得保证 第一个流程名叫 "流程1"
// "流程1" 的流程输入得有一个 "SOLPath0"的string变量
VmProcedure pro1 = (VmProcedure)VmSolution.Instance["流程1"];
proParam.SetInputString("SOLPath0", new InputStringData[] { new InputStringData() { strValue = filePath} }); 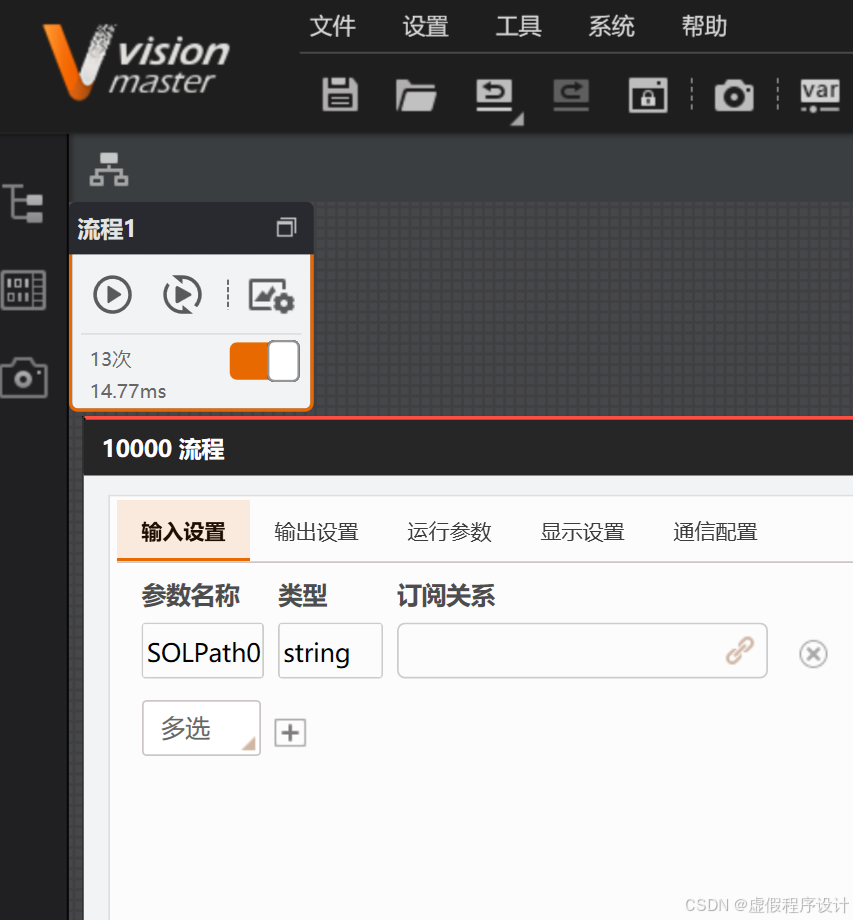
现在点击VM单次运行不出意外sol完整路径就会传入这个地方,当然你看不见的.
拖入一个脚本模块 输入订阅这个地方,脚本什么也不写;
在点击VM单次运行; 当然你得点击最外面的运行,让全局脚本运行起来,只点击脚本的执行是不妥的.
这时稳稳地看到了VM当前打开sol文件的完整路径了.
用这个路径可以做很多事情,我先来举个例子:
为了当前文章更具有艺术色彩,个人风格,我决定稍微用一点C#和 python把他们 拖下水.
首先用VS 2013 以上都可以[当然你不用VS也可以]:
目的: C# 创建 类库.NET Framrwork 4.6.1 X64 Release
我的工程名:"ScriptINI" 所以生成的目标文件叫"ScriptINI.dll"
附上类库程序:
using System;
using System.Collections.Generic;
using System.IO;
using System.Linq;
using System.Runtime.InteropServices;
using System.Text;
using System.Threading.Tasks;
// 创建 类库.NET Framrwork 4.6.1
// X64 Release
namespace ScriptINI
{/// <summary>///  INI 文件读写类/// </summary>public static class RWINI{#region 声明[DllImport("kernel32")]private static extern long WritePrivateProfileString(string section, string key, string val, string filePath);[DllImport("kernel32")]private static extern int GetPrivateProfileString(string section, string key, string def, StringBuilder retVal, int size, string filePath);#endregion 声明public static string path = AppDomain.CurrentDomain.BaseDirectory + "CFG.ini";public static string Getcwd = System.Environment.CurrentDirectory;static public bool NewWinifolder(string folderPath)//folderPath// 指定你想要检查的文件夹路径{if (!Directory.Exists(folderPath))// 检查文件夹是否存在{Directory.CreateDirectory(folderPath);// 如果文件夹不存在,则创建它return true;}else { return false; }}static public bool IsFolder(string folderPath)//folderPath// 指定你想要检查的文件夹路径{if (Directory.Exists(folderPath)) { return true; }else { return false; }}/// <summary>/// 写INI文件/// </summary>/// <param name="path">path</param>/// <param name="Section">分组节点</param>/// <param name="Key">关键字</param>/// <param name="Value">值</param>static public void Wini(string path, string Section, string Key, string Value){WritePrivateProfileString(Section, Key, Value, path);}/// <summary>/// 读取INI文件/// </summary>/// <param name="path">path</param>/// <param name="Section">分组节点</param>/// <param name="Key">关键字</param>/// <param name="def">缺省值</param>/// <returns></returns>static public string Rini(string path, string Section, string Key, string def = ""){StringBuilder temp = new StringBuilder(255);int i = GetPrivateProfileString(Section, Key, def, temp, 255, path);return temp.ToString();}/// <summary>/// 删除ini文件下所有段落/// </summary>public static void ClearAllSection(string path){Wini(path, null, null, null);}/// <summary>/// 删除ini文件下指定段落下的所有键/// </summary>/// <param name="Section"></param>public static void ClearSection(string path, string Section){Wini(path, Section, null, null);}static public string RWini测试(){Wini(Getcwd + "\\CFG.ini", "Section", "Key", "Value");string x = Rini(Getcwd + "\\CFG.ini", "Section", "Key", "def");return "";}/********_minThreshold = Convert.ToInt32(  );********/}
}
好了,现在已经生成了一个 ***\ScriptINI\bin\x64\Release\ScriptINI.dll
用C# 调用就算了,意义不大,人生苦短 用python 调用一下C#写的 dll
#!/usr/bin/env python
# -*- coding: utf-8 -*-
# 安装python后安装pythonnet 3.7以及以上都可以
import os,sys,time
import clr
import System
print(clr.AddReference(f"{os.getcwd()}\ScriptINI.dll"))#载入后会返回 一个地址
import ScriptINI #这个就是刚才的类 C#写的无所谓 当作python的包拿进来
if __name__ == '__main__':ScriptINI.RWINI.NewWinifolder(f"{os.getcwd()}\INI")#创建文件夹print(ScriptINI.RWINI.IsFolder(f"{os.getcwd()}\INI"))#测试文件夹#测试ini读写接口print(ScriptINI.RWINI.path)#显示路径print(ScriptINI.RWINI.Getcwd)ScriptINI.RWINI.Wini(ScriptINI.RWINI.Getcwd+"\pyCFG.ini", "Section", "Key", "Value");#写入测试print(ScriptINI.RWINI.Rini(ScriptINI.RWINI.Getcwd+"\pyCFG.ini", "Section", "Key", "def"))#读取测试
input("结束") 
很顺利的生成了一个文件夹,读写了配置文件.
好 这个例子先留着一会用得到.
接下来 写VM 里面的 脚本 和 python脚本
系统环境是win10毋庸置疑
VM 里 脚本 几乎相当于 C# .net Framework4.6.1 .
VM里面python 几乎相当于 python3.7 X64
几乎相当于是啥意思呢 : 理论上一样 实际行不行你得试 也就是实测.
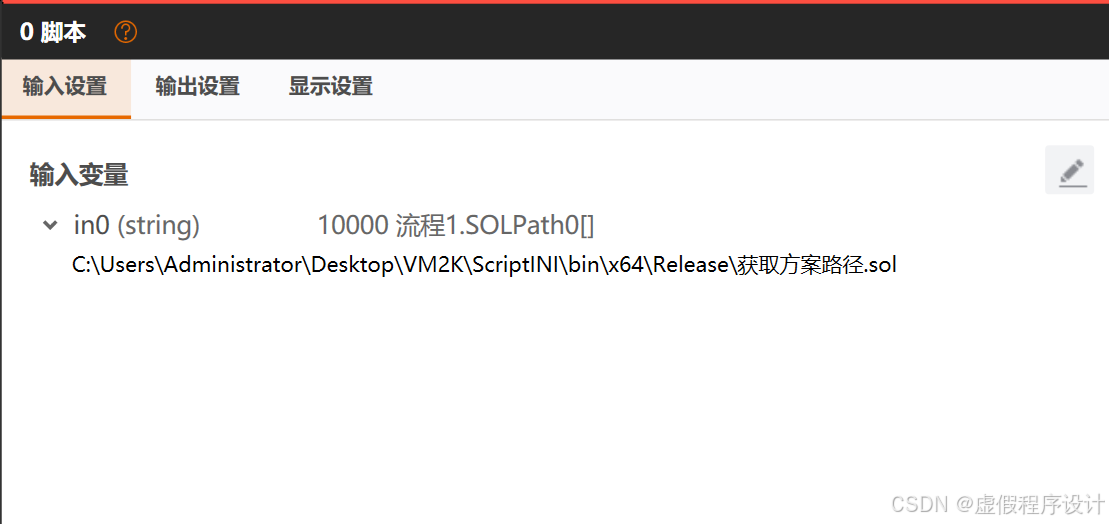
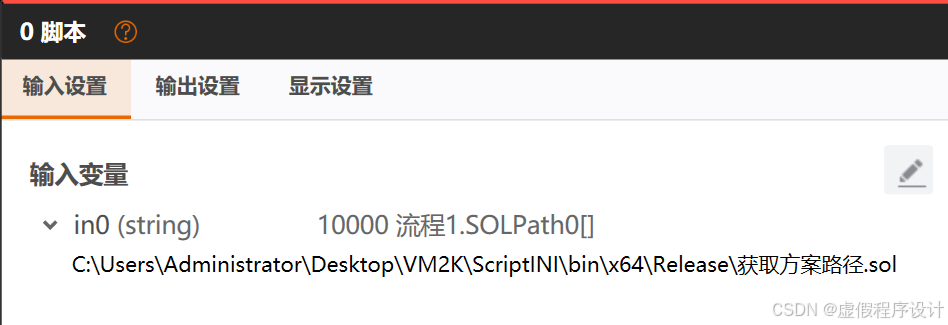
好,现在开始C#脚本;前面已经通过VM全局脚本获取到了sol文件的完整路径并传到了流程的输入;
脚本订阅流程输入的变量就可以获取到这个字符串;
我现在用 脚本订阅 到变量in0
接下来贴脚本: 环境配置在注释里面体现 不再重复;
using System;
using System.Text;
using System.Windows.Forms;
using Script.Methods;
/************************************
Shell Module default code: using .NET Framwwork 4.6.1
*************************************///using VM.Core;
//using VM.PlatformSDKCS;
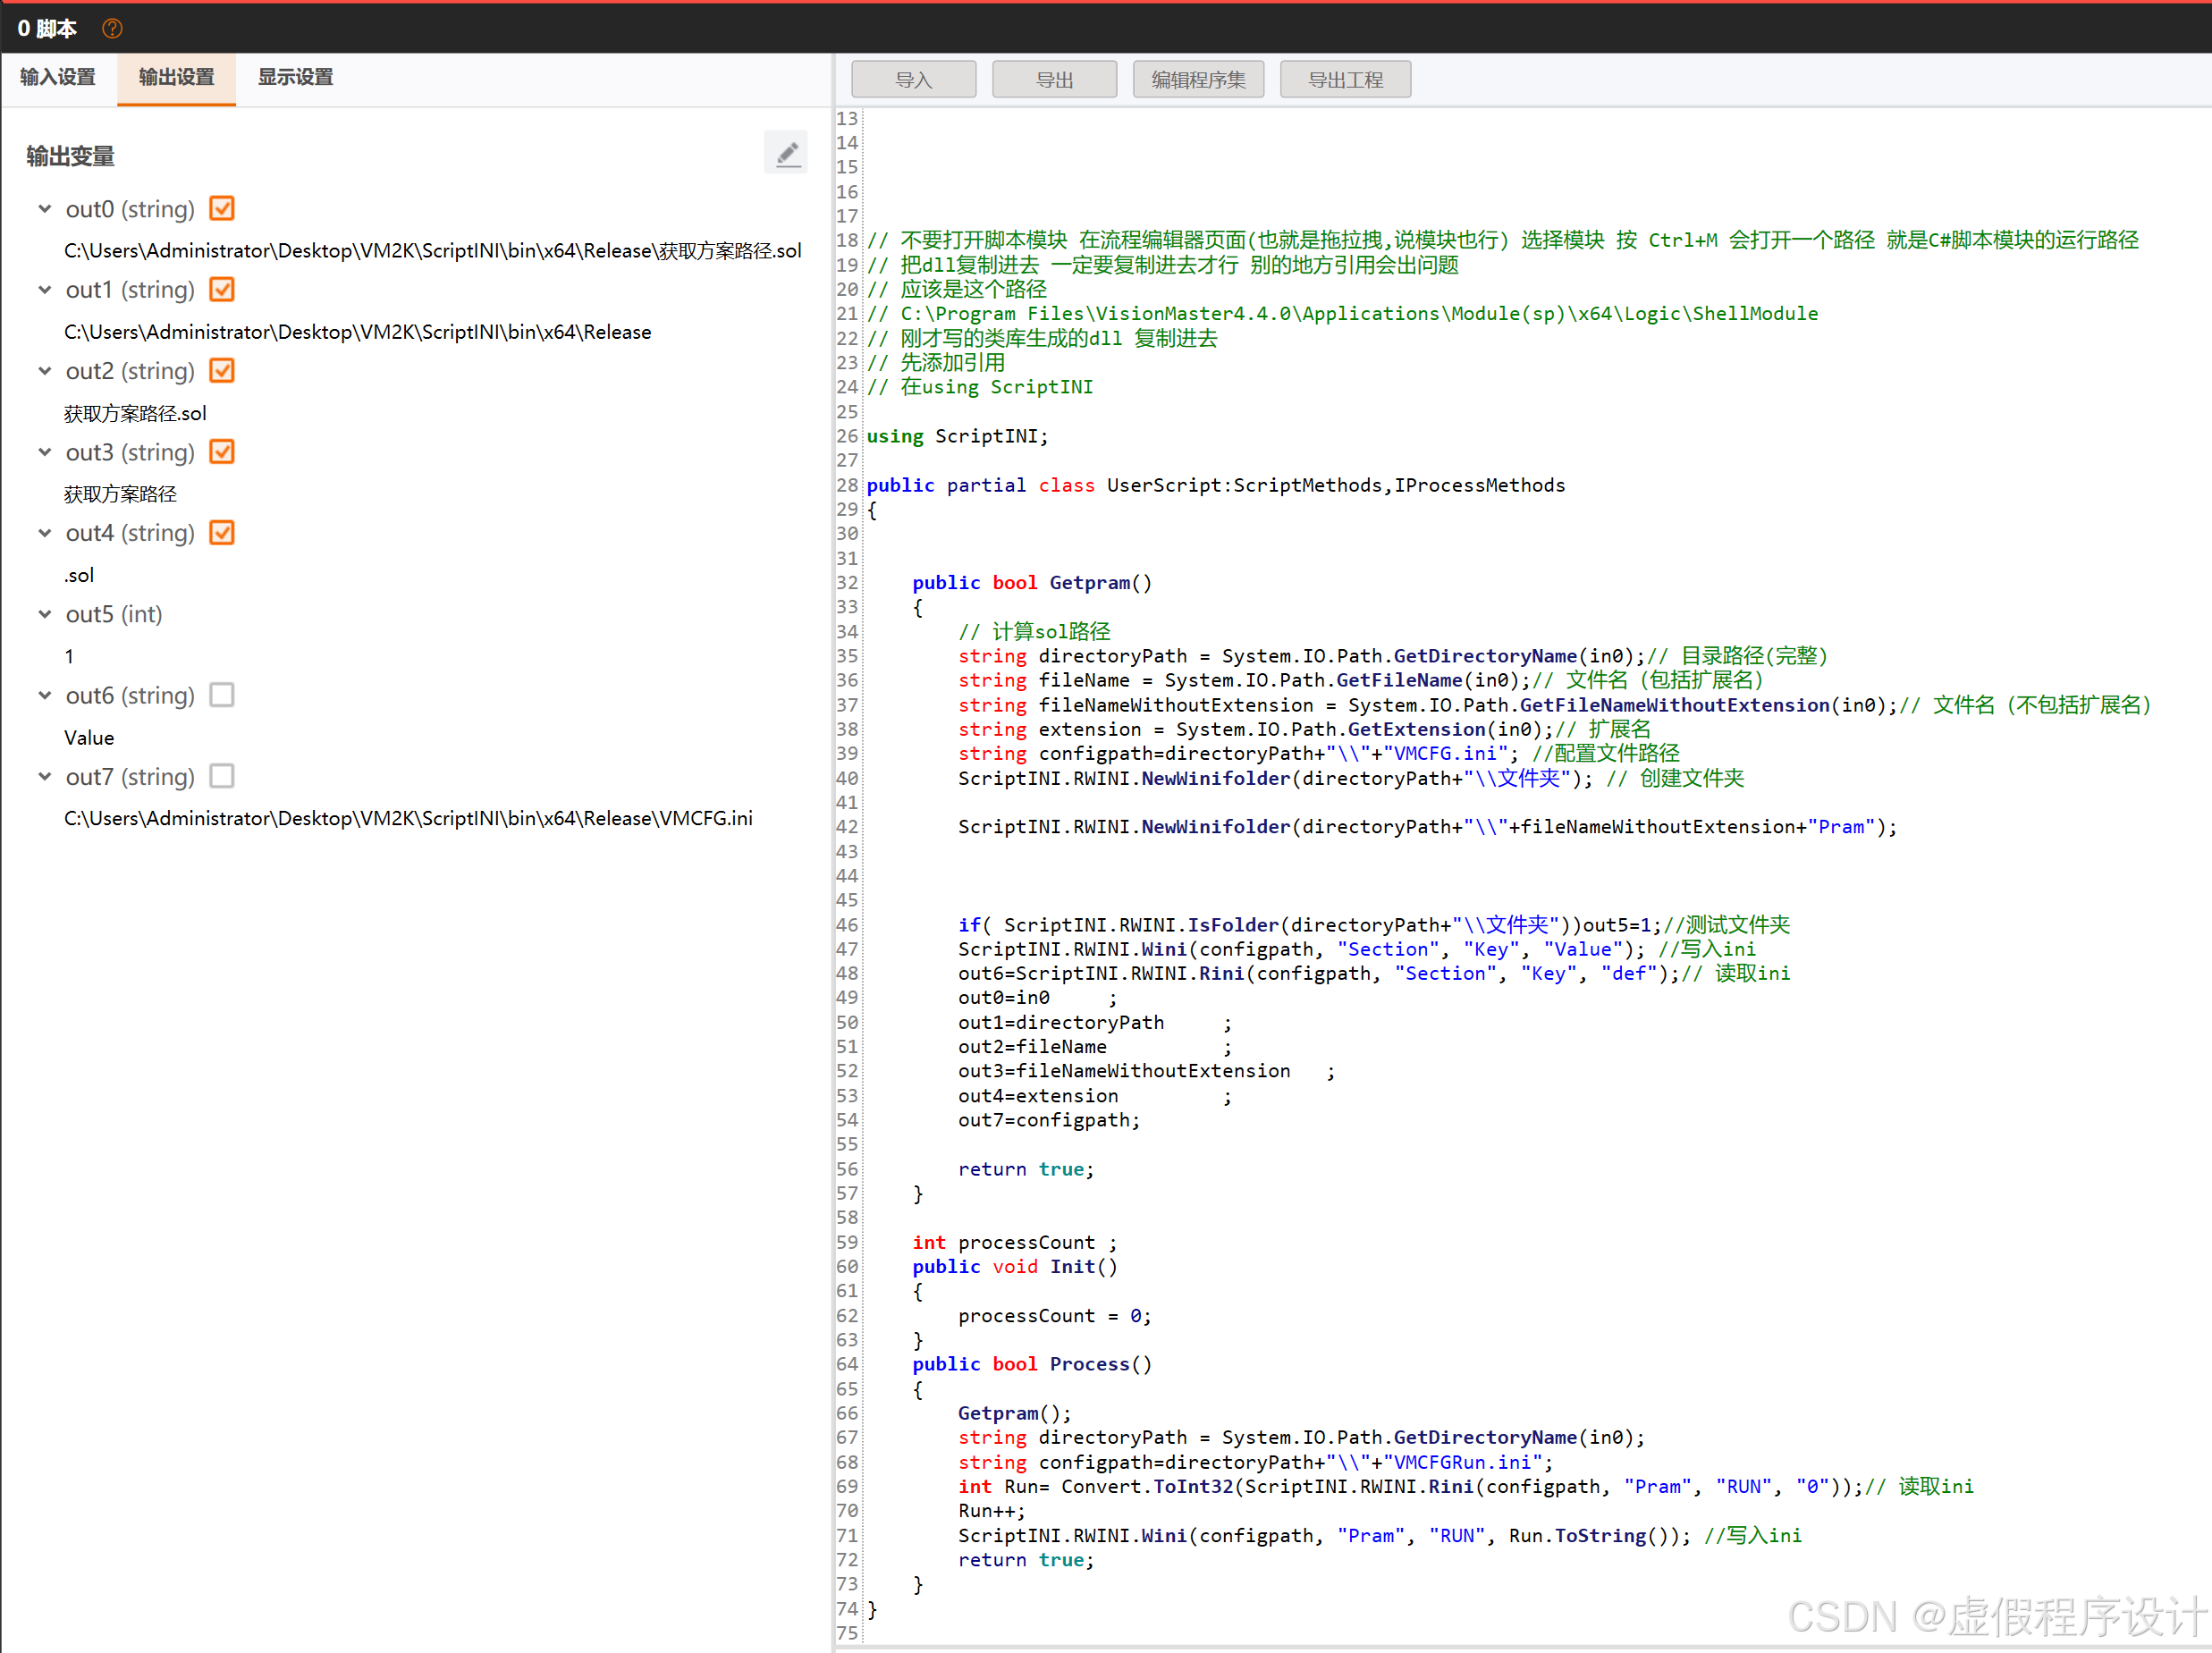
// 不要打开脚本模块 在流程编辑器页面(也就是拖拉拽,说模块也行) 选择模块 按 Ctrl+M 会打开一个路径 就是C#脚本模块的运行路径
// 把dll复制进去 一定要复制进去才行 别的地方引用会出问题
// 应该是这个路径
// C:\Program Files\VisionMaster4.4.0\Applications\Module(sp)\x64\Logic\ShellModule
// 刚才写的类库生成的dll 复制进去
// 先添加引用
// 在using ScriptINIusing ScriptINI;public partial class UserScript:ScriptMethods,IProcessMethods
{public bool Getpram(){// 计算sol路径string directoryPath = System.IO.Path.GetDirectoryName(in0);// 目录路径(完整)string fileName = System.IO.Path.GetFileName(in0);// 文件名(包括扩展名)string fileNameWithoutExtension = System.IO.Path.GetFileNameWithoutExtension(in0);// 文件名(不包括扩展名) string extension = System.IO.Path.GetExtension(in0);// 扩展名 string configpath=directoryPath+"\\"+"VMCFG.ini"; //配置文件路径ScriptINI.RWINI.NewWinifolder(directoryPath+"\\文件夹"); // 创建文件夹ScriptINI.RWINI.NewWinifolder(directoryPath+"\\"+fileNameWithoutExtension+"Pram");if( ScriptINI.RWINI.IsFolder(directoryPath+"\\文件夹"))out5=1;//测试文件夹ScriptINI.RWINI.Wini(configpath, "Section", "Key", "Value"); //写入iniout6=ScriptINI.RWINI.Rini(configpath, "Section", "Key", "def");// 读取iniout0=in0 ;out1=directoryPath ;out2=fileName ;out3=fileNameWithoutExtension ;out4=extension ;out7=configpath;return true;}int processCount ; public void Init(){processCount = 0;}public bool Process(){ Getpram();string directoryPath = System.IO.Path.GetDirectoryName(in0);string configpath=directoryPath+"\\"+"VMCFGRun.ini";int Run= Convert.ToInt32(ScriptINI.RWINI.Rini(configpath, "Pram", "RUN", "0"));// 读取iniRun++;ScriptINI.RWINI.Wini(configpath, "Pram", "RUN", Run.ToString()); //写入inireturn true;}
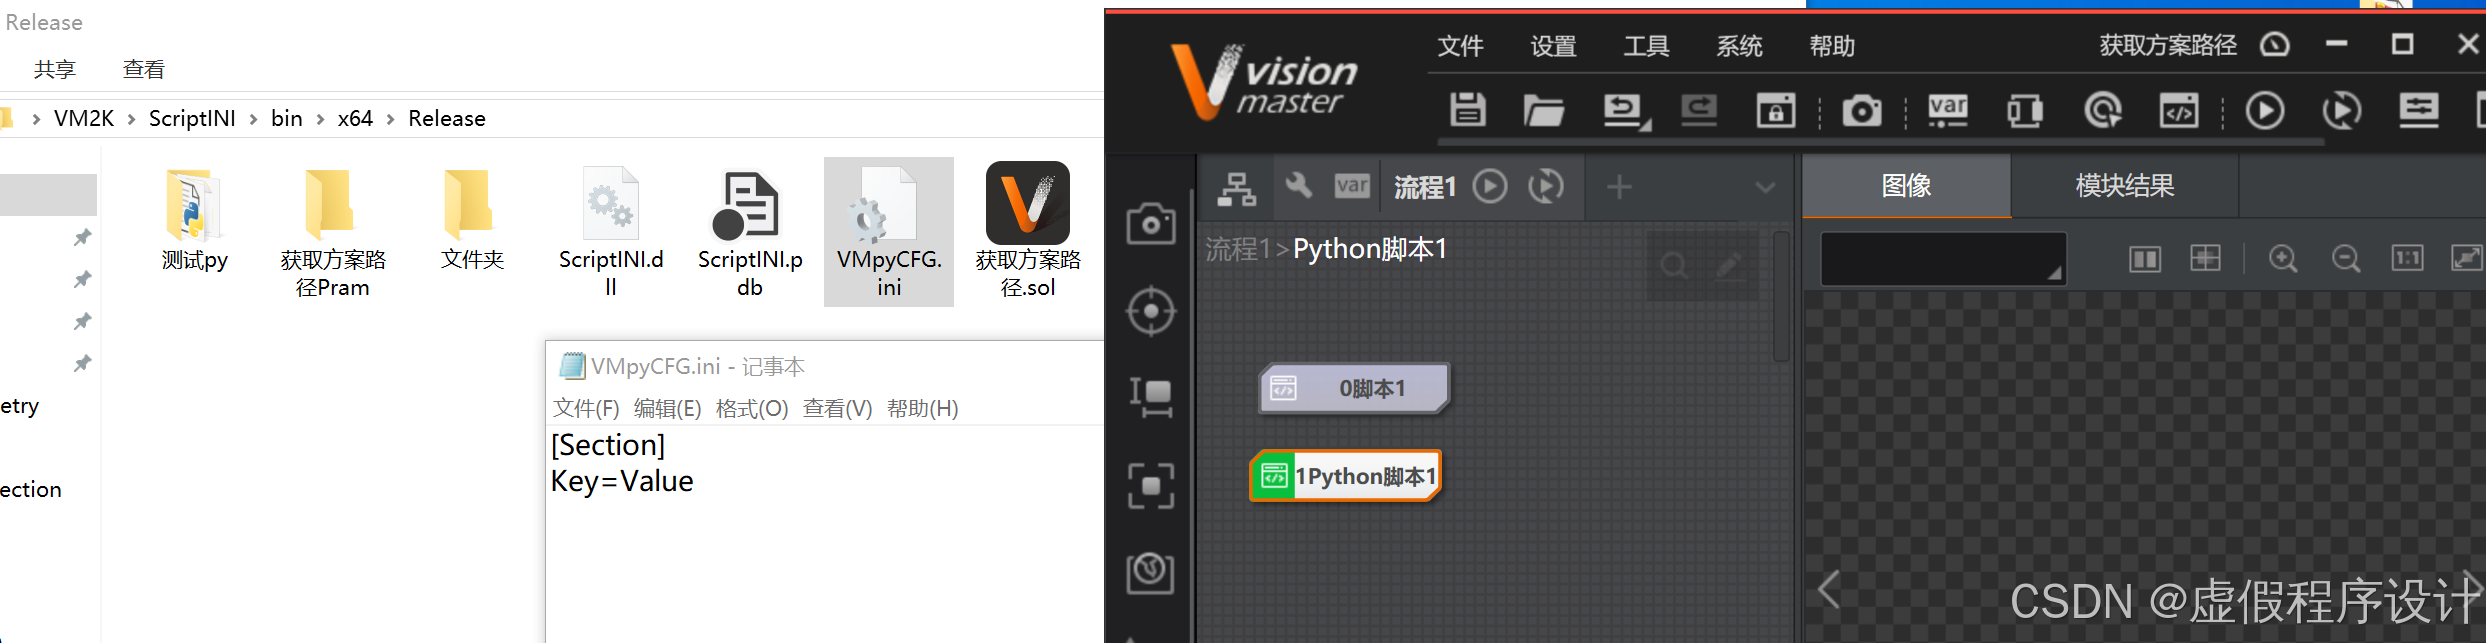
}点外面的运行 而不是单独执行脚本.
看运行结果. 是不是和python那个一模一样 但是这个是在 VM 里面的
在 获取方案路径.sol 同级目录创建了文件夹 和 成功创建读写ini配置文件
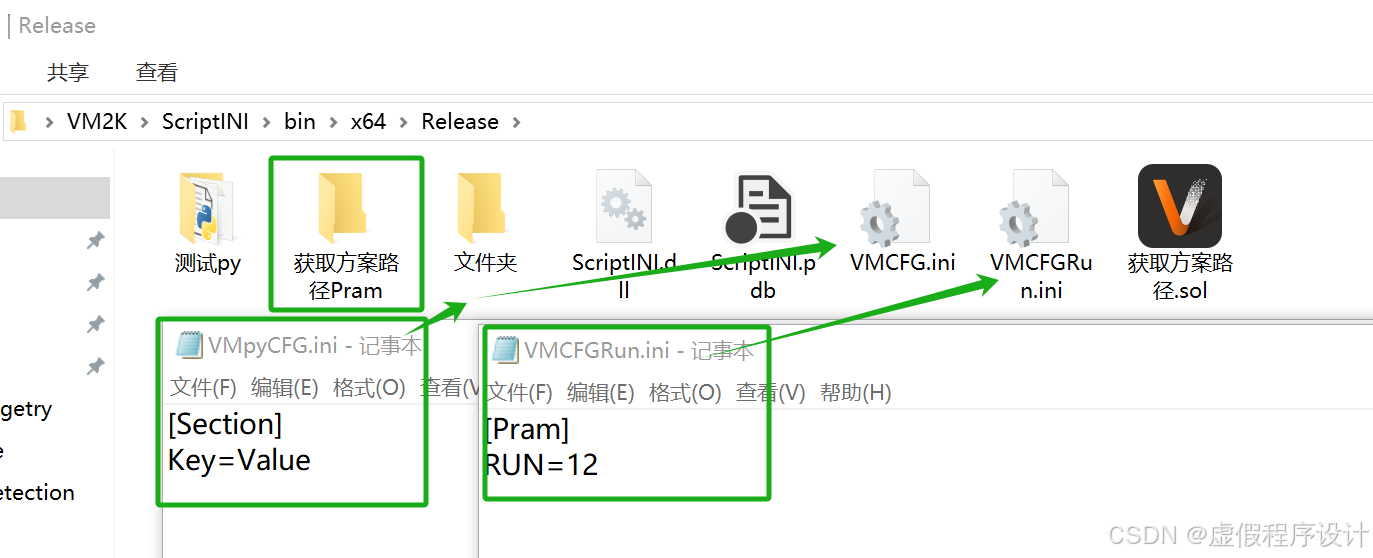
接下来说VM 里面的python 脚本;
还是刚刚写那个程序: 通过 pythonnet 调用.net接口
python 只需要 py 的main文件跟dll是同级目录就行
VM里面的python 脚本不行 经过实验 你得把 dll 就是刚才生成的ScriptINI.dll复制到
# dll 复制到这个地方
#C:\Program Files\VisionMaster4.4.0\Applications\ModuleProxy\x64\
#Lib\site-packages\clr_loader\ffi\dlls\amd64
clr.AddReference('ScriptINI') 就不会报错了.
接下来一模一样 只是语言不一样 贴脚本 截图 贴结果 结束.
VMpython脚本:
# coding: utf-8
import sys
from ioHelper import *
import os,sys,time
import clr
import System
# dll 复制到这个地方
#C:\Program Files\VisionMaster4.4.0\Applications\ModuleProxy\x64\
#Lib\site-packages\clr_loader\ffi\dlls\amd64
clr.AddReference('ScriptINI')
import ScriptINI
def CFparth(fullpath):# 获取目录路径directoryPath = os.path.dirname(fullpath)    # 获取文件名(包括扩展名)fileName = os.path.basename(fullpath)    # 获取文件名(不包括扩展名)fileNameWithoutExtension = os.path.splitext(fileName)[0]    # 获取扩展名extension = os.path.splitext(fileName)[1]    return directoryPath, fileName, fileNameWithoutExtension, extension
def Process(data) -> int:moduleVar = IoHelper(data, INIT_MODULE_VAR)globalVar = IoHelper(data, INIT_GLOBAL_VAR)localVar = IoHelper(data, INIT_LOCAL_VAR)    string=moduleVar.in0moduleVar.out1=stringresult = CFparth(string)moduleVar.out1=result[0]ScriptINI.RWINI.Wini(result[0]+"\VMpyCFG.ini", "Section", "Key", "Value")moduleVar.out2=ScriptINI.RWINI.Rini(result[0]+"\VMpyCFG.ini", "Section", "Key", "def")try:#PrintMsg("\nUser code start")pass#PrintMsg("User code end")except BaseException as e:PrintMsg(e)return 0
python脚本截图:
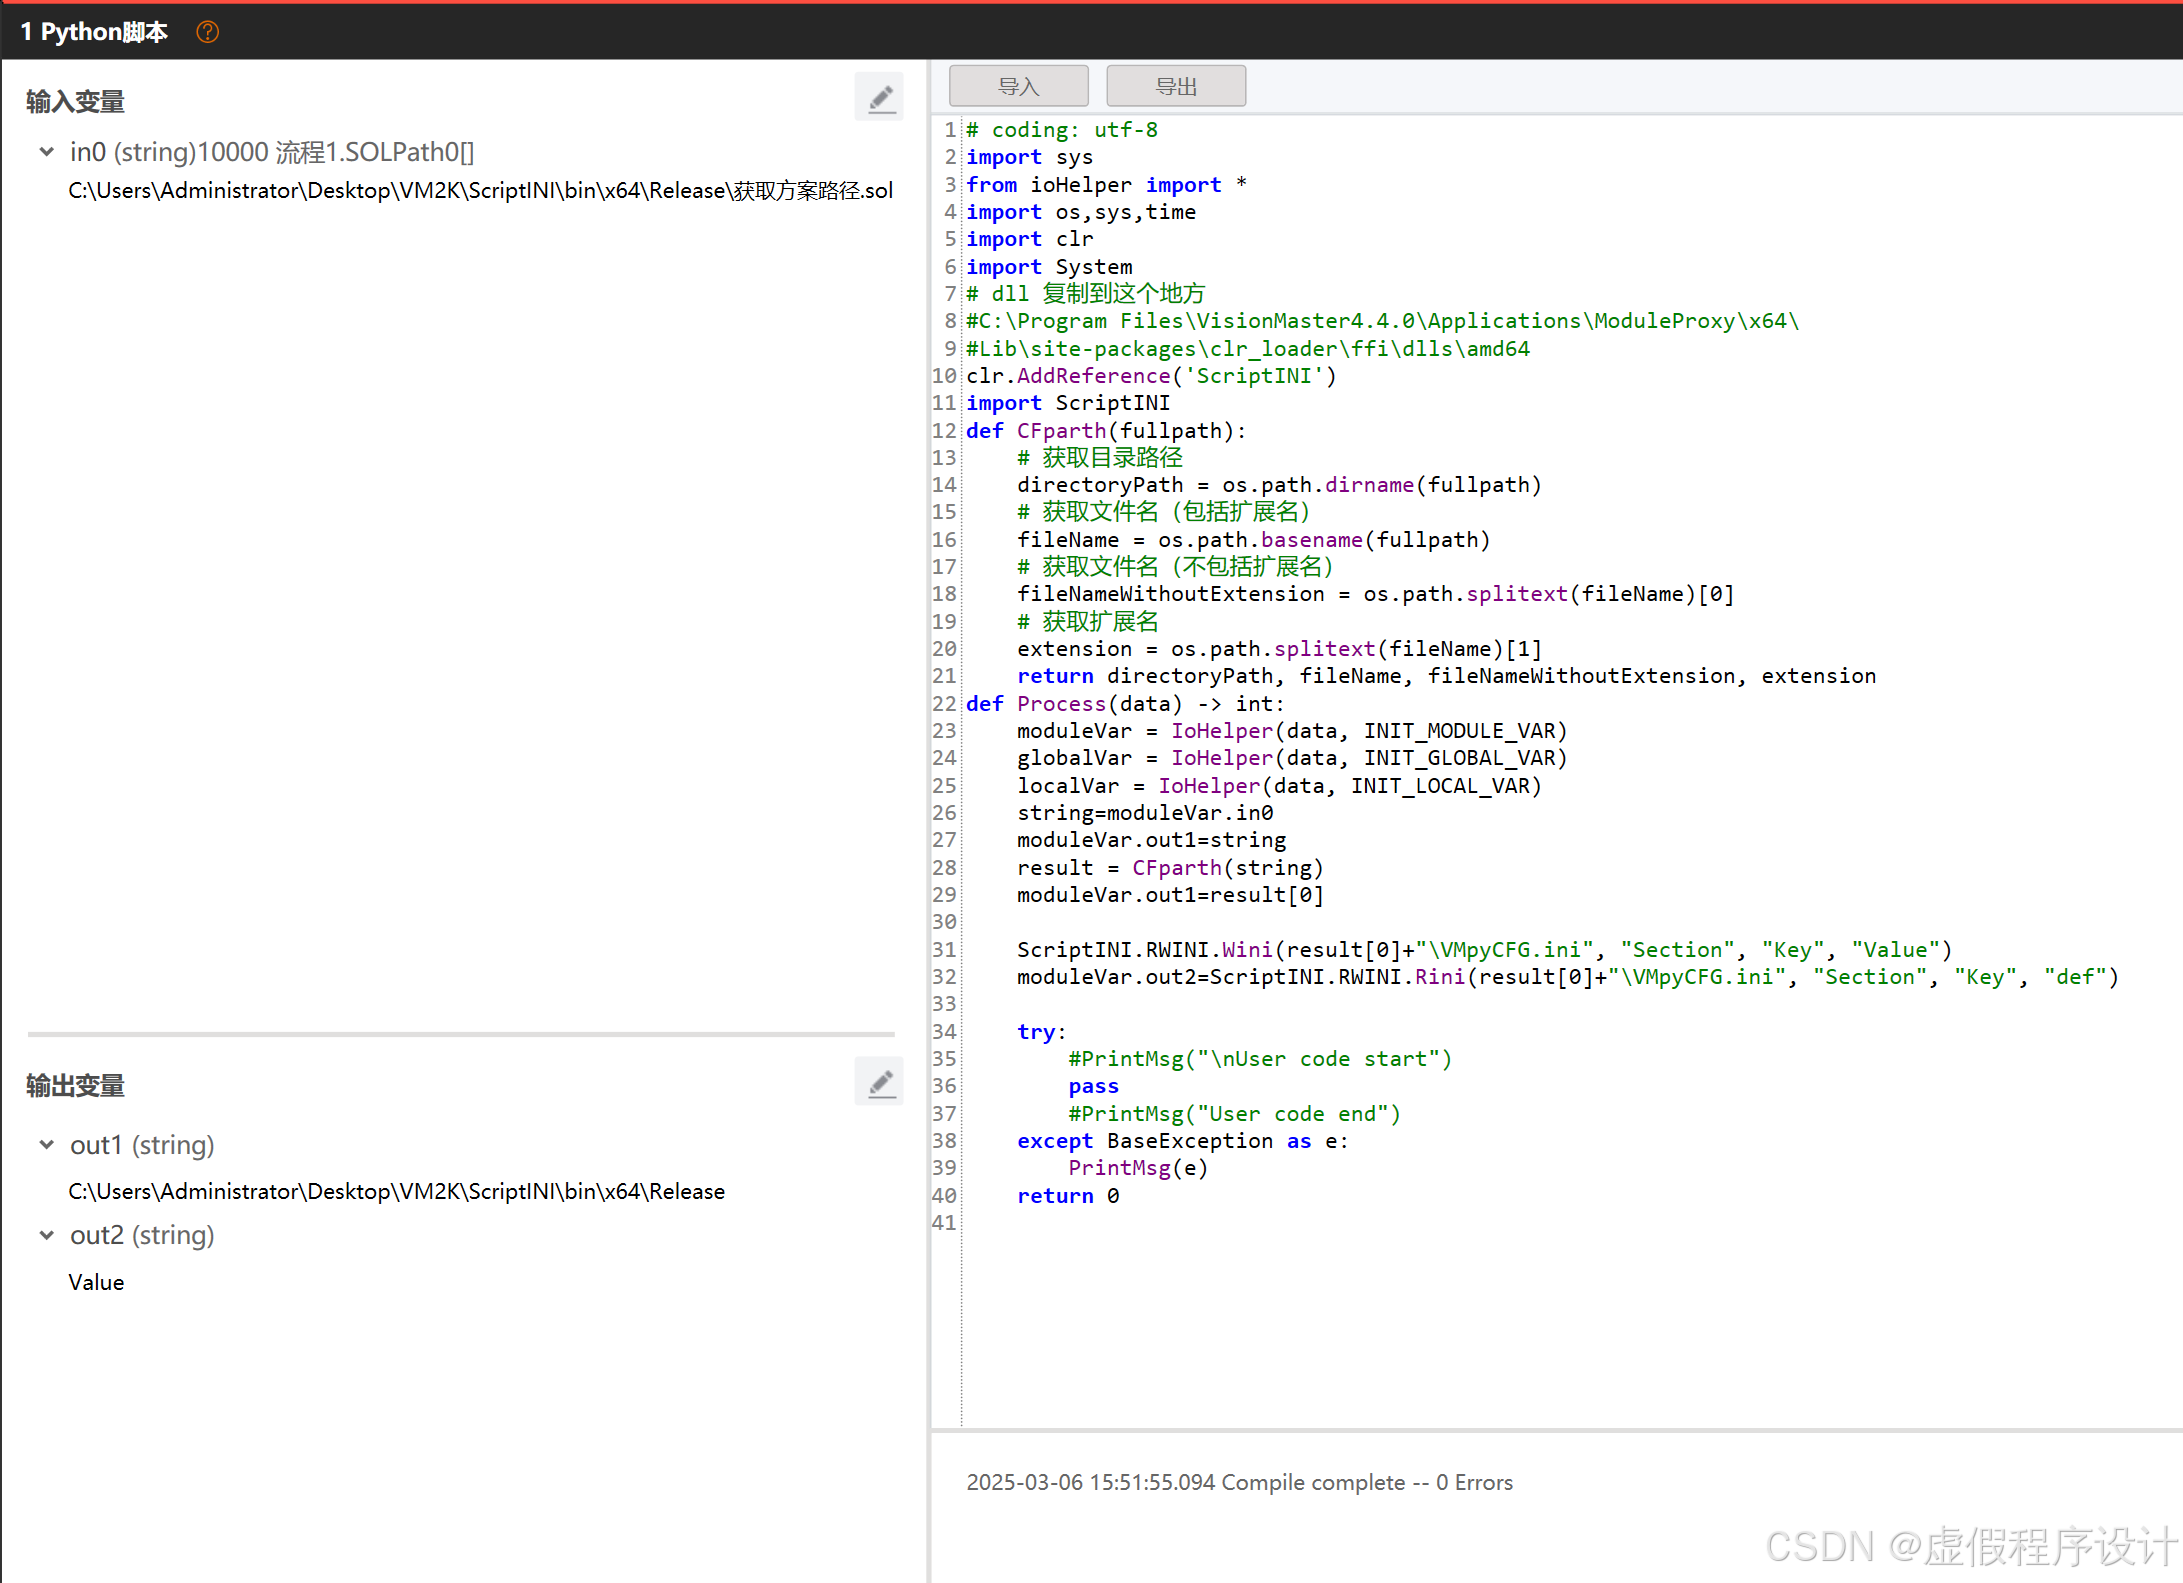
python脚本达到了同样的效果.
当然 获取sol文件路径的目的 1是统一配置文件路径 2是管理 文件 比如后面有 标定文件 或者存图路径 就可以存到 刚刚生成的文件夹中 "获取方案路径Pram" ini文件也可以存在里面 统一管理 不至于同一个工程下依赖文件散乱的存放在磁盘各个角落 也可以 创建 字符串数组 作为脚本输出 后面的 模块 依次订阅 方便 文件的 管理