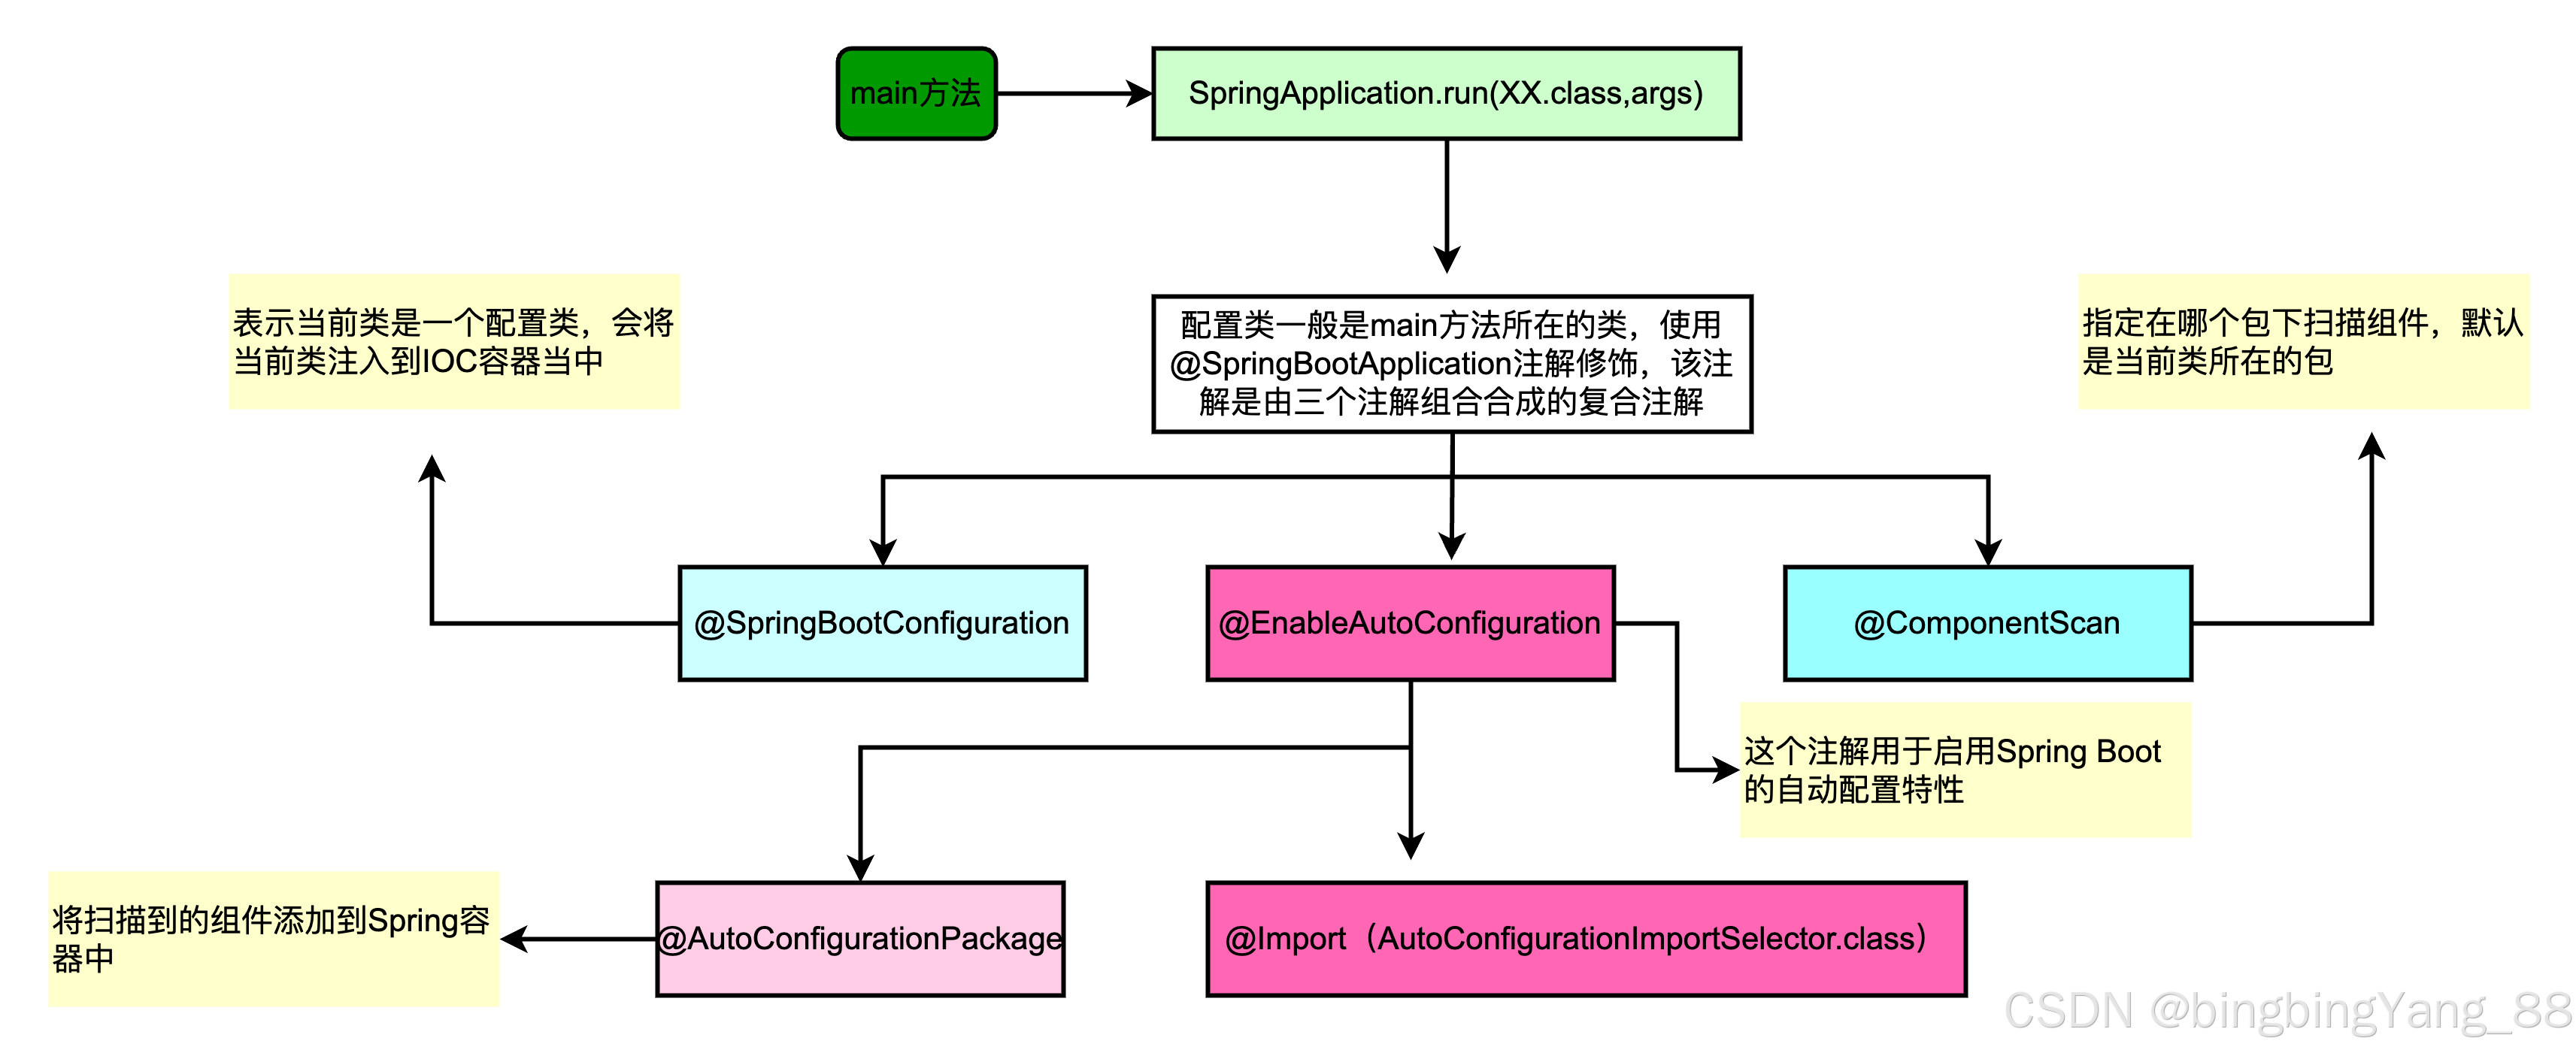
一,背景
Spring Boot应用中的数据库、Redis、Nacos、MQ等的用户名、连接地址、密码在配置文件中一般都是明文存储,如果系统被系统攻破或者配置文件所在的目录读权限被破解,又或者是动态配置文件被窃取,内部人员或者黑客很容易通过配置文件获取到数据库的用户名和密码,进而达到非法连接数据库盗取数据的目的。
本文的目标是对配置文件的敏感信息加密,同时保持对现有应用的最小改动,对应用中的配置文件中的秘文配置项的使用保持和加密前一致,也就是使用配置项不受到任何影响。
二,SpringBoot自动配置原理分析


2.1 配置文件加载准备
-
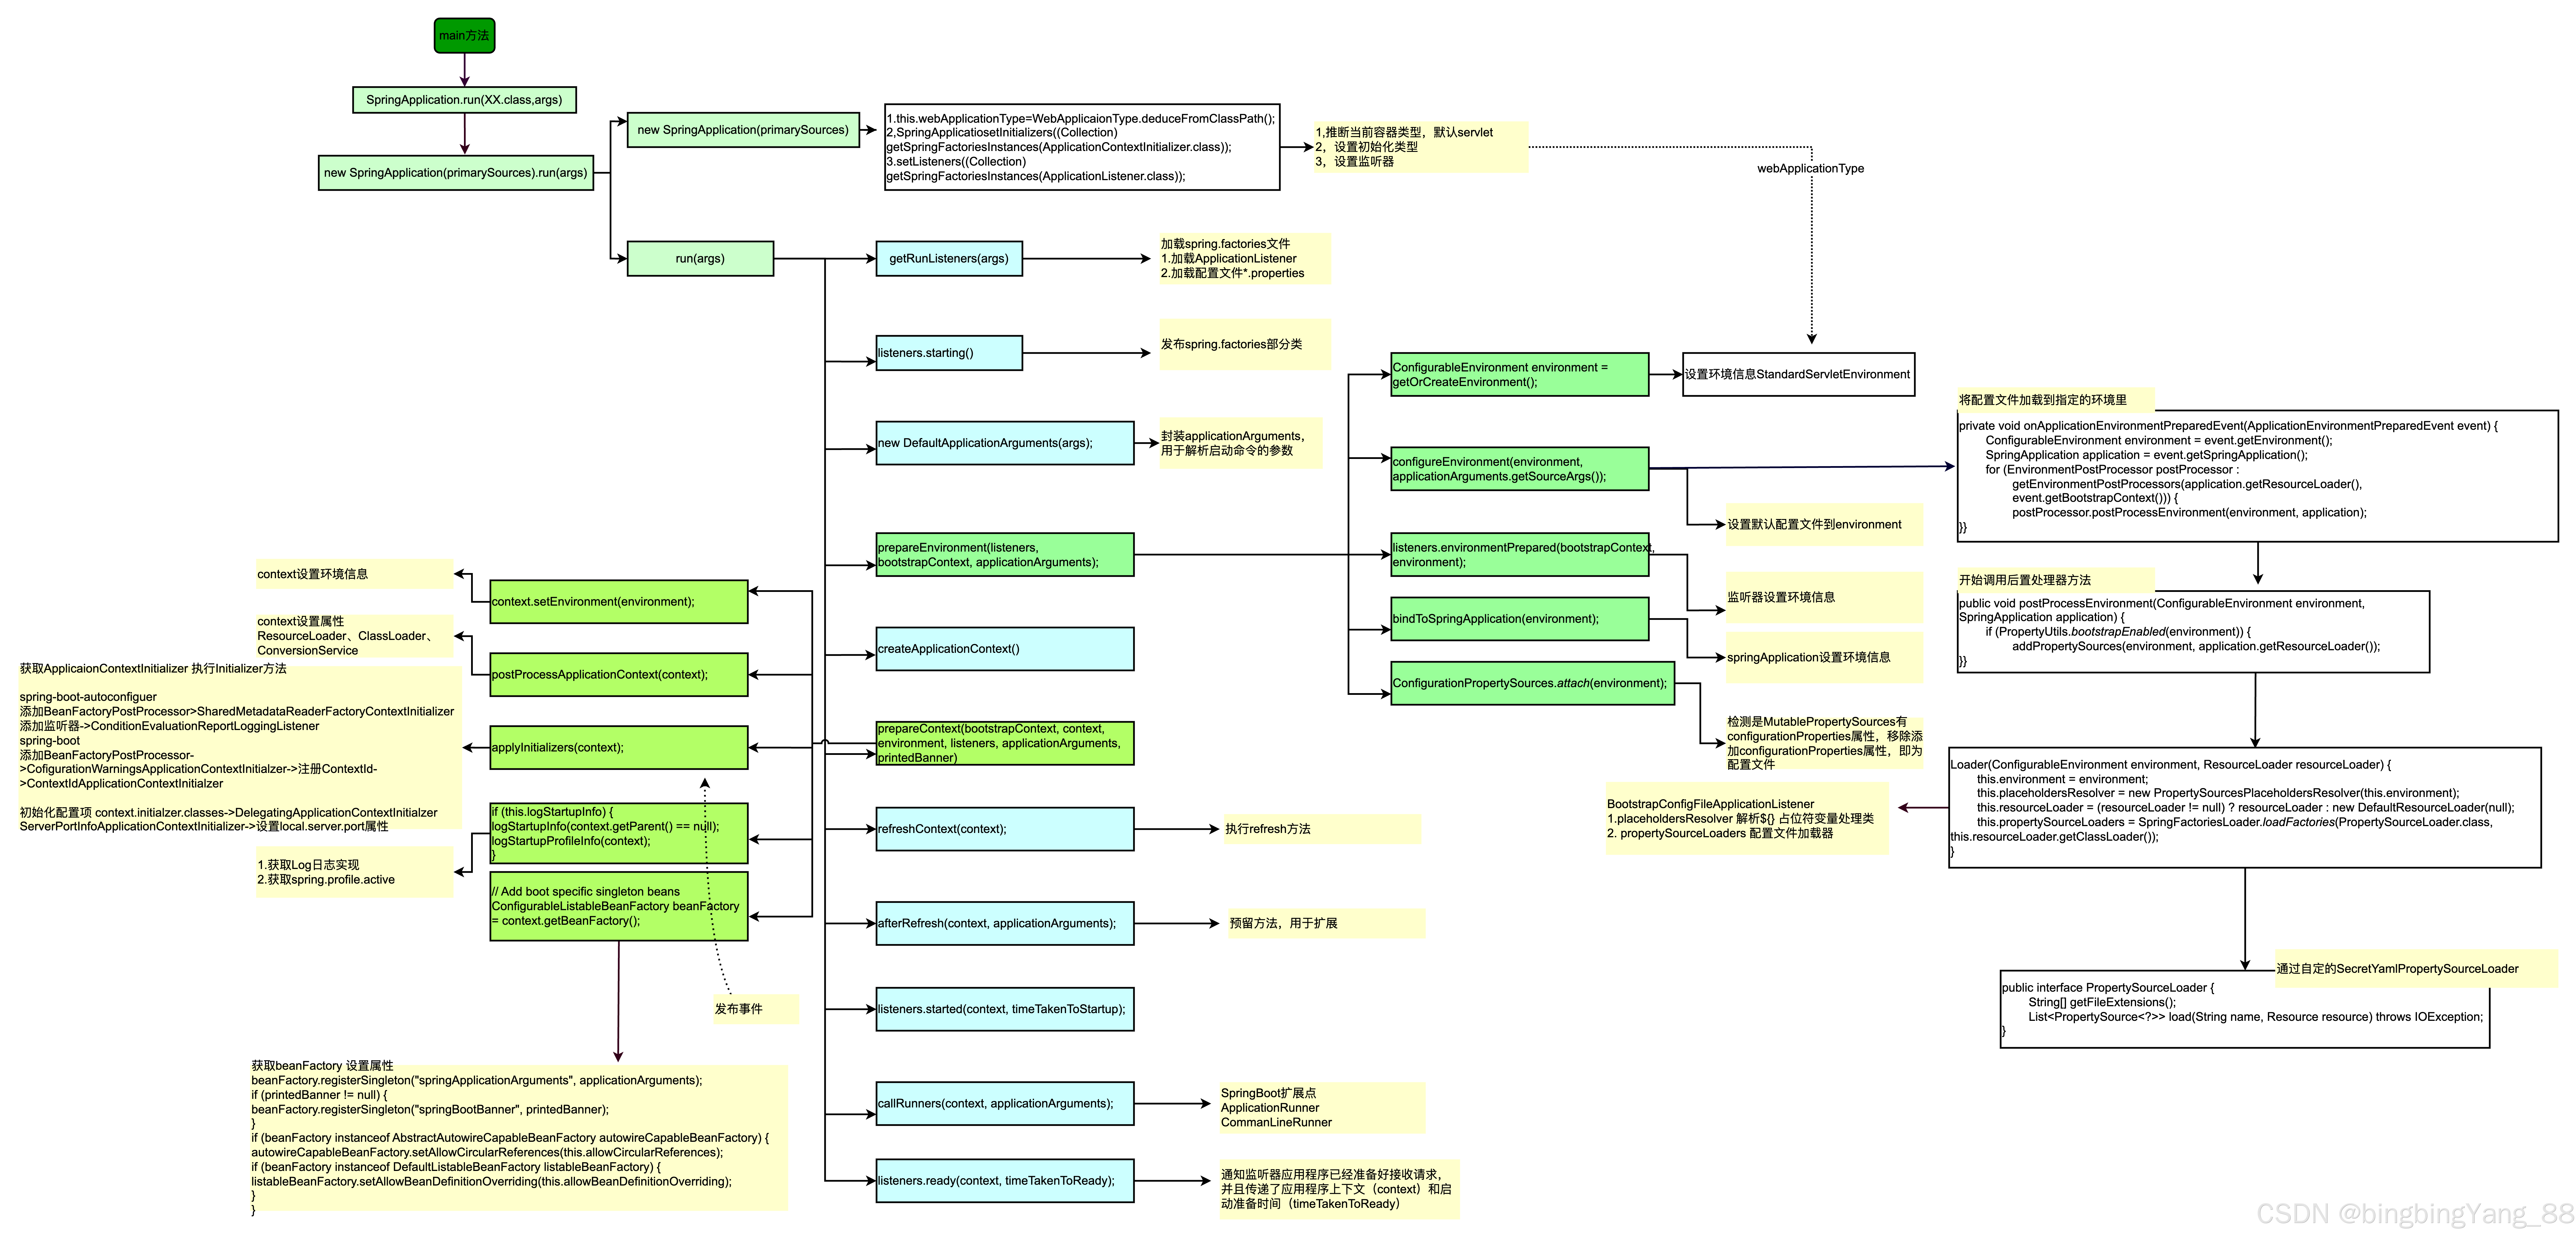
我们知道SpringApplication构造器加载完Initialzers和Listenter后开始调用run(String…args)方法启动Springboot上下文。
/*** Run the Spring application, creating and refreshing a new* {@link ApplicationContext}.* @param args the application arguments (usually passed from a Java main method)* @return a running {@link ApplicationContext}*/ public ConfigurableApplicationContext run(String... args) {long startTime = System.nanoTime();DefaultBootstrapContext bootstrapContext = createBootstrapContext();ConfigurableApplicationContext context = null;configureHeadlessProperty();SpringApplicationRunListeners listeners = getRunListeners(args);listeners.starting(bootstrapContext, this.mainApplicationClass);try {ApplicationArguments applicationArguments = new DefaultApplicationArguments(args);// 配置文件加载入口,它会去执行SpringApplication构造器加载到ListerConfigurableEnvironment environment = prepareEnvironment(listeners, bootstrapContext, applicationArguments);Banner printedBanner = printBanner(environment);context = createApplicationContext();context.setApplicationStartup(this.applicationStartup);prepareContext(bootstrapContext, context, environment, listeners, applicationArguments, printedBanner);refreshContext(context);afterRefresh(context, applicationArguments);Duration timeTakenToStartup = Duration.ofNanos(System.nanoTime() - startTime);if (this.logStartupInfo) {new StartupInfoLogger(this.mainApplicationClass).logStarted(getApplicationLog(), timeTakenToStartup);}listeners.started(context, timeTakenToStartup);callRunners(context, applicationArguments);}catch (Throwable ex) {if (ex instanceof AbandonedRunException) {throw ex;}handleRunFailure(context, ex, listeners);throw new IllegalStateException(ex);}try {if (context.isRunning()) {Duration timeTakenToReady = Duration.ofNanos(System.nanoTime() - startTime);listeners.ready(context, timeTakenToReady);}}catch (Throwable ex) {if (ex instanceof AbandonedRunException) {throw ex;}handleRunFailure(context, ex, null);throw new IllegalStateException(ex);}return context; } -
- SpringApplication#prepareEnvironment( listeners, applicationArguments), 这个方法是配置文件加载路口,他会执行SpringApplication构造器加载到Listener。这里我们重要关注BootstrapApplicationListener和ConfigFileApplicationListener这两个监听器。
package org.springframework.boot.SpringApplication;
private ConfigurableEnvironment prepareEnvironment(SpringApplicationRunListeners listeners,
DefaultBootstrapContext bootstrapContext, ApplicationArguments applicationArguments) {
// 给容器创建一个 environment
ConfigurableEnvironment environment = getOrCreateEnvironment();
configureEnvironment(environment, applicationArguments.getSourceArgs());
ConfigurationPropertySources.attach(environment);
// 执行引入jar包类路径下的META/INF/spring.factories文件到监听器
listeners.environmentPrepared(bootstrapContext, environment);
DefaultPropertiesPropertySource.moveToEnd(environment);
Assert.state(!environment.containsProperty(“spring.main.environment-prefix”),
“Environment prefix cannot be set via properties.”);
// 将加载完成的环境变量信息绑定到Spring IOC容器中
bindToSpringApplication(environment);
if (!this.isCustomEnvironment) {
EnvironmentConverter environmentConverter = new EnvironmentConverter(getClassLoader());
environment = environmentConverter.convertEnvironmentIfNecessary(environment, deduceEnvironmentClass());
}
ConfigurationPropertySources.attach(environment);
return environment;
}public void multicastEvent(final ApplicationEvent event, @Nullable ResolvableType eventType) {
ResolvableType type = eventType != null ? eventType : this.resolveDefaultEventType(event);
Executor executor = this.getTaskExecutor();
Iterator var5 = this.getApplicationListeners(event, type).iterator();while(var5.hasNext()) {ApplicationListener<?> listener = (ApplicationListener)var5.next();if (executor != null) {executor.execute(() -> {this.invokeListener(listener, event);});} else {// 触发BootstrapConfigFileApplicationListenerthis.invokeListener(listener, event);} }}
-
- SpringApplication#prepareEnvironment()触发执行监听器,优先执行BootstrapApplicationListener监听器,再执行ConfigFileApplicationListener监听器
-
BootstrapApplicationListener:来自SpringCloud。优先级最高,用于启动/建立Springcloud的应用上下文。需要注意的是,到此时Springboot的上下文还未创建完成,因为在创建springboot上下文的时候通过BootstrapApplicationListener去开启了springcloud上下文的创建流程。这个流程“嵌套”特别像是Bean初始化流程:初始化A时,A->B,就必须先去完成Bean B的初始化,再回来继续完成A的初始化。
-
在建立SpringCloud的应用的时候,使用的也是SpringApplication#run()完成的,所以也会走一整套SpringApplication的生命周期逻辑。这里之前就踩过坑,初始化器、监听器等执行多次,若只需执行一次,需要自行处理。
-
Springcloud和Springboot应用上下文都是使用ConfigFileApplicationListener来完成加载和解析的
Springboot应用上下文读取的是配置文件默认是:application
Springcloud应用上下文读取的外部配置文件名默认是:bootstrap -
BootstrapApplicationListener 核心代码
@Override public void onApplicationEvent(ApplicationEnvironmentPreparedEvent event) {// 检查是否开启了SpringCloudConfigurableEnvironment environment = event.getEnvironment();if (!bootstrapEnabled(environment) && !useLegacyProcessing(environment)) {return;}// don't listen to events in a bootstrap context// 如果执行了Springcloud上下文触发的BootStapApplicationListener这个监听器,就不执行这个监听器了 避免重复执行if (environment.getPropertySources().contains(BOOTSTRAP_PROPERTY_SOURCE_NAME)) {return;}ConfigurableApplicationContext context = null;String configName = environment.resolvePlaceholders("${spring.cloud.bootstrap.name:bootstrap}");for (ApplicationContextInitializer<?> initializer : event.getSpringApplication().getInitializers()) {if (initializer instanceof ParentContextApplicationContextInitializer) {context = findBootstrapContext((ParentContextApplicationContextInitializer) initializer, configName);}}// 如果还未创建SpringCloud上下文实例,则调用bootstrapServiceContextif (context == null) {context = bootstrapServiceContext(environment, event.getSpringApplication(), configName);event.getSpringApplication().addListeners(new CloseContextOnFailureApplicationListener(context));}apply(context, event.getSpringApplication(), environment); } -
BootstrapApplicationListener#bootstrapServiceContext()核心源码如下
private ConfigurableApplicationContext bootstrapServiceContext(ConfigurableEnvironment environment,
final SpringApplication application, String configName) {
ConfigurableEnvironment bootstrapEnvironment = new AbstractEnvironment() {
};
MutablePropertySources bootstrapProperties = bootstrapEnvironment.getPropertySources();
String configLocation = environment.resolvePlaceholders(“ s p r i n g . c l o u d . b o o t s t r a p . l o c a t i o n : " ) ; S t r i n g c o n f i g A d d i t i o n a l L o c a t i o n = e n v i r o n m e n t . r e s o l v e P l a c e h o l d e r s ( " {spring.cloud.bootstrap.location:}"); String configAdditionalLocation = environment .resolvePlaceholders(" spring.cloud.bootstrap.location:");StringconfigAdditionalLocation=environment.resolvePlaceholders("{spring.cloud.bootstrap.additional-location:}”);
Map<String, Object> bootstrapMap = new HashMap<>();
bootstrapMap.put(“spring.config.name”, configName);
// if an app (or test) uses spring.main.web-application-type=reactive, bootstrap
// will fail
// force the environment to use none, because if though it is set below in the
// builder
// the environment overrides it
bootstrapMap.put(“spring.main.web-application-type”, “none”);
if (StringUtils.hasText(configLocation)) {
bootstrapMap.put(“spring.config.location”, configLocation);
}
if (StringUtils.hasText(configAdditionalLocation)) {
bootstrapMap.put(“spring.config.additional-location”, configAdditionalLocation);
}
bootstrapProperties.addFirst(new MapPropertySource(BOOTSTRAP_PROPERTY_SOURCE_NAME, bootstrapMap));
for (PropertySource<?> source : environment.getPropertySources()) {
if (source instanceof StubPropertySource) {
continue;
}
bootstrapProperties.addLast(source);
}
// TODO: is it possible or sensible to share a ResourceLoader?
// 通过SpringApplicationBuilder构建一个SpringCloud的上下文实例
SpringApplicationBuilder builder = new SpringApplicationBuilder().profiles(environment.getActiveProfiles())
.bannerMode(Mode.OFF).environment(bootstrapEnvironment)
// Don’t use the default properties in this builder
.registerShutdownHook(false).logStartupInfo(false).web(WebApplicationType.NONE);
final SpringApplication builderApplication = builder.application();
if (builderApplication.getMainApplicationClass() == null) {
// gh_425:
// SpringApplication cannot deduce the MainApplicationClass here
// if it is booted from SpringBootServletInitializer due to the
// absense of the “main” method in stackTraces.
// But luckily this method’s second parameter “application” here
// carries the real MainApplicationClass which has been explicitly
// set by SpringBootServletInitializer itself already.
builder.main(application.getMainApplicationClass());
}
if (environment.getPropertySources().contains(“refreshArgs”)) {
// If we are doing a context refresh, really we only want to refresh the
// Environment, and there are some toxic listeners (like the
// LoggingApplicationListener) that affect global static state, so we need a
// way to switch those off.
builderApplication.setListeners(filterListeners(builderApplication.getListeners()));
}
builder.sources(BootstrapImportSelectorConfiguration.class);
// 调用Springcloud上下文实例的run方法,使用的也是SpringApplication#run()方法
//这个过程会将之前的步骤在执行一次
final ConfigurableApplicationContext context = builder.run();
// gh-214 using spring.application.name=bootstrap to set the context id via
//ContextIdApplicationContextInitializerprevents apps from getting the actual
// spring.application.name
// during the bootstrap phase.
context.setId(“bootstrap”);
// Make the bootstrap context a parent of the app context
addAncestorInitializer(application, context);
// It only has properties in it now that we don’t want in the parent so remove
// it (and it will be added back later)
bootstrapProperties.remove(BOOTSTRAP_PROPERTY_SOURCE_NAME);
mergeDefaultProperties(environment.getPropertySources(), bootstrapProperties);
return context;
}
- 调用springcloud上下文实例的run方法,会将之前的步骤在重复执行一次,程序又执行到遍历监听器并发这里了,重点关注一下ConfigFileApplicationListener,这个监听器会完成配置文件的加载。
- 进入断点里面之前,我先做一些说明。因为这里会创建Springcloud和Springboot两个上下文实例, 由于Springboot和Springcloud上下文实例加载配置文件的流程都是相似的,这里我们就讲解Springboot容器配置文件的加载过程。
- bootstrap.yml 可以用来定义应用级别的, 应用程序特有配置信息,可以用来配置后续各个模块中需使用的公共参数等。
- 如果application.yml的内容标签与bootstrap的标签一致,application会覆盖bootstrap, 而application.yml 里面的内容可以动态替换。
2.2 配置文件加载解析
-
EnvironmentPostProcessorApplicationListener#onApplicationEnvironmentPreparedEvent(),根据上面的流程可知,程序会触发EnvironmentPostProcessorApplicationListener的onApplicationEvent方法,从而加载配置文件。
获取所有的onApplicationEnvironmentPreparedEvent后置处理器,并执行后置处理器方法@Override public void onApplicationEvent(ApplicationEvent event) {if (event instanceof ApplicationEnvironmentPreparedEvent environmentPreparedEvent) {onApplicationEnvironmentPreparedEvent(environmentPreparedEvent);}if (event instanceof ApplicationPreparedEvent) {onApplicationPreparedEvent();}if (event instanceof ApplicationFailedEvent) {onApplicationFailedEvent();} }private void onApplicationEnvironmentPreparedEvent(ApplicationEnvironmentPreparedEvent event) {ConfigurableEnvironment environment = event.getEnvironment();SpringApplication application = event.getSpringApplication();for (EnvironmentPostProcessor postProcessor : getEnvironmentPostProcessors(application.getResourceLoader(),event.getBootstrapContext())) {postProcessor.postProcessEnvironment(environment, application);} }@Override
public void postProcessEnvironment(ConfigurableEnvironment environment, SpringApplication application) {
if (PropertyUtils.bootstrapEnabled(environment)) {
addPropertySources(environment, application.getResourceLoader());
}
}/*** Add config file property sources to the specified environment.* @param environment the environment to add source to* @param resourceLoader the resource loader* @see #addPostProcessors(ConfigurableApplicationContext)*/ protected void addPropertySources(ConfigurableEnvironment environment, ResourceLoader resourceLoader) {RandomValuePropertySource.addToEnvironment(environment);new Loader(environment, resourceLoader).load(); } -
BootstrapConfigFileApplicationListener#addPropertySources(),流程继续执行到addPropertySources,这里会去新建一个Loader内部类,并执行load方法。
protected void addPropertySources(ConfigurableEnvironment environment, ResourceLoader resourceLoader) {RandomValuePropertySource.addToEnvironment(environment);new Loader(environment, resourceLoader).load(); } -
BootstrapConfigFileApplicationListener#Loader#load()方法
private class Loader {
private final Log logger = BootstrapConfigFileApplicationListener.this.logger;private final ConfigurableEnvironment environment;private final PropertySourcesPlaceholdersResolver placeholdersResolver;private final ResourceLoader resourceLoader;private final List<PropertySourceLoader> propertySourceLoaders;private Deque<Profile> profiles;private List<Profile> processedProfiles;private boolean activatedProfiles;private Map<Profile, MutablePropertySources> loaded;private Map<DocumentsCacheKey, List<Document>> loadDocumentsCache = new HashMap<>();Loader(ConfigurableEnvironment environment, ResourceLoader resourceLoader) {this.environment = environment;this.placeholdersResolver = new PropertySourcesPlaceholdersResolver(this.environment);this.resourceLoader = (resourceLoader != null) ? resourceLoader : new DefaultResourceLoader(null);this.propertySourceLoaders = SpringFactoriesLoader.loadFactories(PropertySourceLoader.class,this.resourceLoader.getClassLoader());}void load() {FilteredPropertySource.apply(this.environment, DefaultPropertiesPropertySource.NAME, LOAD_FILTERED_PROPERTY,this::loadWithFilteredProperties);} -
初始化initializeProfiles
private void initializeProfiles() {// The default profile for these purposes is represented as null. We add it// first so that it is processed first and has lowest priority.//默认添加一个null,这样的目的是为了先出来加载application.xxx文件,优先级最低this.profiles.add(null);// 把当前environment中已经加载的系统级别的配置文件包装到Binder容器中Binder binder = Binder.get(this.environment);// 在Binder容器中找到spring.profiles.actives配置列表Set<Profile> activatedViaProperty = getProfiles(binder, ACTIVE_PROFILES_PROPERTY);// 在Binder容器中找到spring.profiles.include配置列表Set<Profile> includedViaProperty = getProfiles(binder, INCLUDE_PROFILES_PROPERTY);//environment的spring.profiles.active属性中存在且activeViaProperty和includedViaProProperty Property不存在的配置List<Profile> otherActiveProfiles = getOtherActiveProfiles(activatedViaProperty, includedViaProperty);// 将解析出的profile依次按照otherActiveProfiles、includeViaProperty和activeViaProperty的先后次序//将添加进去的先被加载,但Spring读取使用优先级最低,因为最后一次进行reverse操作this.profiles.addAll(otherActiveProfiles);// Any pre-existing active profiles set via property sources (e.g.// System properties) take precedence over those added in config files.this.profiles.addAll(includedViaProperty);addActiveProfiles(activatedViaProperty);// 在系统中未加载到的profile,此时profiles中就只有进入此方法默认添加的null// 此时就给profile添加一个“default”,若在application.xxx中仍未配置指定的profile则会去加载此时添加的“default”//若application.xxx中配置了指定的profile则会将“default”从profile移除if (this.profiles.size() == 1) { // only has null profilefor (String defaultProfileName : getDefaultProfiles(binder)) {Profile defaultProfile = new Profile(defaultProfileName, true);this.profiles.add(defaultProfile);}}} -
根据源码调用链路可知,程序继续调用Loader#load( profile, filterFactory, consumer)
-
Loader#load(location, name, profile, filterFactory, consumer)
-
location:总共分为"classpath:/,classpath:/config/,file:./,file:./config/",配置文件可配置的地址,加载优先级为倒序。
-
name:默认为“application”。
-
profile:若当前解析的不是spring.profiles.active指定的配置文件时默认为“null”,否则为- spring.profiles.active指定的值。
-
filterFactory:
-
consumer:将加载的document添加到Loader#loaded属性集合中,用于最后的配置文件优先级排序。
private void load(String location, String name, Profile profile,DocumentFilterFactory filterFactory, DocumentConsumer consumer) {
if (!StringUtils.hasText(name)) {
for (PropertySourceLoader loader : this.propertySourceLoaders) {
if (canLoadFileExtension(loader, location)) {
load(loader, location, profile,
filterFactory.getDocumentFilter(profile), consumer);
return;
}
}
}
// 临时存储判断是否已经加载过了某种扩展名类型(propertis、xml、yml、yaml)
// 的的配置,避免重复加载
Set processed = new HashSet<>();
// this.propertySourceLoaders,分为PropertiesPropertySourceLoader和YamlPropertySourceLoader两种
// PropertiesPropertySourceLoader:解析properties、xml类型配置
// YamlPropertySourceLoader:解析yml、yaml类型
for (PropertySourceLoader loader : this.propertySourceLoaders) {
// fileExtension由loder类型决定,优先级顺序为properties > xml > yml > ymal
// 配置文件拼接规则:location + name + “-” + profile + fileExtension;
for (String fileExtension : loader.getFileExtensions()) {
if (processed.add(fileExtension)) {
loadForFileExtension(loader, location + name, “.” + fileExtension,
profile, filterFactory, consumer);
}
}
}
}
- Loader#load(loader, location, profile,filter, consumer)核心解析方法,根据已拼接好地址去获取配置文件(例如:classpath:/application-dev.yml)
-
文件不存在:结束当前方法,继续执行下一次循环
-
文件存在:解析配置文件,将解析到的配置文件保存到Loader#loaded变量中
-
文件存在时还需要尝试获取spring.profiles.active属性,规则如下
1,若没有配置该属性值,则加载完当前fileExtension类型的配置(eg: application.properties、xml、yml、yaml)后就不再尝试解析其他fileExtension类型的配置文件了,此时系统就默认使用加载到的application.properties/yml配置
2,若配置了该属性值,则读取该属性值(当前配置的是dev),将其添加到Loader+profiles属性中(就是第三步while循环的那个profiles变量值),同时Loader会将activatedProfiles属性值改为true来标记系统已有active这个属性值,Loader也不会再去解析该配置文件了
private void load(PropertySourceLoader loader, String location, Profile profile, DocumentFilter filter, DocumentConsumer consumer) {
try {
// 根据拼接的配置文件地址来加载配置文件
// 例如location为classpath:application.yml
Resource resource = this.resourceLoader.getResource(location);
// 配置文件不存在,则返回继续查找
if (resource == null || !resource.exists()) {
if (this.logger.isTraceEnabled()) {
StringBuilder description = getDescription(
"Skipped missing config ", location, resource, profile);
this.logger.trace(description);
}
return;
}
String name = “applicationConfig: [” + location + “]”;
// 解析配置文件,并读取spring.profiles.active属性,将读取到的active属性赋值给document.getActiveProfiles()
List documents = loadDocuments(loader, name, resource);
// 保存已解析的配置文件
List loaded = new ArrayList<>();
for (Document document : documents) {
if (filter.match(document)) {
// 1、将解析到的spring.profiles.active添加到profiles中,下一次while循环就解析profile
// 比如说这里的active为dev,则接下来就拼接并加载dev的配置文件
// 2、将activatedProfiles属性设置为true,标注已经解析到了active属性,后续
// 就算在后面的配置文件中解析到active属性也不会再加载改配置
// 3、移除profiles中的“default”配置,后续将不会再加载application-defalut.yml配置
addActiveProfiles(document.getActiveProfiles());
// 将本次配置文件中加载到的“spring.profiles.include”中配置profile添加到profiles队列头部
// 队列头部的配置将会先被加载,但配置使用的优先级低于后面加载的配置文件(因为配置文件加载完后会执行reverse操作)
addIncludedProfiles(document.getIncludeProfiles());
// 添加到已加载的配置文件
loaded.add(document);
}
}
Collections.reverse(loaded);
if (!loaded.isEmpty()) {
// 将加载的document添加到Loader#loaded属性集合中,用于最后的配置文件优先级排序
// 根据当前加载顺序进行倒序排,由于application.yml比application-dev.yml
// 先加载,所以倒序后指定的application-dev.yml配置优先级更高
loaded.forEach((document) -> consumer.accept(profile, document));
if (this.logger.isDebugEnabled()) {
StringBuilder description = getDescription("Loaded config file ",
location, resource, profile);
this.logger.debug(description);
}
}
} catch (Exception ex) {
throw new IllegalStateException("Failed to load property "
+ “source from location '” + location + “'”, ex);
}
}
-
经过上面的步骤将所有的配置文件解析并添加到Loader#loaded属性中后,继续执行第三步中addLoadedPropertySource()方法,该方法会将现有loaded中保存的配置文件倒叙后依次添加到environment中。
private void addLoadedPropertySources() {
// 获取环境变量中已加载的配置信息
MutablePropertySources destination = this.environment.getPropertySources();
// 获取已本次Loader加载到的配置文件
List loaded = new ArrayList<>(this.loaded.values());
// 将已加载的配置文件倒序,更改优先级,spring.profile.active指定的优先级最高
Collections.reverse(loaded);
// 标注上一个添加到environment中的配置文件,用于确定当前配置文件插入的位置
String lastAdded = null;
// 利用set集合的属性,避免配置文件的重复添加
Set added = new HashSet<>();
// 遍历并将配置添加到environment中
for (MutablePropertySources sources : loaded) {
for (PropertySource<?> source : sources) {
if (added.add(source.getName())) {
// 将已加载的配置文件添加到environment的MutablePropertySources中
addLoadedPropertySource(destination, lastAdded, source);
lastAdded = source.getName();
}
}
}
}private void addLoadedPropertySource(MutablePropertySources destination, String lastAdded, PropertySource<?> source) {
if (lastAdded == null) {
// 如果系统中存在"defaultProperties"这个配置,则将第一个优先级的配置文件添加到这个配置文件的顺序之前
// 如果系统中不存在"defaultProperties"这个配置,则将第一个优先级的配置文件添加到environment中的最后一个
// defaultProperties实际为bootstrap.yml
if (destination.contains(DEFAULT_PROPERTIES)) {
destination.addBefore(DEFAULT_PROPERTIES, source);
} else {
destination.addLast(source);
}
} else {
// 将当前配置文件添加到上一个配置文件之后
destination.addAfter(lastAdded, source);
}
}
三 通过PropertySourceLoader 实现自定义load配置文件的方式植入加解密
3.1 重写yaml格式的文件加载类
-
新建文件 resourece/META-INF/spring.factories
org.springframework.boot.env.PropertySourceLoader=
com.ksher.framework.secret.parser.SecretYamlPropertySourceLoader -
重写yamlSourceLoader
package com.ksher.framework.secret.parser;
import com.alibaba.cloud.nacos.parser.AbstractPropertySourceLoader;
import com.ksher.framework.secret.kms.KmsSecret;
import org.slf4j.Logger;
import org.slf4j.LoggerFactory;
import org.springframework.boot.env.OriginTrackedMapPropertySource;
import org.springframework.core.Ordered;
import org.springframework.core.env.PropertySource;
import org.springframework.core.io.Resource;
import org.springframework.util.ClassUtils;import java.io.IOException;
import java.util.*;public class SecretYamlPropertySourceLoader extends AbstractPropertySourceLoader
implements Ordered {private static final Logger log = LoggerFactory.getLogger(SecretYamlPropertySourceLoader.class);/*** Get the order value of this object.* <p>* Higher values are interpreted as lower priority. As a consequence, the object with* the lowest value has the highest priority (somewhat analogous to Servlet* {@code load-on-startup} values).* <p>* Same order values will result in arbitrary sort positions for the affected objects.* @return the order value* @see #HIGHEST_PRECEDENCE* @see #LOWEST_PRECEDENCE*/ @Override public int getOrder() {return Integer.MIN_VALUE; }@Override public String[] getFileExtensions() {return new String[] { "yml", "yaml" }; }@Override public List<PropertySource<?>> load(String name, Resource resource) throws IOException {if (!ClassUtils.isPresent("org.yaml.snakeyaml.Yaml", getClass().getClassLoader())) {throw new IllegalStateException("Attempted to load " + name + " but snakeyaml was not found on the classpath");}List<Map<String, Object>> loaded = new OriginTrackedYamlLoader(resource).load();if (loaded.isEmpty()) {return Collections.emptyList();}List<PropertySource<?>> propertySources = new ArrayList<>(loaded.size());for (int i = 0; i < loaded.size(); i++) {String documentNumber = (loaded.size() != 1) ? " (document #" + i + ")" : "";Map<String, Object> stringObjectMap = loaded.get(i);for (String s : stringObjectMap.keySet()) {try {String value = stringObjectMap.get(s).toString();if (value.startsWith("Encrypted:")) {int prefixLength = "Encrypted:".length();String extractedString = value.substring(prefixLength);String decrypt = KmsSecret.dncrypt(extractedString);stringObjectMap.put(s, decrypt);}} catch (Exception e) {log.error("KmsSecret decrypt failed", e);}}log.info("loaded properties is {}", stringObjectMap);propertySources.add(new OriginTrackedMapPropertySource(name + documentNumber,stringObjectMap, true));}return propertySources; }@Override protected List<PropertySource<?>> doLoad(String name, Resource resource) throws IOException {if (!ClassUtils.isPresent("org.yaml.snakeyaml.Yaml", getClass().getClassLoader())) {throw new IllegalStateException("Attempted to load " + name + " but snakeyaml was not found on the classpath");}List<Map<String, Object>> loaded = new OriginTrackedYamlLoader(resource).load();if (loaded.isEmpty()) {return Collections.emptyList();}List<PropertySource<?>> propertySources = new ArrayList<>(loaded.size());for (int i = 0; i < loaded.size(); i++) {String documentNumber = (loaded.size() != 1) ? " (document #" + i + ")" : "";propertySources.add(new OriginTrackedMapPropertySource(name + documentNumber,Collections.unmodifiableMap(loaded.get(i)), true));}return propertySources; }}
-
植入解密
@Override
public List<PropertySource<?>> load(String name, Resource resource) throws IOException {
if (!ClassUtils.isPresent(“org.yaml.snakeyaml.Yaml”, getClass().getClassLoader())) {
throw new IllegalStateException(
“Attempted to load " + name + " but snakeyaml was not found on the classpath”);
}
List<Map<String, Object>> loaded = new OriginTrackedYamlLoader(resource).load();
if (loaded.isEmpty()) {
return Collections.emptyList();
}List<PropertySource<?>> propertySources = new ArrayList<>(loaded.size());for (int i = 0; i < loaded.size(); i++) {String documentNumber = (loaded.size() != 1) ? " (document #" + i + ")" : "";Map<String, Object> stringObjectMap = loaded.get(i);for (String s : stringObjectMap.keySet()) {try {String value = stringObjectMap.get(s).toString();if (value.startsWith("Encrypted:")) {// 解密植入int prefixLength = "Encrypted:".length();String extractedString = value.substring(prefixLength);// AESUtil.decrypt(extractedString)
String decrypt = KmsSecret.dncrypt(extractedString);
stringObjectMap.put(s, decrypt);
}
} catch (Exception e) {
log.error(“KmsSecret decrypt failed”, e);
}
}
log.info(“loaded properties is {}”, stringObjectMap);
propertySources.add(new OriginTrackedMapPropertySource(name + documentNumber,
stringObjectMap, true));
}
return propertySources;
} -
解析yaml文件
test:
secret:
mysql:
# 加密数据
user: Encrypted: E2Z3gvXufRIwuif2RfgkNQ==
demo: Encrypted: Encrypted: E2Z3gvXufRIwuif2RfgkNQ==
password: Encrypted: E2Z3gvXufRIwuif2RfgkNQ==
spring:
datasource:
driver-class-name: com.mysql.cj.jdbc.Driver
url: jdbc:mysql://10.10.7.11:3306/ksher_config_dev?serverTimezone=UTC&useUnicode=true&characterEncoding=utf-8&useSSL=true
username: Encrypted: E2Z3gvXufRIwuif2RfgkNQ==
password: Encrypted: E2Z3gvXufRIwuif2RfgkNQ== -
放入springboot的环境变量中
没有解密前数据


四,github地址
secret-spring-boot-starter
