前言
在次之前,我们已经做了图像加雾的一些研究,这里我们将从深度图的方法实现加雾展开细讲
图像加雾算法的研究与应用_图像加雾 算法-CSDN博客
接下来将要介绍如何使用深度图像生成雾效图像的方法。利用Synscapes数据集,通过读取EXR格式的深度信息,结合摄像机参数和暗通道先验等技术,计算传输图和大气光照强度,并应用朗伯-比尔定律生成雾效图像。文中提供了完整的代码示例,包括从深度图读取数据、计算传输图和大气光、以及生成和保存雾效图像。此外,还介绍了如何使用自制数据集进行处理。该方法适用于自动驾驶数据增强、增强现实和图像去雾等领域,并提供了详细的注释和参考资料,帮助读者更好地理解和实现图像加雾技术。
Synscapes数据集
下载路径:Synscapes data set (liu.se)
这个数据集很大,全部下载完成后才能解压。
从exr文件读取深度信息并进行可视化的方法在上一次已经讲过,所以不在赘述:图像加雾算法的研究与应用_图像加雾,具体在第5部分给出。
原作者使用的是matlab版本的:sakaridis/fog_simulation-SFSU_synthetic (github.com)
# utils.pyimport json
import numpy as np
from skimage.color import rgb2gray
from skimage.morphology import square, erosiondef camera_parameters(camera_parameters_file):"""相机参数从 JSON 文件中读取相机参数。:param camera_parameters_file:存储摄像机参数的 JSON 文件的完整路径。:return:f_x (float): 标量,类型为 float,对应于 x 轴的焦距参数(包含纵横比),单位为像素。c_x (float): 标量,类型为 float,对应于 x 轴的光学中心,单位为像素。c_y (float): 标量,类型为 float,对应于 y 轴的光学中心,单位为像素。"""with open(camera_parameters_file, 'r') as file:camera_parameters = json.load(file)f_x = camera_parameters['camera']['intrinsic']['fx']c_x = camera_parameters['camera']['intrinsic']['u0']c_y = camera_parameters['camera']['intrinsic']['v0']return f_x, c_x, c_ydef distance_in_meters(depth_map_in_meters, camera_parameters_file):"""以米为单位的距离使用密集深度图和摄像机固有参数作为输入,以与图像相同分辨率的密集图计算空气厚度,即被描绘物体与摄像机中心的距离,以米为单位。:param depth_map_in_meters: 深度图,以米为单位。:param camera_parameters_file: 相机参数文件。:return: 与深度图相同大小的距离图,以米为单位。"""f_x, c_x, c_y = camera_parameters(camera_parameters_file)height, width = depth_map_in_meters.shape    #创建一个与深度图像大小相同的网格,以便后续计算距离X, Y = np.meshgrid(np.arange(1, width + 1), np.arange(1, height + 1))# 深度图像中的像素值(通常是相机到物体的距离)转换为实际距离,以米为单位distance_map_in_meters = depth_map_in_meters * np.sqrt((f_x ** 2 + (X - c_x) ** 2 + (Y - c_y) ** 2) / f_x ** 2)return distance_map_in_metersdef brightest_pixels_count_rf(number_of_pixels, brightest_pixels_fraction):"""计算最亮像素的数量:param number_of_pixels: 图片中的像素数量:param brightest_pixels_fraction: 最亮像素分数:return: 最亮像素的数量"""brightest_pixels_count_tmp = int(brightest_pixels_fraction * number_of_pixels)brightest_pixels_count = brightest_pixels_count_tmp + ((brightest_pixels_count_tmp + 1) % 2)return brightest_pixels_countdef estimate_atmospheric_light_rf(I_dark, I):"""估计大气光照强度根据输入图像暗通道中最亮像素的一部分来估算大气光,如《图像去噪学习框架中的雾霾相关特征研究》中所建议。:param I_dark: 暗通道的灰度图像。:param I:      与 I_dark 高度和宽度相同的彩色图像。:return:        L (numpy.ndarray): 1x1x3 矩阵,包含大气光值估算值。index_L (int): 单通道版本图像中与大气光等值的像素的线性指数。"""brightest_pixels_fraction = 1 / 1000  #最亮像素分数height, width = I_dark.shapenumber_of_pixels = height * widthbrightest_pixels_count = brightest_pixels_count_rf(number_of_pixels, brightest_pixels_fraction)# 识别暗通道中最亮像素的指数。I_dark_vector = I_dark.flatten()indices = np.argsort(I_dark_vector)[::-1]  # 按降序排序brightest_pixels_indices = indices[:brightest_pixels_count]# 计算原始图像中暗部亮像素的灰度强度。I_gray_vector = rgb2gray(I).flatten()I_gray_vector_brightest_pixels = I_gray_vector[brightest_pixels_indices]# 从原始图像中灰度强度中值最亮的像素中找出能产生大气光的像素下标。median_intensity = np.median(I_gray_vector_brightest_pixels)index_median_intensity = np.where(I_gray_vector_brightest_pixels == median_intensity)[0][0]index_L = brightest_pixels_indices[index_median_intensity]row_L, column_L = np.unravel_index(index_L, (height, width))L = I[row_L, column_L]return Ldef get_dark_channel(I, neighborhood_size = 15):"""获取暗色通道使用侵蚀法计算输入图像相对于正方形邻域斑块的暗色通道。:param I: 输入彩色或灰度图像。:param neighborhood_size: 用于侵蚀的正方形斑块的边长,单位为像素。:return:    I_dark (numpy.ndarray): 输出与 I 相同类型、高度和宽度的灰度图像。I_eroded (numpy.ndarray): 与 I 尺寸相同的中间侵蚀图像。"""# 设置邻域大小# neighborhood_size = 15# 创建方形结构元素se_single_channel = square(neighborhood_size)# 将结构元素在每个通道上重复三次se = np.stack([se_single_channel] * 3, axis=-1)  #用来定义一个矩形区域,用于后续的图像形态学操作。I_eroded = erosion(I, se)                        #侵蚀是形态学操作之一,它用结构元素扫描图像,并将图像中的每个像素值替换为其邻域内像素值的最小值。I_dark = np.min(I_eroded, axis=2)                #获取每个像素在第三个维度(通常是颜色通道)上的最小值。这样做可能是为了将图像从彩色转换为灰度,因为对于灰度图像来说,每个像素只有一个值,即灰度值。return I_darkdef haze_linear(R, t, L_atm):"""使用与朗伯-比尔定律相对应的线性灰度模型,从干净图像生成灰度图像。:param R: H×W×image_channels 表示场景真实辐射度的干净图像。:param t: H×W 传输图。:param L: 1×1×image_channels 均质大气光。:return: 合成灰度图像,大小与输入的干净图像 R 相同。"""L_atm = L_atm.reshape(1, 1, 3)image_channels = L_atm.shape[2]                                        # 包含所有通道传输图副本的辅助矩阵,可方便地表达灰度图像。t_replicated = np.repeat(t[:, :, np.newaxis], image_channels, axis=2)  # 将一个灰度图像的雾度值扩展到所有颜色通道上I = t_replicated * R + (1 - t_replicated) * L_atmreturn Idef transmission_homogeneous_medium(d, beta, camera_parameters_file):"""根据比尔-朗伯定律,利用给定的深度图计算透射图。区分场景深度 d 和摄像机与每个像素所描绘物体之间的距离 l。:param d: H×W 矩阵,包含处理后图像的深度值(以米为单位)。:param beta: 衰减系数(以米为单位)。常数,因为介质是均质的。:param camera_parameters_file: 相机参数文件。:return: H×W 矩阵,介质传输值范围为 [0,1]。"""l = distance_in_meters(d, camera_parameters_file)t = np.exp(-beta * l)return tif __name__=="__main__":camera_parameters_file = r"D:\PythonProject\MB_TaylorFormer\RShazy\FoggySynscapes\data\demo\camera\camera.json"f_x, c_x, c_y = camera_parameters(camera_parameters_file)print(f_x, c_x, c_y)
详细解析请看中文注解
这里请按照默认下载的目录进行,不要随意做修改,相机的内参请自己创建,在数据集的json文件中已经给出。
import os
import numpy as np
from PIL import Image
from skimage.io import imread
import matplotlib.pyplot as plt
from RShazy.FoggySynscapes.utils import get_dark_channel, transmission_homogeneous_medium
from RShazy.FoggySynscapes.utils import estimate_atmospheric_light_rf, haze_linear
plt.rcParams['font.family'] = 'serif'
plt.rcParams['font.serif'] = 'Times New Roman'
from pyzjr.data import multi_makedirs
from RShazy.FoggySynscapes.depth_utils import read_depth_from_exrdef demo_test(demo_root_dir, iter, beta = 0.06, window_size = 15):depth_exr_path = os.path.join(demo_root_dir, 'depth')camera_json_file = os.path.join(demo_root_dir, 'camera.json')image_rgb_path = os.path.join(demo_root_dir, 'rgb')depth_image = read_depth_from_exr(os.path.join(depth_exr_path, f"{iter}.exr"))img_uint8 = imread(os.path.join(image_rgb_path, f'{iter}.png'))clear_image = img_uint8.astype(float) / 255.0t = transmission_homogeneous_medium(depth_image, beta, camera_json_file)clear_image_dark_channel = get_dark_channel(clear_image, window_size)L_atm = estimate_atmospheric_light_rf(clear_image_dark_channel, clear_image)I = haze_linear(clear_image, t, L_atm)converted_I = (I * 255).astype(np.uint8)pil_I = Image.fromarray(converted_I)return pil_Iif __name__=="__main__":import matplotlib# import pyzjrmatplotlib.use('TkAgg')demo_root_dir = r"F:\dataset\Dehazy\synscapes\Synscapes\img"foggy_result_dir = r"D:\PythonProject\MB_TaylorFormer\RShazy\FoggySynscapes\Synscapes\test/hazy"multi_makedirs(foggy_result_dir)# _, length = pyzjr.get_file_list(os.path.join(demo_root_dir, "rgb"))# print(length)  # 25000for i in range(251, 352):pil_I = demo_test(demo_root_dir, i)# plt.imshow(pil_I)# plt.show()print(f"{i} 已保存图片到",os.path.join(foggy_result_dir, f"{i}.png"))pil_I.save(os.path.join(foggy_result_dir, f"{i}.png"))
合成效果如下所示:

D455相机拍摄自制数据集
拍摄以及无效区域处理方法请看此文:D455相机RGB与深度图像对齐,缓解相机无效区域的问题
这里我们需要修改读取深度图的方式:
import numpy as npdef read_depth_from_npy(npy_file_path):"""读取指定的NPY文件中的深度信息"""depth_data = np.load(npy_file_path)return depth_data记得将自己拍摄rgb图像和处理过后的depth文件进行替换
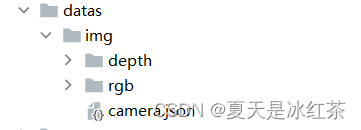
目录结构请按照下面的方式进行:

D455相机的参数:
{
"camera": {
"intrinsic": {
"fx": 387.3067321777344,
"fy": 387.3067321777344,
"resx": 640,
"resy": 480,
"u0": 321.67352294921875,
"v0": 237.27777099609375
}
}
}
import os
import numpy as np
from PIL import Image
from skimage.io import imread
import matplotlib.pyplot as plt
from RShazy.FoggySynscapes.utils import get_dark_channel, transmission_homogeneous_medium
from RShazy.FoggySynscapes.utils import estimate_atmospheric_light_rf, haze_linear
plt.rcParams['font.family'] = 'serif'
plt.rcParams['font.serif'] = 'Times New Roman'
from RShazy.FoggySynscapes.depth_utils import read_depth_from_exr, read_depth_from_npydef demo_test(demo_root_dir, iter, beta = 0.06, window_size = 15):depth_exr_path = os.path.join(demo_root_dir, 'depth')camera_json_file = os.path.join(demo_root_dir, 'camera.json')image_rgb_path = os.path.join(demo_root_dir, 'rgb')depth_image = read_depth_from_npy(os.path.join(depth_exr_path, f"{iter}.npy"))img_uint8 = imread(os.path.join(image_rgb_path, f'{iter}.png'))clear_image = img_uint8.astype(float) / 255.0t = transmission_homogeneous_medium(depth_image, beta, camera_json_file)clear_image_dark_channel = get_dark_channel(clear_image, window_size)L_atm = estimate_atmospheric_light_rf(clear_image_dark_channel, clear_image)I = haze_linear(clear_image, t, L_atm)converted_I = (I * 255).astype(np.uint8)pil_I = Image.fromarray(converted_I)return pil_Iif __name__=="__main__":import matplotlibmatplotlib.use('TkAgg')demo_root_dir = r"D:\PythonProject\MB_TaylorFormer\RShazy\FoggySynscapes\datas\img"foggy_result_dir = r"D:\PythonProject\MB_TaylorFormer\RShazy\FoggySynscapes\outputs/hazy"os.makedirs(foggy_result_dir, exist_ok=True)# _, length = pyzjr.get_file_list(os.path.join(demo_root_dir, "rgb"))# print(length)  # 25000for i in range(1, 5):pil_I = demo_test(demo_root_dir, i, beta = 0.2)# plt.imshow(pil_I)# plt.show()print(f"{i} 已保存图片到",os.path.join(foggy_result_dir, f"{i}.png"))pil_I.save(os.path.join(foggy_result_dir, f"{i}.png"))
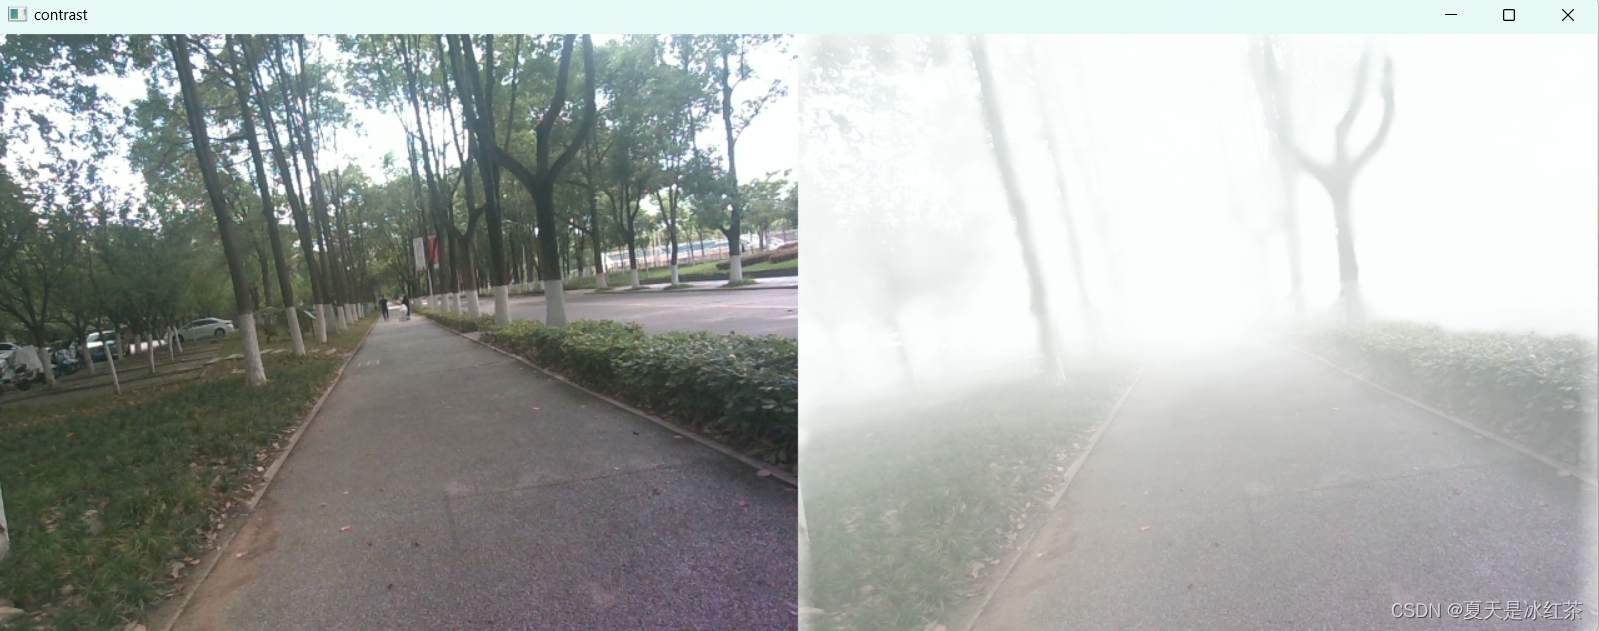
室外场景:

室内场景:

参考文章
完善后的根据深度图加雾代码Python_图像加雾python-CSDN博客
【python】通过深度图生成雾图(HAZERD)_深度图像信息合成雾-CSDN博客
图片合成雾的方法概述_图像加雾-CSDN博客
MATLAB实现利用图像深度信息合成不同浓度的雾【Cityscapes_foggy数据集】_自己合成带雾数据集-CSDN博客
