前言
最近在找完暑期实习之后,终于有了一些干项目外的空余时间学习新的知识,在这么多轮面试中,数据库的考察非常多,但孱弱的数据库基础导致我有很多次面试被问住,因此我希望在学习CMU-15445(Fall 2024)的过程中能夯实我的基础,更好的理解数据库在计算机中的应用。
我将从本节开始记录我从查找资源、注册以及后续project提交的过程。
1. 准备工作
1.1 Gradescope注册
在学习课程之前,我们需要注册一个Gradescope账号用于提交测试我们的project,并留记录以证明自己的学习经历。
非CMU学生如果要测试project,需在网站Gradescope提前注册账号。
- 确保将学校设置为“
Carnegie Mellon University”- 参赛代码为“
WWWJZ5”
1.2 clone仓库
课程主页:CMU 15-445/645 :: Intro to Database Systems (Fall 2024)
github:cmu-db/bustub: The BusTub Relational Database Management System (Educational)
过程如下:
-
首先,在自己的github下创建新存储库
-
在PC上,创建公有 BusTub 存储库的克隆:
$ git clone --bare https://github.com/cmu-db/bustub.git bustub-public -
将公有BusTub镜像到刚才创建的新存储库中:
$ cd bustub-public# If you pull / push over HTTPS
$ git push https://github.com/student/bustub-private.git master# If you pull / push over SSH
$ git push git@github.com:student/bustub-private.git master
我这里使用的SSH协议,用户名和仓库名写为自己新创建的仓库名和用户名,如下:
$ git push git@github.com:qiaobeibei/cmu-15445.git但是在 push 过程中,遇到了一个问题:
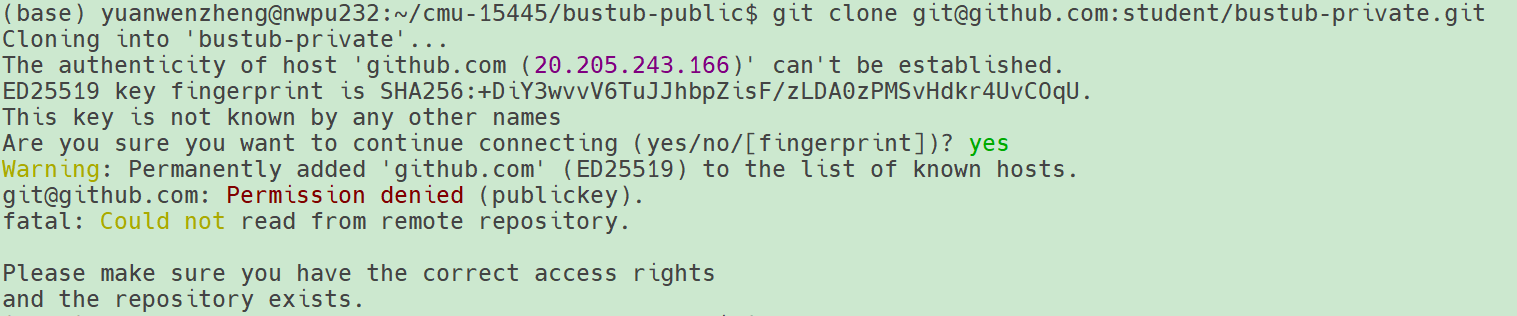
这里需要我们配置有效的SSH密钥,从而能通过GitHub的身份验证:
-
我们先查看本地是否已经存在SSH密钥:
$ ls -al ~/.ssh如果存在
id_rsa.pub(RSA 密钥)或者id_ed25519.pub(Ed25519 密钥),则说明本地已存有密钥,如下
将
id_rsa.pub文件的内容输出到终端,然后复制:$ cat ~/.ssh/id_rsa.pub
如果密钥不存在,那么我们需要生成新的SSH密钥:
$ ssh-keygen -t ed25519 -C "your_email@example.com"your_email@example.com是我们Github上注册的邮箱地址。生成密钥后,启动SSH代理并将新生成的密钥添加到代理中:
$ eval "$(ssh-agent -s)"
$ ssh-add ~/.ssh/id_ed25519
若使用的是 RSA 密钥,就把
id_ed25519替换成id_rsa。然后查看密钥内容,并复制。
-
将SSH 公钥添加到 GitHub 账户
-
登录 GitHub 账户,点击右上角的头像,然后选择
Settings。 -
在左侧菜单中,点击
SSH and GPG keys。 -
点击
New SSH key按钮。 -
在
Title字段中,输入一个描述性的名称,例如你的电脑名称或使用场景,方便你识别这个密钥。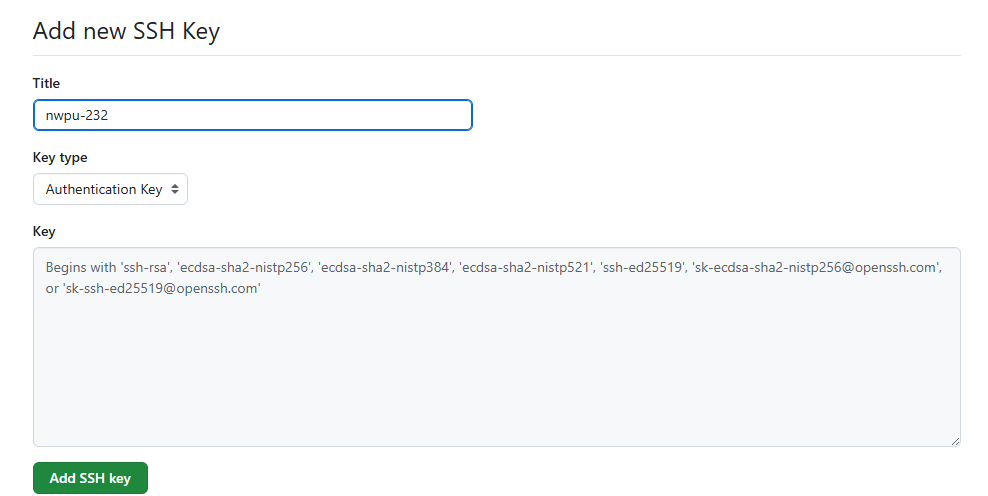

-
在
Key字段中,粘贴你刚才复制的公钥内容。 -
点击
Add SSH key按钮保存设置。
-
-
测试SSh连接
输入以下指令,测试SSH连接是否正常:
ssh -T git@github.com执行该命令后,输入密钥的密码短语,若出现以下结果,则连接成功:

其中,
username是 GitHub 用户名,可以正常使用 SSH 协议克隆和操作仓库了。
再次克隆仓库:
$ git push git@github.com:qiaobeibei/cmu-15445.git
push成功后,删除刚才clone到本地的公有 bustub-public 仓库。
$ cd ..
$ rm -rf bustub-public
-
将我们的个人仓库clone到本地计算机
# If you pull / push over HTTPS $ git clone https://github.com/student/bustub-private.git# If you pull / push over SSH $ git clone git@github.com:student/bustub-private.git -
将公共的 BusTub 仓库添加为第二个远程仓库
$ git remote add public https://github.com/cmu-db/bustub.git使用以下命令验证远程仓库是否已成功添加:
$ git remote -v预期输出示例:
origin	https://github.com/qiaobeibei/cmu-15445.git (fetch)
origin	https://github.com/qiaobeibei/cmu-15445.git (push)
public	https://github.com/cmu-db/bustub.git (fetch)
public	https://github.com/cmu-db/bustub.git (push)
1.3 环境部署
首先要配置LLVM的C/C++环境,这一步非常重要,可以参考文章:CMU15445 2023spring环境准备 | JoyTsing
简要流程:
-
安装LLVM全家桶+cmkae
sudo apt install clang clangd lldb cmake -
安装LLVM
wget https://mirrors.tuna.tsinghua.edu.cn/llvm-apt/llvm.sh chmod +x llvm.sh sudo ./llvm.sh all -m https://mirrors.tuna.tsinghua.edu.cn/llvm-apt -
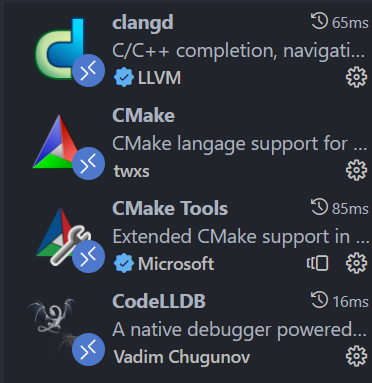
Vscode所需插件:
1.4 build
首先cd到项目根目录下,运行脚本安装依赖
$ sudo build_support/packages.sh
然后编译流程和官网介绍一样:
Then run the following commands to build the system:
$ mkdir build
$ cd build
$ cmake ..
$ make
If you want to compile the system in debug mode, pass in the following flag to cmake: Debug mode:
$ cmake -DCMAKE_BUILD_TYPE=Debug ..
$ make -j`nproc`
This enables AddressSanitizer by default.
If you want to use other sanitizers,
$ cmake -DCMAKE_BUILD_TYPE=Debug -DBUSTUB_SANITIZER=thread ..
$ make -j`nproc`
There are some differences between macOS and Linux (i.e., mutex behavior) that might cause test cases to produce different results in different platforms. We recommend students to use a Linux VM for running test cases and reproducing errors whenever possible.
后续就是跟着project的介绍一步步做,完成project的task后,通过下面的命令进行测试:
$ cd build
$ make -j$(nproc) hyperloglog_test
$ ./test/hyperloglog_test
运行编译好的测试程序即可测试:
./test/hyperloglog_test

确保从测试用例名称中移除了
DISABLED_前缀,不然这些测试用例不会运行。如果想要运行某个之前被禁用的测试用例,只需把DISABLED_前缀去掉即可。
比如要测试./test/buffer/lru_k_replacer_test.cpp,需要将测试用例第二个形参开头的DISABLE_前缀去掉,然后再次make,就会正常测试。
