此脚本的主要功能是通过视觉化工具和键盘交互,动态调整和校准人体轨迹数据中的点云数据(PCD)和位姿(pose)
- 校准模式下,通过键盘输入动态调整点云与位姿偏移量,并保存调整结果
- 非校准模式下,按顺序回放所有帧的点云和位姿数据
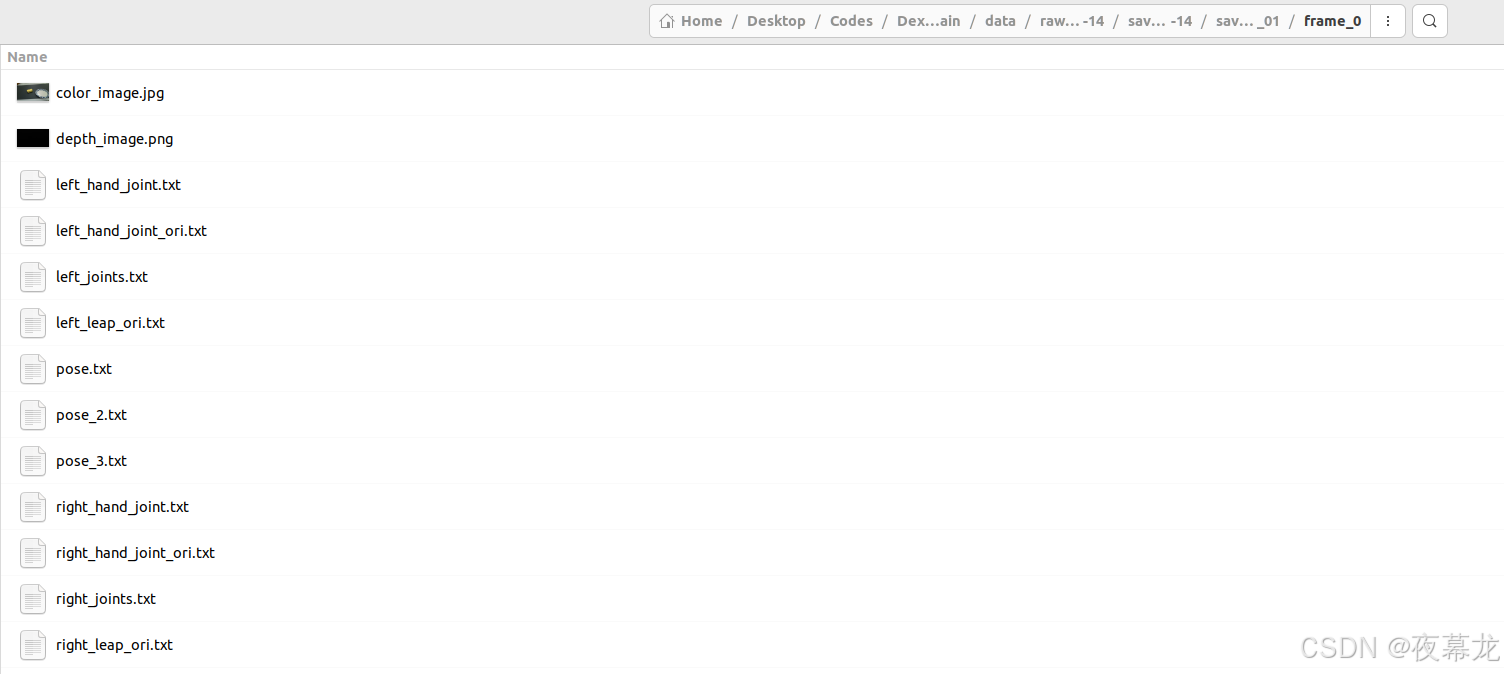
首先,录制完的数据结构如下:
save_data_scenario_1
├── frame_0
│   ├── color_image.jpg           # Chest camera RGB image
│   ├── depth_image.png           # Chest camera depth image
│   ├── pose.txt                  # Chest camera 6-DoF pose in world frame
│   ├── pose_2.txt                # Left hand 6-DoF pose in world frame
│   ├── pose_3.txt                # Right hand 6_DoF pose in world frame
│   ├── left_hand_joint.txt       # Left hand joint positions (3D) in the palm frame
│   └── right_hand_joint.txt      # Right hand joint positions (3D) in the palm frame
├── frame_1
└── ...

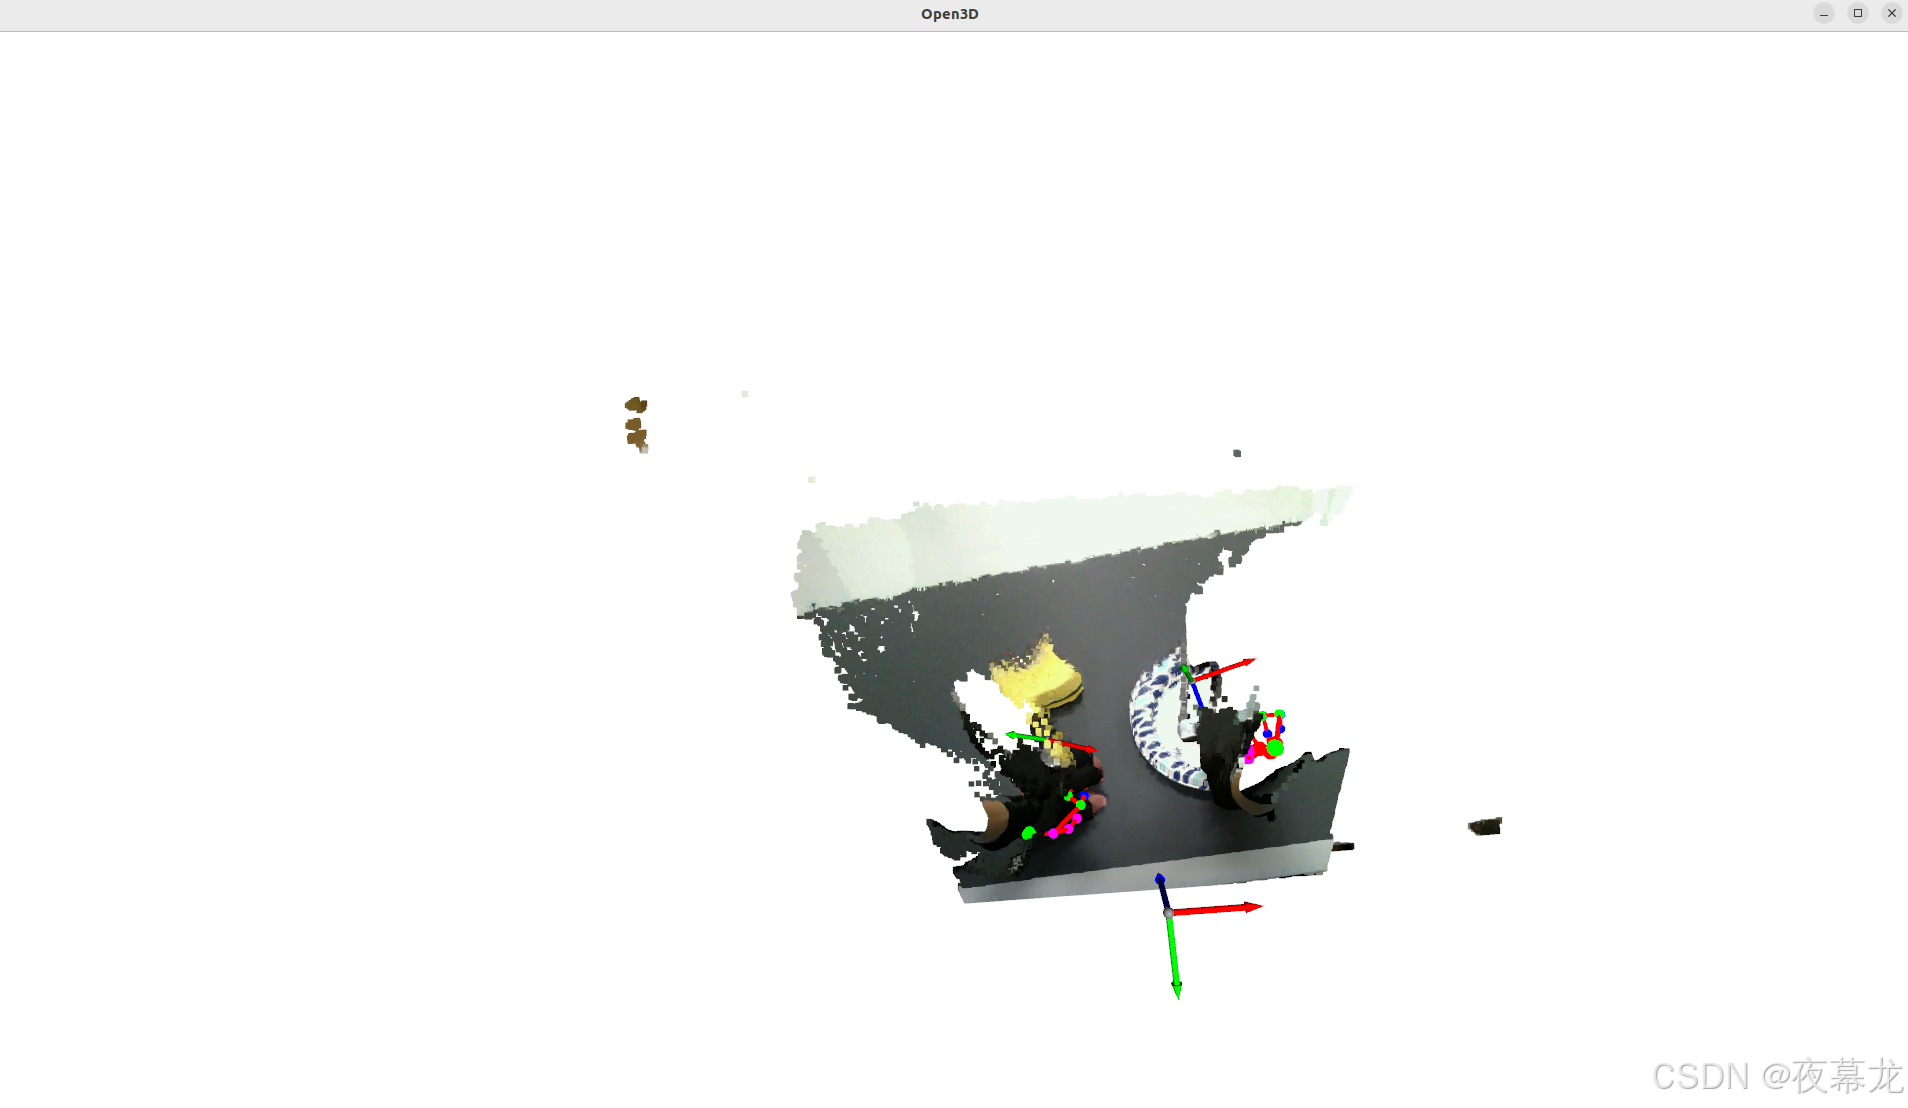
为了可视化收集的数据,显示点云和捕获的手部动作,可以运行:
cd DexCap/STEP1_collect_data
python replay_human_traj_vis.py --directory save_data_scenario_1


此外,此脚本还提供了一个用于纠正 SLAM 初始漂移的接口。运行以下脚本,并使用数字键来纠正漂移,校正将应用于整个视频:
python replay_human_traj_vis.py --directory save_data_scenario_1 --calib
python calculate_offset_vis_calib.py --directory save_data_scenario_1
接下来详细解释一下此脚本的代码逻辑
目录
1 库函数引用
2 主函数
3 ReplayDataVisualizer 类
4 键盘交互逻辑
5 pycharm 优化
1 库函数引用
"""
可视化保存的点云(PCD)文件和位姿使用示例:
(1) 可视化所有帧:
python replay_human_traj_vis.py --directory ./saved_data/(2) 用于校准:
python replay_human_traj_vis.py --directory ./saved_data/ -calib
"""import argparse  # 用于解析命令行参数
import os  # 用于文件和目录操作
import copy  # 用于创建对象的副本
import zmq  # 用于进程间通信(在本脚本中未直接使用)
import cv2  # 用于图像处理(在本脚本中未直接使用)
import sys  # 用于系统特定参数和功能
import shutil  # 用于文件操作,如删除目录
import open3d as o3d  # 用于3D可视化
import numpy as np  # 用于数值计算
import platform  # 用于判断操作系统
from pynput import keyboard  # 用于监听键盘输入
from visualizer import *  # 导入自定义可视化工具
2 主函数
if __name__ == "__main__":parser = argparse.ArgumentParser(description="可视化保存的帧数据。") # 创建参数解析器parser.add_argument("--directory", type=str, default="./saved_data", help="保存数据的目录") # 数据目录参数parser.add_argument("--default", type=str, default="default_offset", help="默认校准目录") # 默认校准偏移目录parser.add_argument("--calib", action='store_true', help="启用校准模式") # 校准模式标志args = parser.parse_args() # 解析命令行参数assert os.path.exists(args.directory), f"给定的目录不存在: {args.directory}" # 检查目录是否存在visualizer = ReplayDataVisualizer(args.directory) # 初始化可视化工具if args.calib: # 如果启用了校准模式# 加载校准偏移量visualizer.right_hand_offset = np.loadtxt(os.path.join(args.default, "calib_offset.txt"))visualizer.right_hand_ori_offset = np.loadtxt(os.path.join(args.default, "calib_ori_offset.txt"))visualizer.left_hand_offset = np.loadtxt(os.path.join(args.default, "calib_offset_left.txt"))visualizer.left_hand_ori_offset = np.loadtxt(os.path.join(args.default, "calib_ori_offset_left.txt"))# 检查临时校准目录是否存在if os.path.exists("tmp_calib"):response = (input(f"tmp_calib 已存在。是否覆盖?(y/n): ").strip().lower())if response != "y": # 如果用户选择不覆盖print("退出程序,未覆盖现有目录。")sys.exit() # 退出程序else:shutil.rmtree("tmp_calib") # 删除现有目录os.makedirs("tmp_calib", exist_ok=True) # 创建临时校准目录visualizer.replay_keyframes_calibration() # 启动校准模式else: # 如果未启用校准模式# 加载校准偏移量visualizer.right_hand_offset = np.loadtxt("{}/calib_offset.txt".format(args.directory))visualizer.right_hand_ori_offset = np.loadtxt("{}/calib_ori_offset.txt".format(args.directory))visualizer.left_hand_offset = np.loadtxt("{}/calib_offset_left.txt".format(args.directory))visualizer.left_hand_ori_offset = np.loadtxt("{}/calib_ori_offset_left.txt".format(args.directory))visualizer.replay_all_frames() # 回放所有帧代码入口 if __name__ == "__main__":,解析命令行参数并执行不同模式的逻辑,包括:
1. 检查 --directory 指定的目录是否存在
2. 如果启用校准模式 (--calib):
- 加载默认偏移值文件(如 calib_offset.txt 和 calib_ori_offset.txt)
- 检查并处理可能已有的临时校准文件目录(tmp_calib)
- 调用 replay_keyframes_calibration 方法启动校准模式
否则,加载对应帧数据并调用 replay_all_frames 方法,逐帧回放所有数据
3. 数据校验与文件保存
校验数据目录和默认偏移文件是否存在
确保 tmp_calib 目录可用,如果已有旧文件,会提示用户是否覆盖。
校准结果存储为 .txt 文件,按帧编号命名(如 frame_10.txt)
3 ReplayDataVisualizer 类
# 可视化类,用于回放和校准 PCD 数据
class ReplayDataVisualizer(DataVisualizer):def __init__(self, directory):super().__init__(directory)  # 使用数据目录初始化基类def replay_keyframes_calibration(self):"""可视化并逐帧校准。"""global delta_movement_accu, delta_ori_accu, next_frame, frameif self.R_delta_init is None:  # 检查是否初始化了基准帧self.initialize_canonical_frame()self._load_frame_data(frame)  # 加载当前帧的数据# 将 3D 对象添加到可视化工具中self.vis.add_geometry(self.pcd)self.vis.add_geometry(self.coord_frame_1)self.vis.add_geometry(self.coord_frame_2)self.vis.add_geometry(self.coord_frame_3)for joint in self.left_joints + self.right_joints:self.vis.add_geometry(joint)for cylinder in self.left_line_set + self.right_line_set:self.vis.add_geometry(cylinder)next_frame = True  # 准备加载下一帧try:with keyboard.Listener(on_press=on_press) as listener:  # 启动键盘监听器while True:if next_frame == True:  # 如果准备好,加载下一帧next_frame = Falseframe += 10self._load_frame_data(frame)  # 加载帧数据self.step += 1  # 步数计数器递增# 更新可视化工具中的几何体self.vis.update_geometry(self.pcd)self.vis.update_geometry(self.coord_frame_1)self.vis.update_geometry(self.coord_frame_2)self.vis.update_geometry(self.coord_frame_3)for joint in self.left_joints + self.right_joints:self.vis.update_geometry(joint)for cylinder in self.left_line_set + self.right_line_set:self.vis.update_geometry(cylinder)self.vis.poll_events()  # 处理可视化事件self.vis.update_renderer()  # 更新可视化渲染器listener.join()  # 等待监听器结束finally:print("cumulative_correction ", self.cumulative_correction)  # 打印累计修正值
此类继承自 DataVisualizer,实现了点云和轨迹数据的校准与回放功能
1. 初始化
通过 __init__ 方法调用父类构造函数,初始化路径和可视化工具
校准模式下,加载偏移量并初始化临时存储目录
2. 校准方法 replay_keyframes_calibration
核心方法,用于处理校准模式下逐帧的动态调整:
- 如果尚未初始化基准帧(R_delta_init),调用 initialize_canonical_frame
- 加载当前帧的点云和姿态数据,并添加到 open3d 的可视化窗口
- 启动键盘监听器(keyboard.Listener),实时监听按键调整点云和位姿的偏移量
- 每次按下保存键时,更新临时文件中的偏移量,并加载下一帧
4 键盘交互逻辑
# 脚本中使用的全局变量
def on_press(key):global next_frame, delta_movement_accu, delta_ori_accu, delta_movement_accu_left, delta_ori_accu_left, adjust_movement, adjust_right, frame, step# 判断当前操作系统类型os_type = platform.system()# 根据当前模式(右手/左手,平移/旋转)选择需要调整的数据if adjust_right:data_to_adjust = delta_movement_accu if adjust_movement else delta_ori_accuelse:data_to_adjust = delta_movement_accu_left if adjust_movement else delta_ori_accu_leftif os_type == "Linux":  # Linux 特定的按键绑定# 根据按键调整平移/旋转偏移量if key.char == '6':  # 沿负 x 方向移动data_to_adjust[0] += stepelif key.char == '4':  # 沿正 x 方向移动data_to_adjust[0] -= stepelif key.char == '8':  # 沿正 y 方向移动data_to_adjust[1] += stepelif key.char == '2':  # 沿负 y 方向移动data_to_adjust[1] -= stepelif key.char == "7":  # 沿正 z 方向移动data_to_adjust[2] += stepelif key.char == "9":  # 沿负 z 方向移动data_to_adjust[2] -= stepelif key.char == "3":  # 重置所有偏移量delta_movement_accu *= 0.0delta_ori_accu *= 0.0delta_movement_accu_left *= 0.0delta_ori_accu_left *= 0.0next_frame = Trueelif key.char == "0":  # 保存偏移量并加载下一帧# 将偏移量保存到临时校准文件if (delta_movement_accu != np.array([0.0, 0.0, 0.0])).any() or (delta_ori_accu != np.array([0.0, 0.0, 0.0])).any() or (delta_movement_accu_left != np.array([0.0, 0.0, 0.0])).any() or (delta_ori_accu_left != np.array([0.0, 0.0, 0.0])).any():frame_dir = "./tmp_calib/"np.savetxt(os.path.join(frame_dir, f"frame_{frame}.txt"), delta_movement_accu)np.savetxt(os.path.join(frame_dir, f"frame_{frame}_ori.txt"), delta_ori_accu)np.savetxt(os.path.join(frame_dir, f"frame_{frame}_left.txt"), delta_movement_accu_left)np.savetxt(os.path.join(frame_dir, f"frame_{frame}_ori_left.txt"), delta_ori_accu_left)# 重置偏移量,准备处理下一帧delta_movement_accu *= 0.0delta_ori_accu *= 0.0delta_movement_accu_left *= 0.0delta_ori_accu_left *= 0.0next_frame = Trueelif key == keyboard.Key.space:  # 切换平移和旋转调整模式adjust_movement = not adjust_movementelif key == keyboard.Key.enter:  # 切换左右手调整模式adjust_right = not adjust_rightelse:print("Key error", key)  # 对于不支持的按键打印错误elif os_type == "Windows":  # Windows 特定的按键绑定# 与 Linux 类似的逻辑,但使用不同的按键(方向键、Page Up/Down 等)if key == keyboard.Key.right:  # 沿负 x 方向移动data_to_adjust[0] += stepelif key == keyboard.Key.left:  # 沿正 x 方向移动data_to_adjust[0] -= stepelif key == keyboard.Key.up:  # 沿正 y 方向移动data_to_adjust[1] += stepelif key == keyboard.Key.down:  # 沿负 y 方向移动data_to_adjust[1] -= stepelif key == keyboard.Key.home:  # 沿正 z 方向移动data_to_adjust[2] += stepelif key == keyboard.Key.page_up:  # 沿负 z 方向移动data_to_adjust[2] -= stepelif key == keyboard.Key.page_down:  # 重置偏移量delta_movement_accu *= 0.0delta_ori_accu *= 0.0delta_movement_accu_left *= 0.0delta_ori_accu_left *= 0.0next_frame = Trueelif key == keyboard.Key.insert:  # 保存偏移量并加载下一帧# 将偏移量保存到临时校准文件if (delta_movement_accu != np.array([0.0, 0.0, 0.0])).any() or (delta_ori_accu != np.array([0.0, 0.0, 0.0])).any() or (delta_movement_accu_left != np.array([0.0, 0.0, 0.0])).any() or (delta_ori_accu_left != np.array([0.0, 0.0, 0.0])).any():frame_dir = "./tmp_calib/"np.savetxt(os.path.join(frame_dir, f"frame_{frame}.txt"), delta_movement_accu)np.savetxt(os.path.join(frame_dir, f"frame_{frame}_ori.txt"), delta_ori_accu)np.savetxt(os.path.join(frame_dir, f"frame_{frame}_left.txt"), delta_movement_accu_left)np.savetxt(os.path.join(frame_dir, f"frame_{frame}_ori_left.txt"), delta_ori_accu_left)# 重置偏移量,准备处理下一帧delta_movement_accu *= 0.0delta_ori_accu *= 0.0delta_movement_accu_left *= 0.0delta_ori_accu_left *= 0.0next_frame = Trueelif key == keyboard.Key.space:  # 切换平移和旋转调整模式adjust_movement = not adjust_movementelif key == keyboard.Key.enter:  # 切换左右手调整模式adjust_right = not adjust_rightelse:print("Key error", key)  # 对于不支持的按键打印错误
键盘输入是代码的交互核心,定义在 on_press 方法中
1. 调整逻辑
(1)判断调整目标:
- 右手(adjust_right=True)或左手(adjust_right=False)
- 调整移动偏移量(adjust_movement=True)或姿态偏移量(adjust_movement=False)
(2)根据操作系统选择按键:
- Linux 使用数字键(如 6 表示 x 轴负方向移动)
- Windows 使用方向键和功能键(如 Key.right 表示 x 轴负方向移动)
2. 特殊按键功能
- Space:切换移动和姿态调整模式
- Enter:切换左右手调整
- 0 / Insert:保存当前偏移量到文件并加载下一帧
- 3 / Page Down:重置所有偏移量
3. 偏移量存储
- 偏移量存储在 delta_movement_accu 和 delta_ori_accu 等全局变量中
- 保存时调用 np.savetxt,将每帧的调整结果存储到临时目录(tmp_calib)
5 pycharm 优化
因为想用 pychram 调试,所以简单改一下进入条件,变成选择模式:
# 添加用户交互菜单
print("Select mode:")
print("1. Calibration Mode")
print("2. Visualization Mode")
mode = input("Enter your choice (1/2): ").strip()if mode == "1":print("Entering calibration mode...")visualizer.right_hand_offset = np.loadtxt(os.path.join(args.default, "calib_offset.txt"))visualizer.right_hand_ori_offset = np.loadtxt(os.path.join(args.default, "calib_ori_offset.txt"))visualizer.left_hand_offset = np.loadtxt(os.path.join(args.default, "calib_offset_left.txt"))visualizer.left_hand_ori_offset = np.loadtxt(os.path.join(args.default, "calib_ori_offset_left.txt"))# 检查临时校准目录是否存在if os.path.exists("tmp_calib"):response = input("tmp_calib already exists. Do you want to override? (y/n): ").strip().lower()if response != "y":print("Exiting program without overriding the existing directory.")sys.exit()else:shutil.rmtree("tmp_calib")os.makedirs("tmp_calib", exist_ok=True)visualizer.replay_keyframes_calibration()  # 启动校准模式
elif mode == "2":print("Entering visualization mode...")visualizer.right_hand_offset = np.loadtxt(f"{args.directory}/calib_offset.txt")visualizer.right_hand_ori_offset = np.loadtxt(f"{args.directory}/calib_ori_offset.txt")visualizer.left_hand_offset = np.loadtxt(f"{args.directory}/calib_offset_left.txt")visualizer.left_hand_ori_offset = np.loadtxt(f"{args.directory}/calib_ori_offset_left.txt")visualizer.replay_all_frames()  # 启动可视化模式
else:print("Invalid choice. Exiting program.")sys.exit()
此时再运行会进入选择:

