一、发布探店笔记
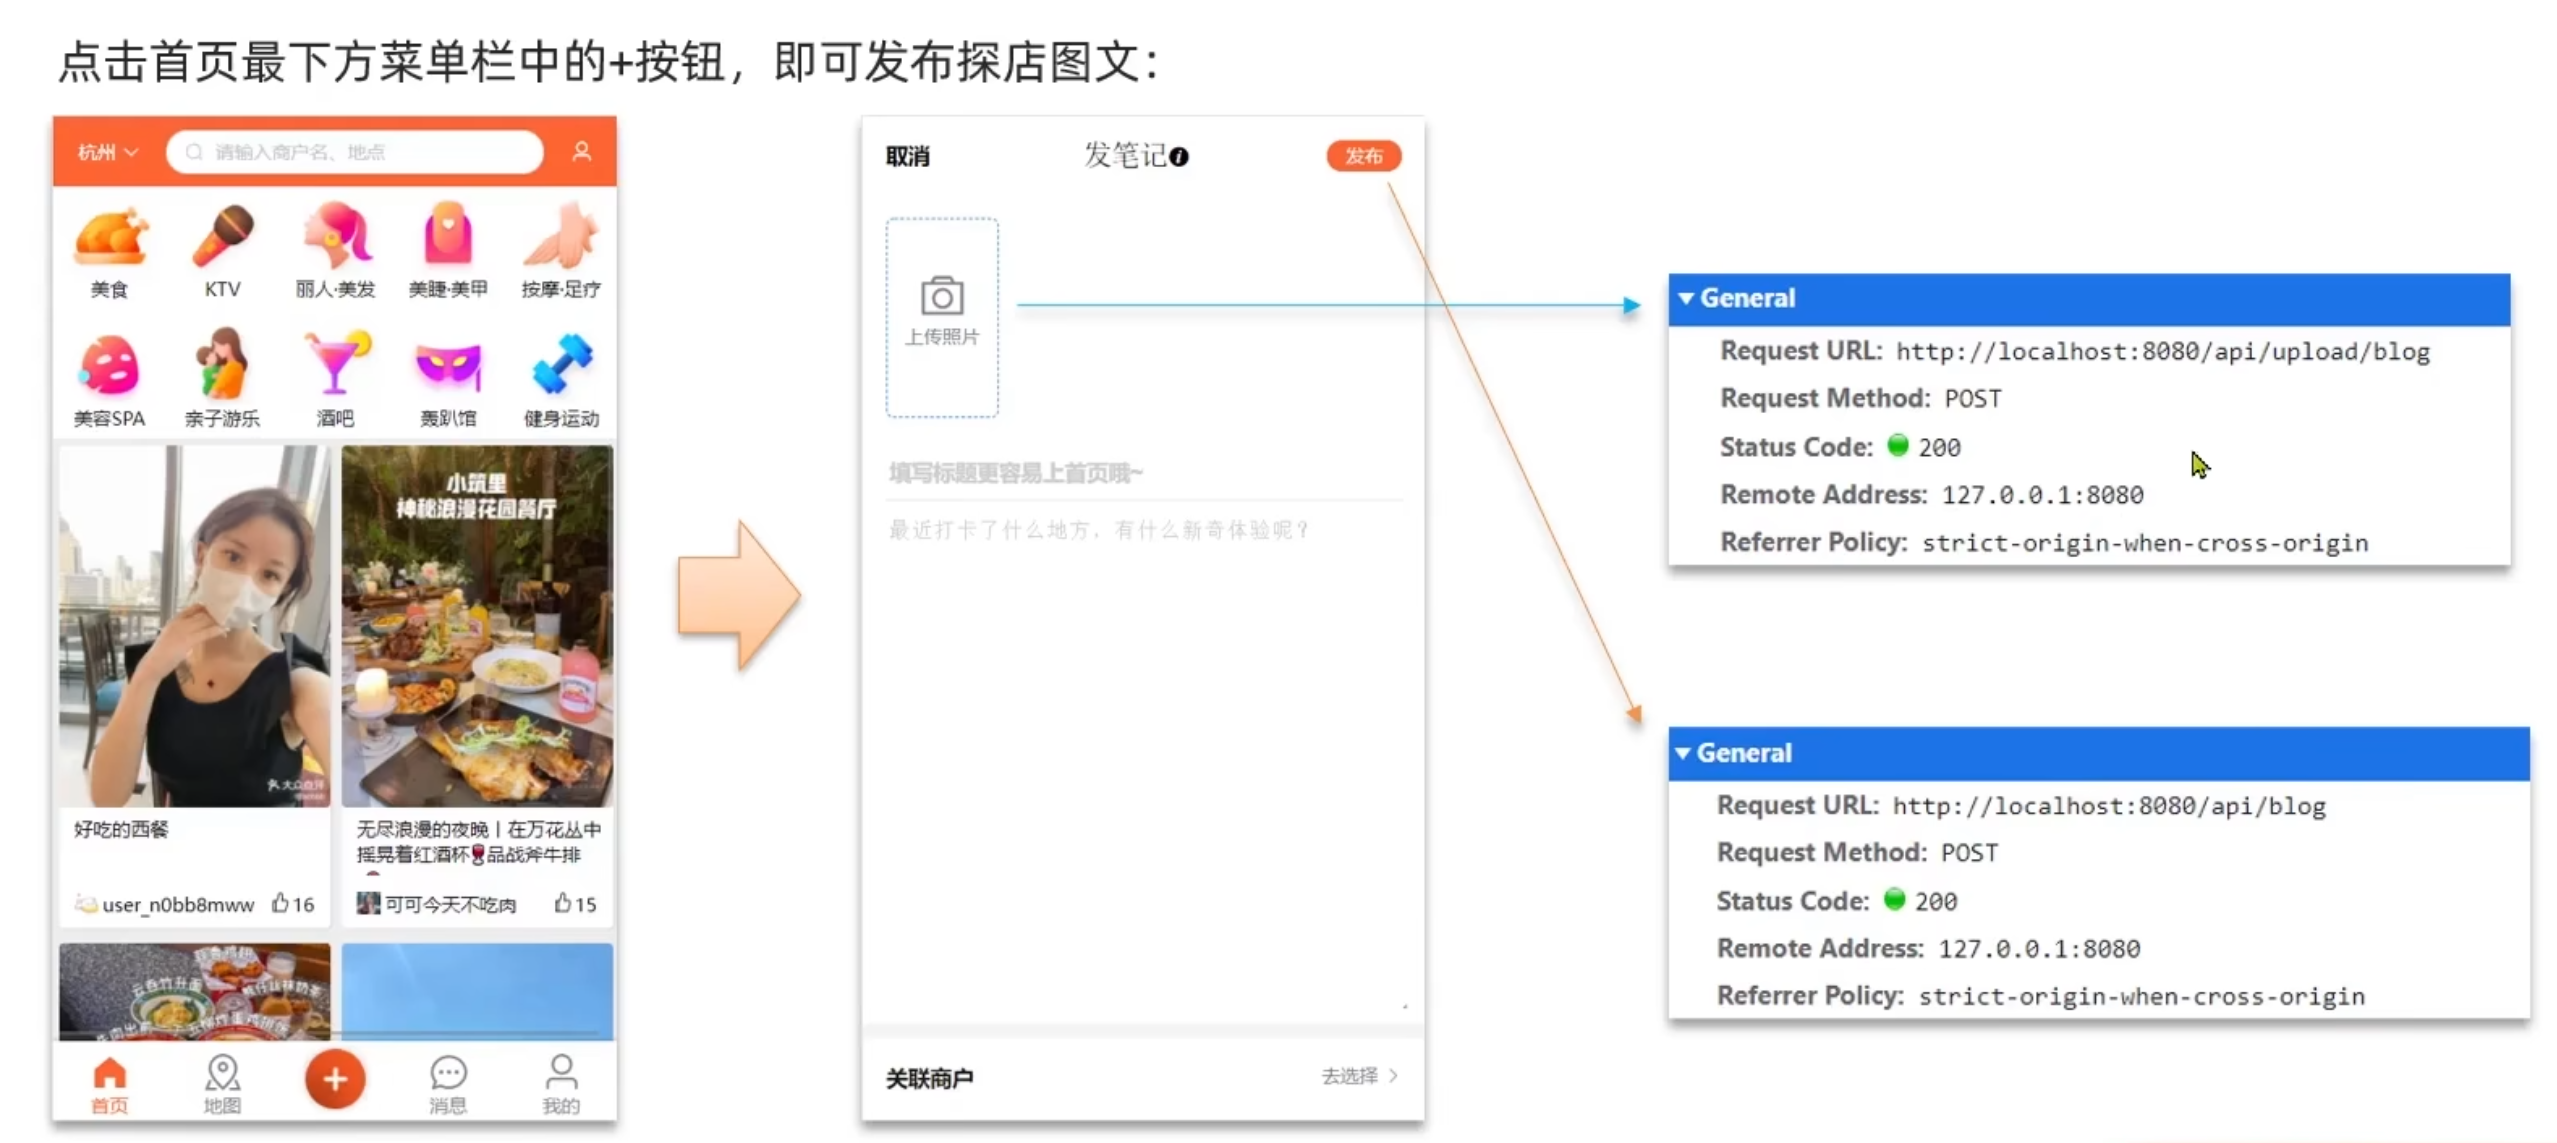
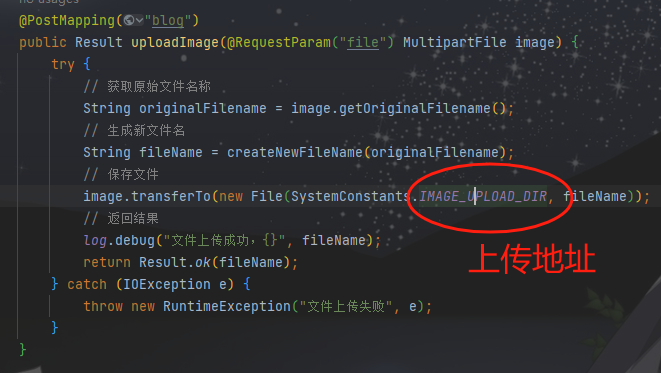
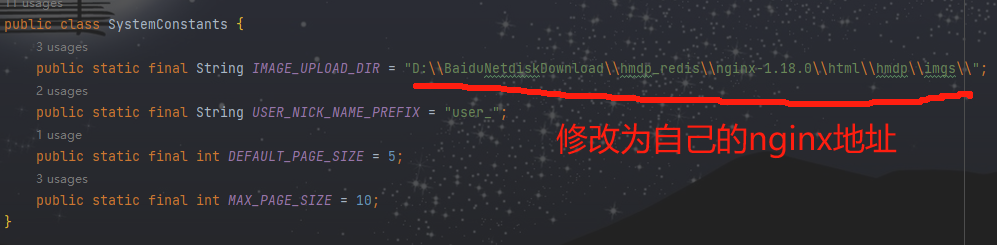
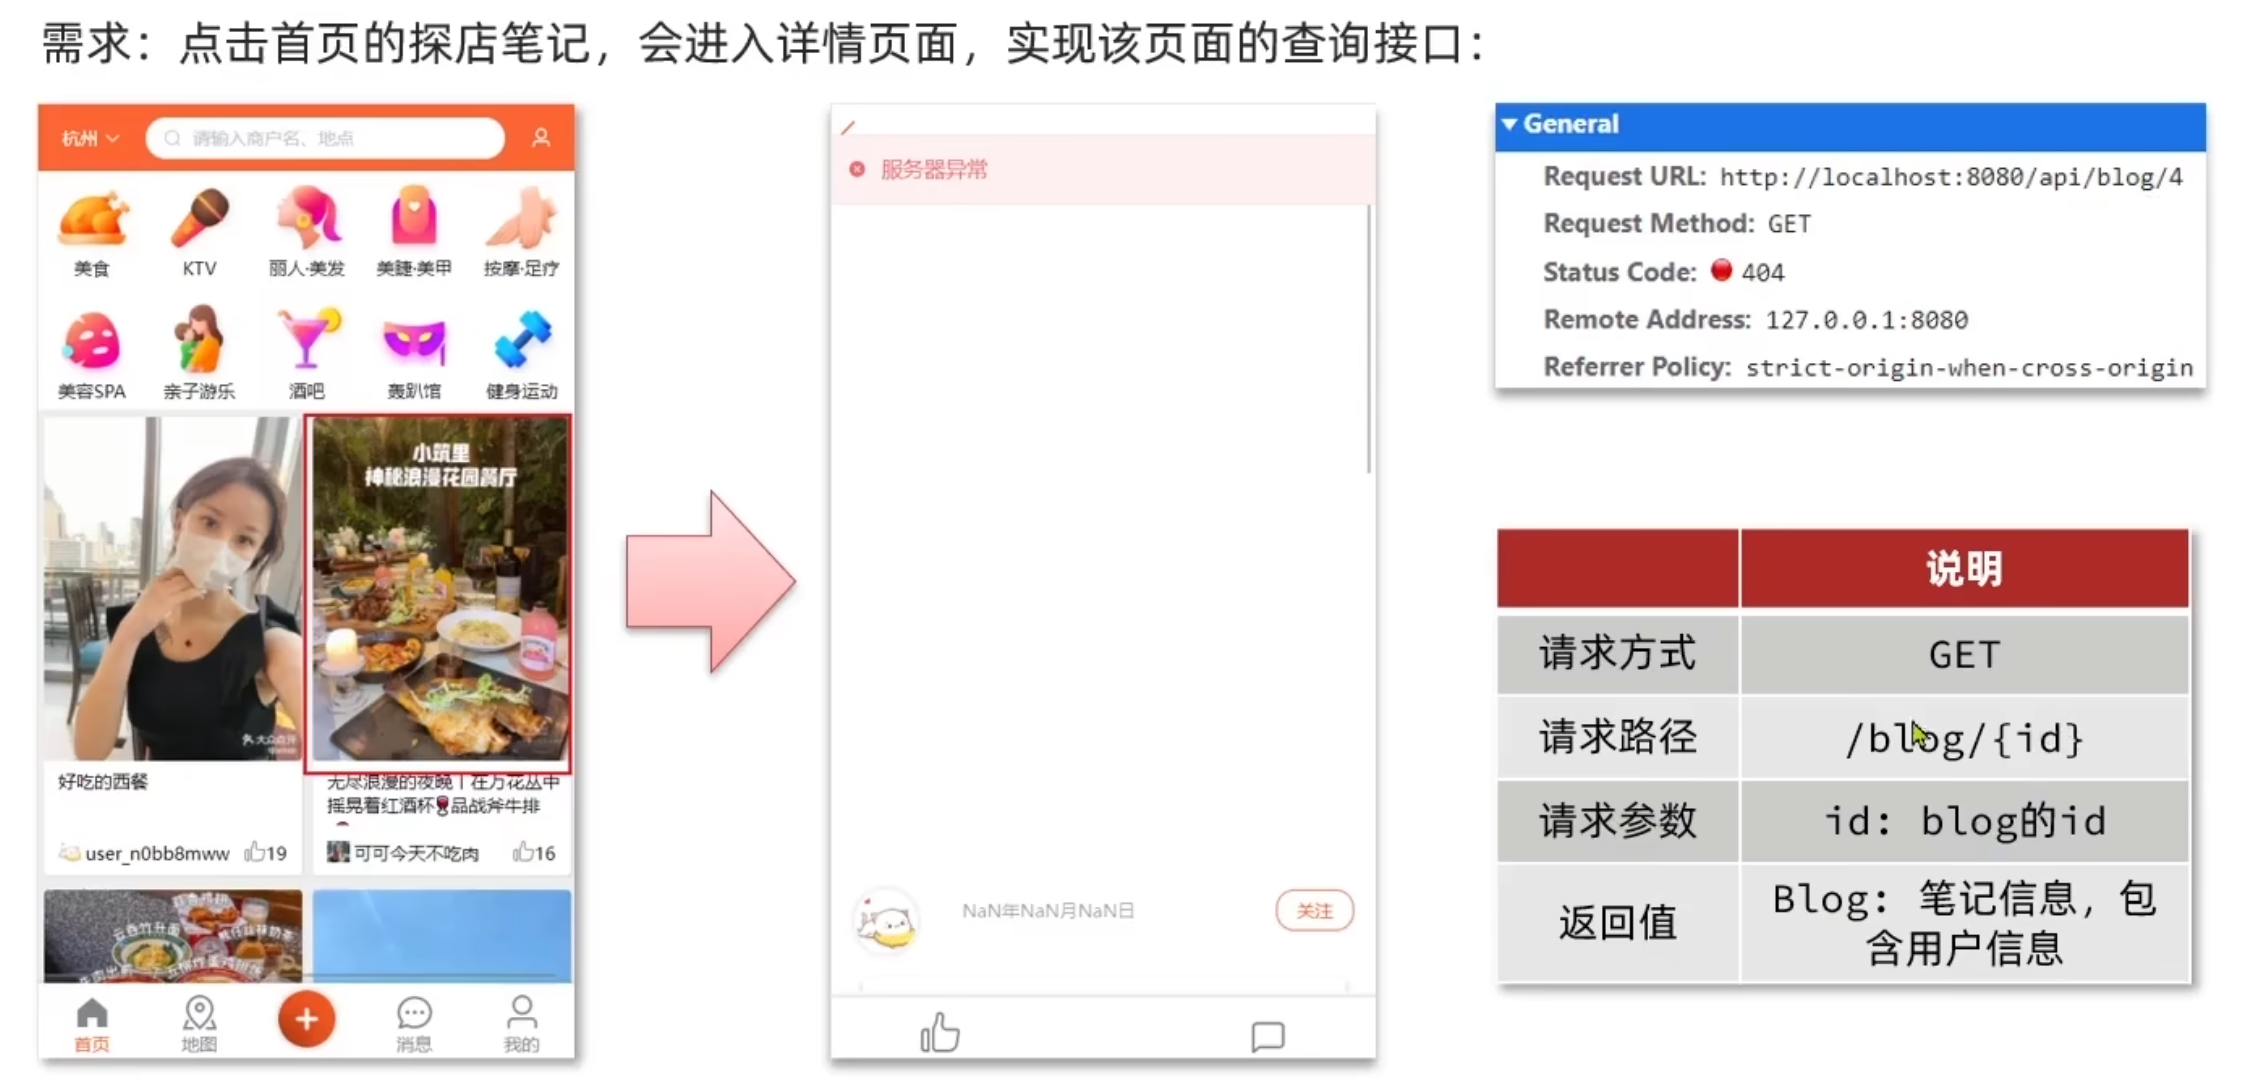
案例--实现查看发布探店笔记的接口:
映射到对应数据库
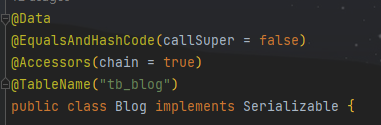
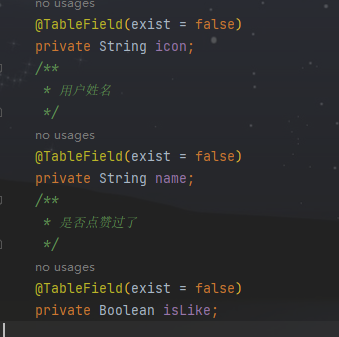
BLOG类中存在和对应数据库表不相关的属性,使用@TableField注解表示该字段并不在表中,需要在后续进行手动维护
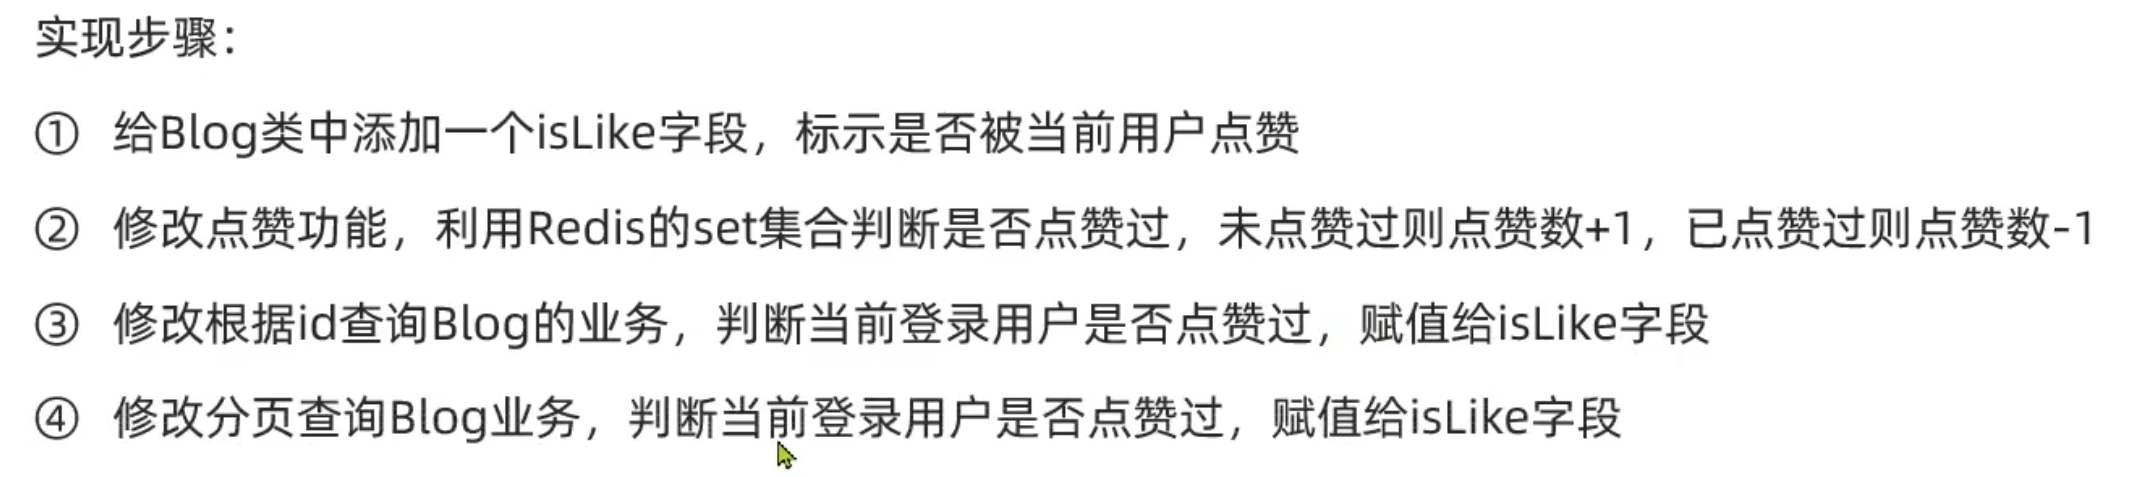
@GetMapping("/{id}")public Result queryBlogById(@PathVariable("id") Long id){return blogService.queryBlogById(id);}@Overridepublic Result queryBlogById(Long id) {//1.查询BlogBlog blog = getById(id);if (blog == null ){return Result.fail("笔记不存在!");}//2.查询blog有关的用户queryBlogUser(blog);return Result.ok(blog);}private void queryBlogUser(Blog blog){Long userId = blog.getUserId();User user = userService.getById(userId);blog.setName(user.getNickName());blog.setIcon(user.getIcon());}案例--完善点赞功能:

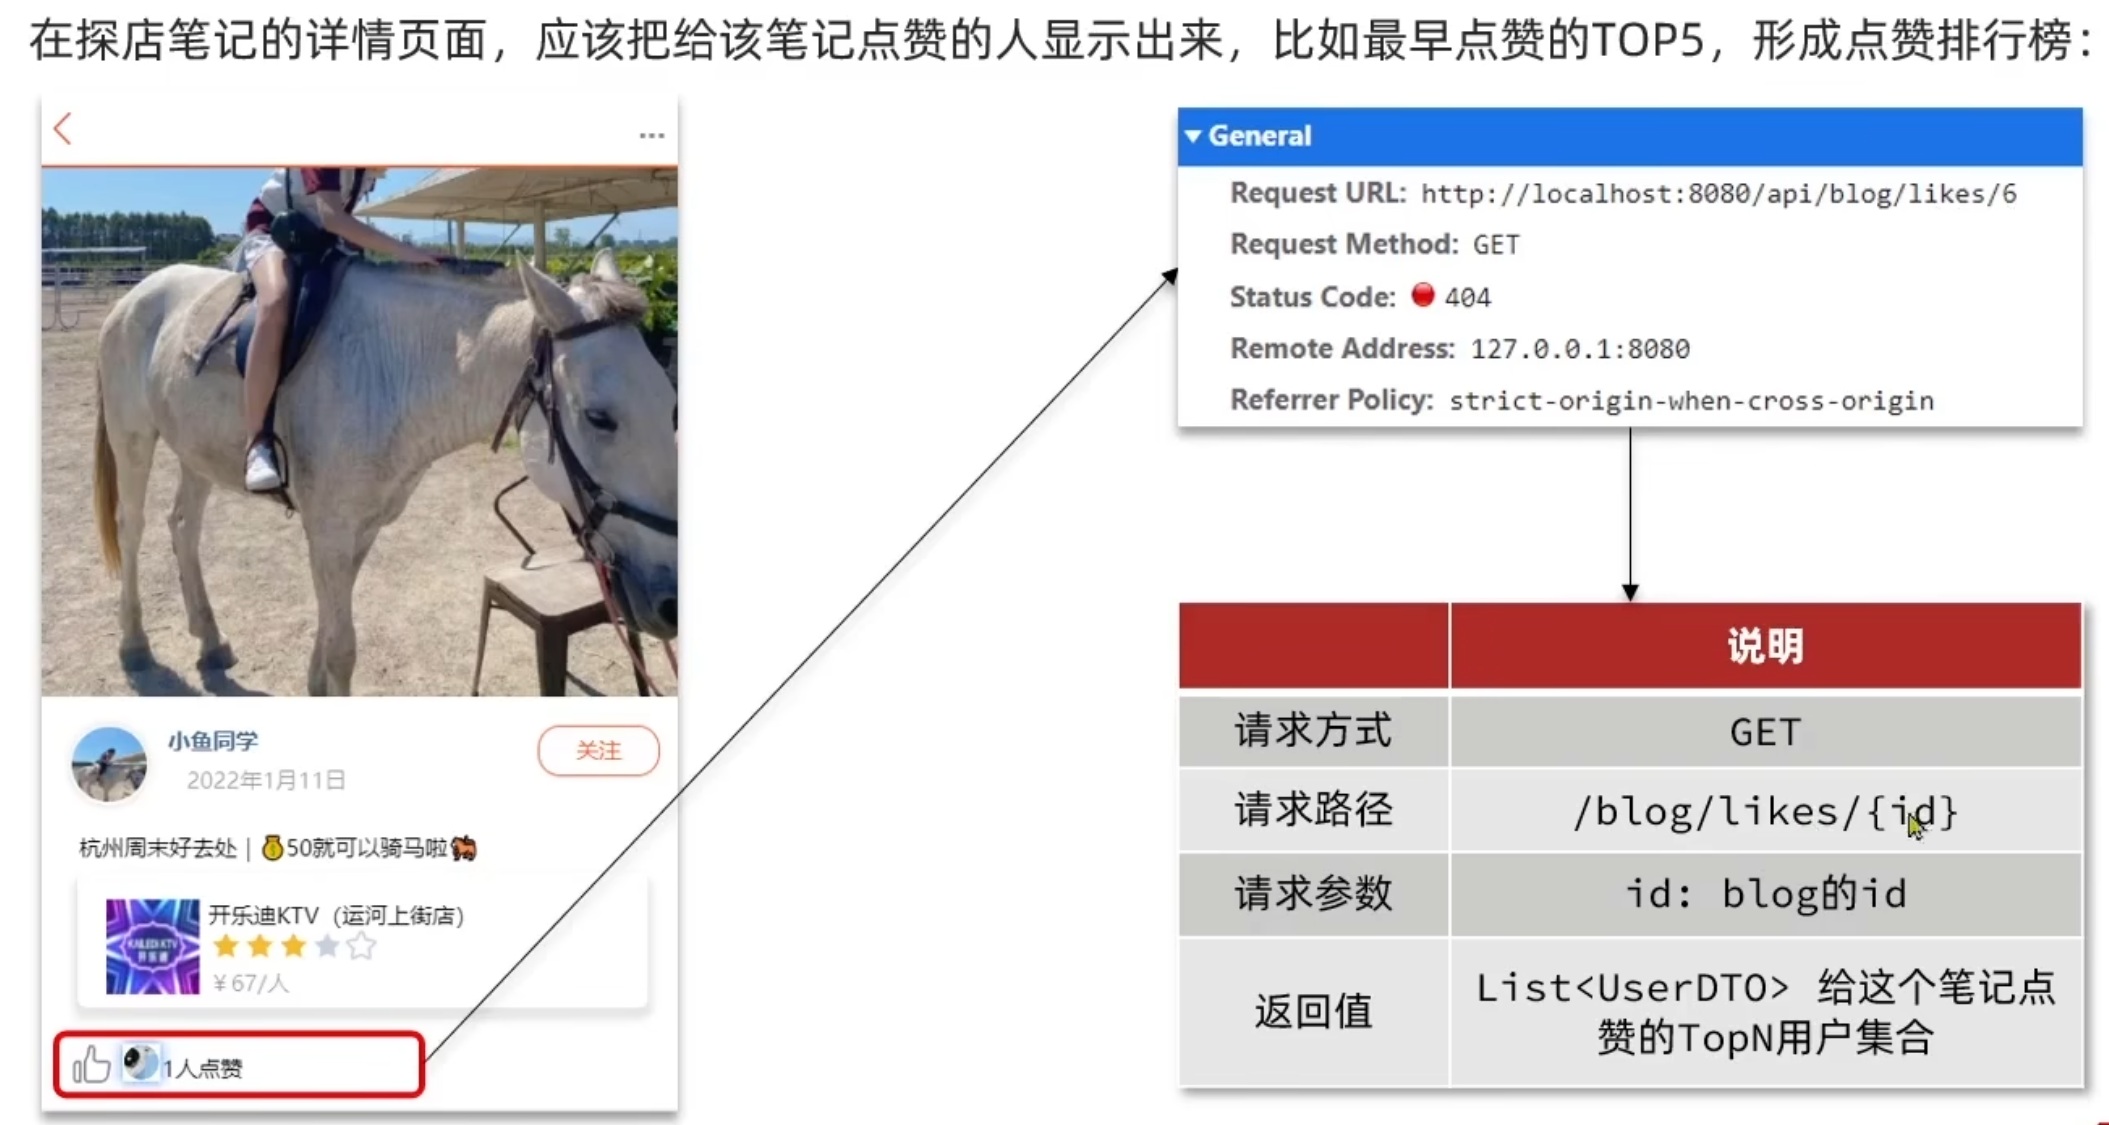
@Overridepublic Result likeBlog(Long id) {//1. 获取当前用户Long userId = UserHolder.getUser().getId();//2. 判断用户是否已经点赞String key = BLOG_LIKED_KEY + id;Boolean isMember = stringRedisTemplate.opsForSet().isMember(key, userId.toString());//防止为空 使用BooleanUtillif (BooleanUtil.isFalse(isMember)){//3. 如果未点赞,可以点赞//3.1 数据库点赞数+1boolean isSuccess = update().setSql("liked = liked + 1").eq("id", id).update();//3.2 保存用户到Redis的set集合if (isSuccess) {stringRedisTemplate.opsForSet().add(key, userId.toString());}}else {//4. 如果已经点赞,则取消点赞//4.1. 数据库点赞数-1boolean isSuccess = update().setSql("liked = liked - 1").eq("id", id).update();//4.2. 把用户从Redis中的set集合移除if (isSuccess) {stringRedisTemplate.opsForSet().remove(key, userId.toString());}}return Result.ok();}案例--点赞排行榜:
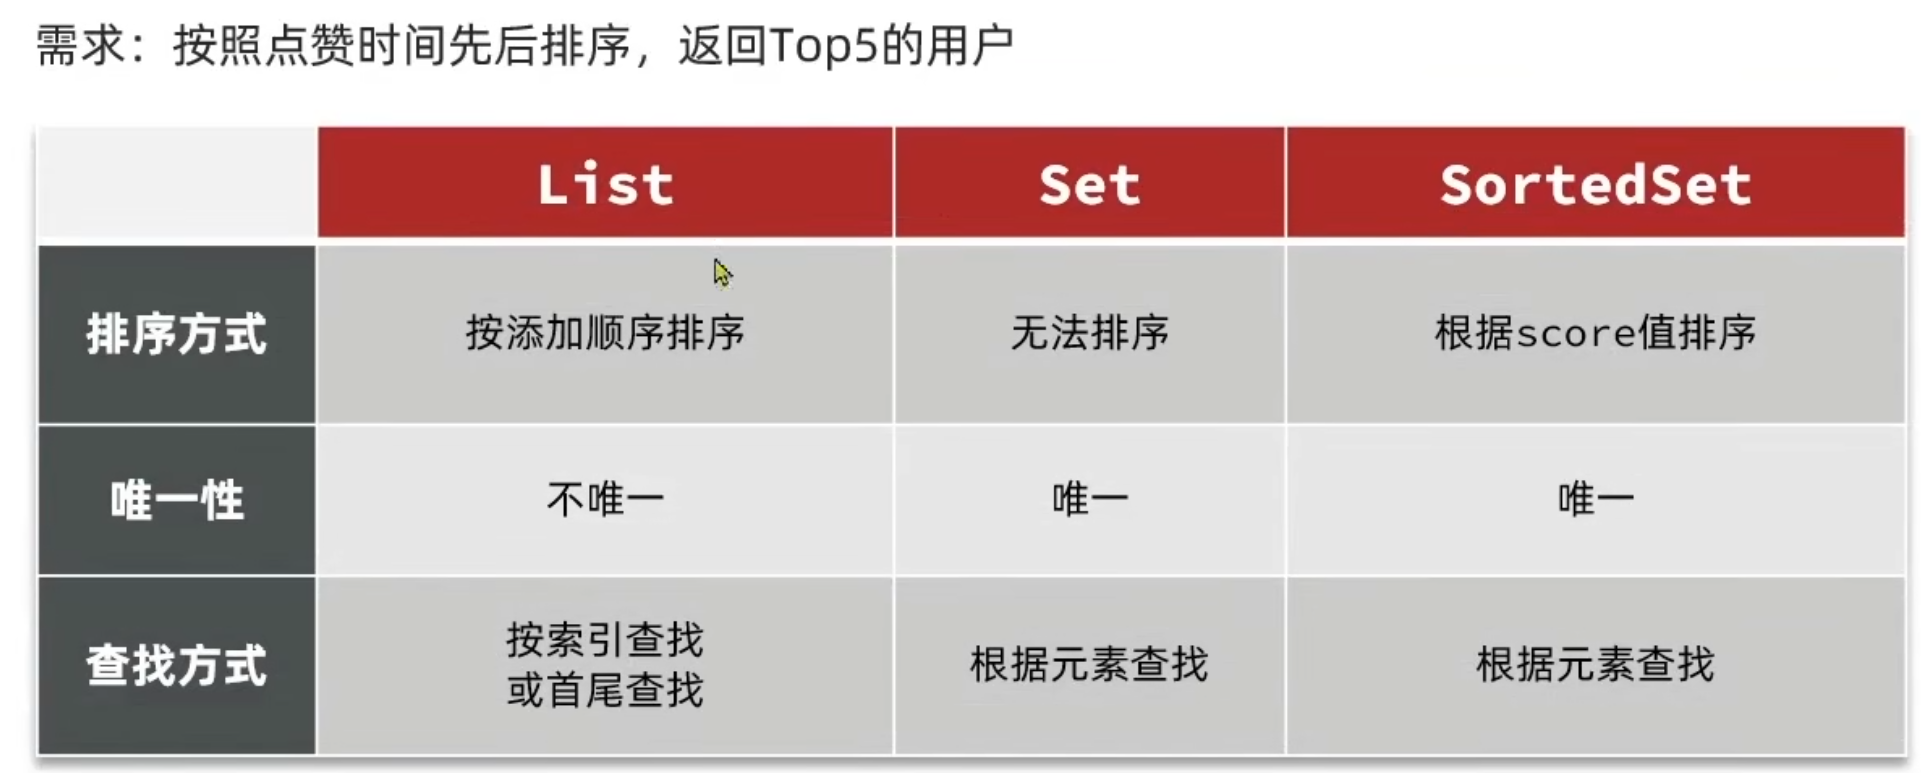

Set集合无序,因此采用SortedSet 修改相关代码
源代码中所有有关Set的操作改为SortedSet 对应的分数 使用时间戳System.currentTimeMillis()

@GetMapping("/likes/{id}")public Result queryBlogLikes(@PathVariable("id") Long id){return blogService.queryBlogLikes(id);}@Overridepublic Result queryBlogLikes(Long id) {String key = BLOG_LIKED_KEY + id;//1. 查询top5的点赞用户 zrange key 0 4Set<String> top5 = stringRedisTemplate.opsForZSet().range(key, 0, 4);if(top5 == null || top5.isEmpty()){return Result.ok();}//2. 解析出其中的用户idList<Long> ids = top5.stream().map(Long::valueOf).collect(Collectors.toList());//3. 根据用户id查询用户List<UserDTO> userDTOS = userService.listByIds(ids).stream().map(user -> BeanUtil.copyProperties(user, UserDTO.class)).collect(Collectors.toList());//4. 返回return Result.ok(userDTOS);}结果点赞用户展示顺序出现错误
![]()
原因,数据库使用in关键字进行查询时自动根据id调整了顺序
修改代码:.last表示在原有SQL语句最后拼接一句SQL语句
@Overridepublic Result queryBlogLikes(Long id) {String key = BLOG_LIKED_KEY + id;//1. 查询top5的点赞用户 zrange key 0 4Set<String> top5 = stringRedisTemplate.opsForZSet().range(key, 0, 4);if(top5 == null || top5.isEmpty()){return Result.ok();}//2. 解析出其中的用户idList<Long> ids = top5.stream().map(Long::valueOf).collect(Collectors.toList());String idStr = StrUtil.join(",", ids);//3. 根据用户id查询用户List<UserDTO> userDTOS = userService.query().in("id",ids).last("order by field(id,"+idStr+")").list().stream().map(user -> BeanUtil.copyProperties(user, UserDTO.class)).collect(Collectors.toList());//4. 返回return Result.ok(userDTOS);}二、好友关注
关注和取关:
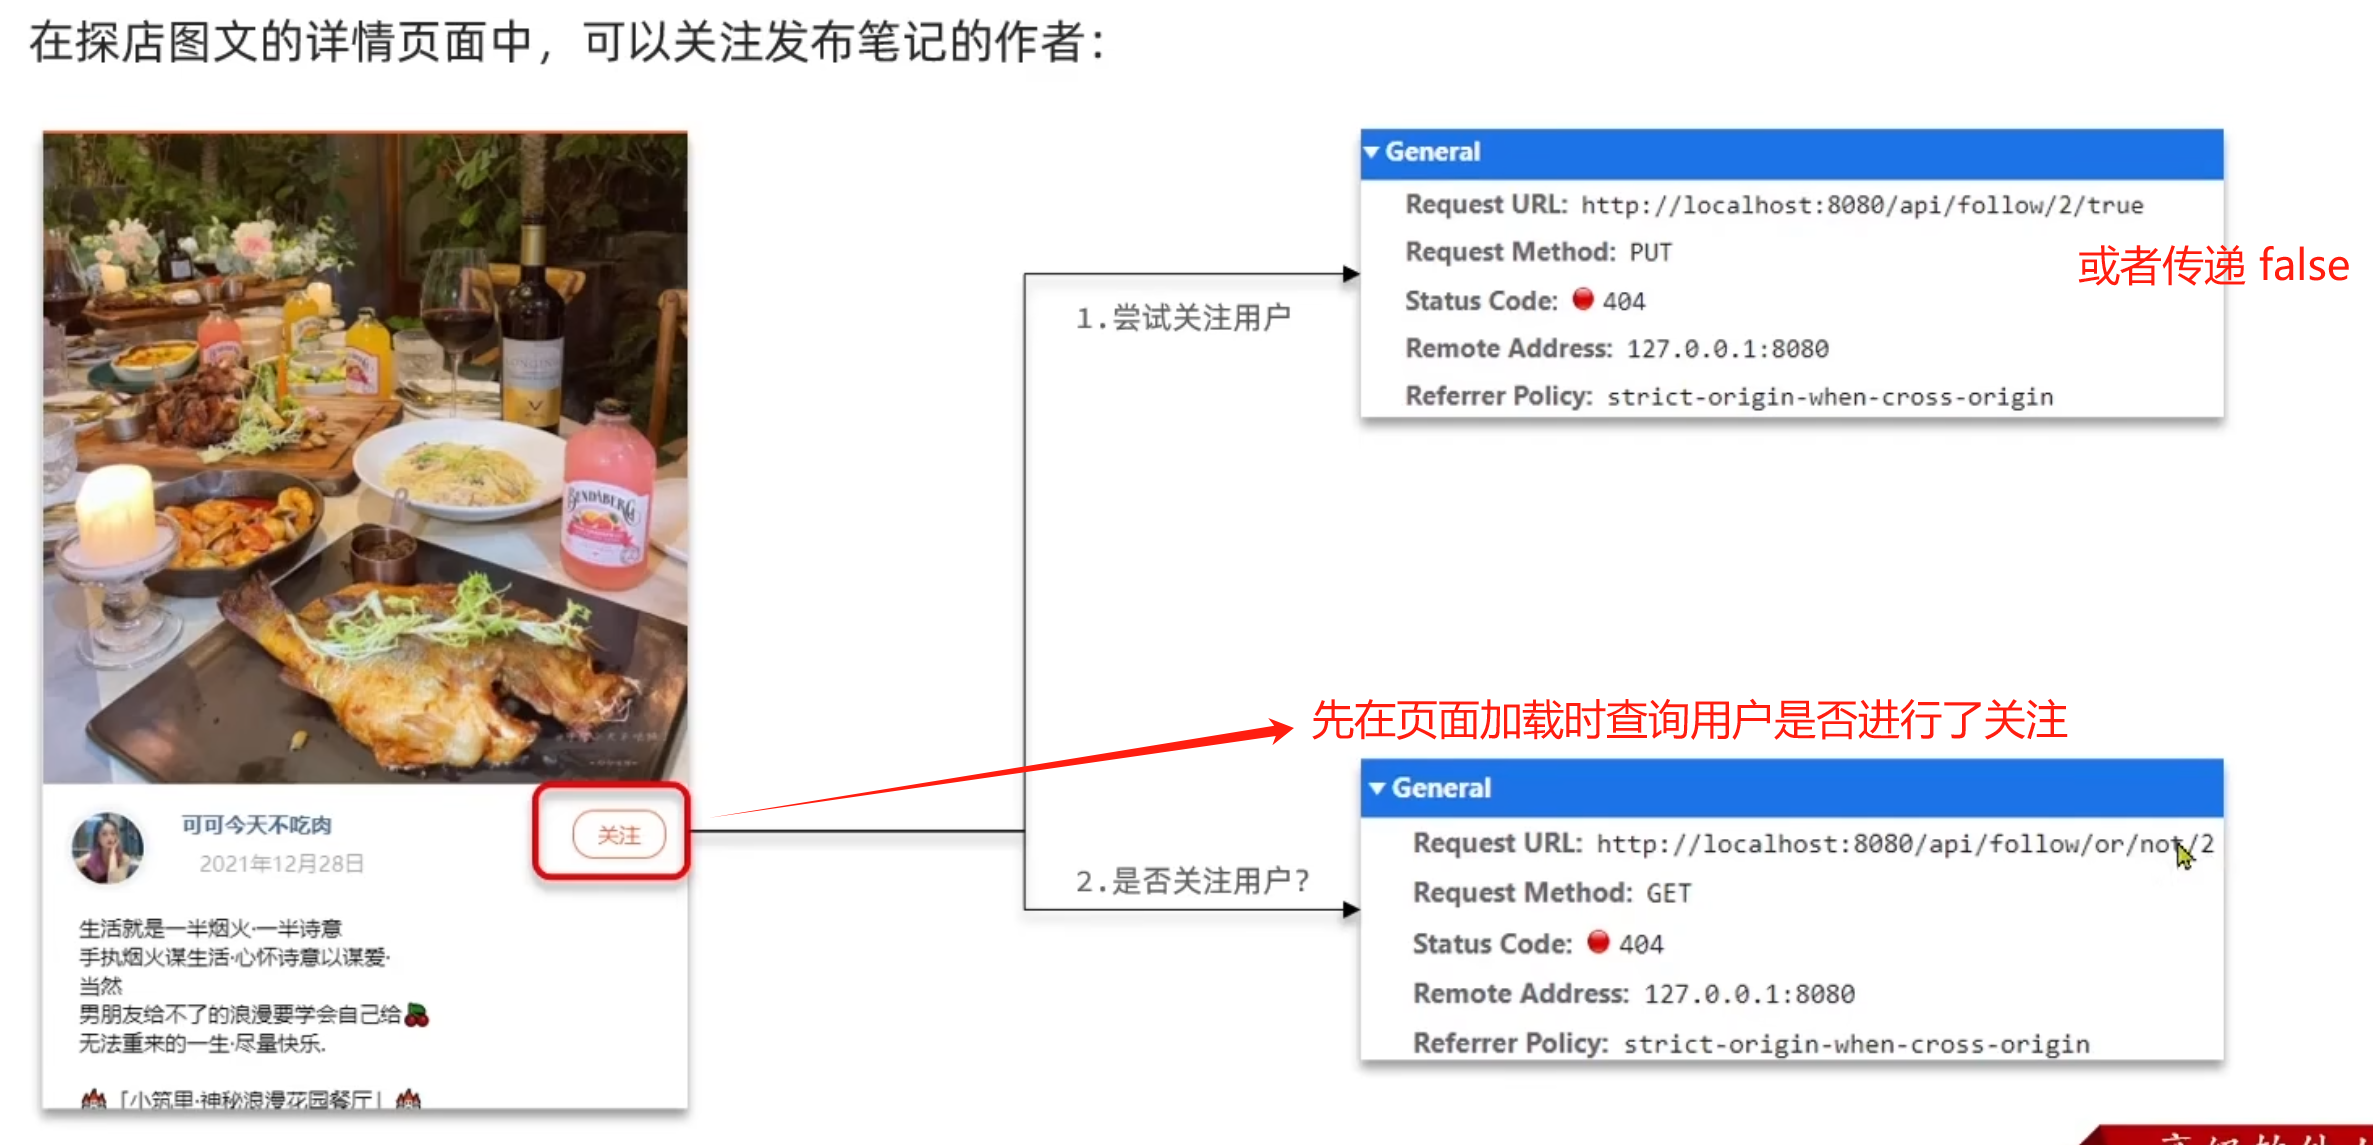
案例---实现关注和取关功能:
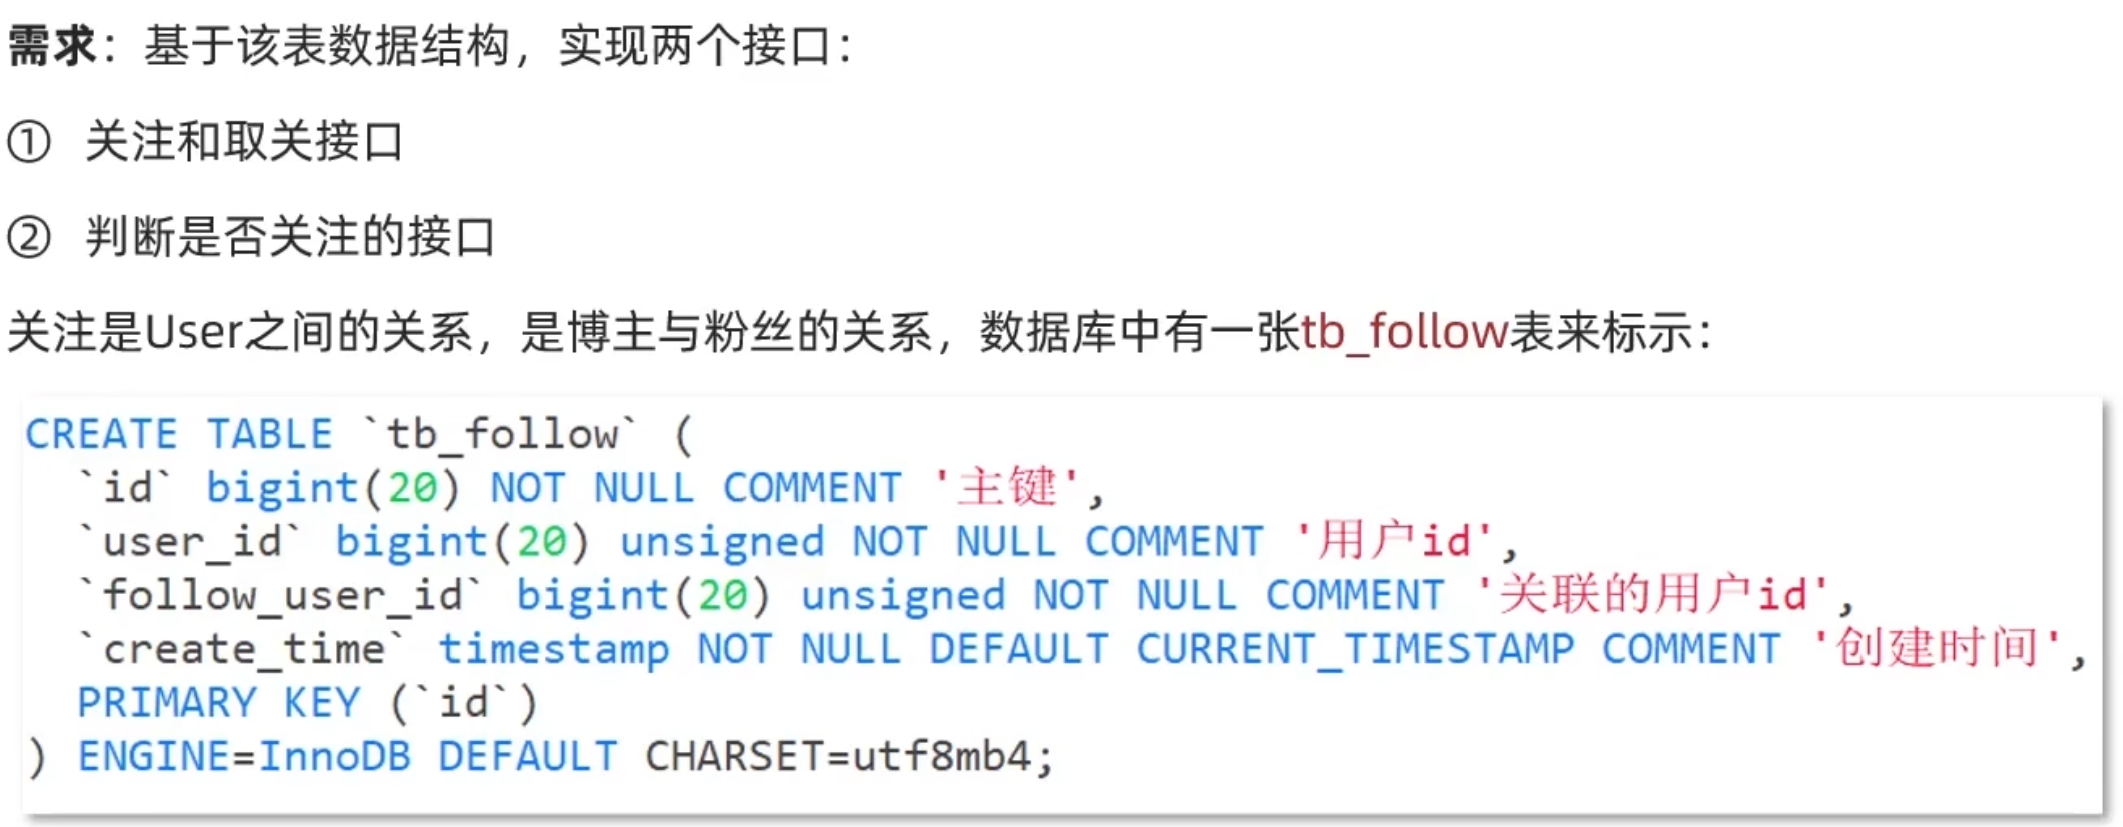
@Overridepublic Result follow(Long followUserId, Boolean isFollow) {//1. 获取登录用户Long userId = UserHolder.getUser().getId();//2. 判断是关注还是取关if(isFollow){//3. 关注,新增数据Follow follow = new Follow();follow.setUserId(userId);follow.setFollowUserId(followUserId);save(follow);}else{//4. 取关,删除 delete * from tb_follow where userId = ? and follow_user_id = ?remove(new QueryWrapper<Follow>().eq("user_id",userId).eq("follow_user_id",followUserId));}return Result.ok();}@Overridepublic Result isFollow(Long followUserId) {//1. 获取登录用户UserDTO user = UserHolder.getUser();if(user == null){//用户未登录return Result.ok(false);}Long userId = user.getId();//查询是否关注 selec * from tb_follow where user_id = ? and follow_user_id = ?//.count 表示数据数量 >0 表示关注了 反之一样Integer count = query().eq("user_id", userId).eq("follow_user_id", followUserId).count();return Result.ok(count>0);}共同关注:
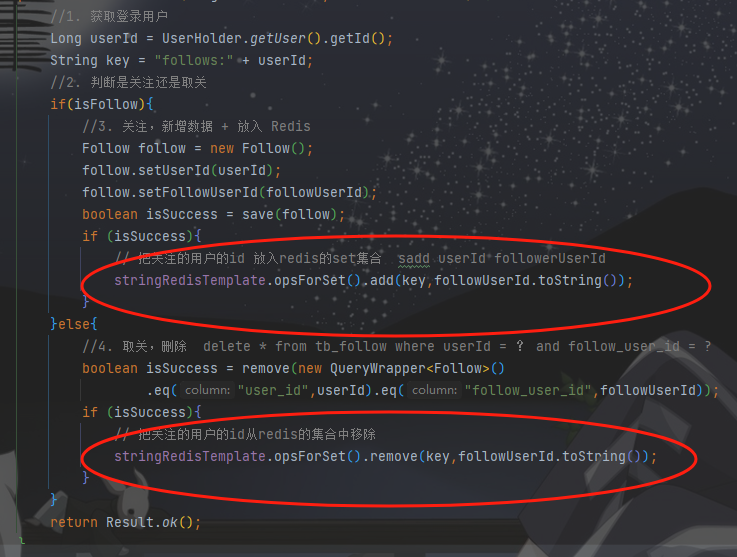
方案---实现共同关注功能:
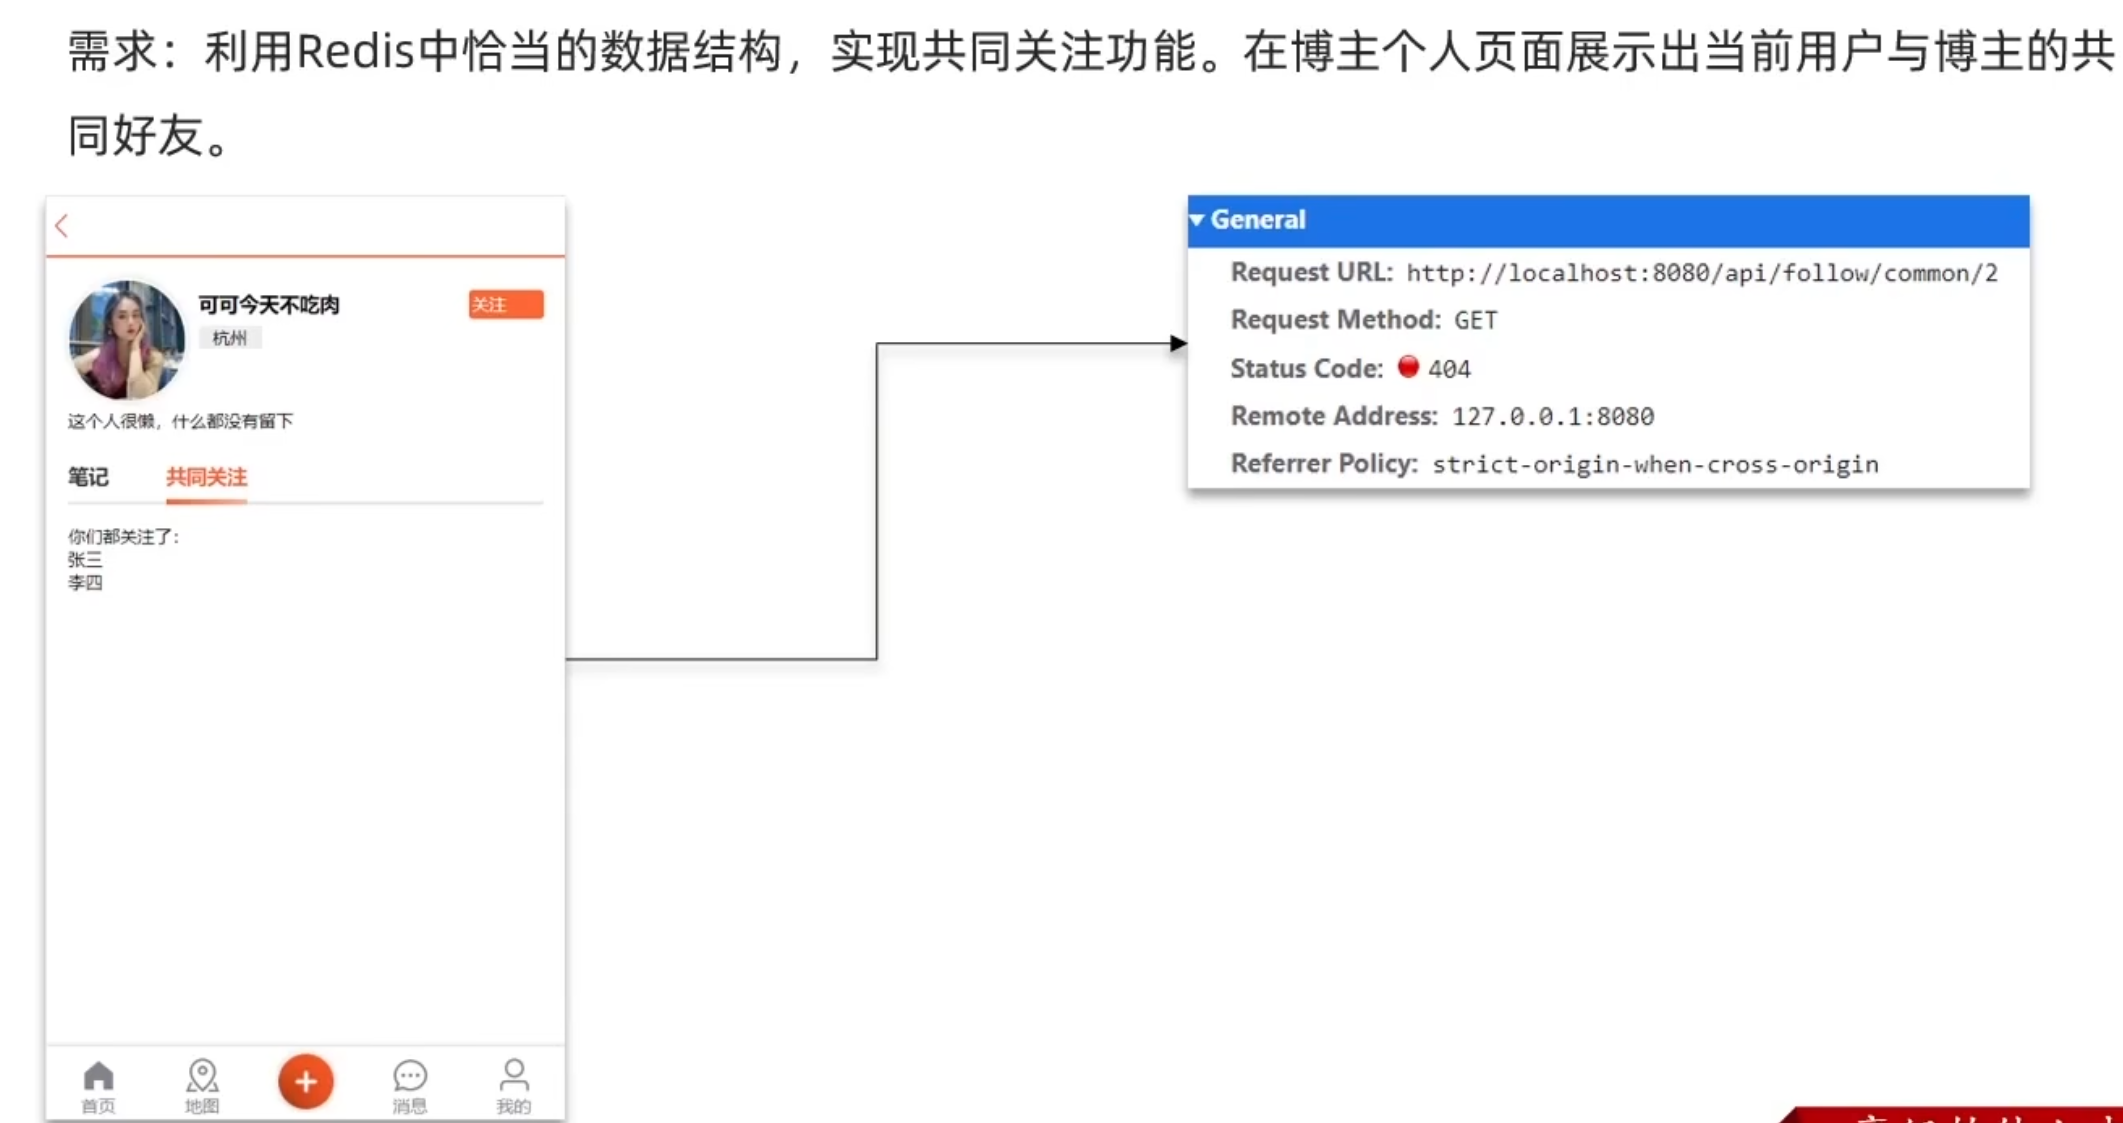
在关注相关代码中 增加 写入关注数据 Redis 功能
@GetMapping("/common/{id}")public Result followCommons(@PathVariable("id") Long followUserId){return followService.followCommons(followUserId);}@Overridepublic Result followCommons(Long followUserId) {//1. 先获取当前登录用户Long userId = UserHolder.getUser().getId();String key = "follows:" + userId;//2. 求交集String key2= "follows:" + followUserId;Set<String> intersect = stringRedisTemplate.opsForSet().intersect(key, key2);if (intersect == null || intersect.isEmpty()){//无交集return Result.ok(Collections.emptyList());}//3. 解析id集合List<Long> ids = intersect.stream().map(Long::valueOf).collect(Collectors.toList());//4. 查询用户List<UserDTO> users = userService.listByIds(ids).stream().map(user -> BeanUtil.copyProperties(user, UserDTO.class)).collect(Collectors.toList());return Result.ok(users);}关注推送:
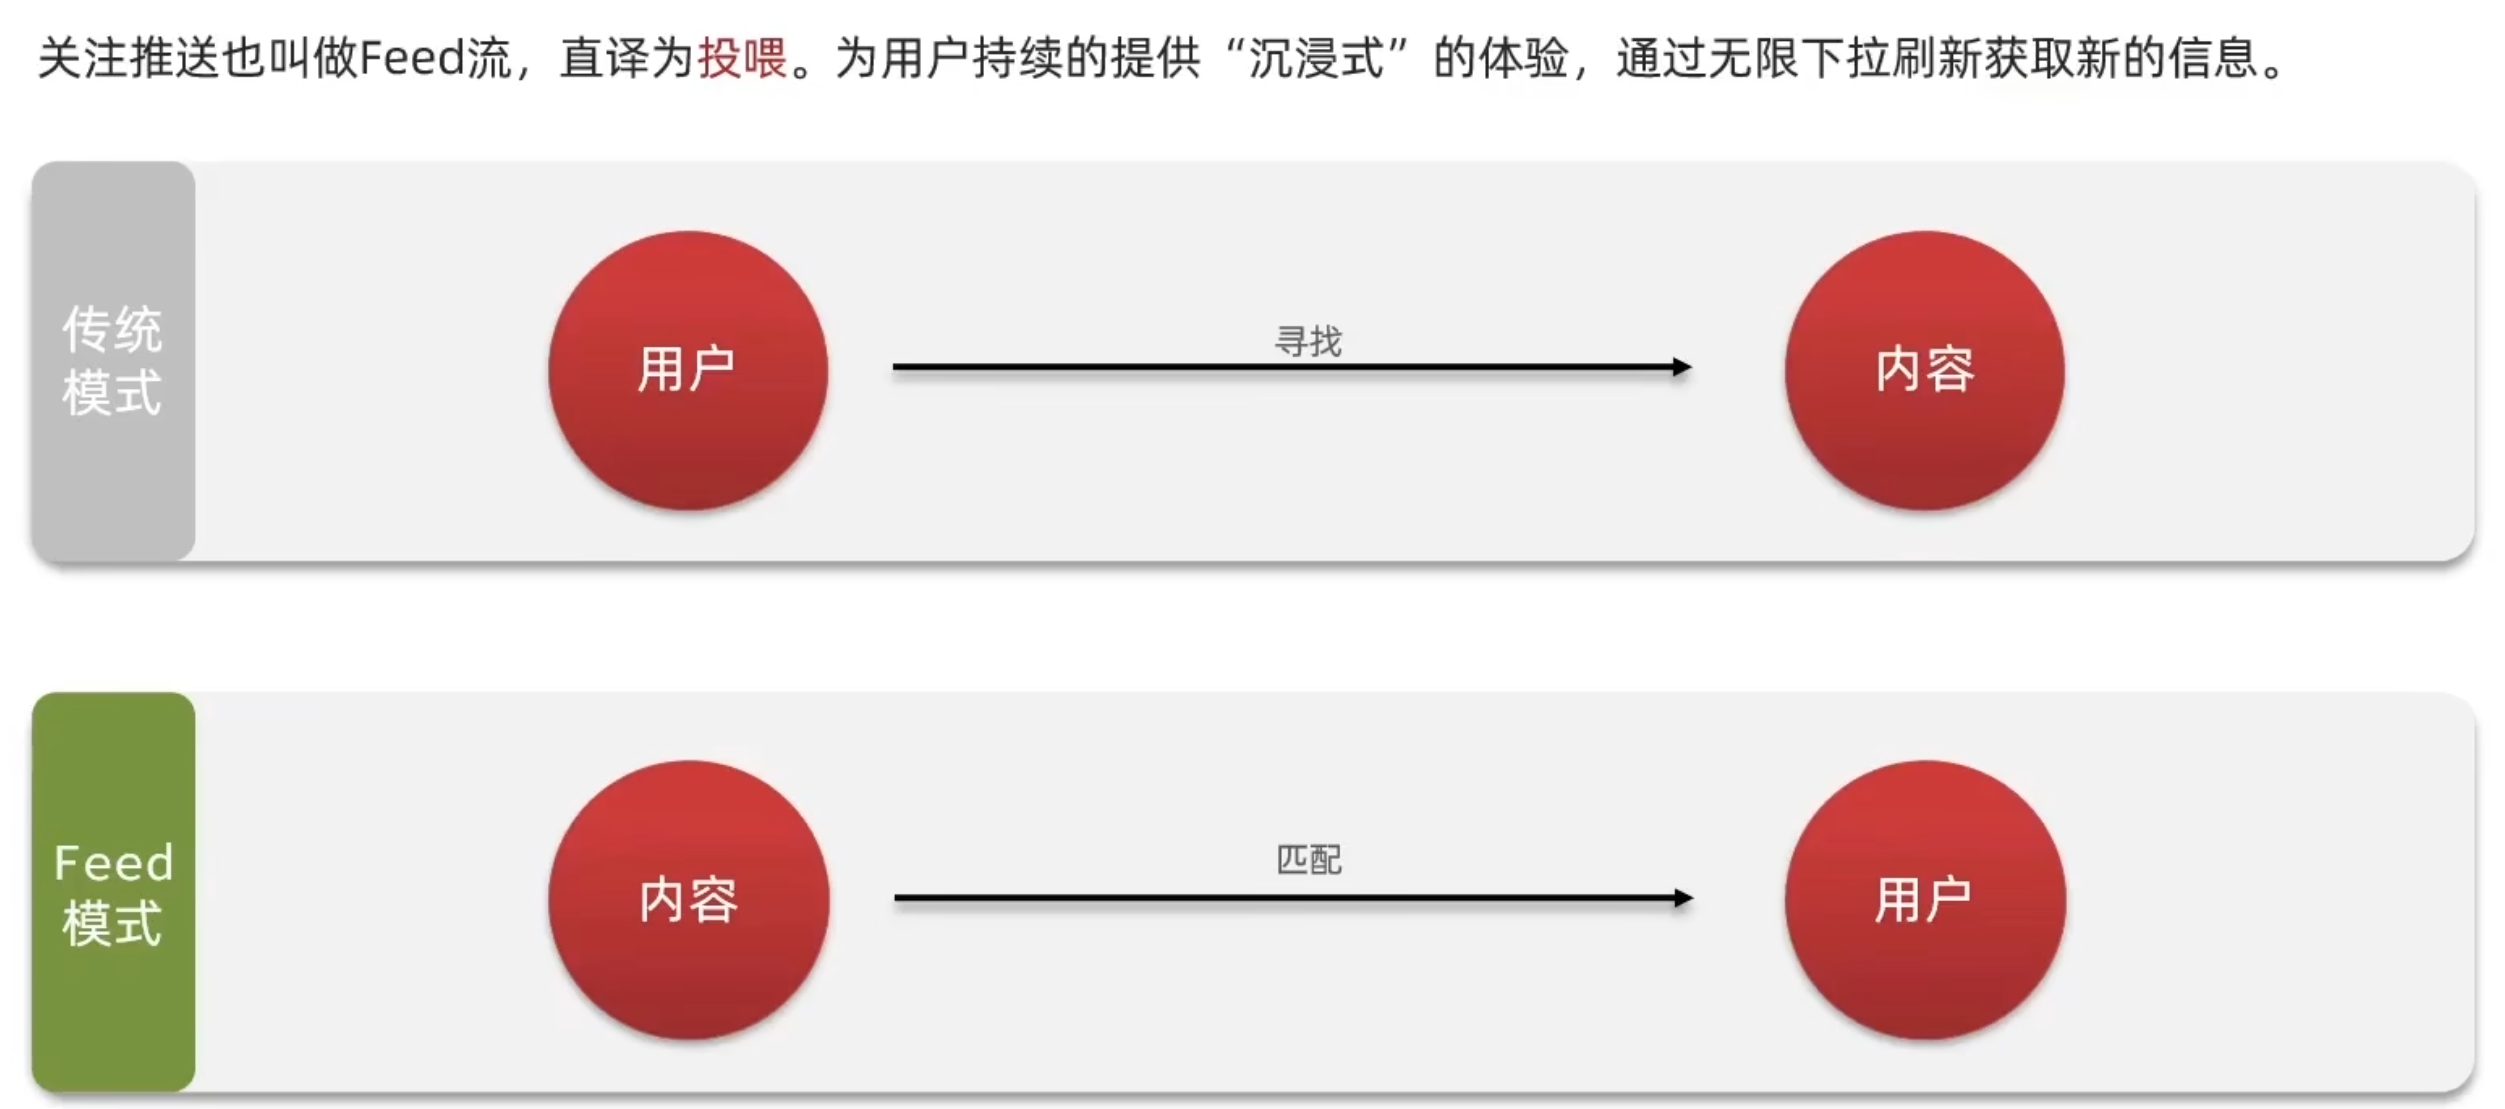
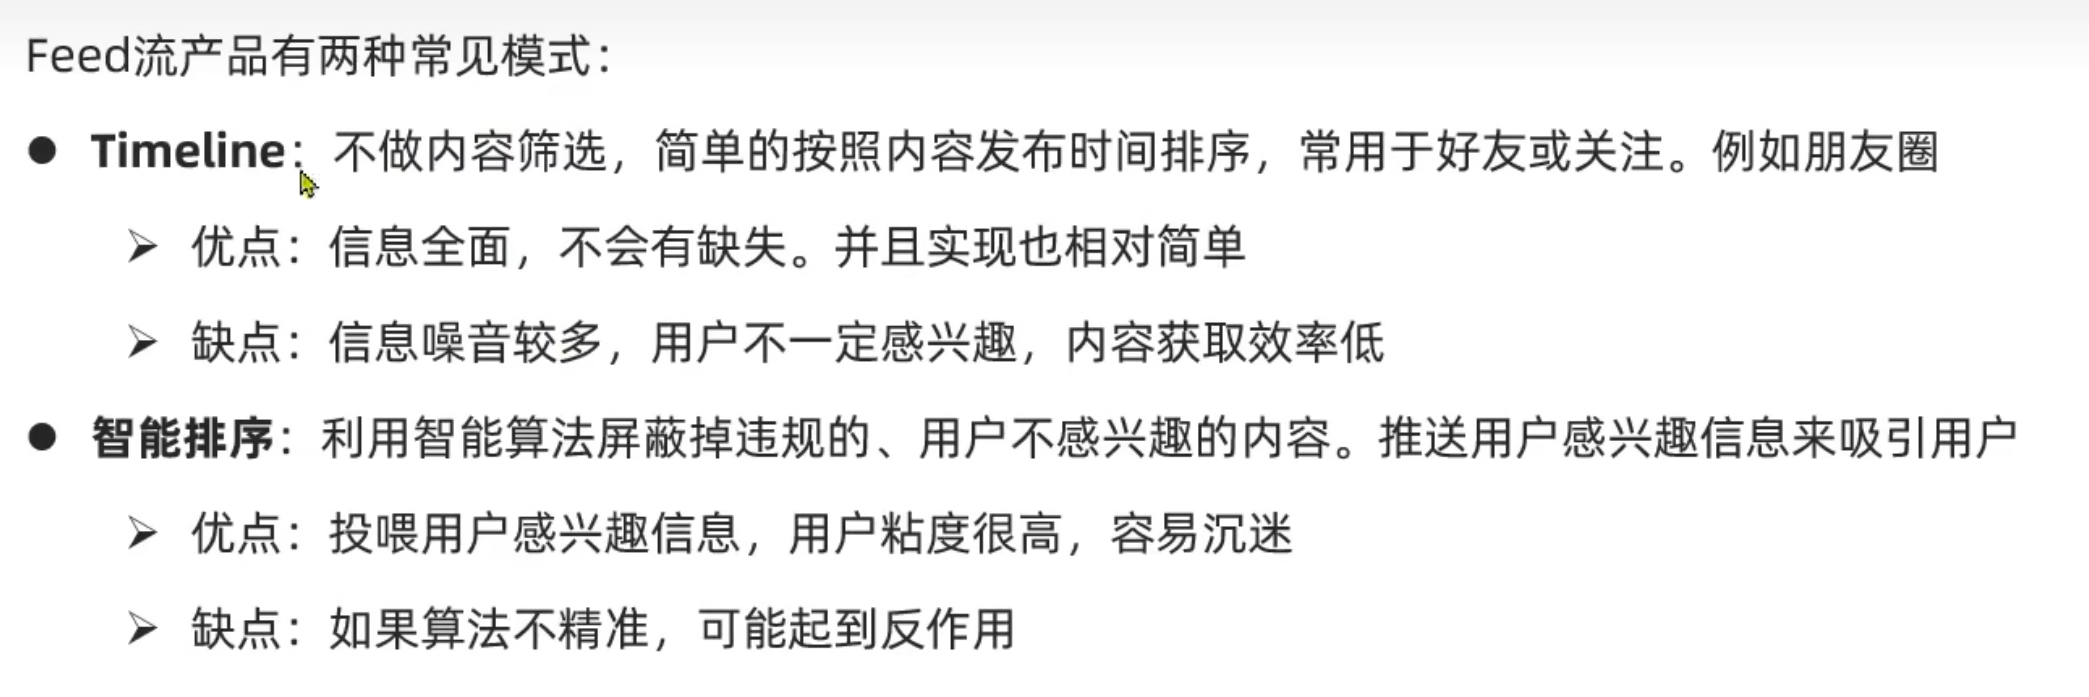

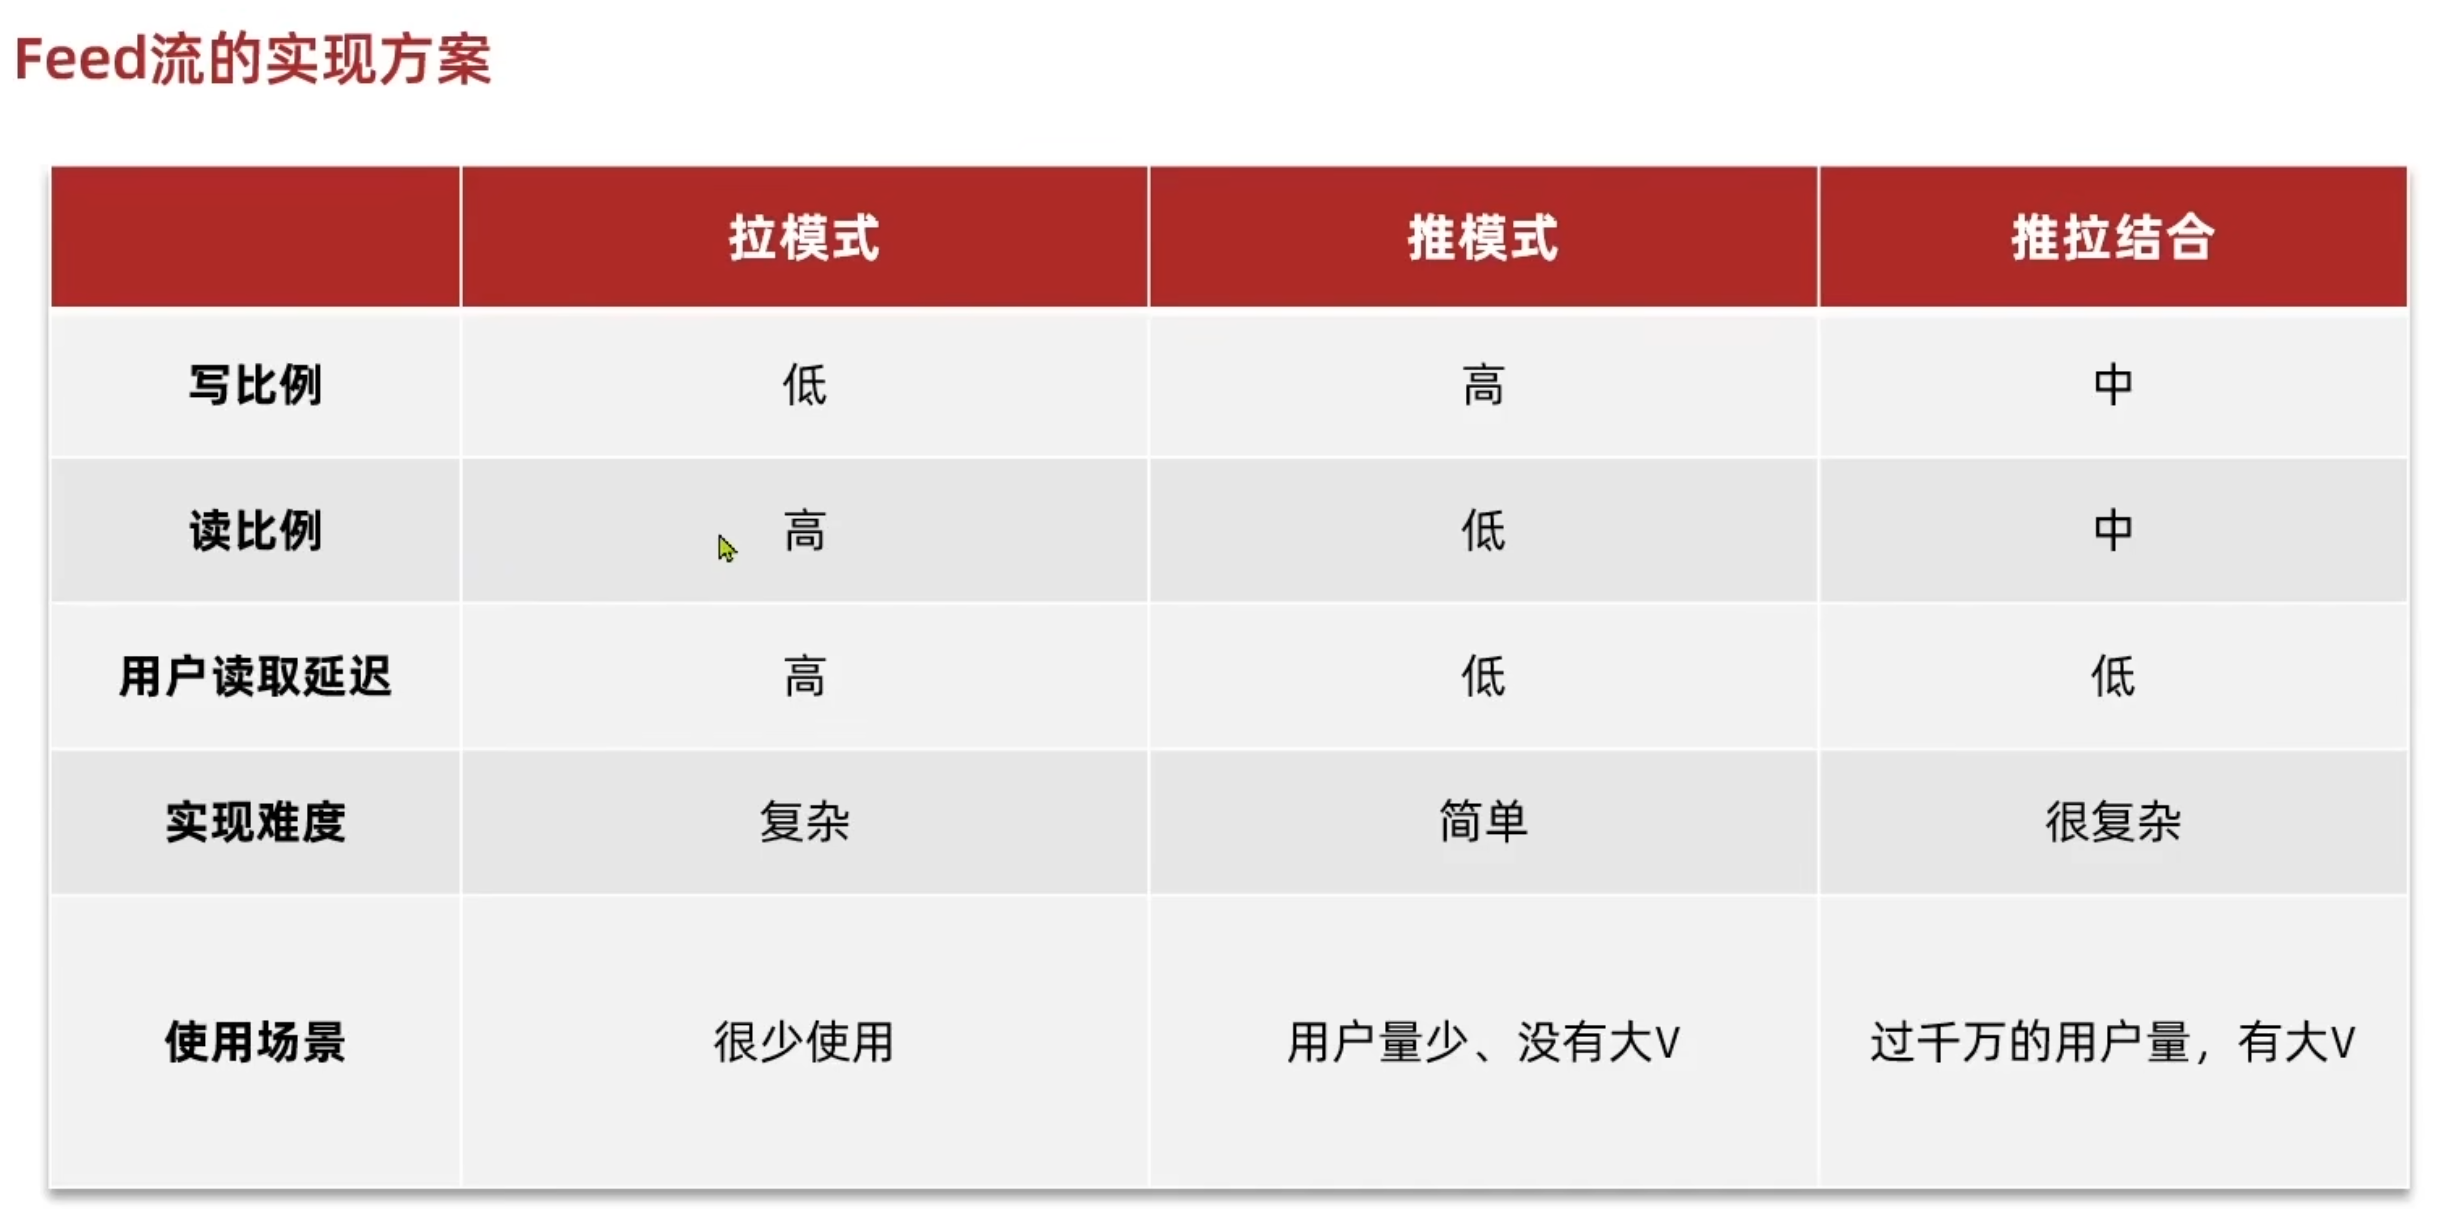
拉模式:
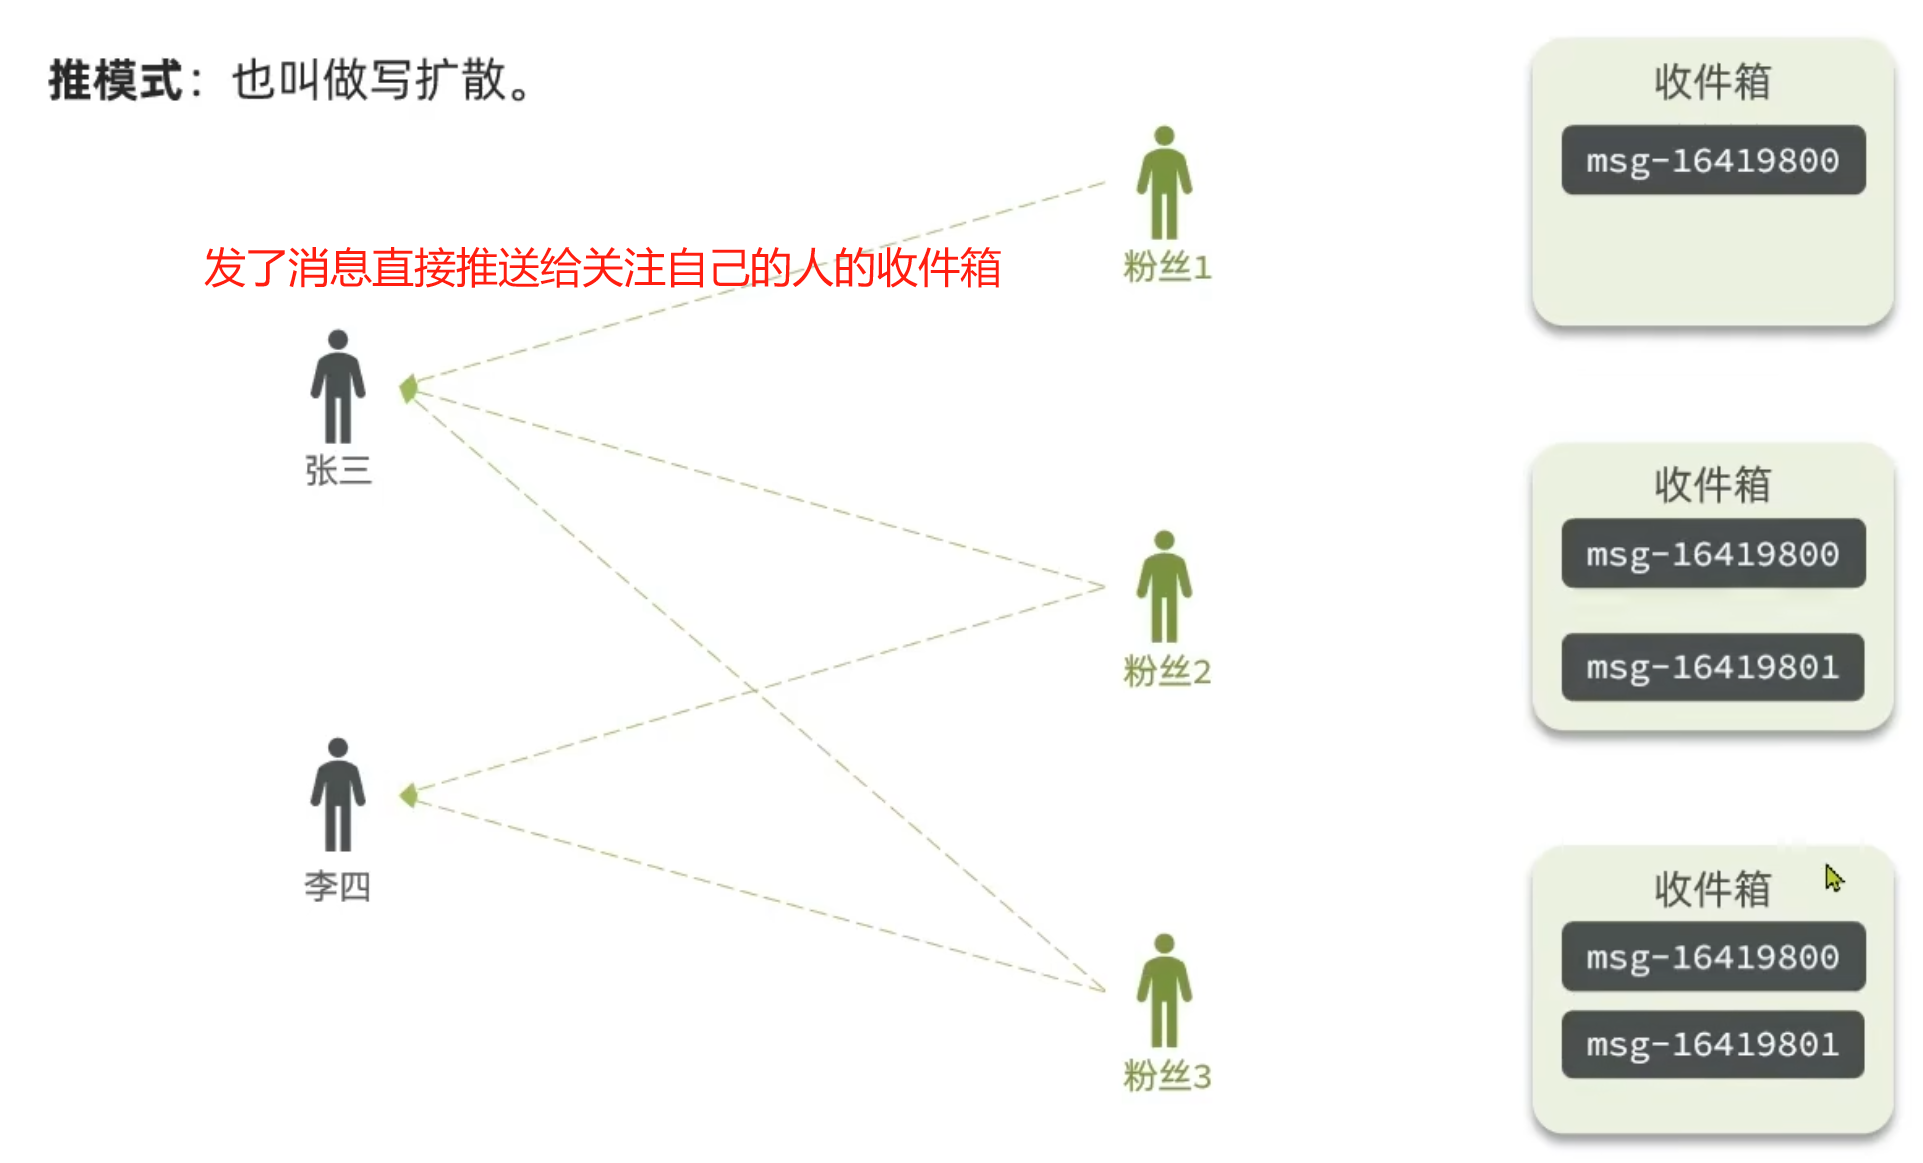
推模式:
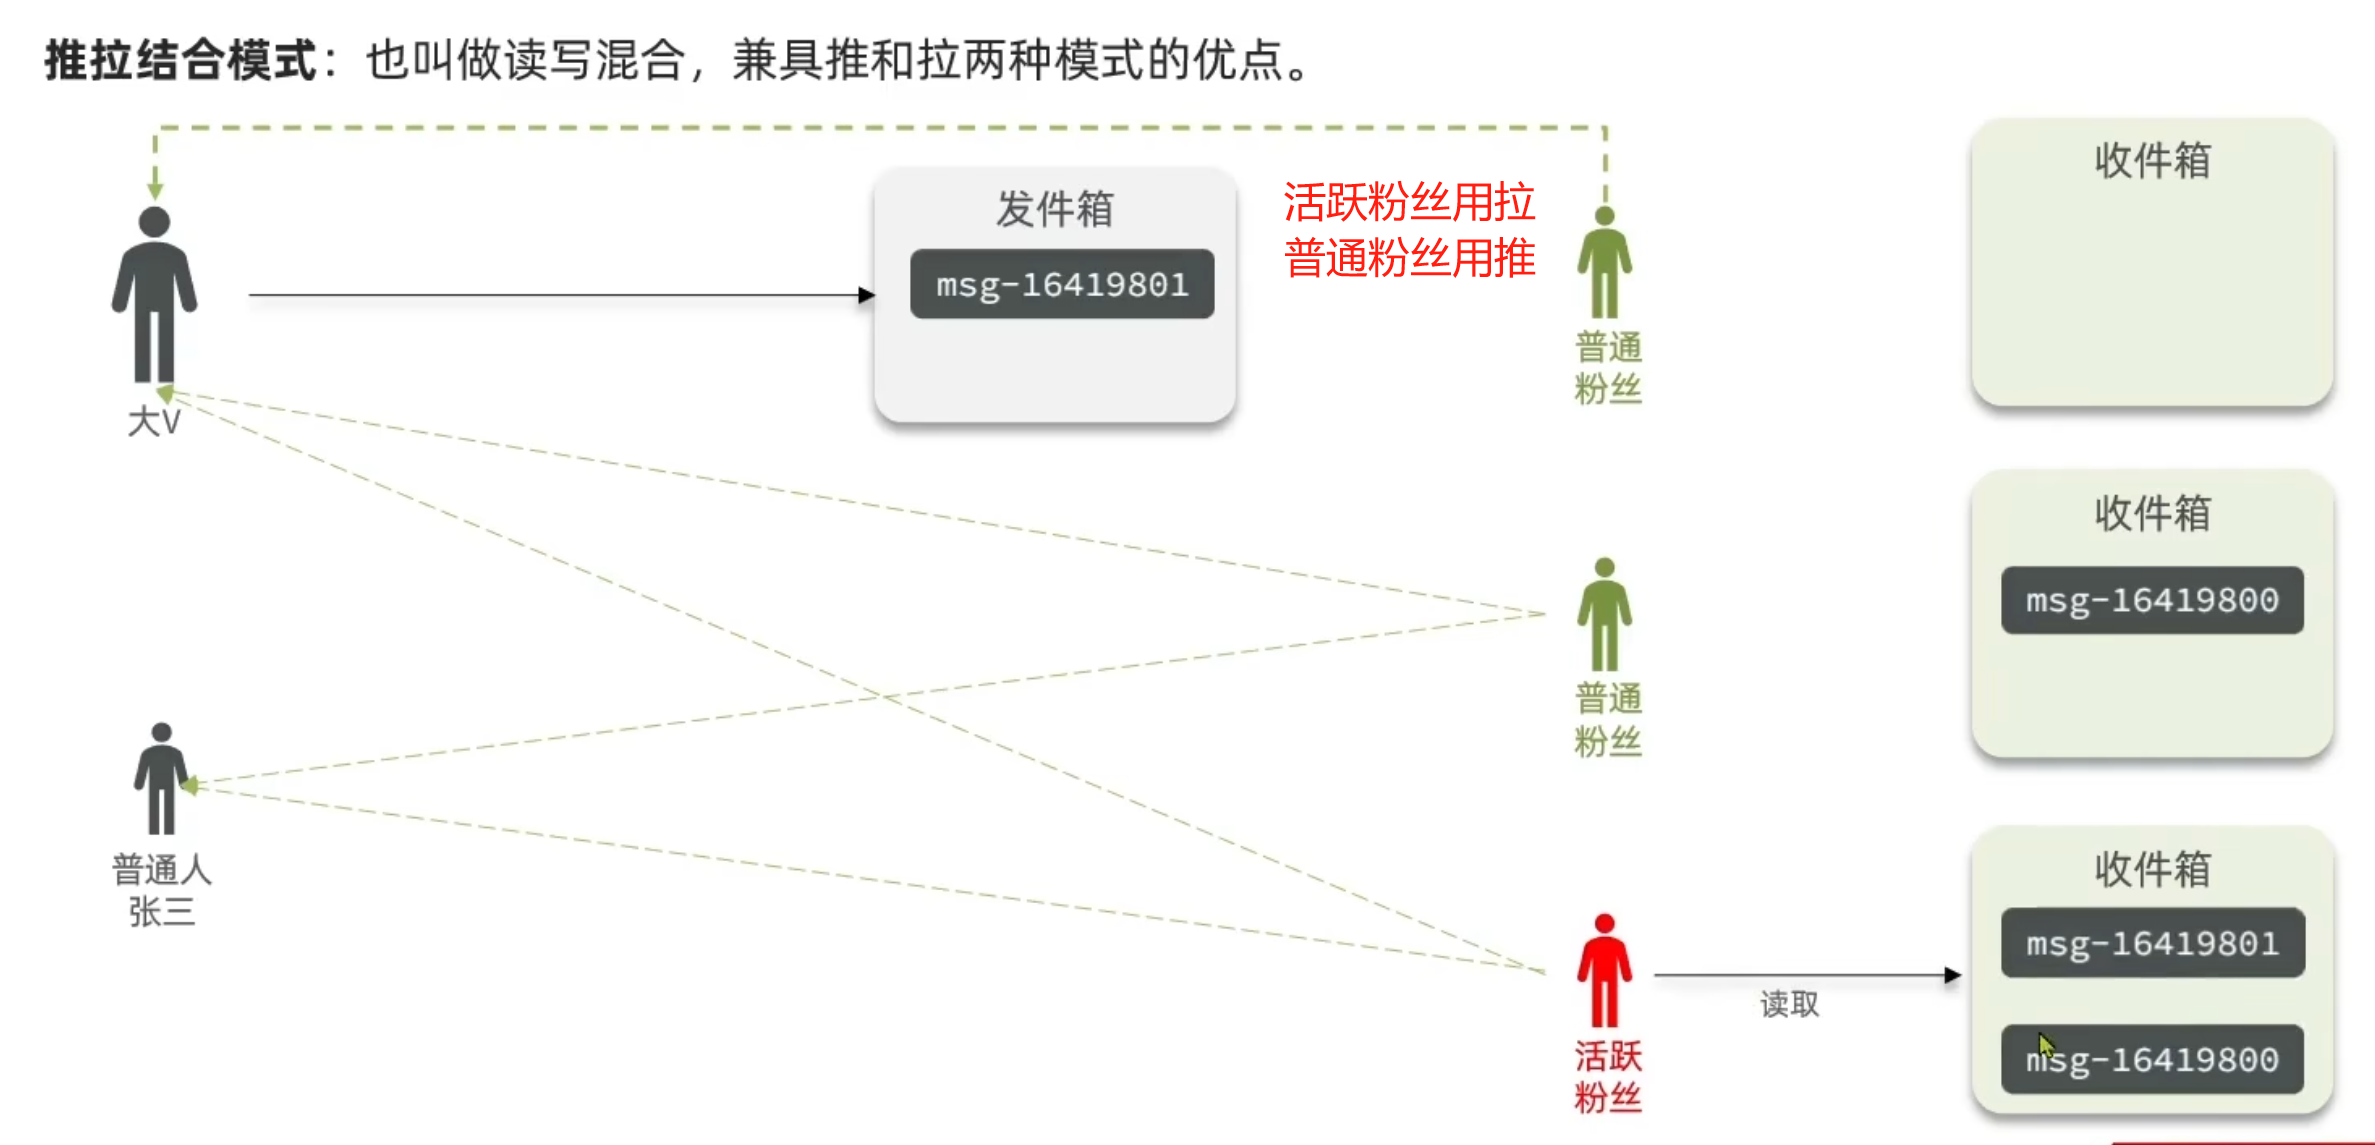
推拉结合模式:
案例---基于推模式实现关注推送:
 传统分页问题:
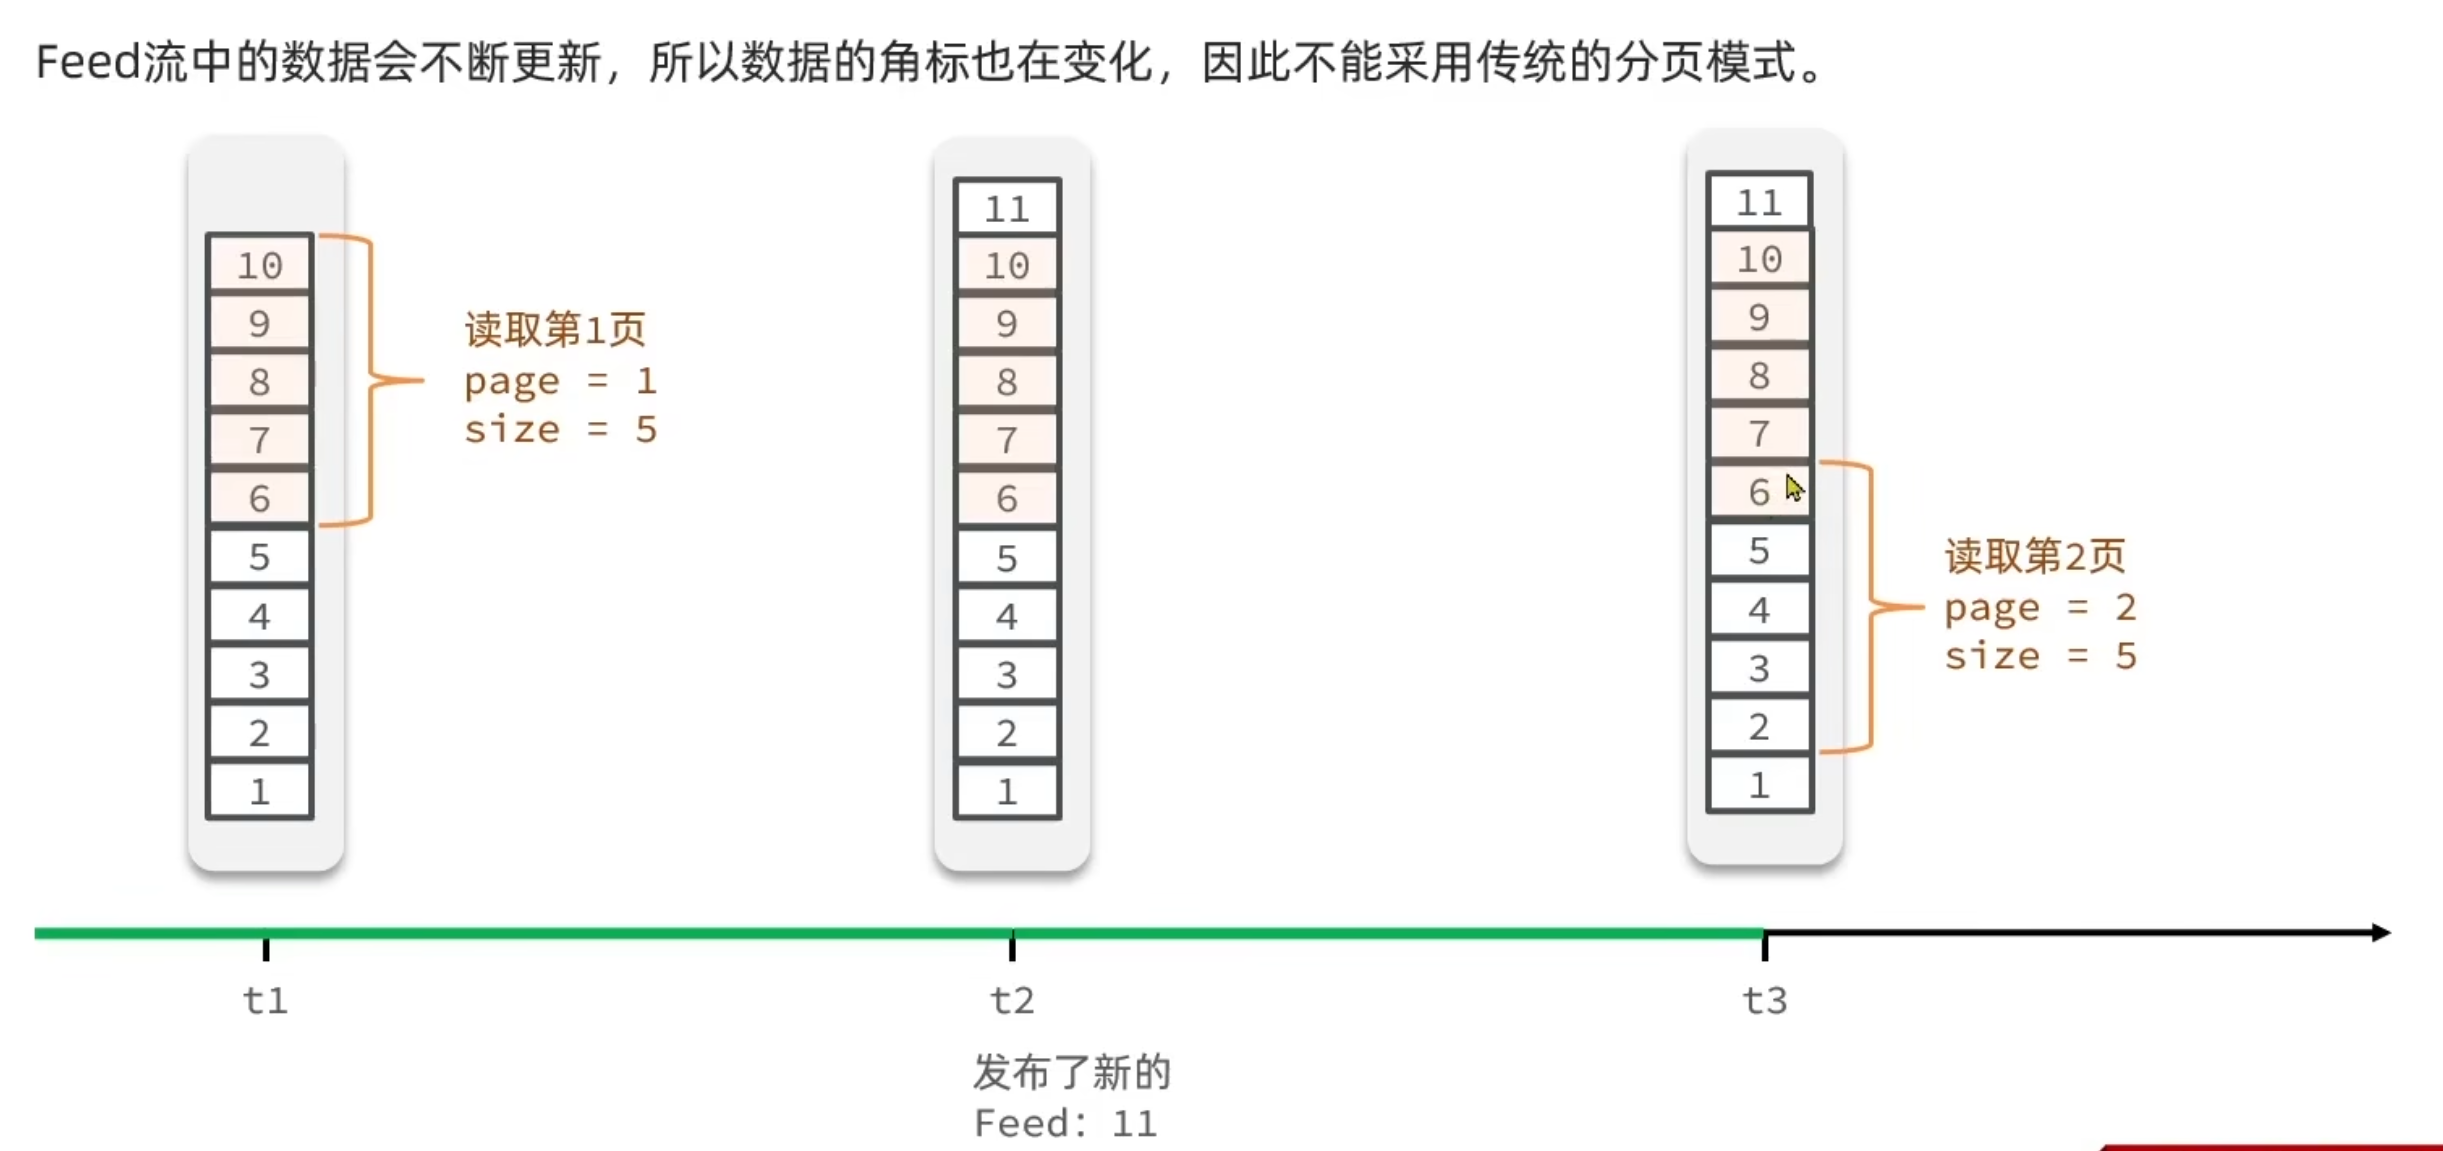
解决办法--Feed流的滚动分页:
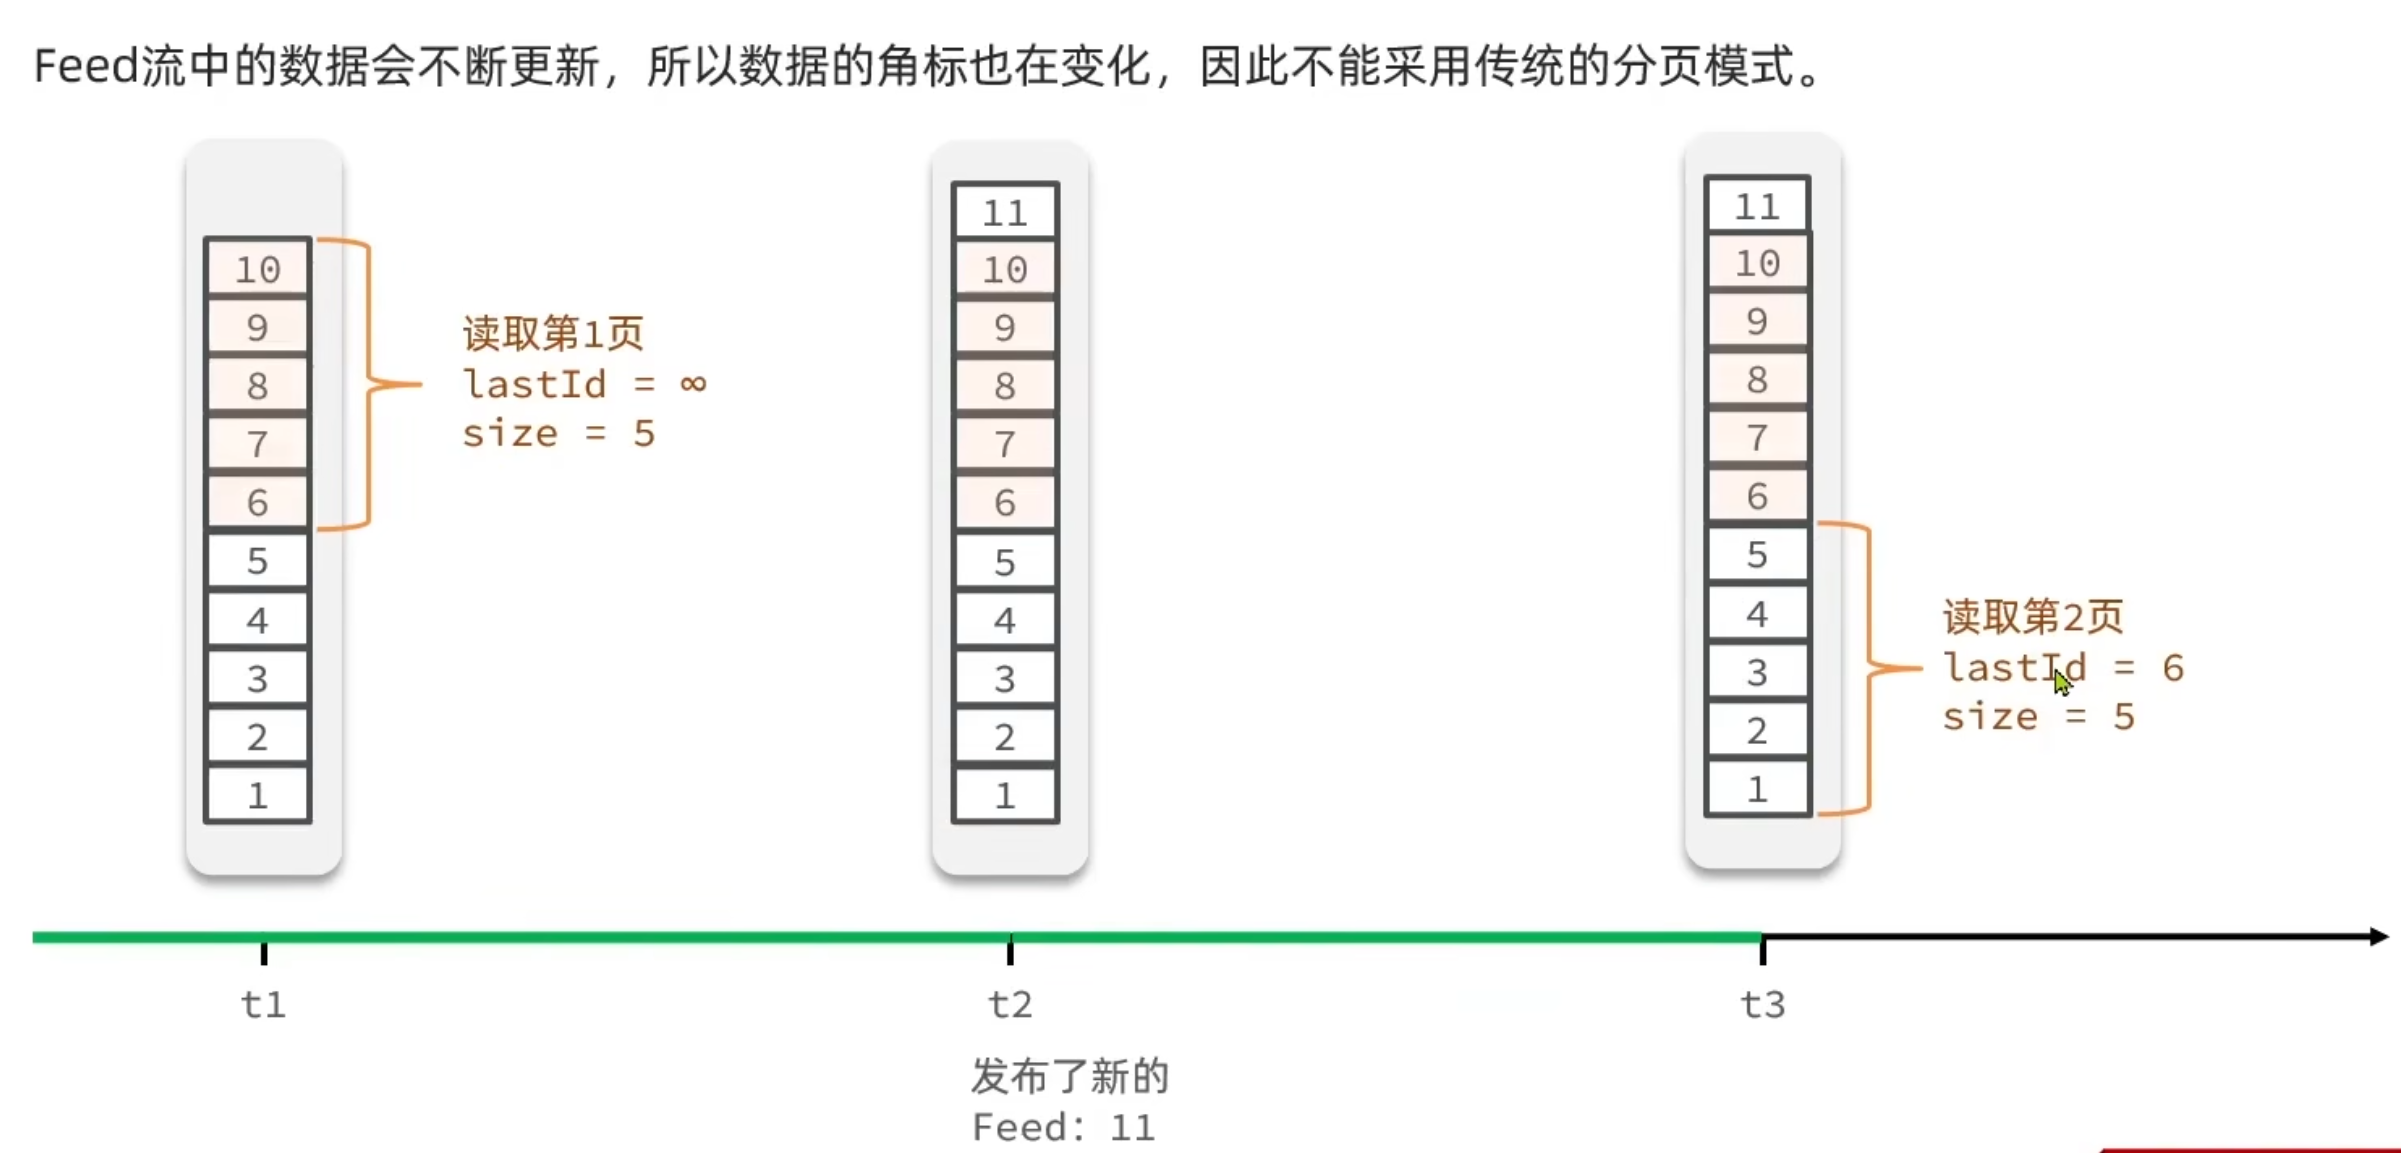
根据Feed流滚动分页的特性,关注推送采用SortedSet数据结构在Redis中存储查询(设置时间戳为分数)
代码实现:
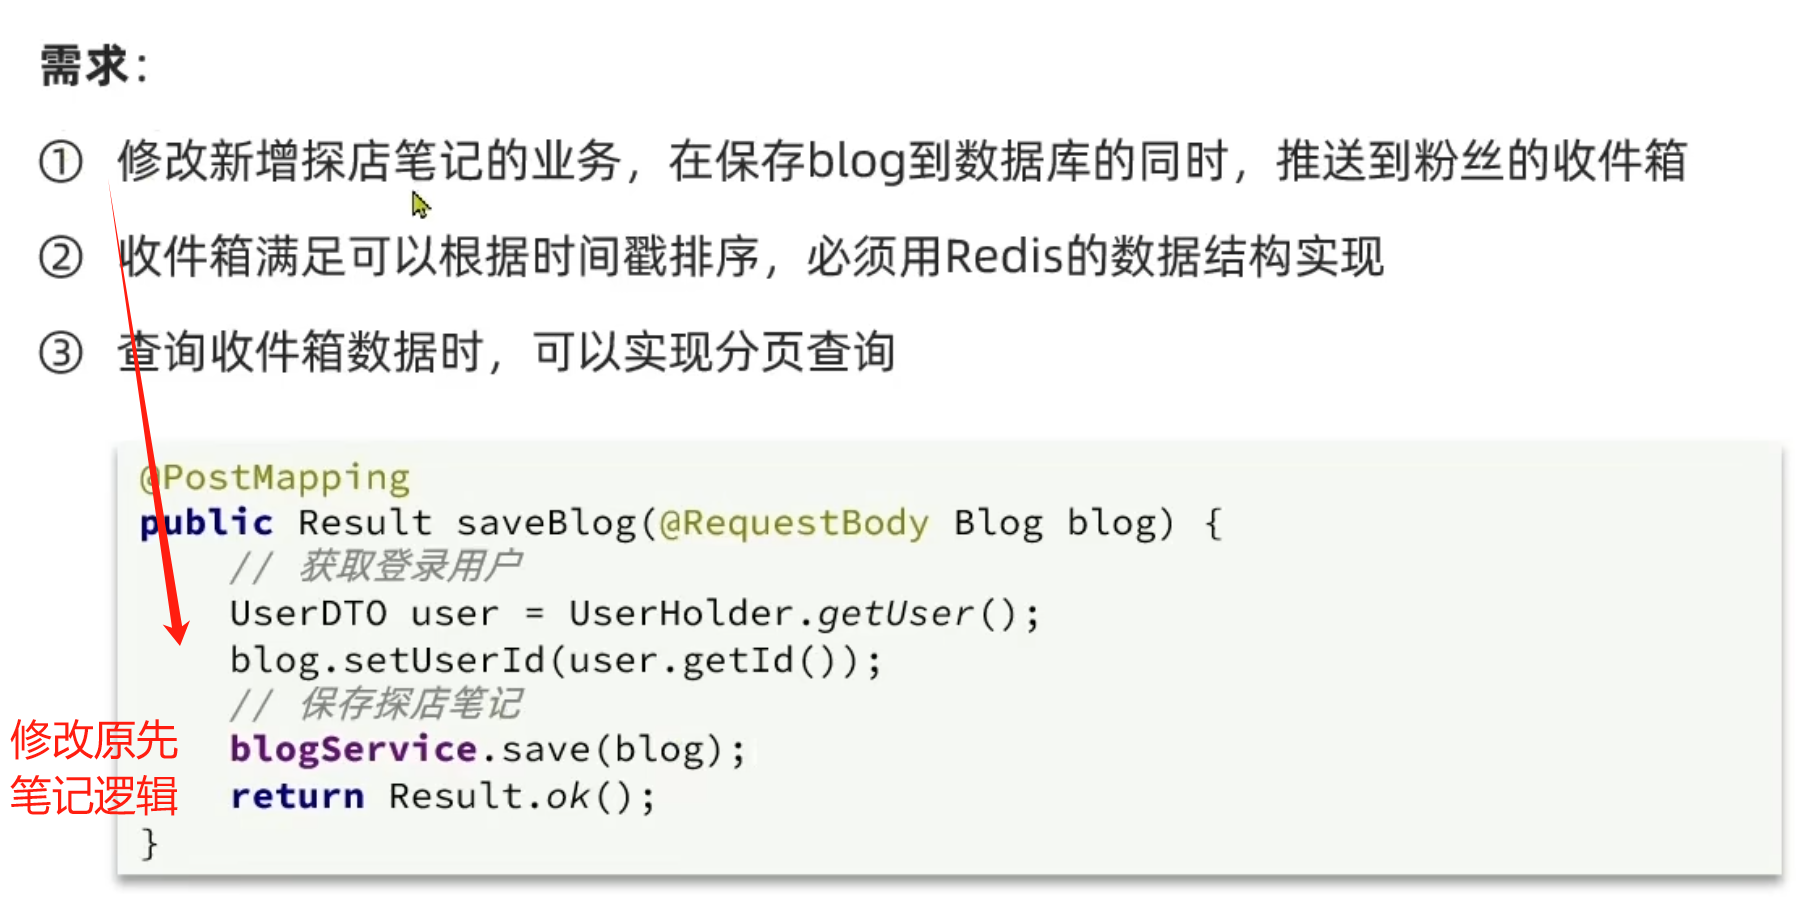
修改发送笔记代码
发送笔记后,查询发送者的粉丝,向所有粉丝推送信息
@Overridepublic Result saveBlog(Blog blog) {//1.获取登录用户UserDTO user = UserHolder.getUser();blog.setUserId(user.getId());//2.保存探店笔记boolean isSuccess = save(blog);if (!isSuccess){return Result.fail("新增笔记失败!");}//3.查询笔记作者的粉丝 select * from tb_follow where follow_user_id = ?List<Follow> follows = followService.query().eq("follow_user_id", user.getId()).list();//4.推送笔记给所有粉丝for (Follow follow : follows) {//4.1 获取粉丝idLong userId = follow.getUserId();//4.2 推送String key = FEED_KEY + userId;stringRedisTemplate.opsForZSet().add(key,blog.getId().toString(),System.currentTimeMillis());}//5. 返回idreturn Result.ok(blog.getId());}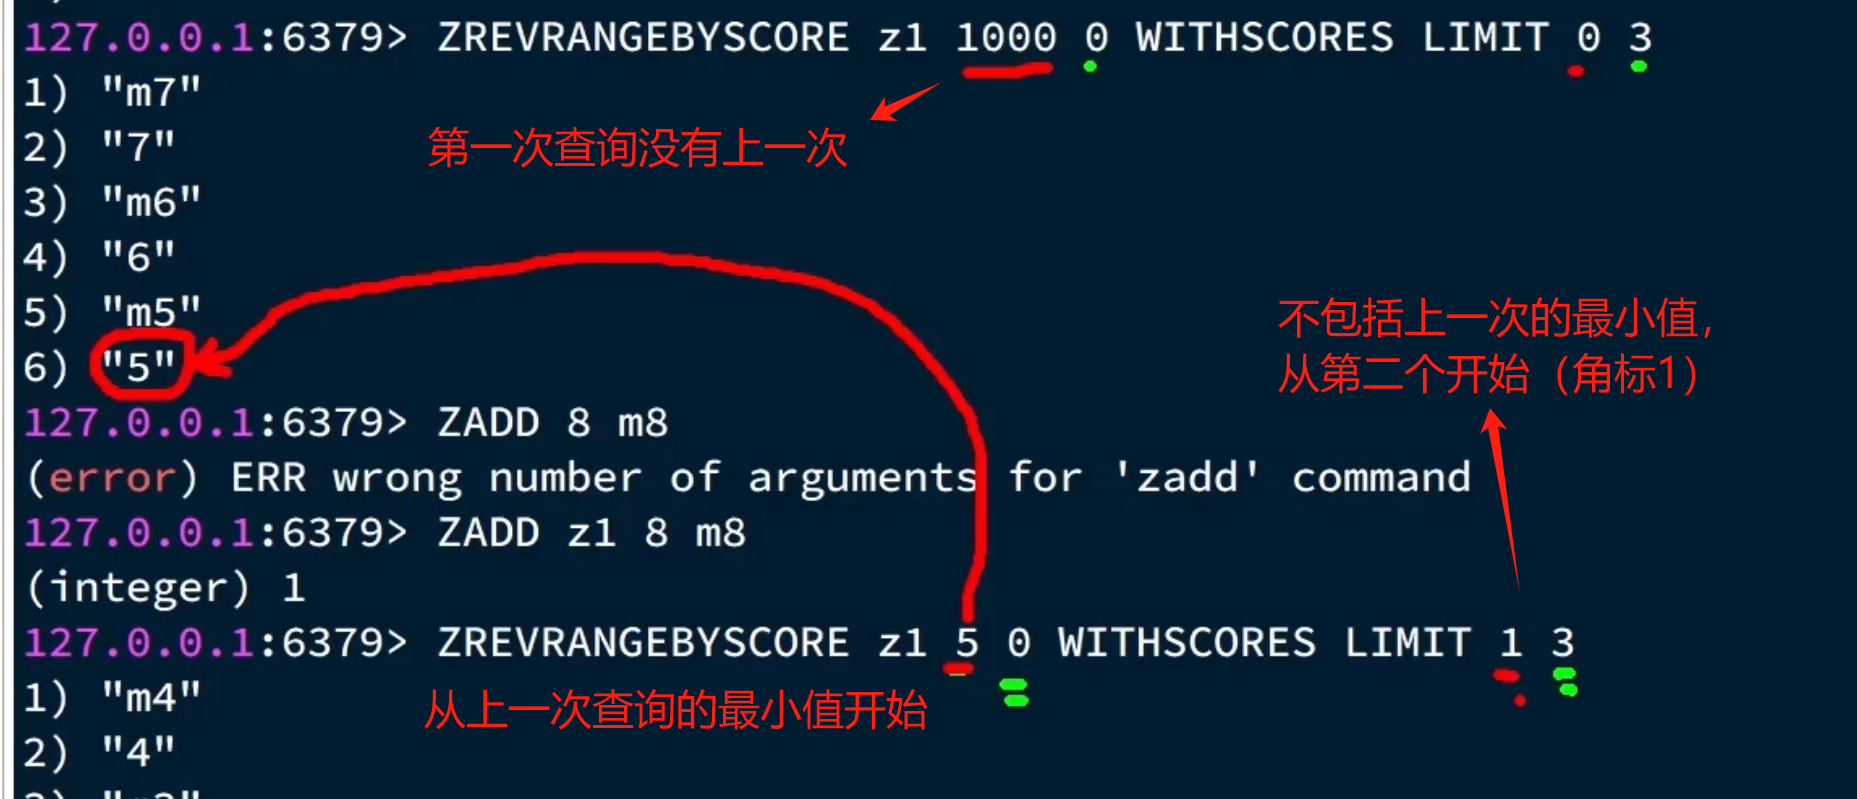
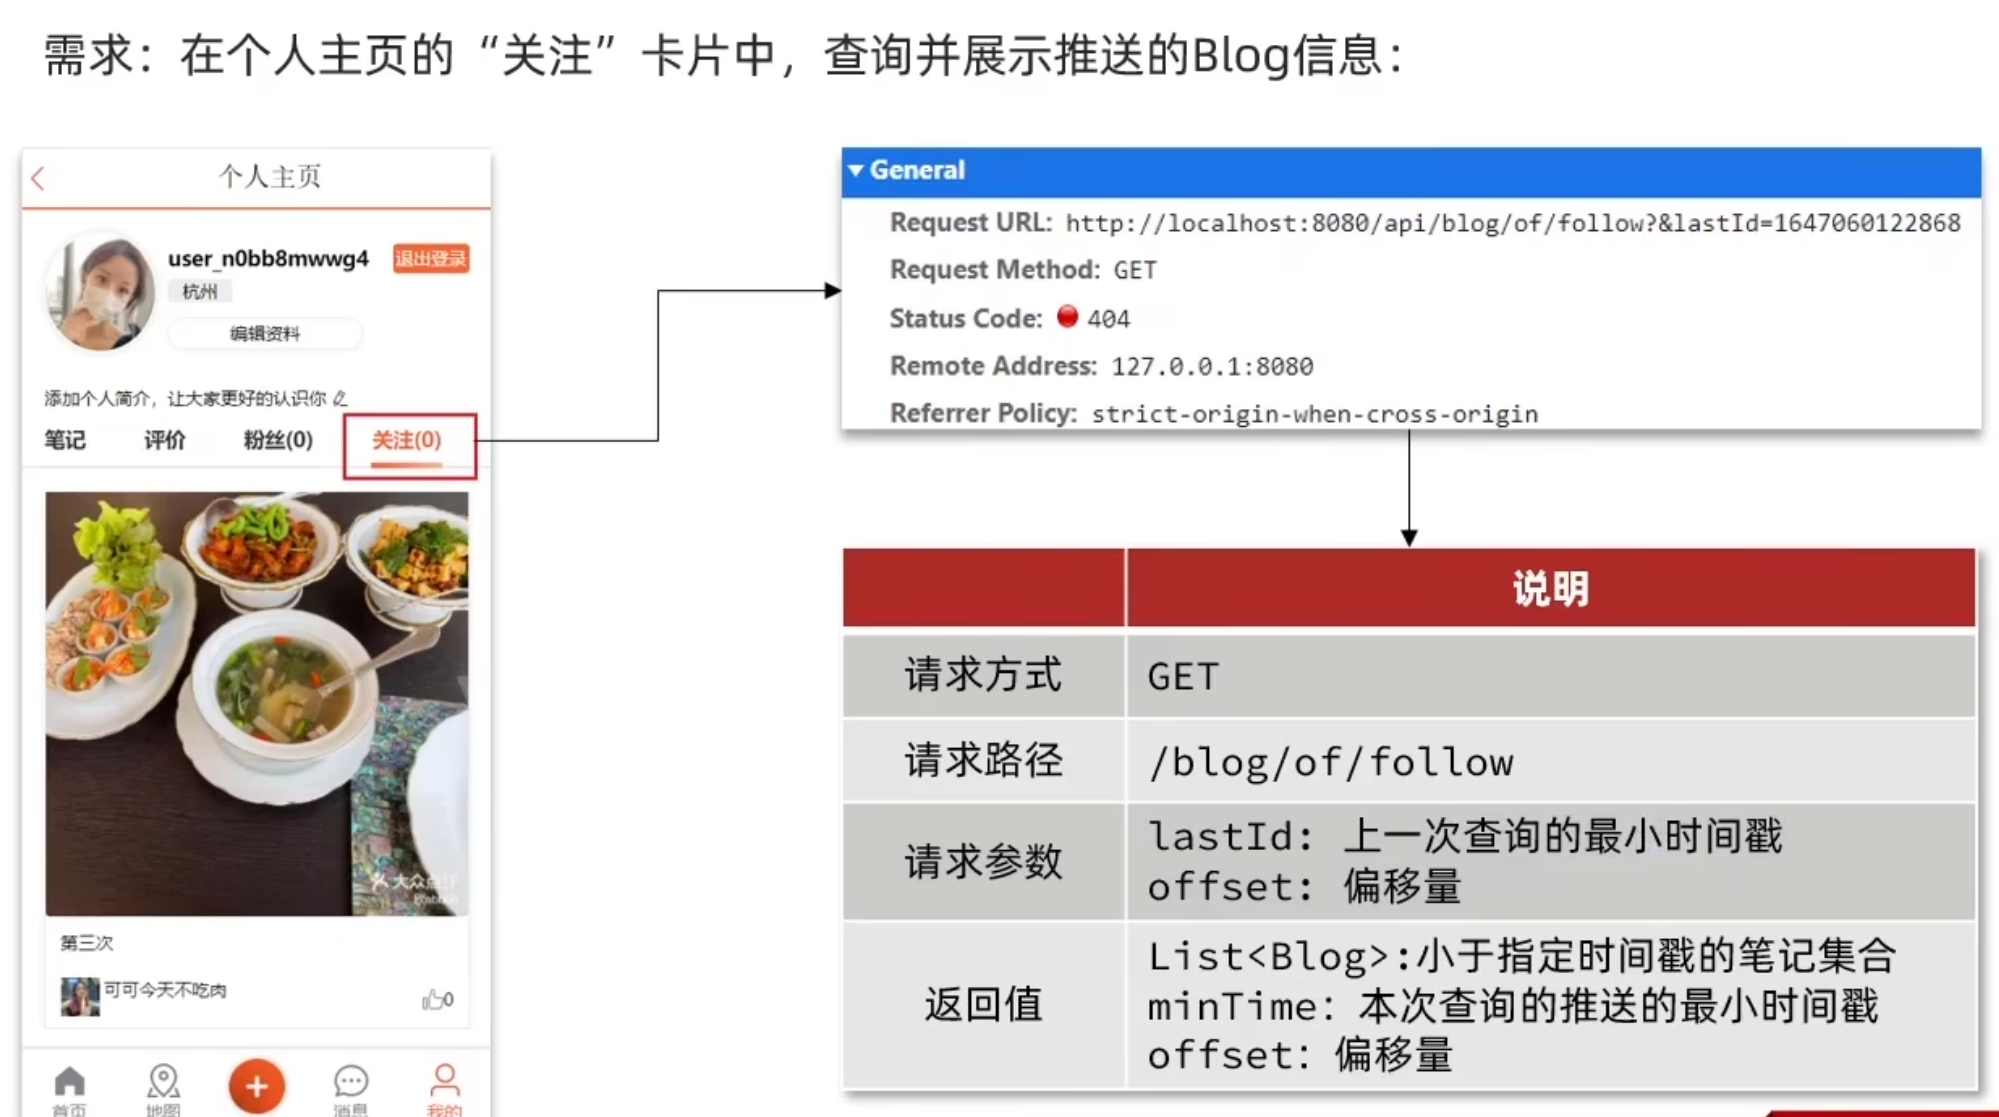
 案例---实现关注推送页面的分页查询:
@Overridepublic Result queryBlogofFollow(Long max, Integer offset) {//1. 获取当前用户Long userId = UserHolder.getUser().getId();//2. 查询收件箱String key= FEED_KEY + userId;Set<ZSetOperations.TypedTuple<String>> typedTuples = stringRedisTemplate.opsForZSet().reverseRangeByScoreWithScores(key, 0, max, offset, 2);//3.判断非空if (typedTuples == null || typedTuples.isEmpty()){return Result.ok();}//4. 解析数据: blogId + minTime(时间戳) + offset(跟上次查询的最小值一样的元素的个数)long minTime = 0;int os = 1;List<Long> ids = new ArrayList<>(typedTuples.size());for (ZSetOperations.TypedTuple<String> typedTuple : typedTuples) {//4.1 获取idids.add(Long.valueOf(typedTuple.getValue()));//4.2 获取分数(时间戳)long time = typedTuple.getScore().longValue();if (time == minTime){os++;}else {minTime = time;os=1;}}//5. 根据blogId查询blogString idStr = StrUtil.join(",", ids);List<Blog> blogs = query().in("id", ids).last("order by field(id," + idStr + ")").list();for (Blog blog : blogs) {//5.1.查询blog有关的用户queryBlogUser(blog);//5.2.查询blog是否点过赞isBlogLiked(blog);}//6. 封装并返回ScrollResult r = new ScrollResult();r.setList(blogs);r.setOffset(os);r.setMinTime(minTime);return Result.ok(r);}三、附近商铺
GEO数据结构:
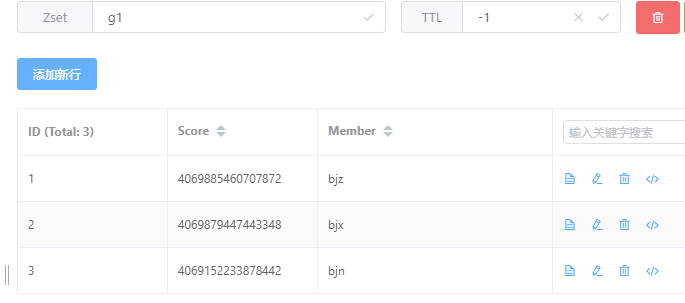
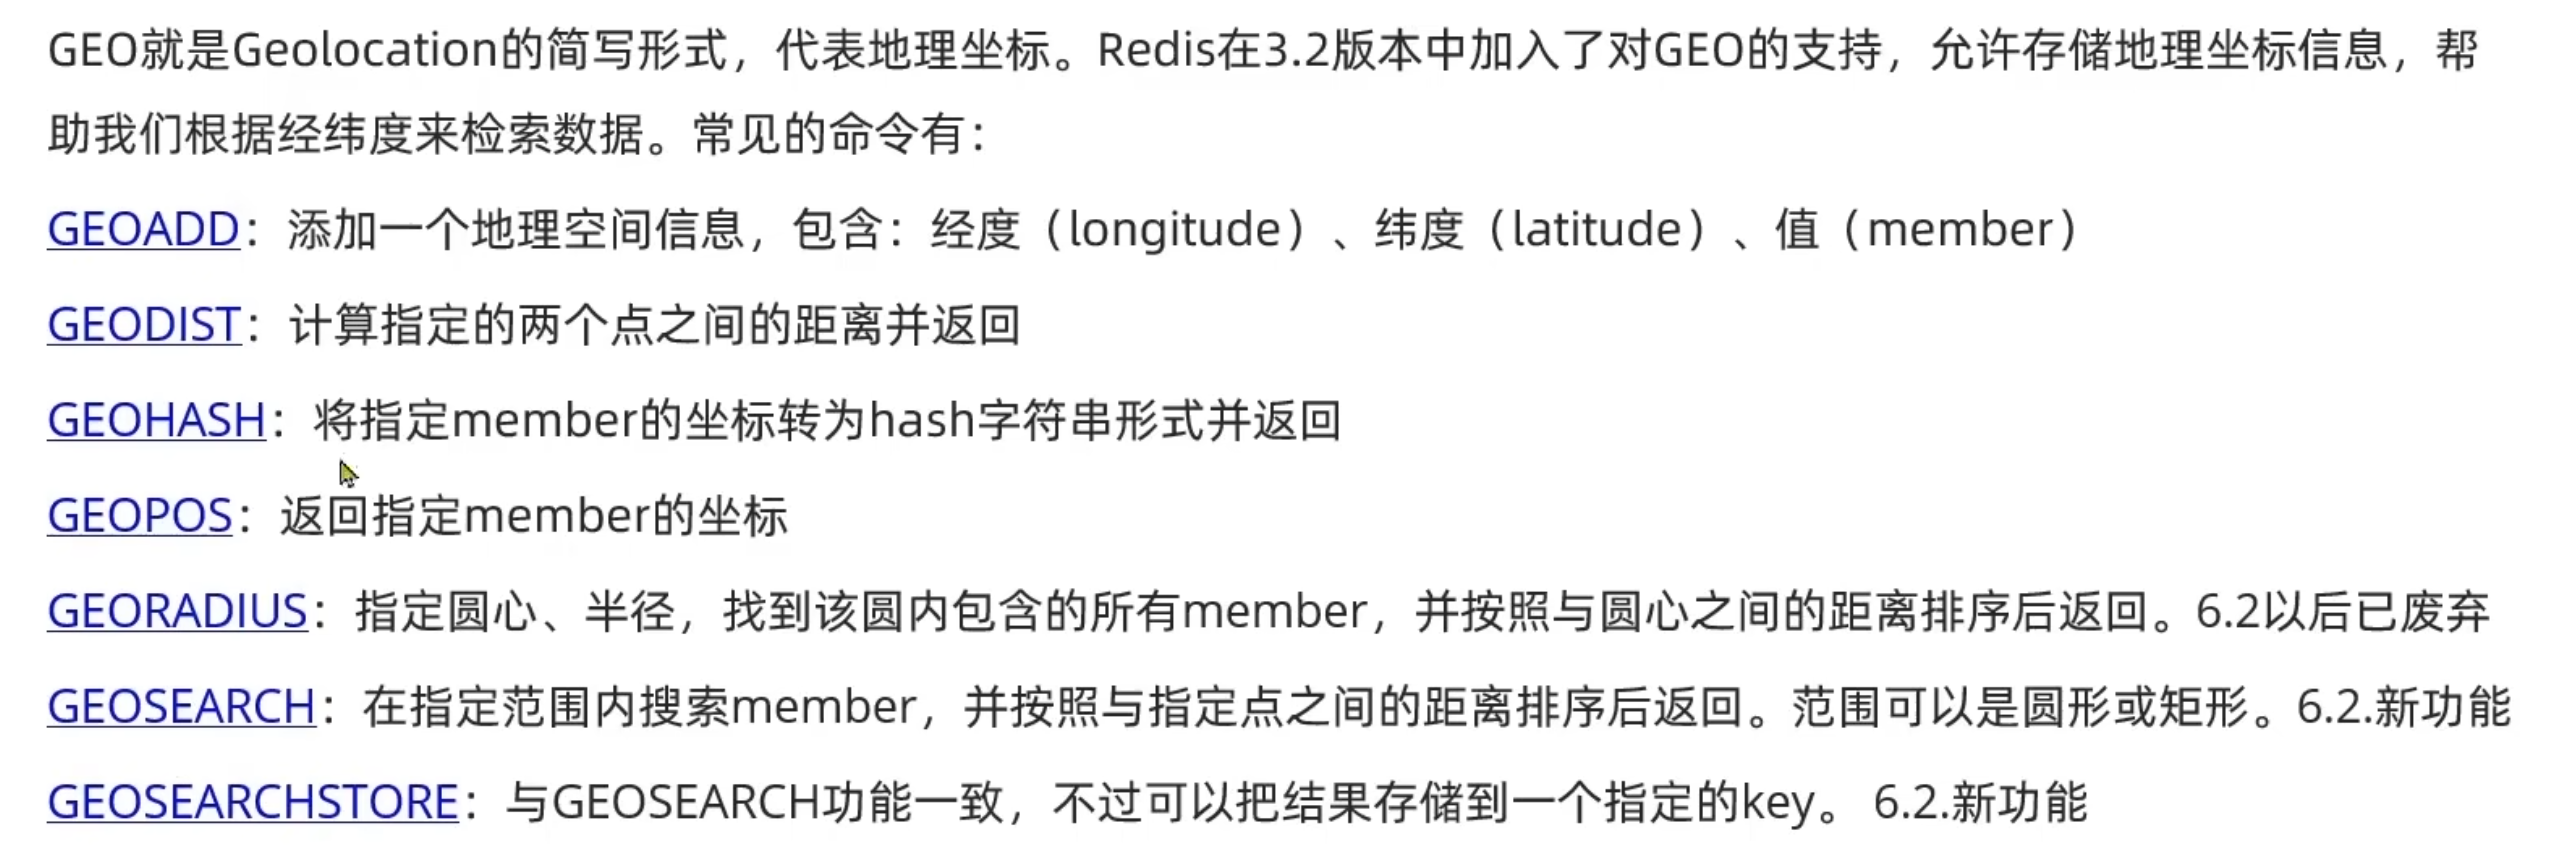 案例---联系Redis的GEO功能:

![]()

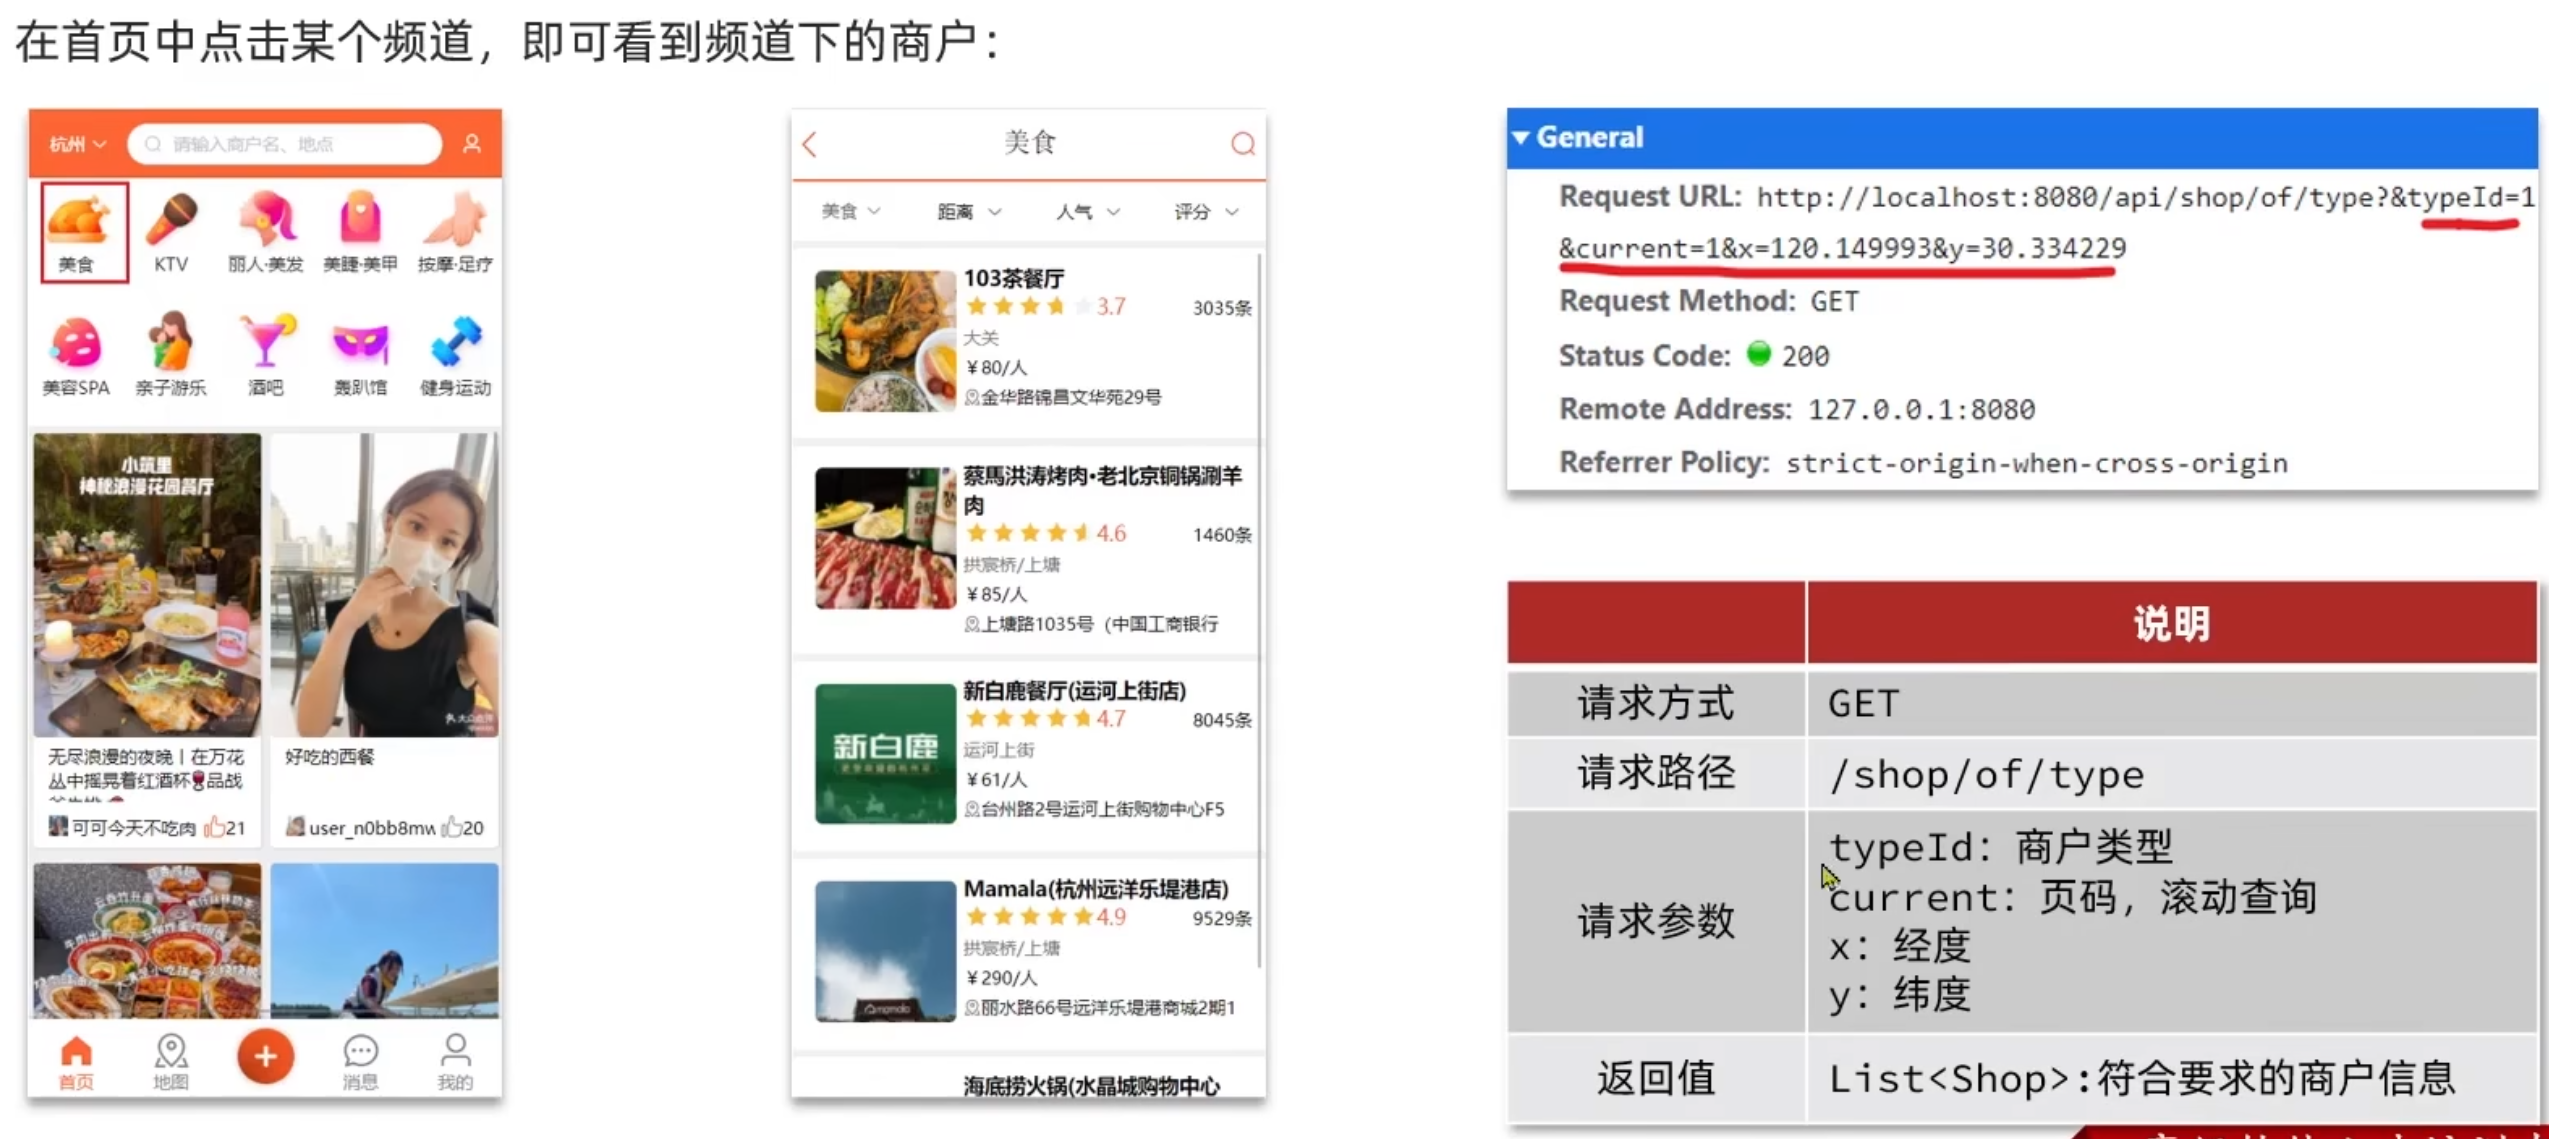
附近商户搜索:
 数据存储方式:

支持版本:
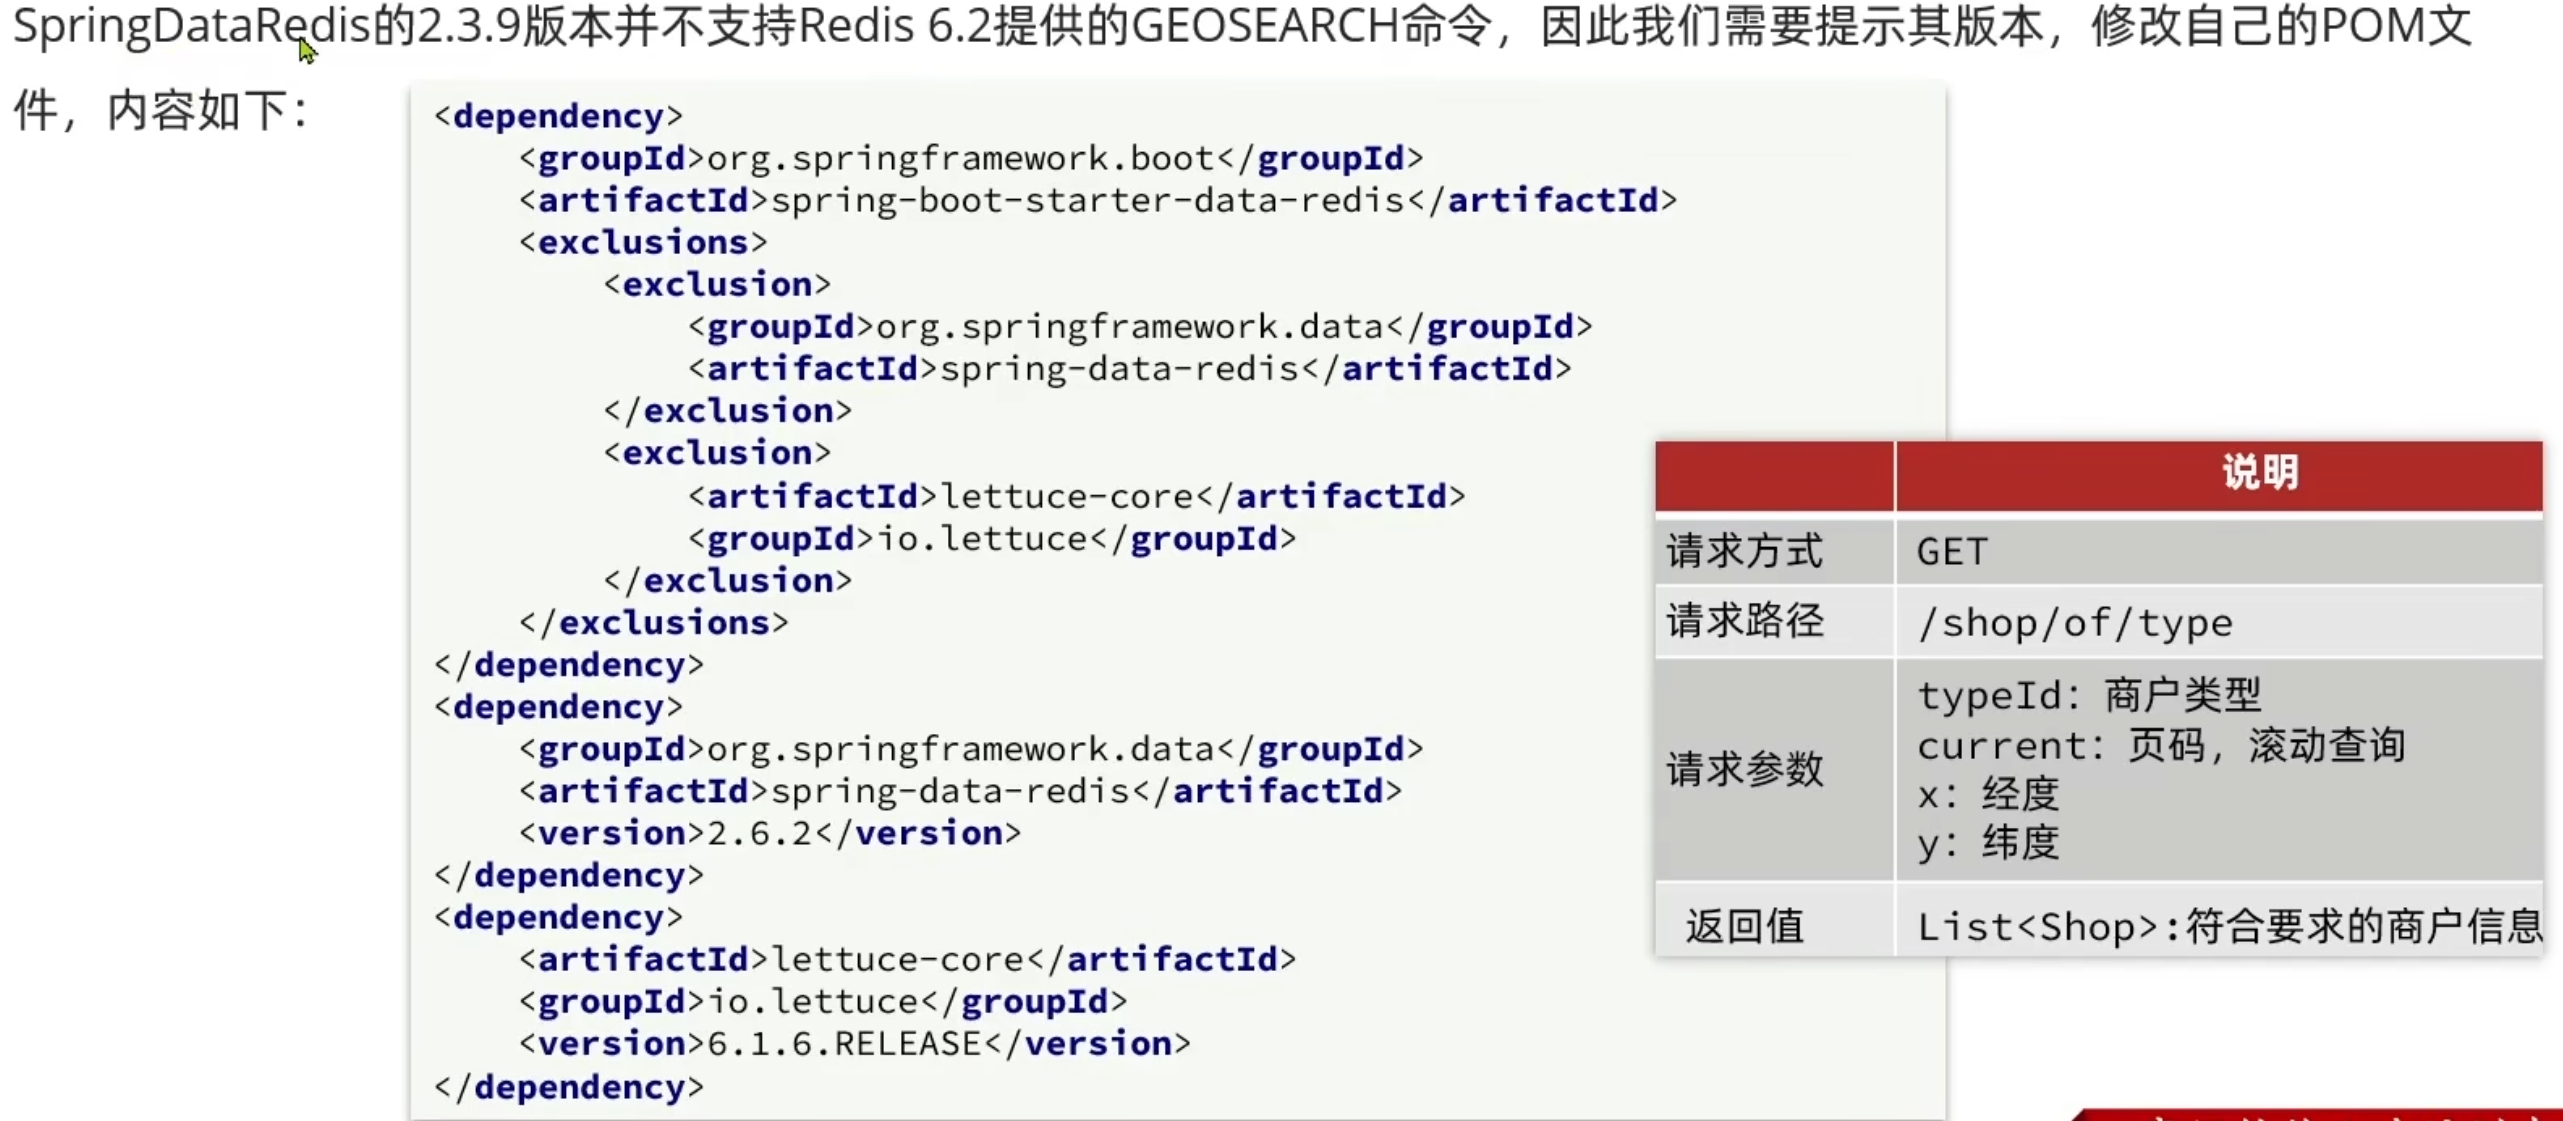 实现:
实现:
@GetMapping("/of/type")public Result queryShopByType(@RequestParam("typeId") Integer typeId,@RequestParam(value = "current", defaultValue = "1") Integer current,@RequestParam(value = "x",required = false) Double x,@RequestParam(value = "y",required = false) Double y) {return shopService.queryShopByType(typeId,current,x,y);} @Overridepublic Result queryShopByType(Integer typeId, Integer current, Double x, Double y) {//1. 判断 是否需要根据坐标查询if (x == null || y == null){//不需要坐标查询,按数据库查询// 根据类型分页查询Page<Shop> page = query().eq("type_id", typeId).page(new Page<>(current, SystemConstants.DEFAULT_PAGE_SIZE));// 返回数据return Result.ok(page.getRecords());}//2. 计算分页参数int from = (current - 1)*SystemConstants.DEFAULT_PAGE_SIZE;int end = current * SystemConstants.DEFAULT_PAGE_SIZE;//3. 查询redis 按照距离排序+分页 结果: shipId、distanceString key = SHOP_GEO_KEY + typeId;GeoResults<RedisGeoCommands.GeoLocation<String>> results = stringRedisTemplate.opsForGeo() //GEOSEARCH key BYLONLAT(圆心) x y BYRADIUS(半径) 10 WITHDISTANCE(带距离).search(key, GeoReference.fromCoordinate(x, y),new Distance(5000),RedisGeoCommands.GeoSearchCommandArgs.newGeoSearchArgs().includeDistance().limit(end));//4. 解析shopIdif (results==null){//判空return Result.ok(Collections.emptyList());}List<GeoResult<RedisGeoCommands.GeoLocation<String>>> list = results.getContent();if (list.size() <= from){//没有下一页了return Result.ok(Collections.emptyList()); }//4.1 截取 from - end 的部分List<Long> ids = new ArrayList<>(list.size());Map<String,Distance> distanceMap = new HashMap<>(list.size());list.stream().skip(from).forEach(result ->{//4.2 获取店铺idString shopIdStr = result.getContent().getName();ids.add(Long.valueOf(shopIdStr));//4.3 获取距离Distance distance = result.getDistance();distanceMap.put(shopIdStr,distance);});//5. 根据shopId查询店铺String idStr = StrUtil.join(",", ids);List<Shop> shops = query().in("id", ids).last("order by field(id," + idStr + ")").list();for (Shop shop : shops) {shop.setDistance(distanceMap.get(shop.getId().toString()).getValue());}//6. 返回return Result.ok(shops);}由于GEO查询没有办法查询对应范围数据,只能指定数量,因此分页查询需要手动截取对应部分
四、用户签到
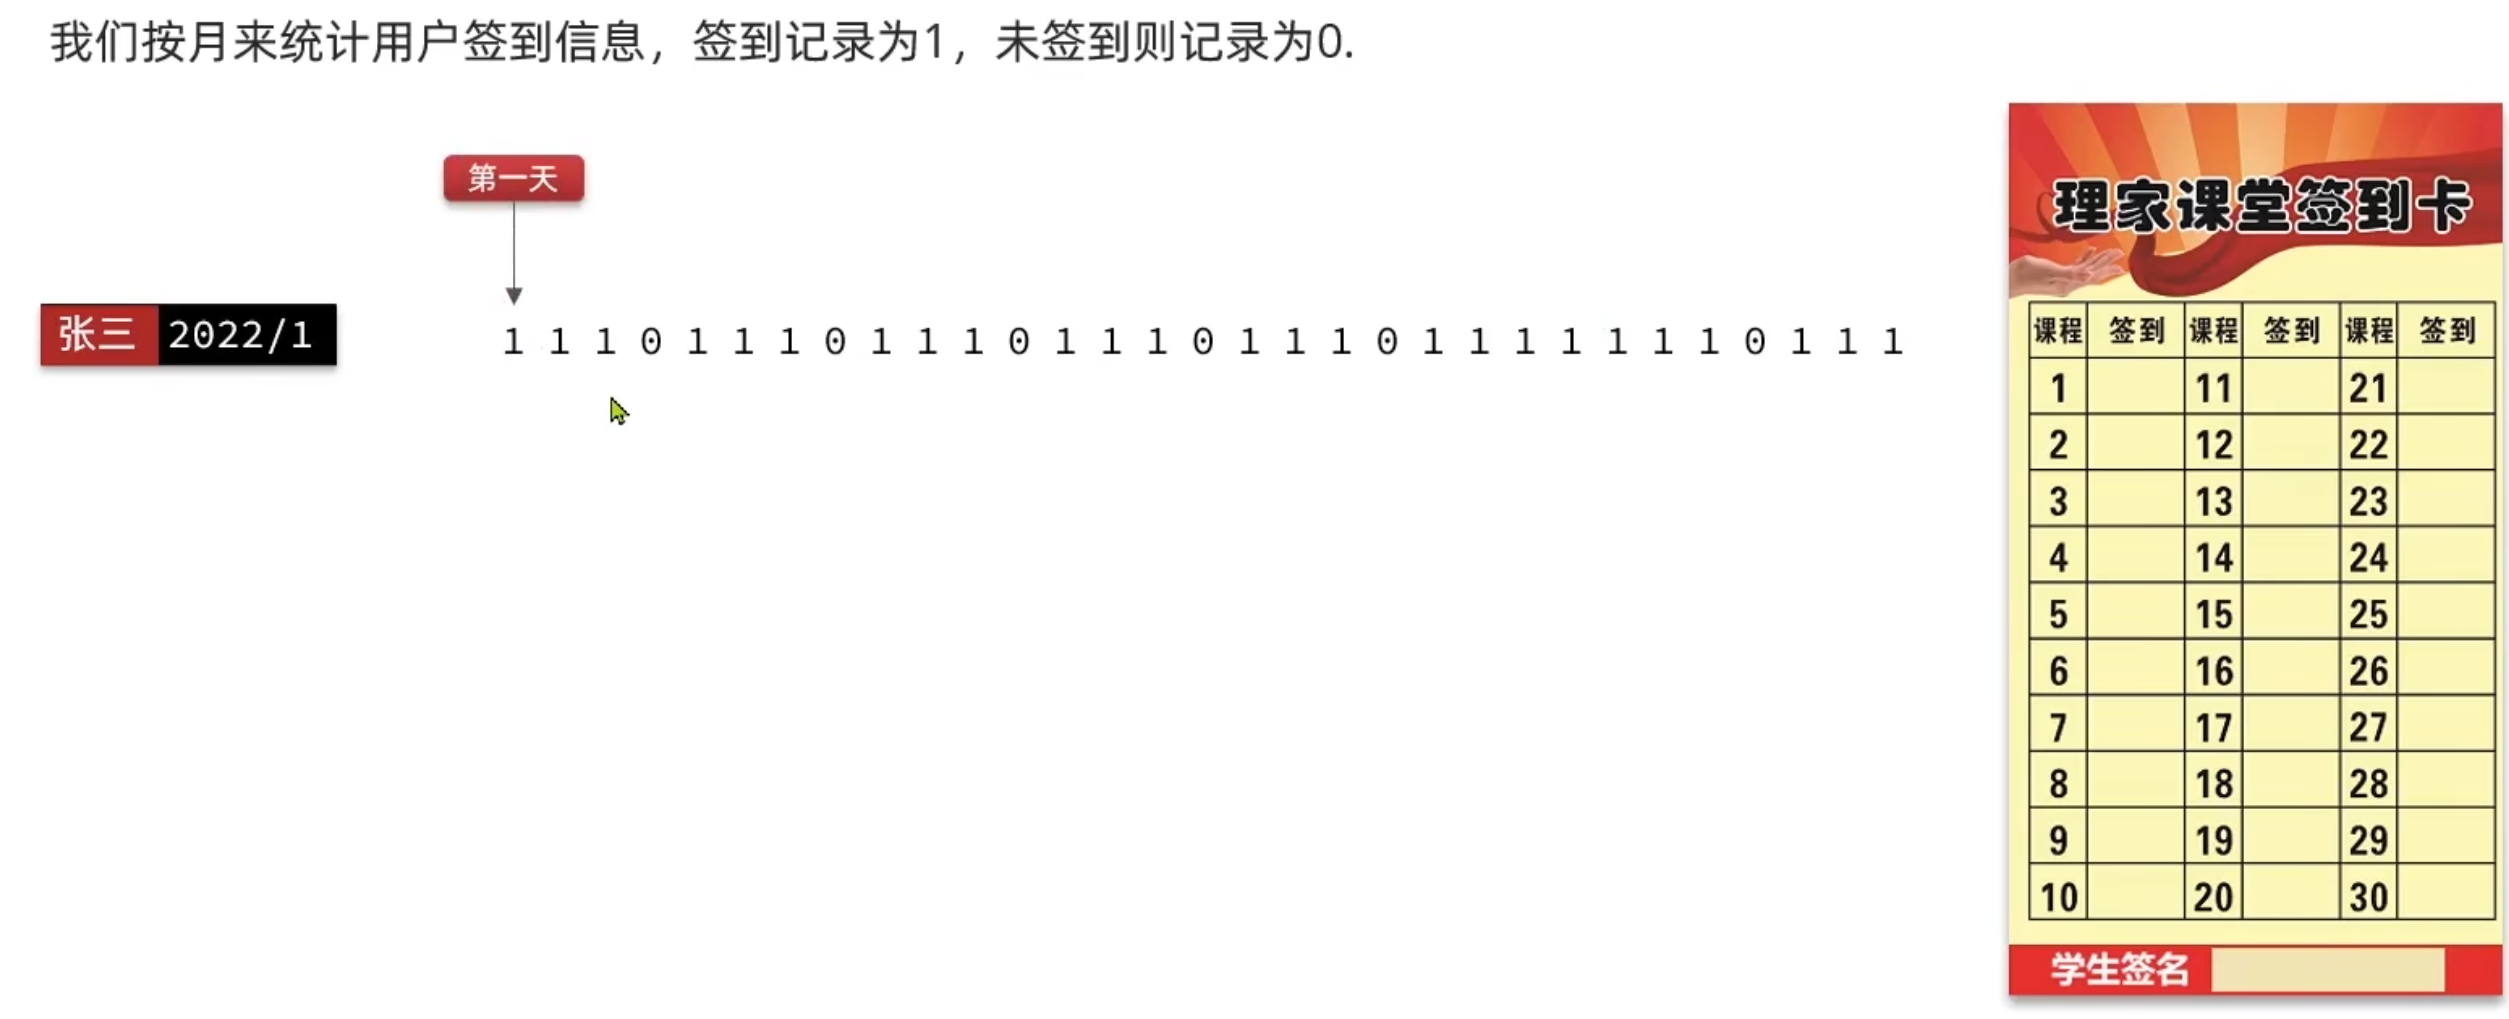
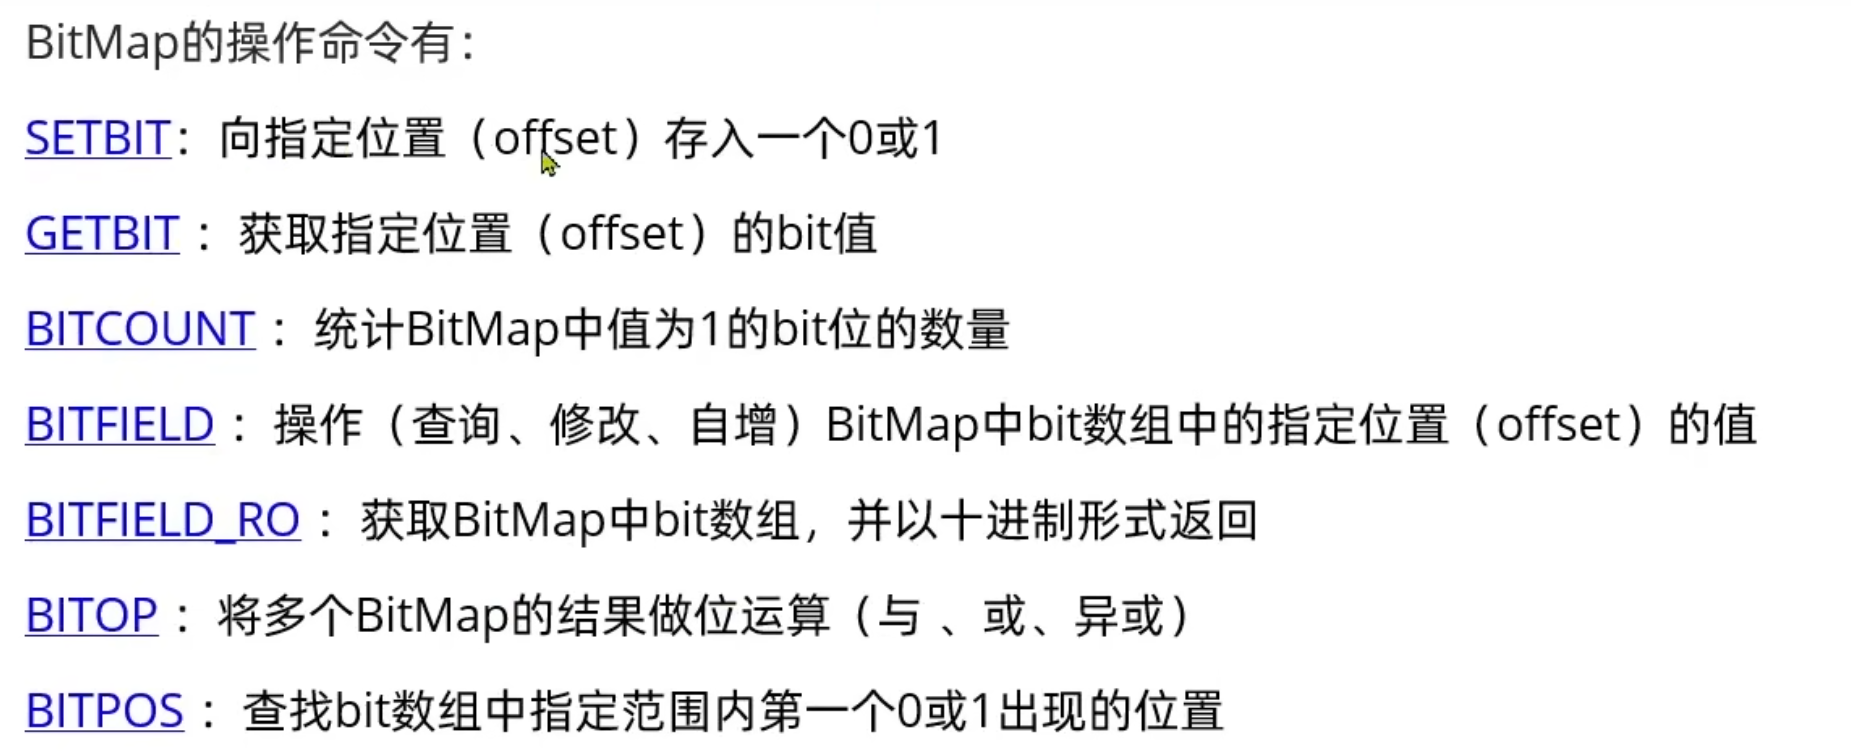
BitMap用法: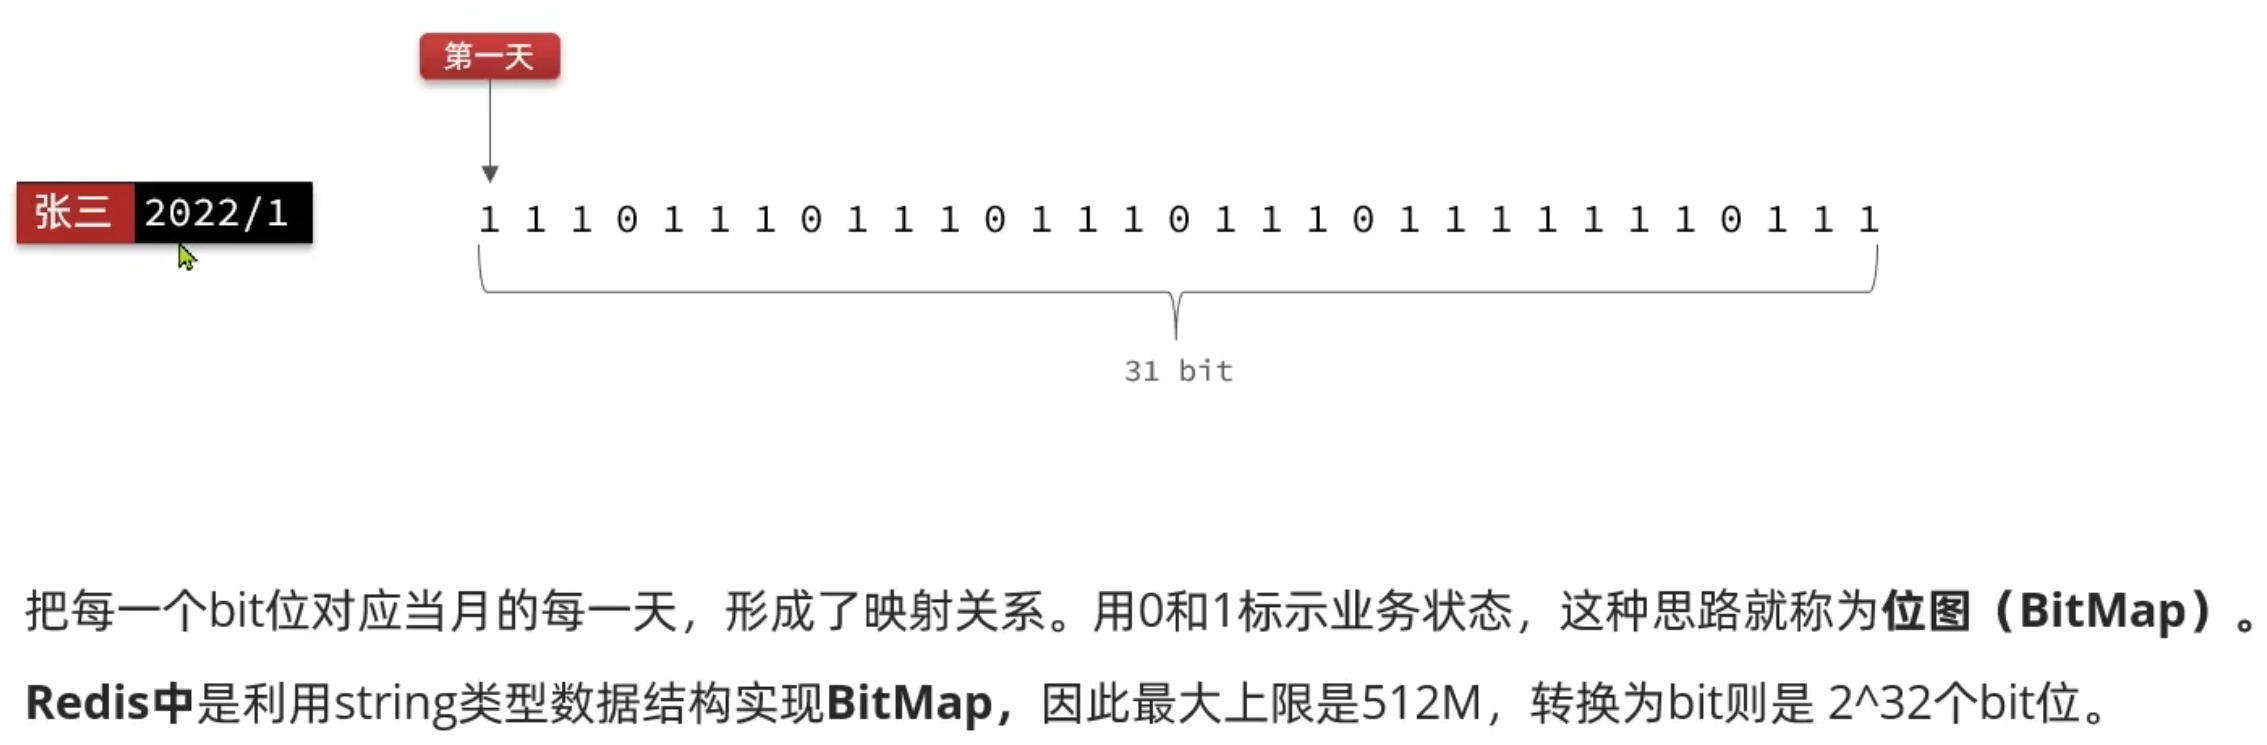
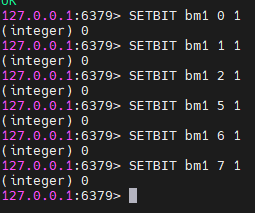
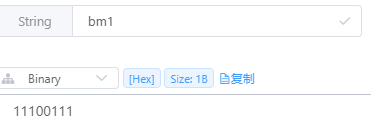
案例--实现签到功能 :
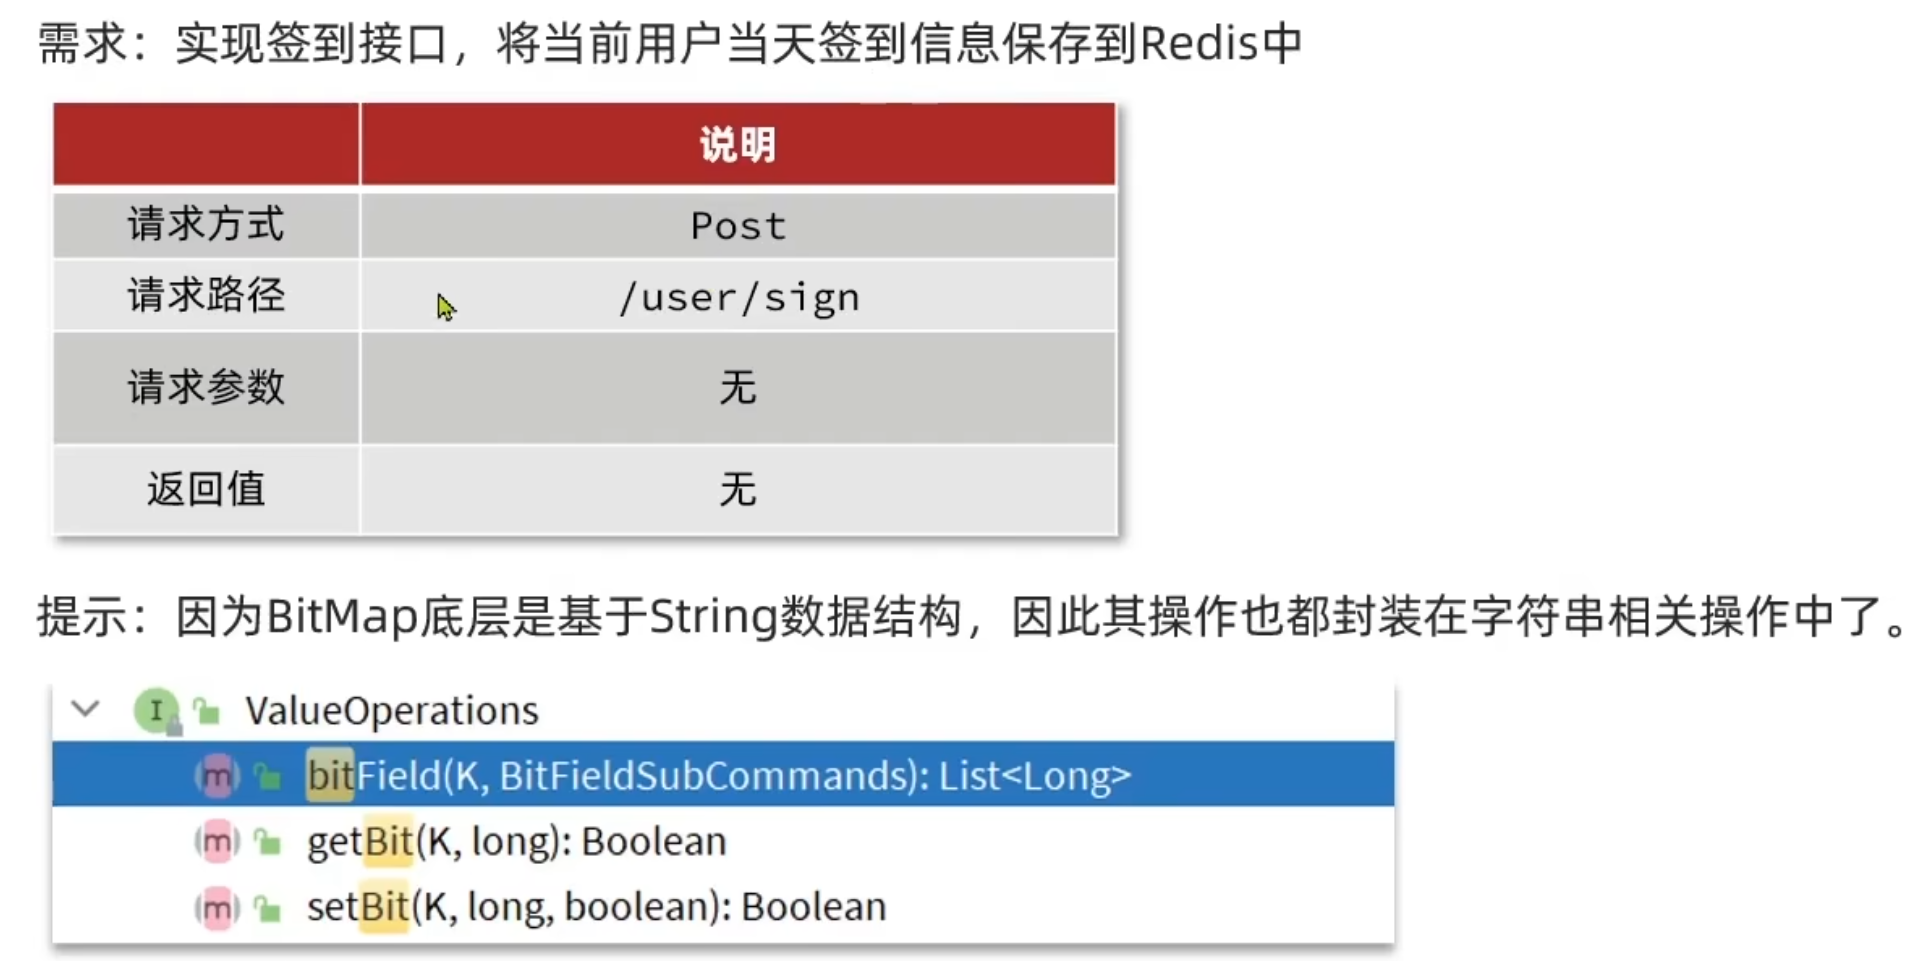
@Overridepublic Result sign() {//1. 获取当前登录的用户Long userId = UserHolder.getUser().getId();//2. 获取日期LocalDateTime now = LocalDateTime.now();//3. 拼接keyString keySuffix = now.format(DateTimeFormatter.ofPattern(":yyyy-MM"));String key = USER_SIGN_KEY + userId +keySuffix;//4. 获取今天是当月第几天(填充bit的位置)int dayOfMonth = now.getDayOfMonth(); //这个月第一天返回值为1//5. 写入Redis SETBIT key offset 1stringRedisTemplate.opsForValue().setBit(key,dayOfMonth-1,true);return Result.ok();}案例--实现签到统计:
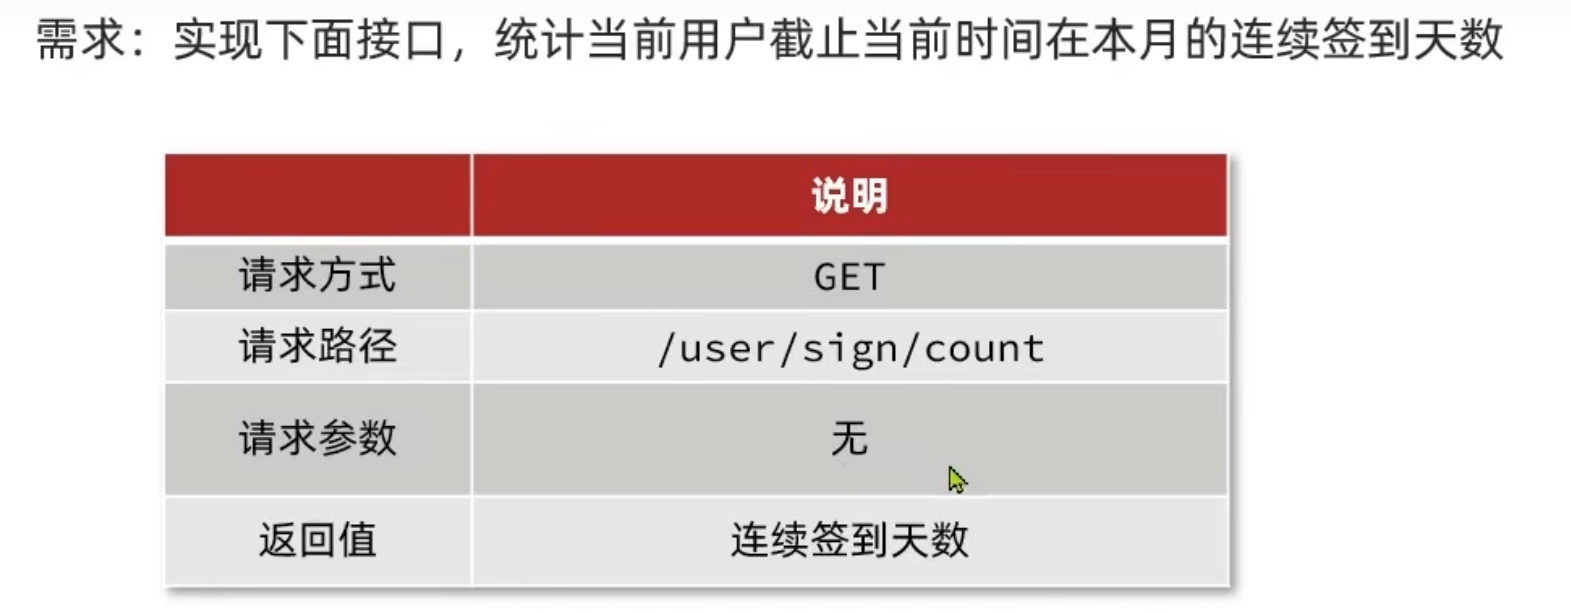
@GetMapping("/sign/count")public Result signCount(){return userService.signCount();}
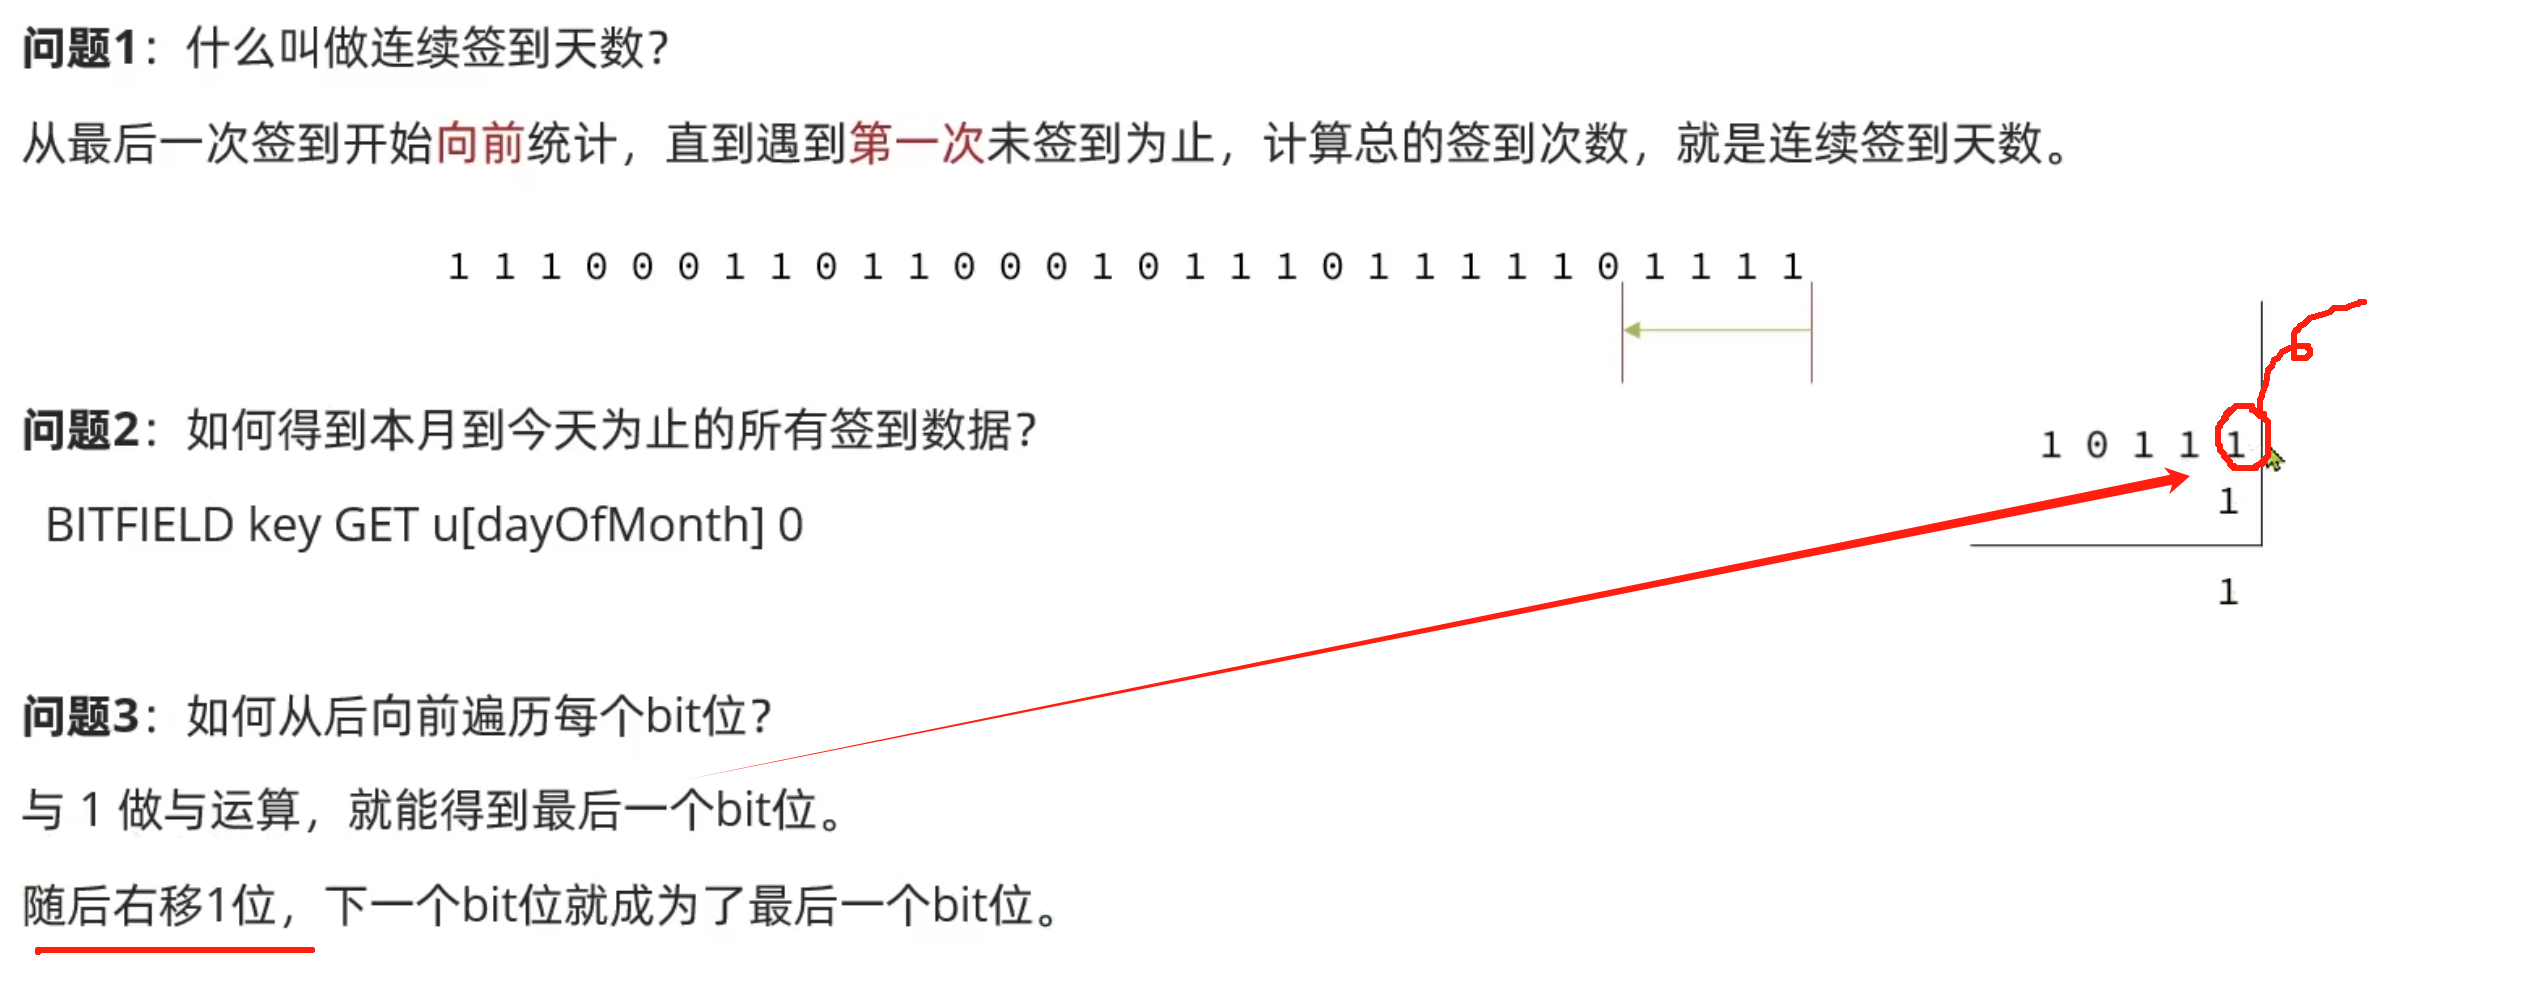
} @Overridepublic Result signCount() {//1. 获取当前登录的用户Long userId = UserHolder.getUser().getId();//2. 获取日期LocalDateTime now = LocalDateTime.now();//3. 拼接keyString keySuffix = now.format(DateTimeFormatter.ofPattern(":yyyy-MM"));String key = USER_SIGN_KEY + userId +keySuffix;//4. 获取今天是当月第几天int dayOfMonth = now.getDayOfMonth(); //这个月第一天返回值为1//5. 获取本月截至今天为止的所有签到记录 返回的是一个十进制数字 BITFIELD sign:5:202505 GET U14 0List<Long> results = stringRedisTemplate.opsForValue().bitField(key, BitFieldSubCommands.create().get(BitFieldSubCommands.BitFieldType.unsigned(dayOfMonth)).valueAt(0));if(results == null || results.isEmpty()){//没有任何结果return Result.ok(0);}Long num = results.get(0);if(num == null || num == 0){return Result.ok();}//6. 循环遍历int count=0;while(true){//6.1.让这个数字与1做与运算,得到数字的最后一个bit位if((num & 1)==0){//如果为0 说明未签到 结束break;}else{//不为0,说明已经签到,计数器+1count ++;}//把数字右移一位,抛弃最后一个bit位,继续下一个bit位num = num>>>1;}return Result.ok(count);}五、UV统计

HyperLogLog用法:
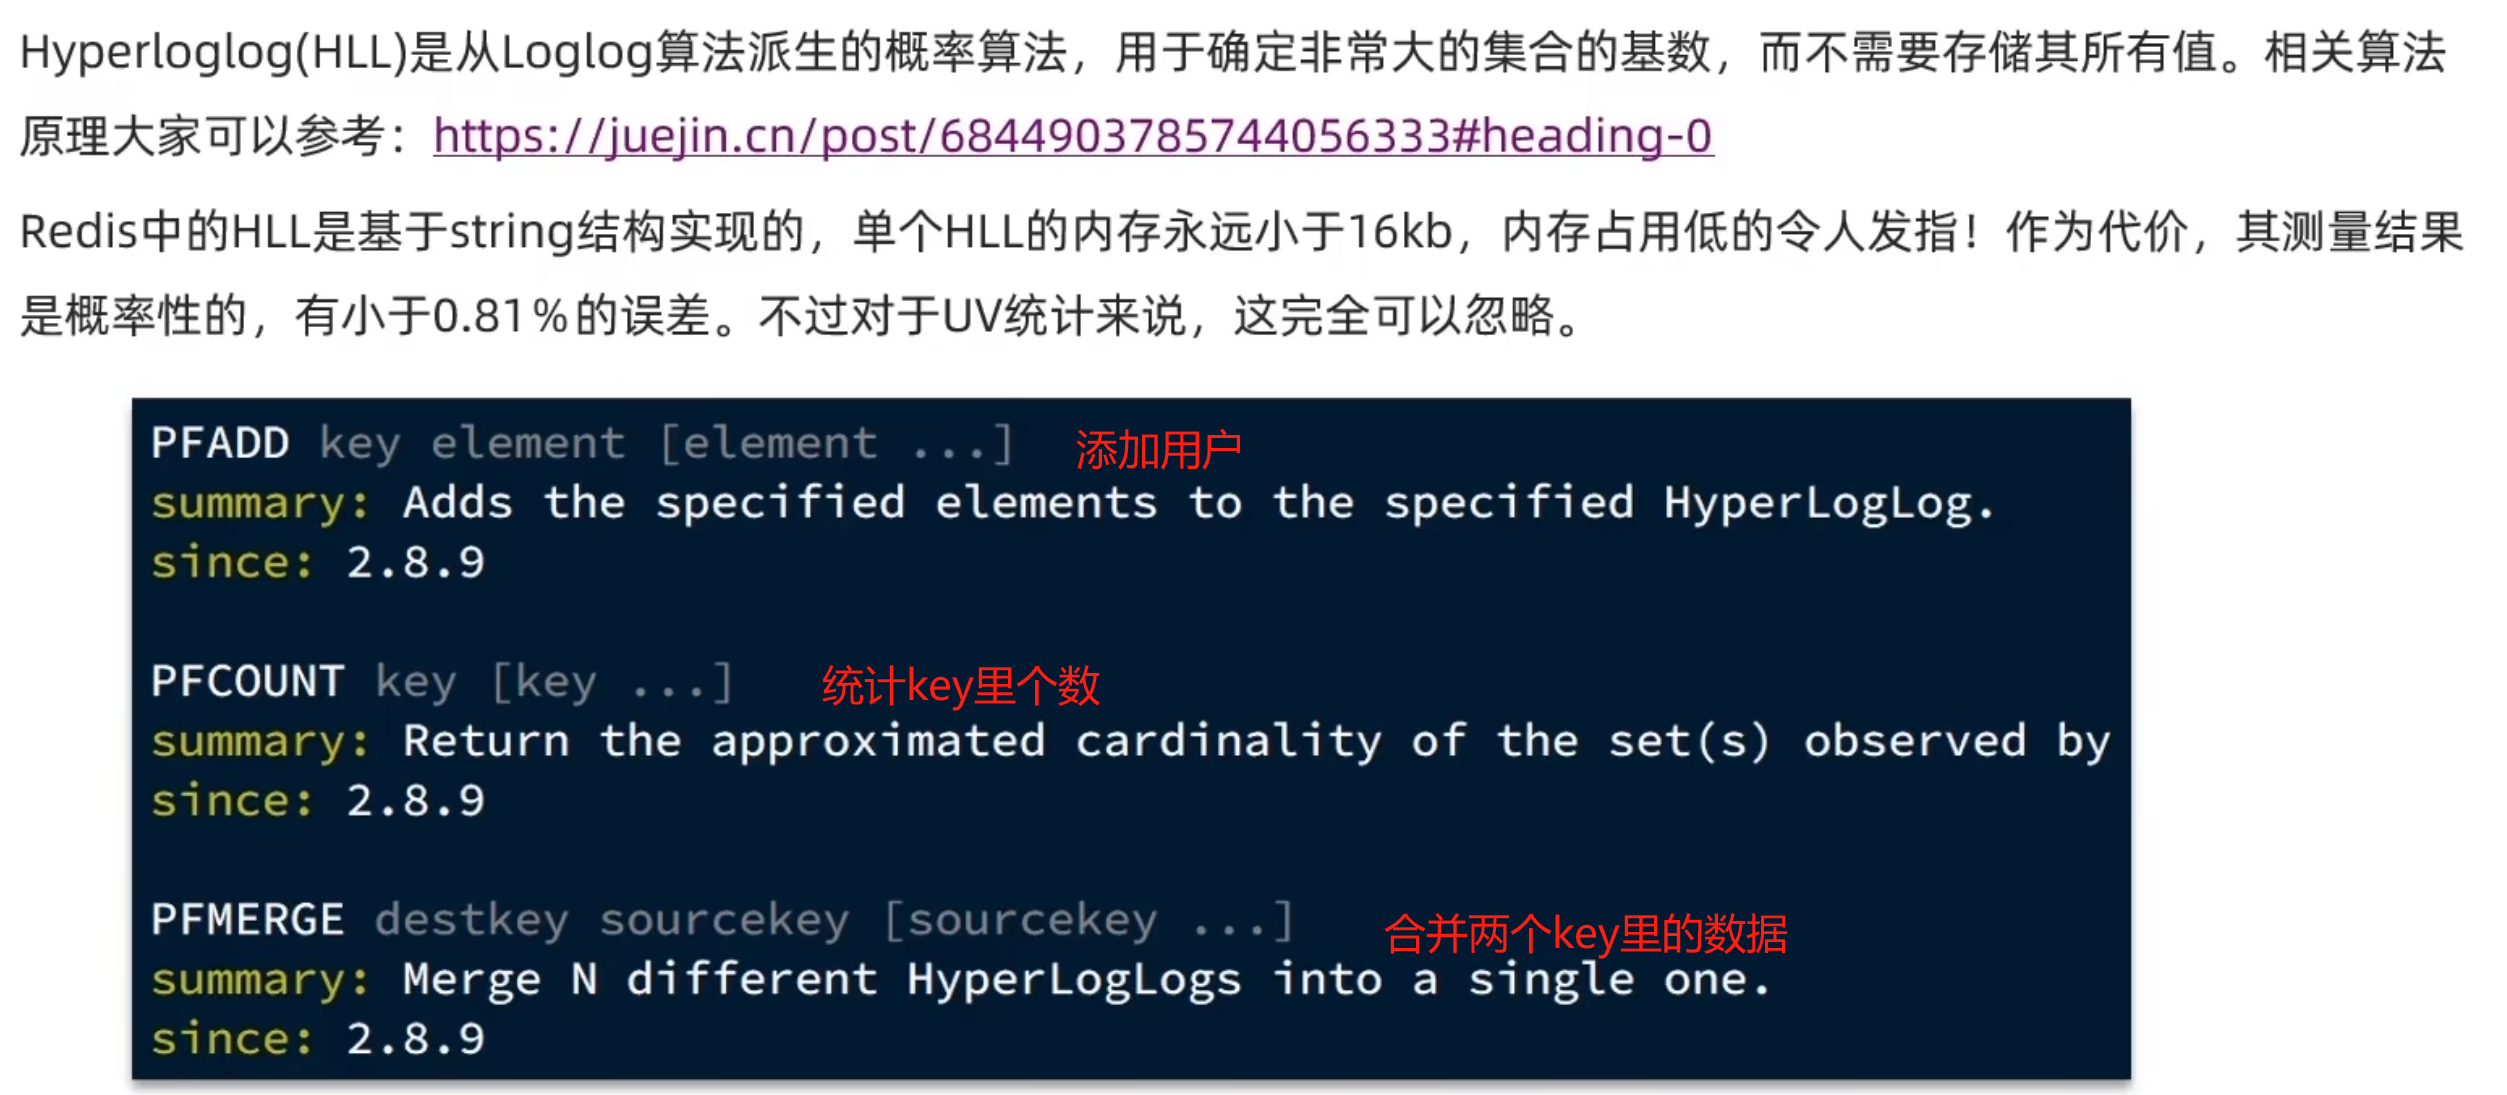 HyperLogLog 算法的原理讲解以及 Redis 是如何应用它的聪明的你可能会马上想到,用 HashMap 这种数 - 掘金