在Micro Service的治理中。
有两个很重要的点,
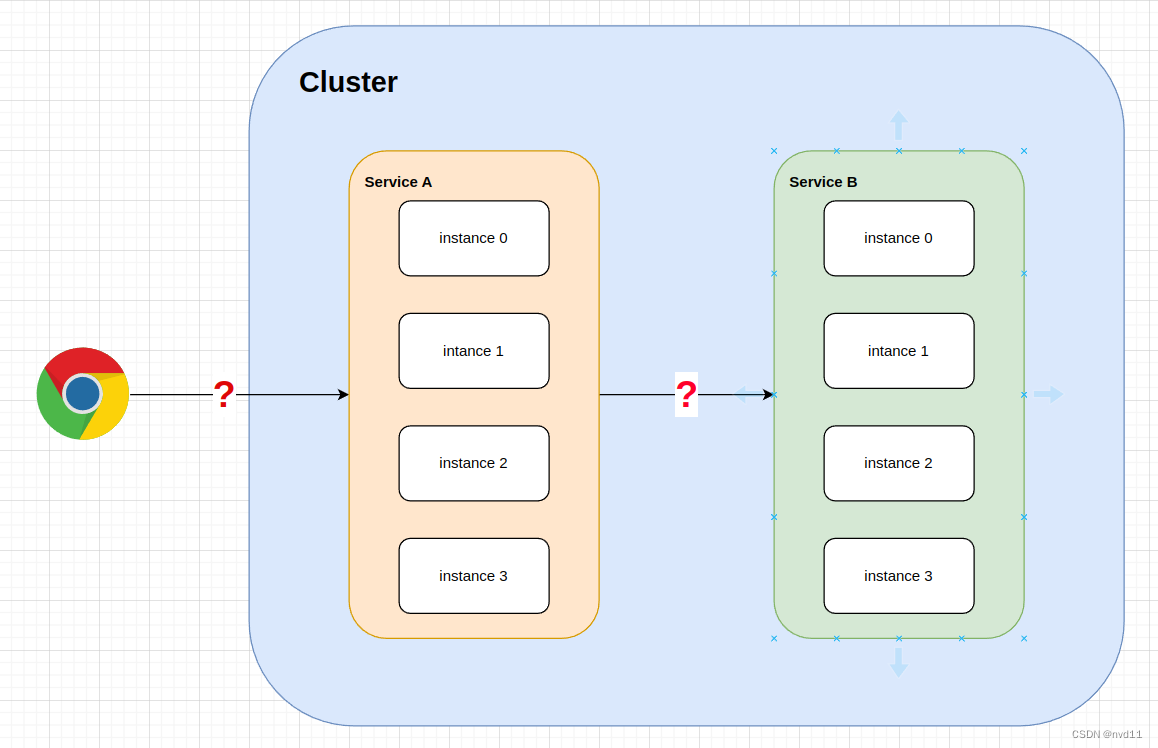
- 集群外部的用户/service 如何访问集群内的 入口服务(例如UI service)
- 集群内的service A 如何 访问 集群内的service B
为什么有上面的问题
无非是:
- 集群内的service 都是多实例的
- 每个service 实例都有单独不同的ip
- 如何负载均衡?
如图:
Spring Cloud 是如何就解决这两个问题的
集群外 to 集群内
-
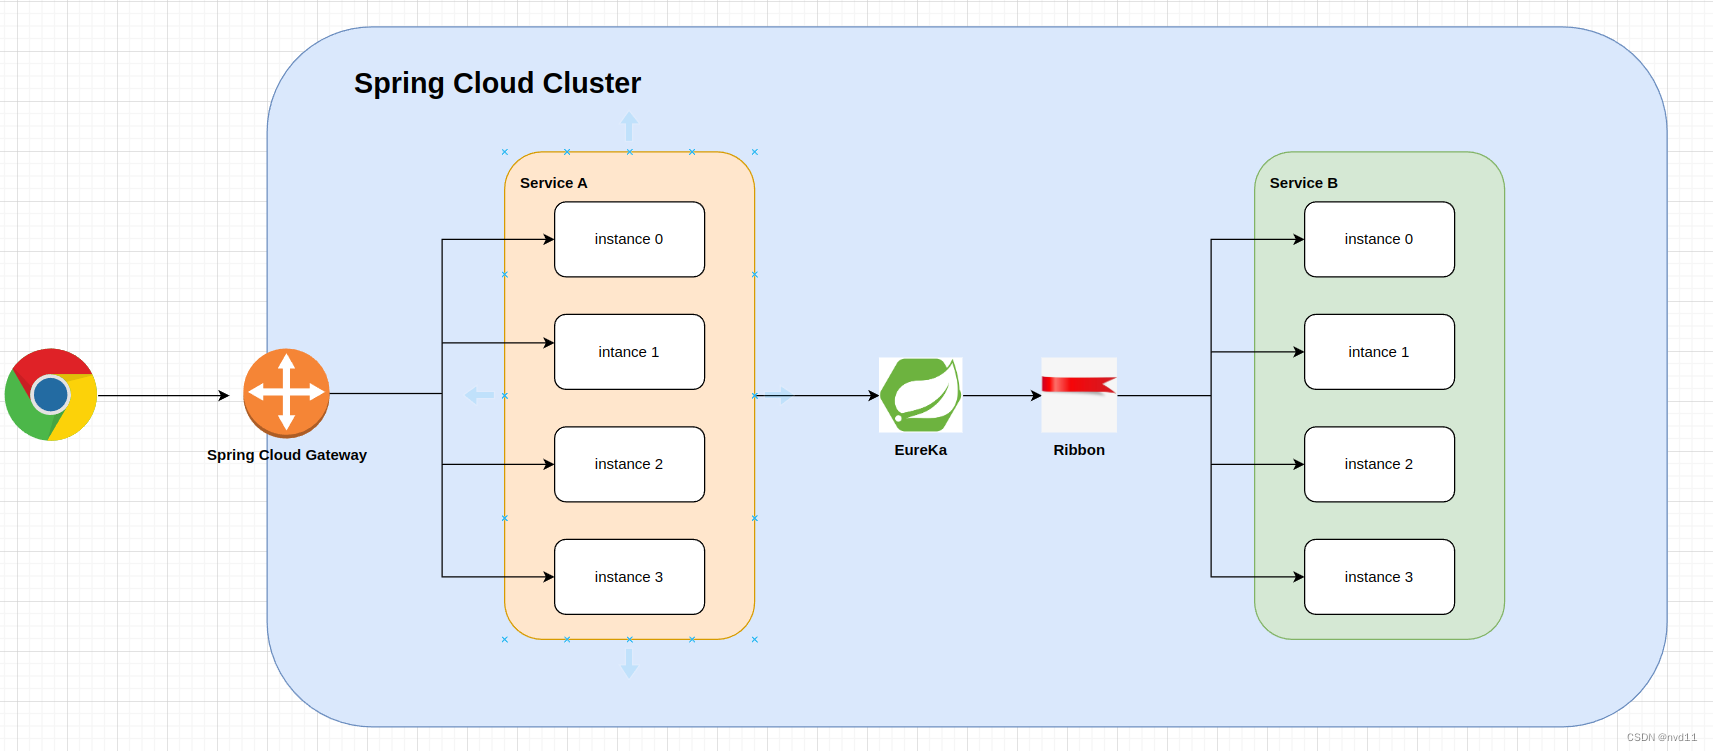
用spring cloud gateway 来反向代理集群内的对外service, 例如图中的Service A, 如果其他Service 没有被配置在gateway中, 集群外部是无法直接访问的, 更加安全。 通常这个api gateway所在的server 具有双网卡, 1个ip在外网, 1个ip在集群内网
-
同是Spring Cloud Gateway 自带Load balancer 功能(基于 Spring cloud loadbalancer) , 所以即使要exposed 的service 有多个实例, Gateway同样可以根据指定规则 分发到不同的instance.
集群内 Service A to Service B
- 使用Eureke 作为注册中心, 每个service 的instance 都要往里面注册, 以给每个service 的多个instance 获得1个common的service Name作为DNS
- 使用Ribbon(继承在Eureka) 中, 作为load balancer 进行request转发
如图:
k8s 是如何就解决这两个问题的
K8S 的service 包括了很多种,
ingress, nodeport, clusterIp, externalName 都是属于service的
集群外 to 集群内
-
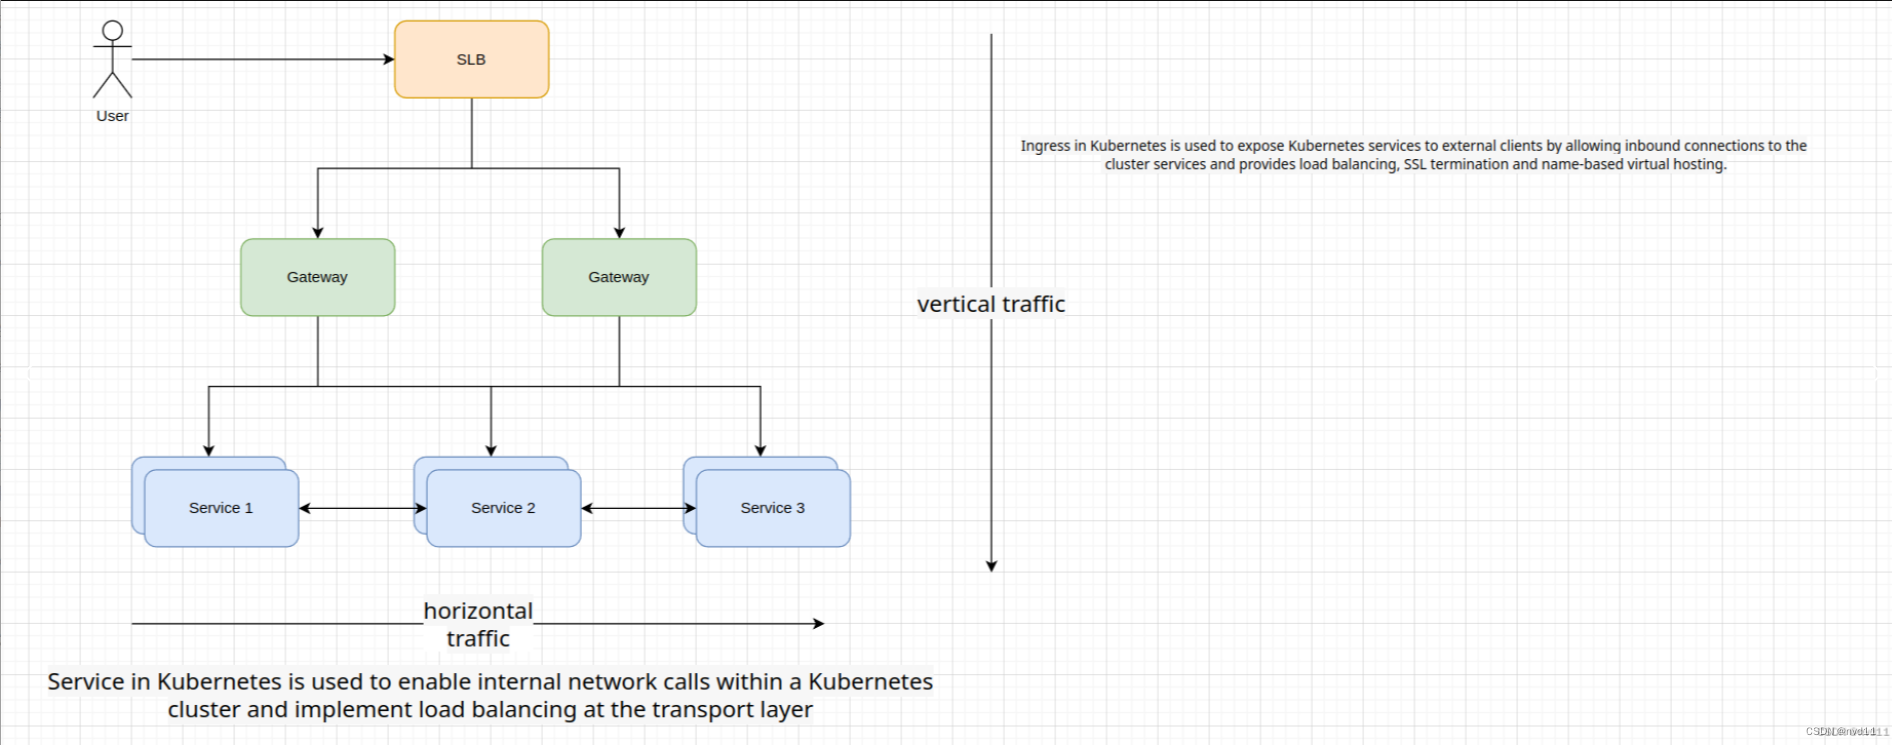
使用ingress or NodePort 来作为纵向流量代理, 而ingress 和 NodePort 都是自带load balancer 的。
置于什么是纵向横向流量
参考
-
使用ClusterIP 作为 Service B之的反向代理, ClusterIP 的service自带loadbalancer 功能, 这样Service A就可以通过ClusterIP service的名字DNS 来访问Service B了
-
虽然k8s 没用Eureka, Nacos等注册中心, 但是实际上k8s 的service list 实际上就是1个注册中心了!
原理如图:

ClusterIP 的定义和简单介绍
- 集群内部通信:ClusterIP 为 Service 提供了一个虚拟的内部 IP 地址,用于在 Kubernetes 集群内的其他组件和服务之间进行通信。其他 Pod 可以通过该虚拟 IP 地址和 Service 的端口来访问该 Service。
- 内部负载均衡:ClusterIP 实现了基于轮询算法的负载均衡,它将请求均匀地分发给 Service 关联的后端 Pod。这意味着无论有多少个后端 Pod,它们都可以被平等地访问,从而实现负载均衡和高可用性。
集群外部不可访问:ClusterIP 分配的 IP 地址只在 Kubernetes 集群内部可见,对集群外部不可访问。它不直接暴露给外部网络,因此不能直接从集群外部访问该 IP 地址。 - 适用于内部服务:ClusterIP 适用于内部服务,即那些只需要在 Kubernetes 集群内部可访问的服务。这些服务通常用于应用程序的内部组件之间的通信,例如数据库连接、队列服务等。
- 可用于其他类型的 Service:ClusterIP 可以作为其他类型的 Service(如 NodePort、LoadBalancer 或 Ingress)的后端服务。通过将其他类型的 Service 配置为使用 ClusterIP 类型的 Service,可以将请求转发到 ClusterIP 提供的虚拟 IP 地址上。
总的来说,ClusterIP 是 Kubernetes 集群内部的一种服务发现和负载均衡机制,用于实现集群内部的内部通信和服务访问。它提供了一个虚拟 IP 地址给 Service,并通过负载均衡算法将请求分发给关联的后端 Pod。ClusterIP 适用于内部服务,不直接对外部公开。
NodePort 和 ClusterIP 的具体例子
解下来我会用 NodePort 和 ClusterIP 来demo 以下 k8s service A 如何 访问 ServiceB
置于从集群外访问为何不用ingress, 是因为k8s 的博文系列还没提到Ingress.
大概框架
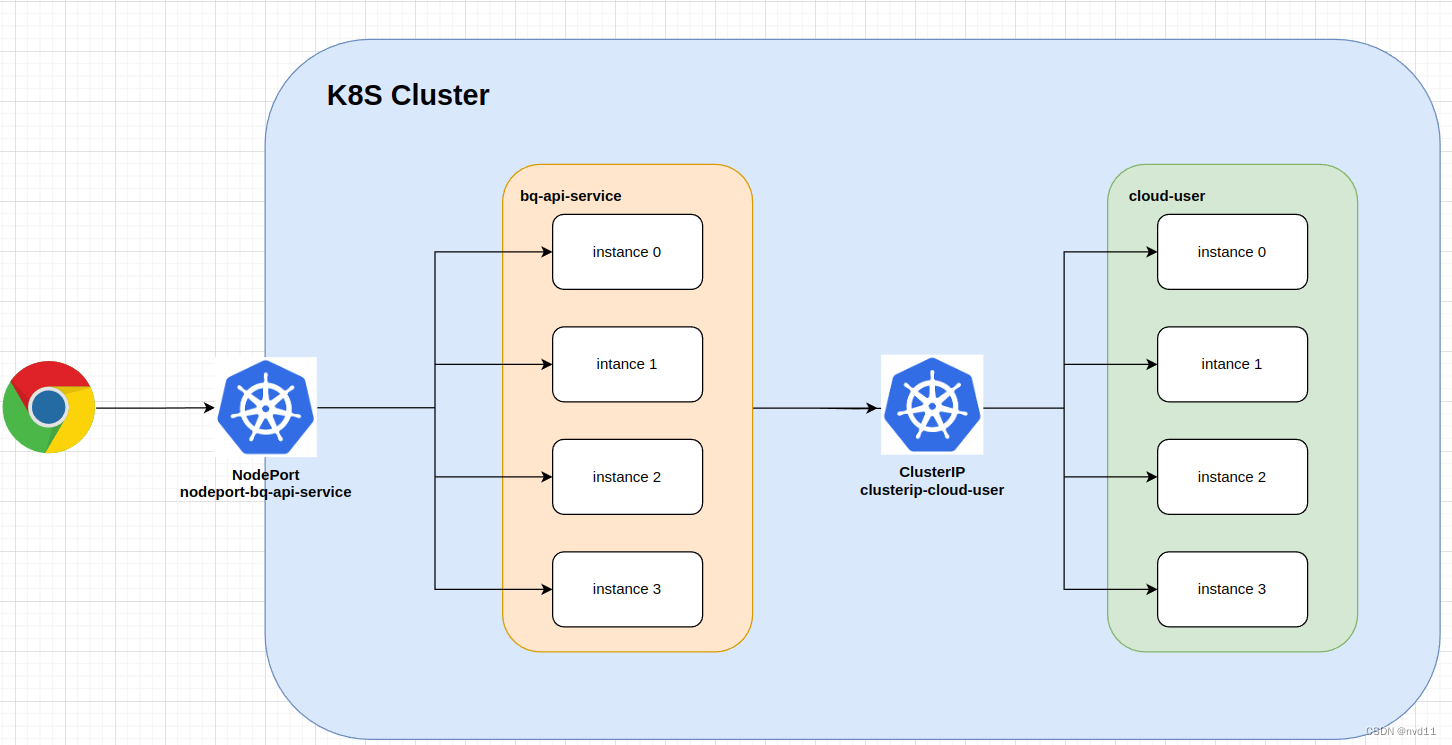
在这个例子中
我们会部署:
Service A: bq-api-service
Service B: cloud-user
nodePort service: nodeport-bq-api-service
clusterIP service: clusterip-cloud-user
置于这里两个service 具体是什么不重要, 可以认为它们是两个简单的springboot service 并没有集成任何spring cloud 的框架。
cleanup
当前k8s 环境是干净的
[gateman@manjaro-x13 bq-api-service]$ kubectl get all -o wide
NAME                 TYPE        CLUSTER-IP   EXTERNAL-IP   PORT(S)   AGE   SELECTOR
service/kubernetes   ClusterIP   10.96.0.1    <none>        443/TCP   77d   <none>
部署 Service B , cloud-user service
更新info 接口让其return hostname
先update /actuator/info 接口 让其可以return 当前service 所在server/container 的hostname
@Component
@Slf4j
public class AppVersionInfo implements InfoContributor {@Value("${pom.version}") // https://stackoverflow.com/questions/3697449/retrieve-version-from-maven-pom-xml-in-codeprivate String appVersion;@Autowiredprivate String hostname;@Value("${spring.datasource.url}")private String dbUrl;@Overridepublic void contribute(Info.Builder builder) {log.info("AppVersionInfo: contribute ...");builder.withDetail("app", "Cloud User API").withDetail("version", appVersion).withDetail("hostname",hostname).withDetail("dbUrl", dbUrl).withDetail("description", "This is a simple Spring Boot application to demonstrate the use of BigQuery in GCP.");}
}
测试效果:
[gateman@manjaro-x13 bq-api-service]$ curl 127.0.0.1:8080/actuator/info
{"app":"Cloud User API","version":"0.0.1","hostname":"manjaro-x13","dbUrl":"jdbc:mysql://34.39.2.90:6033/demo_cloud_user?useUnicode=true&characterEncoding=utf-8&useSSL=false&allowPublicKeyRetrieval=true","description":"This is a simple Spring Boot application to demonstrate the use of BigQuery in GCP."}
[gateman@manjaro-x13 bq-api-service]$
利用cloudbuild 和 其trigger 让其自动部署docker image 到GAR (google artifact repository)
cloudbuild-gar.yaml
# just to update the docker image to GAR with the pom.xml versionsteps:- id: run maven installname: maven:3.9.6-sapmachine-17 # https://hub.docker.com/_/mavenentrypoint: bashargs:- '-c'- |whoamiset -xpwdmvn installcat pom.xml | grep -m 1 "<version>" | sed -e 's/.*<version>\([^<]*\)<\/version>.*/\1/' > /workspace/version.txtecho "Version: $(cat /workspace/version.txt)"- id: build and push docker imagename: 'gcr.io/cloud-builders/docker'entrypoint: bashargs:- '-c'- |set -xecho "Building docker image with tag: $(cat /workspace/version.txt)"docker build -t $_GAR_BASE/$PROJECT_ID/$_DOCKER_REPO_NAME/${_APP_NAME}:$(cat /workspace/version.txt) .docker push $_GAR_BASE/$PROJECT_ID/$_DOCKER_REPO_NAME/${_APP_NAME}:$(cat /workspace/version.txt)logsBucket: gs://jason-hsbc_cloudbuild/logs/
options: # https://cloud.google.com/cloud-build/docs/build-config#optionslogging: GCS_ONLY # or CLOUD_LOGGING_ONLY https://cloud.google.com/cloud-build/docs/build-config#loggingsubstitutions:_DOCKER_REPO_NAME: my-docker-repo_APP_NAME: cloud-user_GAR_BASE: europe-west2-docker.pkg.dev
cloudbuild trigger:
terraform:
# referring https://registry.terraform.io/providers/hashicorp/google/latest/docs/resources/cloudbuild_trigger
resource "google_cloudbuild_trigger" "cloud-user-gar-trigger" {name = "cloud-user-gar-trigger" # could not contains underscorelocation = var.region_id# when use github then should use trigger_templategithub {name = "demo_cloud_user"owner = "nvd11"push {branch = "main"invert_regex = false # means trigger on branch}}filename = "cloudbuild-gar.yaml"# projects/jason-hsbc/serviceAccounts/terraform@jason-hsbc.iam.gserviceaccount.comservice_account = data.google_service_account.cloudbuild_sa.id
}
这样, 一但有任何commit 推送到github main branch
cloudbuild 就会自动打包docker image 到指定的 GAR 仓库
url:
europe-west2-docker.pkg.dev/jason-hsbc/my-docker-repo/cloud-user:xxx
其中xxx 是pom.xml 里定义的version 数字
有了这个image path,就方便了后面在k8s 部署
编写yaml 脚本
deployment-cloud-user.yaml
apiVersion: apps/v1
kind: Deployment
metadata:labels: # label of this deploymentapp: cloud-user # custom definedauthor: nvd11name: deployment-cloud-user # name of this deploymentnamespace: default
spec:replicas: 4            # desired replica count, Please note that the replica Pods in a Deployment are typically distributed across multiple nodes.revisionHistoryLimit: 10 # The number of old ReplicaSets to retain to allow rollbackselector: # label of the Pod that the Deployment is managing,, it's mandatory, without it , we will get this error # error: error validating data: ValidationError(Deployment.spec.selector): missing required field "matchLabels" in io.k8s.apimachinery.pkg.apis.meta.v1.LabelSelector ..matchLabels:app: cloud-userstrategy: # Strategy of upodatetype: RollingUpdate # RollingUpdate or RecreaterollingUpdate:maxSurge: 25% # The maximum number of Pods that can be created over the desired number of Pods during the updatemaxUnavailable: 25% # The maximum number of Pods that can be unavailable during the updatetemplate: # Pod templatemetadata:labels:app: cloud-user # label of the Pod that the Deployment is managing. must match the selector, otherwise, will get the error Invalid value: map[string]string{"app":"bq-api-xxx"}: `selector` does not match template `labels`spec:containers:- image: europe-west2-docker.pkg.dev/jason-hsbc/my-docker-repo/cloud-user:1.0.1 # image of the containerimagePullPolicy: IfNotPresentname: container-cloud-userenv: # set env varaibles- name: APP_ENVIRONMENTvalue: prodrestartPolicy: Always # Restart policy for all containers within the PodterminationGracePeriodSeconds: 10 # The period of time in seconds given to the Pod to terminate gracefully
部署yaml
[gateman@manjaro-x13 cloud-user]$ kubectl apply -f deployment-cloud-user.yaml
deployment.apps/deployment-cloud-user created
[gateman@manjaro-x13 cloud-user]$ kubectl get pods -o wide
NAME                                     READY   STATUS    RESTARTS   AGE    IP             NODE        NOMINATED NODE   READINESS GATES
deployment-cloud-user-65fb8d79fd-28vmn   1/1     Running   0          104s   10.244.2.133   k8s-node0   <none>           <none>
deployment-cloud-user-65fb8d79fd-9rjln   1/1     Running   0          104s   10.244.2.134   k8s-node0   <none>           <none>
deployment-cloud-user-65fb8d79fd-m8xv4   1/1     Running   0          104s   10.244.1.67    k8s-node1   <none>           <none>
deployment-cloud-user-65fb8d79fd-ndvjb   1/1     Running   0          104s   10.244.3.76    k8s-node3   <none>           <none>
可以见到 4个pods 跑起来了
初步测试
cloud-user 是部署好了, 但是它没有配置nodeport 和 clusterIP 等任何service, 所以它是无法被nodes 的service 访问的。
上面的pods信息里显示了 ip address, 但那些ip address 是容器level, 只能被另1个容器访问。
这样的话, 我们可以进入1个新建的容器内测试:
新建dns-test 测试pod
[gateman@manjaro-x13 cloud-user]$ kubectl run dns-test --image=odise/busybox-curl --restart=Never -- /bin/sh -c "while true; do echo hello docker; sleep 1; done"
pod/dns-test created
这样dns-test pod 就创建成功了, 之所以要加上一段 while死循环是避免这个pod 自动complete退出
进入测试容器
[gateman@manjaro-x13 cloud-user]$ kubectl get pods -o wide
NAME                                     READY   STATUS    RESTARTS   AGE   IP             NODE        NOMINATED NODE   READINESS GATES
deployment-cloud-user-65fb8d79fd-28vmn   1/1     Running   0          15m   10.244.2.133   k8s-node0   <none>           <none>
deployment-cloud-user-65fb8d79fd-9rjln   1/1     Running   0          15m   10.244.2.134   k8s-node0   <none>           <none>
deployment-cloud-user-65fb8d79fd-m8xv4   1/1     Running   0          15m   10.244.1.67    k8s-node1   <none>           <none>
deployment-cloud-user-65fb8d79fd-ndvjb   1/1     Running   0          15m   10.244.3.76    k8s-node3   <none>           <none>
dns-test 1/1 Running 0 6s 10.244.2.135 k8s-node0 <none> <none>[gateman@manjaro-x13 cloud-user]$ kubectl exec -it dns-test -- /bin/sh
/ #
十分简单
在容器内调用各个pod的api
/ # curl 10.244.2.133:8080/actuator/info
{"app":"Cloud User API","version":"1.0.1","hostname":"deployment-cloud-user-65fb8d79fd-28vmn","dbUrl":"jdbc:mysql://192.168.0.42:3306/demo_cloud_user?useUnicode=true&characterEncoding=utf-8&useSSL=false&allowPublicKeyRetrieval=true","description":"This is a simple Spring Boot application to demonstrate the use of BigQuery in GCP."}/ #
/ #
/ # curl 10.244.2.134:8080/actuator/info
{"app":"Cloud User API","version":"1.0.1","hostname":"deployment-cloud-user-65fb8d79fd-9rjln","dbUrl":"jdbc:mysql://192.168.0.42:3306/demo_cloud_user?useUnicode=true&characterEncoding=utf-8&useSSL=false&allowPublicKeyRetrieval=true","description":"This is a simple Spring Boot application to demonstrate the use of BigQuery in GCP."}/ #
/ #
/ #
/ # curl 10.244.1.67:8080/actuator/info
{"app":"Cloud User API","version":"1.0.1","hostname":"deployment-cloud-user-65fb8d79fd-m8xv4","dbUrl":"jdbc:mysql://192.168.0.42:3306/demo_cloud_user?useUnicode=true&characterEncoding=utf-8&useSSL=false&allowPublicKeyRetrieval=true","description":"This is a simple Spring Boot application to demonstrate the use of BigQuery in GCP."}/ #
/ #
/ # curl 10.244.3.76:8080/actuator/info
{"app":"Cloud User API","version":"1.0.1","hostname":"deployment-cloud-user-65fb8d79fd-ndvjb","dbUrl":"jdbc:mysql://192.168.0.42:3306/demo_cloud_user?useUnicode=true&characterEncoding=utf-8&useSSL=false&allowPublicKeyRetrieval=true","description":"This is a simple Spring Boot application to demonstrate the use of BigQuery in GCP."}/ #
/ #
/ #
可以见到4个pod的 service 都可以被dns-test 容器内call 通, 能分别return 它们的hostname, 但是调用时要指定ip , 无法做到统一入口 和 load balance
部署 ClusterIP - clusterip-cloud-user
编写yaml
clusterip-cloud-user.yaml
apiVersion: v1
kind: Service
metadata:name: clusterip-cloud-user
spec:selector:app: cloud-user # for the pods that have the label app: cloud-userports:- protocol: TCPport: 8080targetPort: 8080type: ClusterIP
由于加上了selector , 所以endpoint 也会自动创建
部署yaml
[gateman@manjaro-x13 cloud-user]$ kubectl create -f clusterip-cloud-user.yaml
service/clusterip-cloud-user created
检查一下:
[gateman@manjaro-x13 cloud-user]$ kubectl get svc -o wide
NAME                   TYPE        CLUSTER-IP    EXTERNAL-IP   PORT(S)    AGE   SELECTOR
clusterip-cloud-user   ClusterIP   10.96.11.18   <none>        8080/TCP   29s   app=cloud-user
kubernetes             ClusterIP   10.96.0.1     <none>        443/TCP    77d   <none>
[gateman@manjaro-x13 cloud-user]$ kubectl get ep -o wide
NAME                   ENDPOINTS                                                          AGE
clusterip-cloud-user   10.244.1.67:8080,10.244.2.133:8080,10.244.2.134:8080 + 1 more...   2m36s
kubernetes             192.168.0.3:6443                                                   77d
可以见到1个cluster ip service 已被创建
名字是 clusterip-cloud-user, 类型是ClusterIP, Cluster-IP 就是所谓的虚拟ip
在endpoints 里面, 可以见到这个clusterip service 代理的是 4个 ip和端口的组合, 它们实际上就是 cloud-user 的4个pods
初步测试
ClusterIP 和 NodePort 不一样, 是无法从容器外部直接访问的,
所以我们还是需要进入测试容器类测试
kubectl exec -it dns-test -- /bin/sh
之后我们可以用 $serviceName:$\port 去访问endpoints里的service了
/ # nslookup clusterip-cloud-user
Server:    10.96.0.10
Address 1: 10.96.0.10 kube-dns.kube-system.svc.cluster.localName:      clusterip-cloud-user
Address 1: 10.96.11.18 clusterip-cloud-user.default.svc.cluster.local`
/ # ping clusterip-cloud-userPING clusterip-cloud-user (10.96.11.18): 56 data bytes
^C
--- clusterip-cloud-user ping statistics ---
10 packets transmitted, 0 packets received, 100% packet loss
/ # curl clusterip-cloud-user:8080/actuator/info
{"app":"Cloud User API","version":"1.0.1","hostname":"deployment-cloud-user-65fb8d79fd-m8xv4","dbUrl":"jdbc:mysql://192.168.0.42:3306/demo_cloud_user?useUnicode=true&characterEncoding=utf-8&useSSL=false&allowPub/ # curl clusterip-cloud-user:8080/actuator/info
{"app":"Cloud User API","version":"1.0.1","hostname":"deployment-cloud-user-65fb8d79fd-28vmn","dbUrl":"jdbc:mysql://192.168.0.42:3306/demo_cloud_user?useUnicode=true&characterEncoding=utf-8&useSSL=false&allowPub/ # curl clusterip-cloud-user:8080/actuator/info
{"app":"Cloud User API","version":"1.0.1","hostname":"deployment-cloud-user-65fb8d79fd-9rjln","dbUrl":"jdbc:mysql://192.168.0.42:3306/demo_cloud_user?useUnicode=true&characterEncoding=utf-8&useSSL=false&allowPub/ # curl clusterip-cloud-user:8080/actuator/info
{"app":"Cloud User API","version":"1.0.1","hostname":"deployment-cloud-user-65fb8d79fd-9rjln","dbUrl":"jdbc:mysql://192.168.0.42:3306/demo_cloud_user?useUnicode=true&characterEncoding=utf-8&useSSL=false&allowPublicKeyRetrieval=true","description":"This is a simple Spring Boot application to demonstrate the use of BigQuery in GCP."}
虽然ping 是无法ping 通的, 可能没开通ICMP 协议
但是我们的确可以通过 clusterip的service 去访问 cloud-user 的4个instance , 而且是随机分配的, 时间了load balance的功能!
部署 Service A - bq-api-service
修改配置
部署之前, 我们在 bq-api-service 先增加1个接口 /ext-service/user-service/info
在这个接口内, 会调用 cloud-user 的 /actuator/info 接口
方便测试
Controller
@Autowiredprivate UserService userService;@GetMapping("/user-service/info")public ResponseEntity<ApiResponse<ServiceInfoDao>> userServiceInfo() {ServiceInfoDao userServiceInfo = null;try {userServiceInfo = this.userService.getServiceInfo();ApiResponse<ServiceInfoDao> response = new ApiResponse<>();response.setData(userServiceInfo);response.setReturnCode(0);response.setReturnMsg("user service is running in the host: " + userServiceInfo.getHostname());return ResponseEntity.ok(response);} catch (Exception e) {log.error("Error in getUserById...", e);ApiResponse<ServiceInfoDao> response = new ApiResponse<>();response.setReturnCode(-1);response.setReturnMsg("Error in getting user service info: " + e.getMessage());return ResponseEntity.status(500).body(response);}}
Service
@Overridepublic ServiceInfoDao getServiceInfo() {log.info("getServiceInfo()...");return userClient.getServiceInfo();}
feignclient:
@FeignClient(name = "demo-cloud-user", url="${hostIp.cloud-user}")
public interface UserClient {@GetMapping("/actuator/info")ServiceInfoDao getServiceInfo();
}
在feign client里见到 ip address 是配置在配置文件中的。
正好, 我们增加1个新的application-k8s 配置文件
application-k8s.yaml
## 其他配置hostIp:cloud-user: clusterip-cloud-user:8080
关键我们不需要再指定 cloud-user 部署在哪里的ip了, 也不用关心它有多少instance, 跟spring cloud 用法很类似, 只需要提供1个名字
在spring cloud 中我们需要提供cloud-user 在eureka注册的名字
在k8s 我们需要提供用于反向代理的 clusterIP service 的名字
部署docker image 上GAR
同样的方法
url: europe-west2-docker.pkg.dev/jason-hsbc/my-docker-repo/bq-api-service:xxx
编写yaml
deployment-bq-api-service.yaml
apiVersion: apps/v1
kind: Deployment
metadata:labels: # label of this deploymentapp: bq-api-service # custom definedauthor: Jasonname: deployment-bq-api-service # name of this deploymentnamespace: default
spec:replicas: 4            # desired replica count, Please note that the replica Pods in a Deployment are typically distributed across multiple nodes.revisionHistoryLimit: 10 # The number of old ReplicaSets to retain to allow rollbackselector: # label of the Pod that the Deployment is managing,, it's mandatory, without it , we will get this error # error: error validating data: ValidationError(Deployment.spec.selector): missing required field "matchLabels" in io.k8s.apimachinery.pkg.apis.meta.v1.LabelSelector ..matchLabels:app: bq-api-servicestrategy: # Strategy of upodatetype: RollingUpdate # RollingUpdate or RecreaterollingUpdate:maxSurge: 25% # The maximum number of Pods that can be created over the desired number of Pods during the updatemaxUnavailable: 25% # The maximum number of Pods that can be unavailable during the updatetemplate: # Pod templatemetadata:labels:app: bq-api-service # label of the Pod that the Deployment is managing. must match the selector, otherwise, will get the error Invalid value: map[string]string{"app":"bq-api-xxx"}: `selector` does not match template `labels`spec:containers:- image: europe-west2-docker.pkg.dev/jason-hsbc/my-docker-repo/bq-api-service:1.2.1 # image of the containerimagePullPolicy: IfNotPresentname: container-bq-api-serviceenv: # set env varaibles- name: APP_ENVIRONMENTvalue: k8srestartPolicy: Always # Restart policy for all containers within the PodterminationGracePeriodSeconds: 10 # The period of time in seconds given to the Pod to terminate gracefully
同样4个实例, 注意的是环境变量要正确地 配置成 k8s`
env: # set env varaibles- name: APP_ENVIRONMENTvalue: k8s
部署yaml
deployment.apps/deployment-bq-api-service created
[gateman@manjaro-x13 bq-api-service]$ kubectl get po -o wide
NAME                                        READY   STATUS    RESTARTS   AGE    IP             NODE        NOMINATED NODE   READINESS GATES
deployment-bq-api-service-778cf8f54-677vl   1/1     Running   0          34s    10.244.2.136   k8s-node0   <none>           <none>
deployment-bq-api-service-778cf8f54-nfzhg   1/1     Running   0          34s    10.244.3.77    k8s-node3   <none>           <none>
deployment-bq-api-service-778cf8f54-q9lfx   1/1     Running   0          34s    10.244.1.68    k8s-node1   <none>           <none>
deployment-bq-api-service-778cf8f54-z72dr   1/1     Running   0          34s    10.244.3.78    k8s-node3   <none>           <none>
deployment-cloud-user-65fb8d79fd-28vmn      1/1     Running   0          121m   10.244.2.133   k8s-node0   <none>           <none>
deployment-cloud-user-65fb8d79fd-9rjln      1/1     Running   0          121m   10.244.2.134   k8s-node0   <none>           <none>
deployment-cloud-user-65fb8d79fd-m8xv4      1/1     Running   0          121m   10.244.1.67    k8s-node1   <none>           <none>
deployment-cloud-user-65fb8d79fd-ndvjb      1/1     Running   0          121m   10.244.3.76    k8s-node3   <none>           <none>
dns-test                                    1/1     Running   0          105m   10.244.2.135   k8s-node0   <none>           <none>
可以见到 4个 bq-api-service 的pods 也起来了
初步测试
因为没有nodeport , 我们还是需要进入测试容器
kubectl exec -it dns-test -- /bin/sh
还是单独地测试1个instance, 先记住2个ip 10.244.2.136, 10.244.3.77
先测试该service 的info
/ # curl 10.244.2.136:8080/actuator/info
{"app":"Sales API","version":"1.2.1","hostname":"deployment-bq-api-service-778cf8f54-677vl","description":"This is a simple Spring Boot application to demonstrate the use of BigQuery in GCP."}
可以见到是已经启动了
然后在测试它的 /ext-service/user-service/info 接口
/ # curl 10.244.3.77:8080/ext-service/user-service/info
{"returnCode":0,"returnMsg":"user service is running in the host: deployment-cloud-user-65fb8d79fd-m8xv4","data":{"app":"Cloud User API","version":"1.0.1","description":"This is a simple Spring Boot application to demonstrate the use of BigQuery in GCP.","hostname":"deployment-cloud-user-65fb8d79fd-m8xv4","dbUrl":"jdbc:mysql://192.168.0.42:3306/demo_cloud_user?useUnicode=true&characterEncoding=utf-8&useSSL=false&allowP/ # curl 10.244.3.77:8080/ext-service/user-service/info
{"returnCode":0,"returnMsg":"user service is running in the host: deployment-cloud-user-65fb8d79fd-m8xv4","data":{"app":"Cloud User API","version":"1.0.1","description":"This is a simple Spring Boot application to demonstrate the use of BigQuery in GCP.","hostname":"deployment-cloud-user-65fb8d79fd-m8xv4","dbUrl":"jdbc:mysql://192.168.0.42:3306/demo_cloud_user?useUnicode=true&characterEncoding=utf-8&useSSL=false&allowP/ # curl 10.244.3.77:8080/ext-service/user-service/info
{"returnCode":0,"returnMsg":"user service is running in the host: deployment-cloud-user-65fb8d79fd-m8xv4","data":{"app":"Cloud User API","version":"1.0.1","description":"This is a simple Spring Boot application to demonstrate the use of BigQuery in GCP.","hostname":"deployment-cloud-user-65fb8d79fd-m8xv4","dbUrl":"jdbc:mysql://192.168.0.42:3306/demo_cloud_user?useUnicode=true&characterEncoding=utf-8&useSSL=false&allowP/ # curl 10.244.3.77:8080/ext-service/user-service/info
{"returnCode":0,"returnMsg":"user service is running in the host: deployment-cloud-user-65fb8d79fd-m8xv4","data":{"app":"Cloud User API","version":"1.0.1","description":"This is a simple Spring Boot application to demonstrate the use of BigQuery in GCP.","hostname":"deployment-cloud-user-65fb8d79fd-m8xv4","dbUrl":"jdbc:mysql://192.168.0.42:3306/demo_cloud_user?useUnicode=true&characterEncoding=utf-8&useSSL=false&allowP/ # curl 10.244.2.136:8080/ext-service/user-service/info
{"returnCode":0,"returnMsg":"user service is running in the host: deployment-cloud-user-65fb8d79fd-28vmn","data":{"app":"Cloud User API","version":"1.0.1","description":"This is a simple Spring Boot application to demonstrate the use of BigQuery in GCP.","hostname":"deployment-cloud-user-65fb8d79fd-28vmn","dbUrl":"jdbc:mysql://192.168.0.42:3306/demo_cloud_user?useUnicode=true&characterEncoding=utf-8&useSSL=false&allowP/ # curl 10.244.2.136:8080/ext-service/user-service/info
{"returnCode":0,"returnMsg":"user service is running in the host: deployment-cloud-user-65fb8d79fd-28vmn","data":{"app":"Cloud User API","version":"1.0.1","description":"This is a simple Spring Boot application to demonstrate the use of BigQuery in GCP.","hostname":"deployment-cloud-user-65fb8d79fd-28vmn","dbUrl":"jdbc:mysql://192.168.0.42:3306/demo_cloud_user?useUnicode=true&characterEncoding=utf-8&useSSL=false&allowP/ # curl 10.244.2.136:8080/ext-service/user-service/info
{"returnCode":0,"returnMsg":"user service is running in the host: deployment-cloud-user-65fb8d79fd-28vmn","data":{"app":"Cloud User API","version":"1.0.1","description":"This is a simple Spring Boot application to demonstrate the use of BigQuery in GCP.","hostname":"deployment-cloud-user-65fb8d79fd-28vmn","dbUrl":"jdbc:mysql://192.168.0.42:3306/demo_cloud_user?useUnicode=true&characterEncoding=utf-8&useSSL=false&allowP/ # curl 10.244.2.136:8080/ext-service/user-service/info
{"returnCode":0,"returnMsg":"user service is running in the host: deployment-cloud-user-65fb8d79fd-28vmn","data":{"app":"Cloud User API","version":"1.0.1","description":"This is a simple Spring Boot application to demonstrate the use of BigQuery in GCP.","hostname":"deployment-cloud-user-65fb8d79fd-28vmn","dbUrl":"jdbc:mysql://192.168.0.42:3306/demo_cloud_user?useUnicode=true&characterEncoding=utf-8&useSSL=false&allowPublicKeyRetrieval=true"}}/ #
可见bq-api-service 已经成功 通过 cluster ip 去访问 后面的cloud-user service 了, 根据返回的host name
可以看出
clusterip 的loadbalancer 不会无脑随机转发
从 10.244.3.77 访问的bq-api-service 会访问 deployment-cloud-user-65fb8d79fd-m8xv4 里的cloud-user
从 10.244.2.136 访问的就会访问 deployment-cloud-user-65fb8d79fd-28vmn
为什么? 因为clusterip 会智能地优先访问 同1个node的后台服务!
到这了这一步, 我们已经成功demo了 ClusterIP 的主要功能了
service A 已经能通过 cluster ip 访问service B 只是差了NodePort 无法从集群外测试
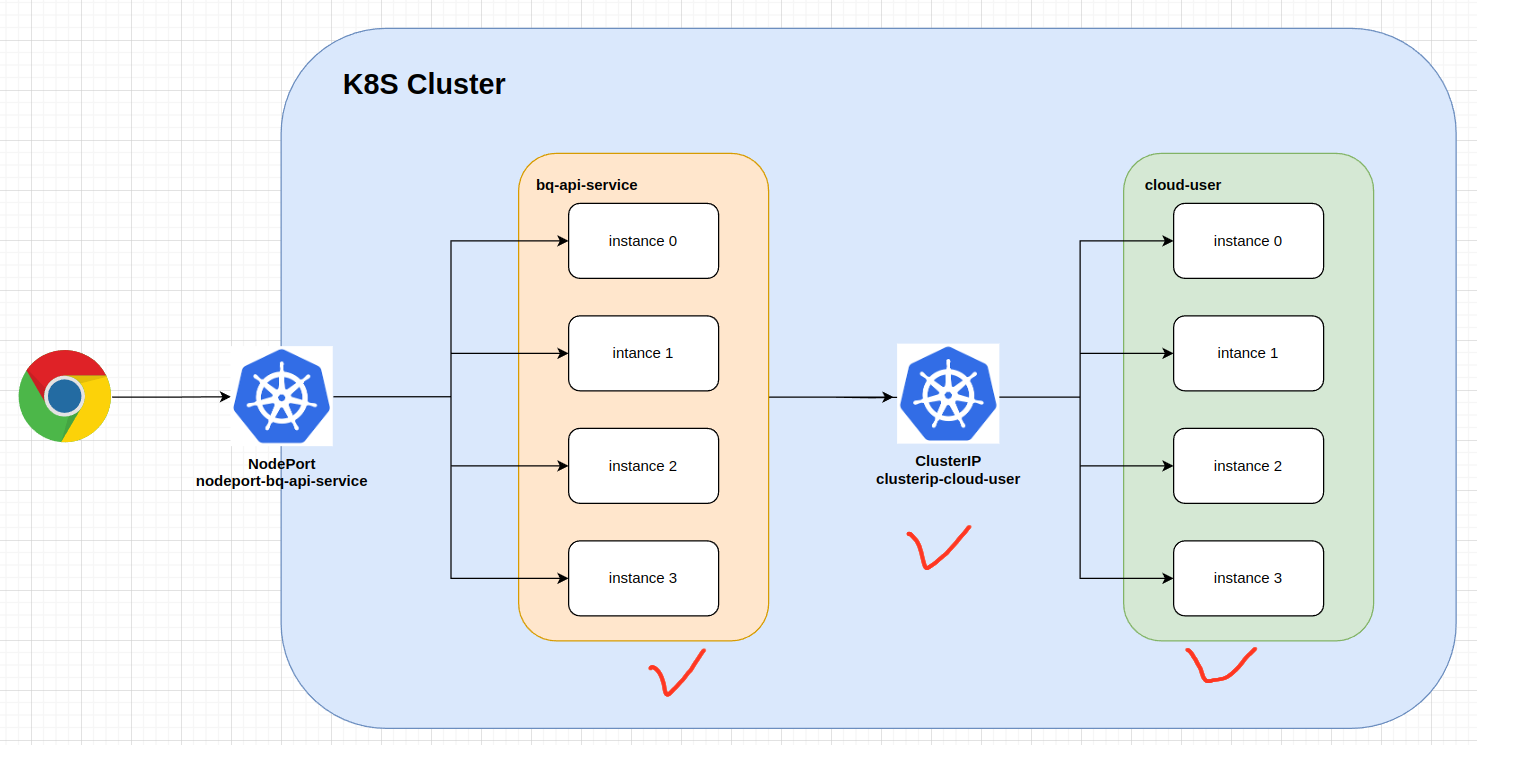
部署 NodePort nodeport-bq-api-service
注意这个nodeport 是for service A(bq-api-service)的而不是 service B, 如上图
编写yaml
nodeport-bq-api-service.yaml
apiVersion: v1 #  api version can be v1 or apps/v1
kind: Service
metadata:name: nodeport-bq-api-service # name of the servicelabels:app: bq-api-service # label of the service itself
spec:selector: # Label of the Pod that the Service is selecting ,  all the pods not matter the pods are belong to which deployment, as long as the pods have the label app: bq-api-serviceapp: bq-api-service # if the pod do not have the label app: bq-api-service, the pod could not be selected by the serviceports:- port: 8080 # port of the service itself. we could also use serviceip:port to access the pod service, # but we use the nodeip:nodePort to access the service it. this nodePort is generated by k8s ramdomlytargetPort: 8080 # port of the Podname: 8080-port # name of the porttype: NodePort # type of the service, NodePort, ClusterIP, LoadBalancer# Ramdomly start a port (30000-32767) on each node, and forward the request to the service port (32111) on the pod# and it could also be use to expose the service to the external world, but it's not recommended for production, because it's not secure and low efficient
部署yaml
[gateman@manjaro-x13 bq-api-service]$ kubectl create -f nodeport-bq-api-service.yaml
service/nodeport-bq-api-service created
[gateman@manjaro-x13 bq-api-service]$ kubectl get svc -o wide
NAME                      TYPE        CLUSTER-IP      EXTERNAL-IP   PORT(S)          AGE   SELECTOR
clusterip-cloud-user      ClusterIP   10.96.11.18     <none>        8080/TCP         86m   app=cloud-user
kubernetes                ClusterIP   10.96.0.1       <none>        443/TCP          77d   <none>
nodeport-bq-api-service   NodePort    10.106.59.100   <none>        8080:32722/TCP   13s   app=bq-api-service
[gateman@manjaro-x13 bq-api-service]$ kubectl get ep -o wide
NAME                      ENDPOINTS                                                          AGE
clusterip-cloud-user      10.244.1.67:8080,10.244.2.133:8080,10.244.2.134:8080 + 1 more...   86m
kubernetes                192.168.0.3:6443                                                   77d
nodeport-bq-api-service   10.244.1.68:8080,10.244.2.136:8080,10.244.3.77:8080 + 1 more...    19s
从nodeport service 的信息得出, 1个随机端口 32722 生成用于外部访问
E2E 测试
既然所有components 都部署了, 现在我们可以直接从集群外部测试
34.142.xxxxxx 是k8s-master 的公网ip
[gateman@manjaro-x13 bq-api-service]$ curl 34.142.xxxxxx:32722/actuator/info
{"app":"Sales API","version":"1.2.1","hostname":"deployment-bq-api-service-778cf8f54-z72dr","description":"This is a simple Spring Boot application to demonstrate the use of BigQuery in GCP."}[gateman@manjaro-x13 bq-api-service]$ curl 34.142.35.168:32722/ext-service/user-service/info
{"returnCode":0,"returnMsg":"user service is running in the host: deployment-cloud-user-65fb8d79fd-9rjln","data":{"app":"Cloud User API","version":"1.0.1","description":"This is a simple Spring Boot application to demonstrate the use of BigQuery in GCP.","hostname":"deployment-cloud-user-65fb8d79fd-9rjln","dbUrl":"jdbc:mysql://192.168.0.42:3306/demo_cloud_user?useUnicode=true&characterEncoding=utf-8&useSSL=false&allowPublicKeyRetrieval=true"}}[gateman@manjaro-x13 bq-api-service]$ 