【05】从0到1构建AI生成思维导图应用 – 前端交互实现
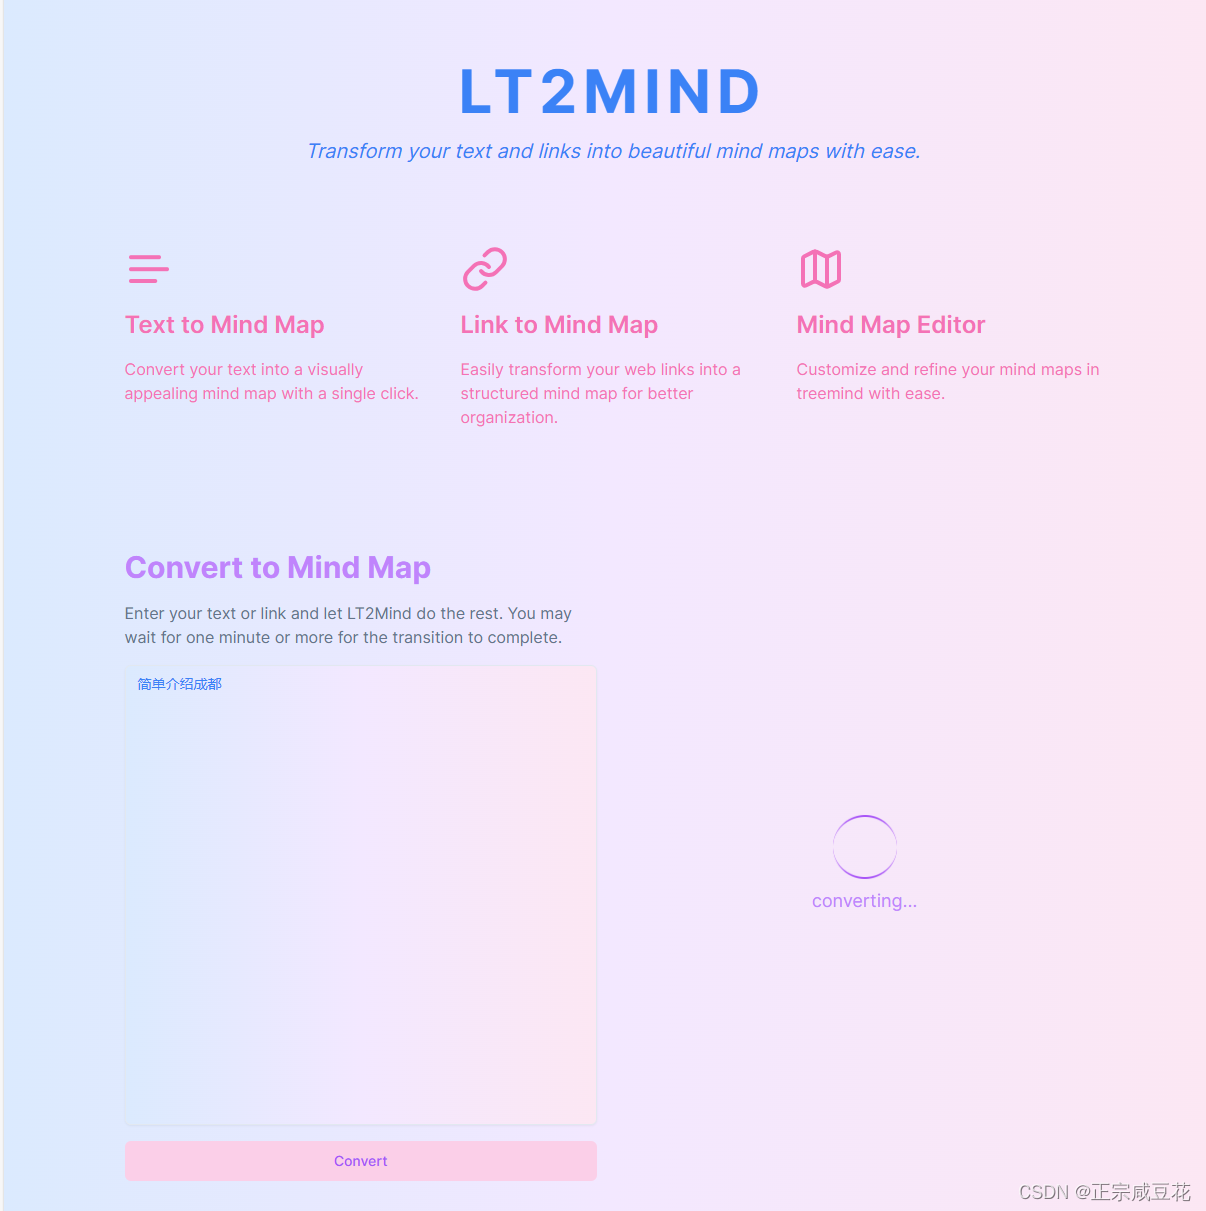
大家好!最近自己做了一个完全免费的AI生成思维导图的网站,支持下载,编辑和对接微信公众号,可以在这里体验:https://lt2mind.zeabur.app/
上一章:https://blog.csdn.net/m0_56699208/article/details/140061215?spm=1001.2014.3001.5502
上一章中,我们已经构建了完整的 生成思维导图的 AI 功能,并将其暴露为 API。接下来,我们要编写一套交互逻辑,供用户输入文字或链接,点击按钮,即可生成思维导图,并提供下载和编辑按钮。
import axios from "axios";
export const toMind = async (query: string) => {const url = 'https://api.coze.cn/open_api/v2/chat';const headers = {'Content-Type': 'application/json','Authorization': "Bearer your api key"};const body = {"conversation_id": "1","bot_id": "your bot id","user": "29032201862555","query": query,"stream": false};try {const response = await axios.post(url, body, { headers });console.log('Response:', response.data.messages[2].content);const urlPattern = /https:\/\/[^\s]+/g;let urls = response.data.messages[2].content.match(urlPattern);let imgUrl = urls[0]let editUrl = urls[1]return {imgUrl, editUrl}} catch (error) {console.error('Error:', error);}};
这段代码使用正则表达式/https://[^\s]+/g来匹配响应内容中的URL,包含两个属性imgUrl和editUrl,分别对应匹配到的第一个和第二个URL。这两个URL分别是图片的下载地址和对应在treemind里面的编辑地址。我们只需要在前端把链接给到对应的按钮上,即可实现交互逻辑:
完整代码:
"use client";
import { useState } from "react";
import { SignedOut, useUser } from "@clerk/nextjs";
import { Textarea } from "./ui/textarea";
import Header from "./header";
import Feature from "../components/feature";
import Img from "next/image";
import { Button } from "@/components/ui/button";
import { toMind } from "@/lib/coze";
import Link from "next/link";
import { Typewriter } from "react-simple-typewriter";
import { Skeleton } from "@/components/ui/skeleton";
import { Tooltip, TooltipTrigger, TooltipContent, TooltipProvider } from "../components/ui/tooltip";export default function Hero() {const { isSignedIn } = useUser();const [imgUrl, setImgUrl] = useState("");const [editUrl, setEditUrl] = useState("");const [loading, setLoading] = useState(false);const handleSubmit = async (event: any) => {event.preventDefault(); // Prevent the default form submission behaviorif (!isSignedIn) {//router.push('/sign-in');return;}setLoading(true);const inputValue = event.target.elements.textOrLink.value; // Get the value from the textareaconst result = await toMind(inputValue); // Call the toMind function with the input valueif (result) {setImgUrl(result.imgUrl);setEditUrl(result.editUrl);}setLoading(false);};return (<div className="flex flex-col bg"><header className="text-blue-500"><Header /><section className="container max-w-5xl px-4 md:px-6 py-6 md:py-10"><div className="text-center space-y-4 sm:mt-4"><h1 className="text-4xl md:text-6xl font-bold tracking-widest">LT2MIND</h1><p className="text-lg md:text-xl max-w-3xl mx-auto italic"><Typewriterwords={["Transform your text and links into beautiful mind maps with ease.",]}loop={1}cursorcursorStyle=""typeSpeed={20}deleteSpeed={50}delaySpeed={1000}/></p></div></section><Feature /><section className="py-12 md:py-20"><div className="container max-w-5xl px-4 md:px-6 grid grid-cols-1 md:grid-cols-2 gap-8"><div className="space-y-4"><h2 className="text-3xl font-bold text-purple-400">Convert to Mind Map</h2><p className="text-muted-foreground">Enter your text or link and let LT2Mind do the rest. You maywait for one minute or more for the transition to complete.</p><form className="flex gap-2" onSubmit={handleSubmit}><div className="flex flex-col gap-2 h-[40vh] w-full"><Textareaname="textOrLink"placeholder="Enter text or link..."className="shadow-sm focus:border-none flex-1 resize-none bg"style={{outline: "none",overflow: "auto",scrollbarWidth: "none",msOverflowStyle: "none",}}/><style jsx>{`textarea::-webkit-scrollbar {display: none;}`}</style><TooltipProvider><Tooltip><TooltipTrigger asChild><div><Buttontype="submit"className="mt-2 w-full bg-pink-200 text-purple-500 hover:bg-pink-100"disabled={!isSignedIn}>Convert</Button></div></TooltipTrigger>{!isSignedIn && (<TooltipContent>You need to sign in to convert</TooltipContent>)}</Tooltip></TooltipProvider></div></form></div>{loading ? (<div className="flex flex-col items-center justify-center gap-2"><div className="animate-spin rounded-full h-16 w-16 border-t-2 border-b-2 border-purple-500"></div><p className="text-lg text-purple-400">converting...</p></div>) : imgUrl ? (<div className="flex flex-col items-center justify-center gap-2"><imgsrc={imgUrl}alt="Image 1"className="w-full h-full object-contain shadow-sm"/><div className="flex gap-x-4 w-full justify-center"><Link href={editUrl} target="_blank" className="w-full"><Button className="bg-pink-200 text-purple-500 w-full hover:bg-pink-100">Edit in TreeMind</Button></Link><ahref={imgUrl}download="mindmap.jpeg"target="_blank"className="w-full"><Button className="bg-pink-200 text-purple-500 w-full hover:bg-pink-100">Download</Button></a></div></div>) : (<div className="flex flex-col items-center justify-center gap-2"><p className="text-lg text-purple-400">Waiting For Conversion<Typewriterwords={["..."]}loop={true}cursorcursorStyle=""typeSpeed={200}deleteSpeed={50}delaySpeed={2000}/></p>{/* <div className="flex gap-x-4 w-full justify-center"><Skeleton className="w-full" /><Skeleton className="w-full" /></div> */}</div>)}</div></section></header></div>);
}
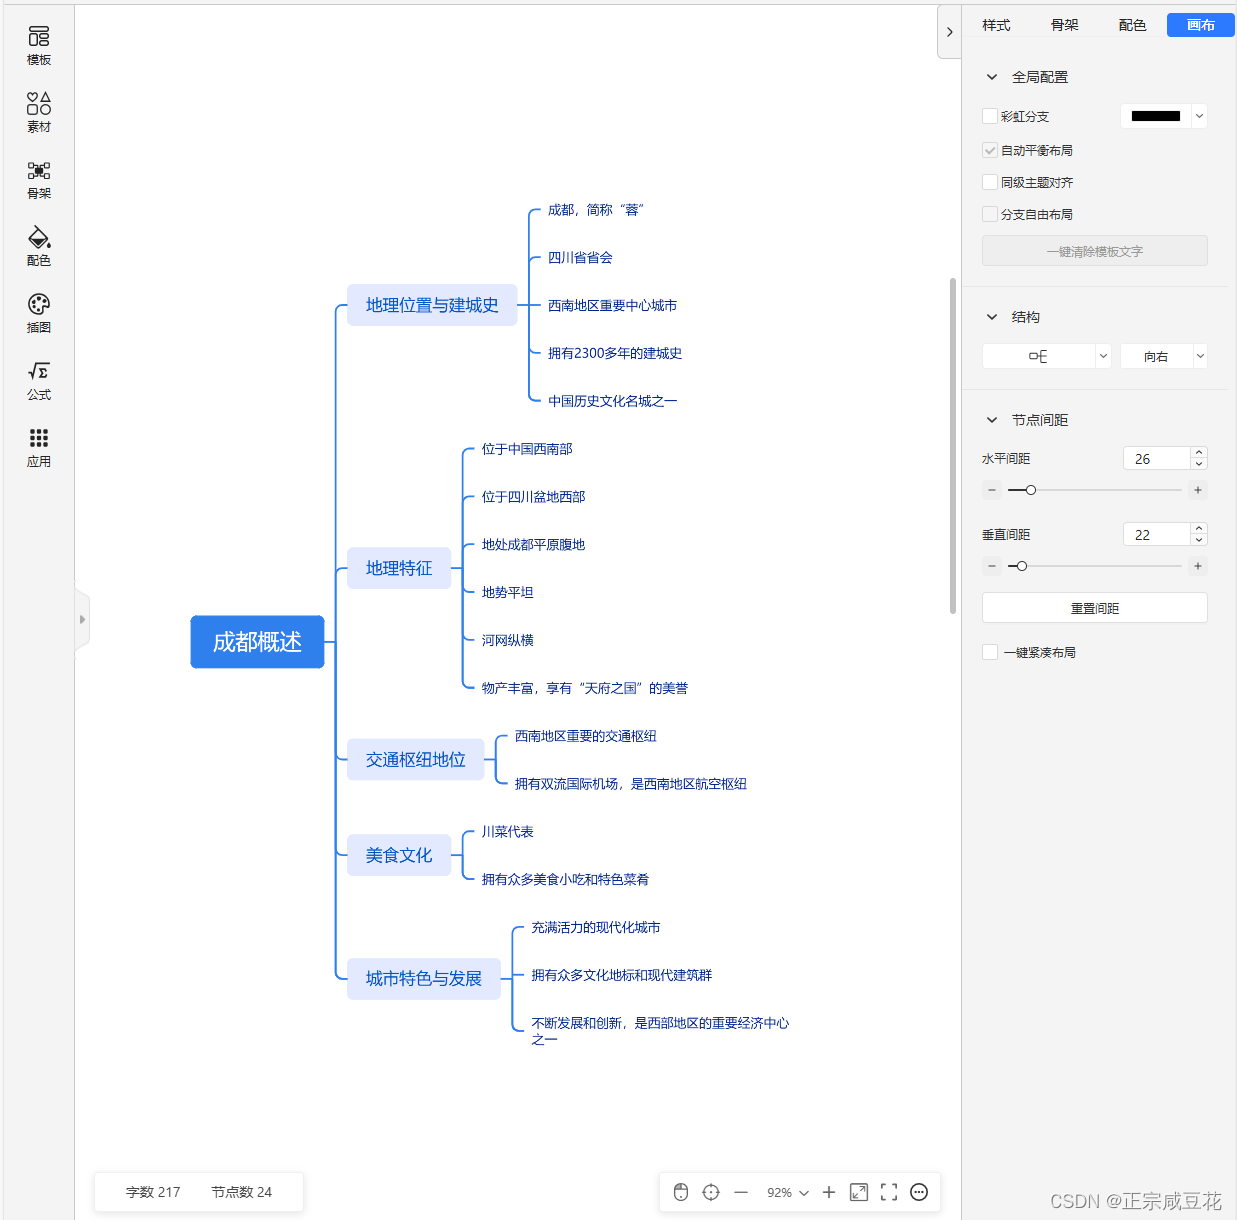
这样,用户输入文字,点击按钮后,就能实现生成的逻辑:
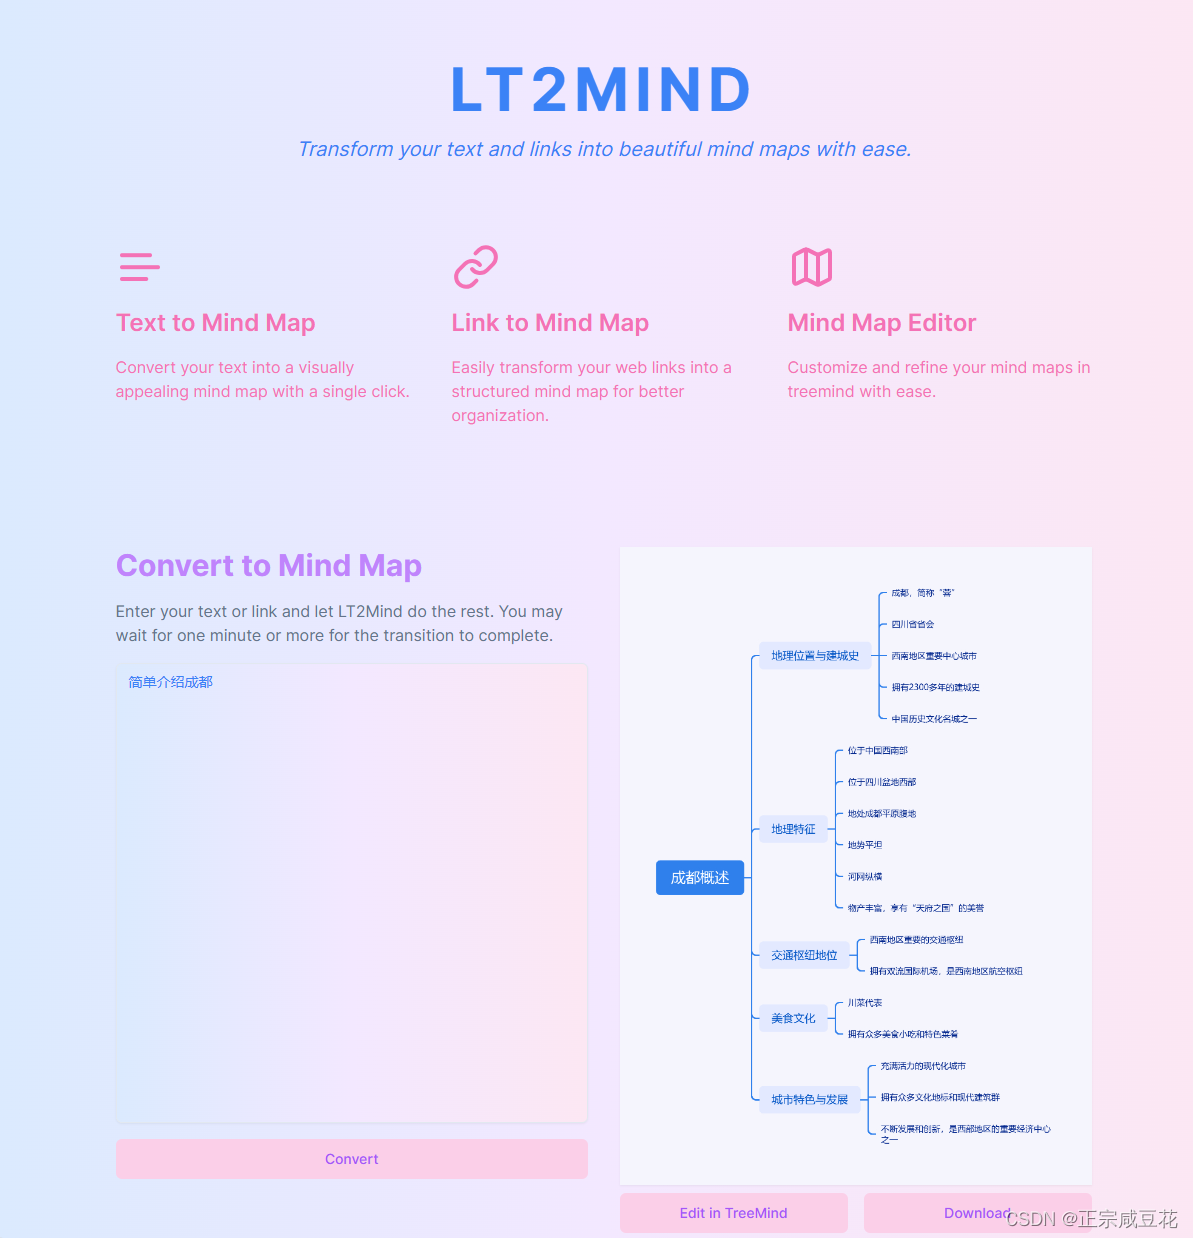
生成完成后,用户可以点击按钮选择下载或是继续编辑。