致力于,UI开发拿来即用,提高开发效率
- 常量格式
- 枚举enum格式
- 正则表达式
- ...手机号校验
- ...邮箱校验
- 文件
- 判断文件是否存在
- 网络下载
- 下载图片
- 从沙箱中图片转为Base64格式
- 从资源文件中读取图片转Base64
- 组件
- 输入框
- ...矩形输入框
- ...输入框堆叠效果(用于登录使用)
- 文本
- ...Text公用组件:TextView
- 按钮
- ...Button公用组件:ButtonView
- ...单选按钮公用组件:RadioView
- 组件工具包
- ...输入框(矩形)
- ...登录延时效果
- ...UI分页查询的实现
- ...弹框和短通知工具包
- 成形UI
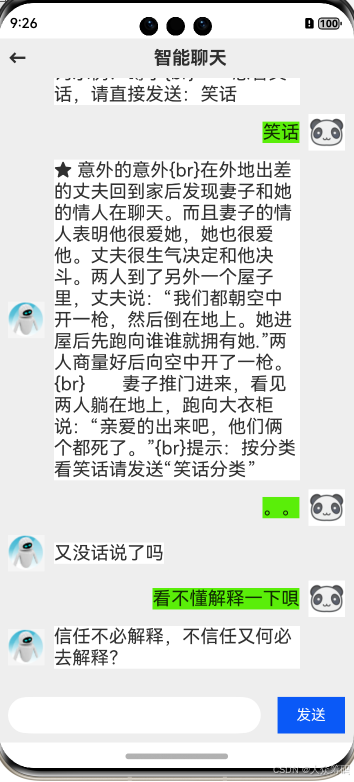
- ...聊天界面UI
- 类、接口、枚举工具包
- 进程间通讯(IPC)
- 设计模式
- 单例模式

常量格式
export  class CommonConstants {// 首选项名称static  readonly  PRE_USER:string= "user"// 全局应用static  readonly  STORE_USER:string= "user"// 列表查询行数static  readonly  LIST_SIZE:number = 10
}
枚举enum格式
// 数值可以为number、string
export enum Status {Enable=0, //启用Disable=1 // 禁用
}
正则表达式
…手机号校验
isValidPhoneNumber(phoneNumber: string): boolean {const regex = /^(13[0-9]|14[5|7|9]|15[0-3|5-9]|16[2|5|6|7]|17[0-8]|18[0-9]|19[8|9])\d{8}$/;return regex.test(phoneNumber)}
…邮箱校验
isValidEmail(email: string): boolean {let regEmail = /^([a-zA-Z0-9_-])+@([a-zA-Z0-9_-])+(\.[a-zA-Z0-9_-])+/;return regEmail.test(email)}
文件
导包: import fs from ‘@ohos.file.fs’;
判断文件是否存在
// 判断文件是否存在?let imgFile = filesDir + '/myImg.png'; // 路径let res = fs.accessSync(imgFile);if (res) {//如存在,就删除fs.unlinkSync(imgFile);}
网络下载
导包:
import request from ‘@ohos.request’;
import fs from ‘@ohos.file.fs’;
下载图片
request.downloadFile(getContext(), {url: netFile, filePath: imgFile // 网络路径,本地路径}).then((task) => {task.on('complete', function callback() {let file:fileIo.File;file = fs.openSync(imgFile) // 本地路径prompt.showToast({message: "文件下载成功:" + imgFile})})task.on('fail', function callBack(err) {prompt.showToast({message: "文件下载失败,err:" + JSON.stringify(err)})});
从沙箱中图片转为Base64格式
// 工具包:
// 其中当转为这个后,可能会与原文件有差异,需要修改配置base64ImgStr
// 获取沙箱路径:this.context.__Dir
async toBase64(image_uri: string) {if (image_uri) {let selectImage = fs.openSync(image_uri, fs.OpenMode.READ_WRITE) // openSync() 根据文件file://路径 转文件const imageSource = image.createImageSource(selectImage.fd);const imagePackerApi: image.ImagePacker = image.createImagePacker();let packOpts: image.PackingOption = { format: 'image/jpeg', quality: 100 };let readBuffer = await imagePackerApi.packing(imageSource, packOpts);let bufferArr = new Uint8Array(readBuffer)let help = new util.Base64Helperlet base = help.encodeToStringSync(bufferArr)let base64ImgStr = 'data:image/png;base64,' + base; // 回显需要有前面的前缀才可以return base64ImgStr;}return '';
}
从资源文件中读取图片转Base64
async toBase64StrFromResource(img_name: string) {// 1. 获取图片所对应的PixelMap对象let pixelMap: PixelMap = await this.toPixelMapFromResource(img_name); // 自己封装函数,见下// 2. 获取pixelMap总字节数let pixelBytesNumber: number = pixelMap.getPixelBytesNumber();// 3. 创建了一个ImagePacker对象,用于图像编码。(ImagePacker是HarmonyOS中用于将图像(PixelMap格式)编码为不同存档格式的工具)const imagePackageApi: image.ImagePacker = image.createImagePacker();// 4. 定义了一个PackingOption对象,用于设置图像编码的选项。let packOpts: image.PackingOption = {format: 'image/jpeg', //表示编码的图像格式为jpeg格式quality: 100, //表示图像质量为最高质量(取值为0~100之间)}// 5. 将pixelMap对象按照packOpts中设置的选项进行编码。编码的结果被存储在readBuffer中const readBuffer = await imagePackageApi.packing(pixelMap, packOpts);// 6. 创建了一个Base64Helper对象,用于进行Base64编码和解码操作。let base64Helper = new util.Base64Helper();// 7. 将readBuffer转换为一个Uint8Array对象(Uint8Array是一种JavaScript内置对象,表示一个8位无符号整数的数组,适合表示二进制数据。)let uint8Arr = new Uint8Array(readBuffer);// 8. 将uint8Arr中的二进制数据同步地编码为Base64字符串let pixelStr = base64Helper.encodeToStringSync(uint8Arr);// 9. 加入base64编码协议(用于显示在Image组件中)(以下前缀形成一个可以在Web上直接使用的Data URL。这个Data URL可以被用于在HTML或CSS中嵌入图像数据,而不需要额外的图像文件)let base64ImgStr = 'data:image/png;base64,' + pixelStr;Log.MyLog("'hmlog-->',base64 str : " + base64ImgStr);// 10. 返回编码后并转换为Data URL的Base64字符中return base64ImgStr;}async toPixelMapFromResource(img_name: string) {// 1. 获取stage模型下的Context上下文对象const context = getContext(this);// 2. 获取ResourceManager资源管理类const resourceMgr = context.resourceManager;// 3. 获取resource/rawfile/face.pngconst fileData = await resourceMgr.getRawFileContent(img_name)// 4. 获取图片的ArrayBufferconst buffer = fileData.buffer;// 5. 创建ImageSource实例const imageSource = image.createImageSource(buffer);// 6. 定义解码参数DecodingOptionslet decodingOptions = {editable: true, // editable设置为true表示图片是可编辑的desiredPixelFormat: 3 // desiredPixelFormat设置为3表示解码的像素格式为RGBA_8888}// 7. 根据解码参数DecodingOptions获取PixelMap图片对象const pixelMap = await imageSource.createPixelMap(decodingOptions)// 8. 返回PixelMap图片对象return pixelMap;}组件
(图片样式+代码) : 封装的组件则放在工具包下,可以使用 CTRL+F进行搜索 如: TextInputRectangleView
输入框
…矩形输入框
若有其他变动,可以修改参数即可

TextInputRectangleView({placeholder: '请输入手机号/邮箱',onClickCallBack: (value: string) => { // 回调函数this.name = value}})
…输入框堆叠效果(用于登录使用)

Stack({ alignContent: Alignment.End }) { // 布局TextInputRectangleView({placeholder: '请输入验证码',inPutType: InputType.Number,onClickCallBack: (value: string) => {this.code = value}})Text(this.message).fontColor(Color.Red).padding({ right: 20 }).enabled(this.isEnable).opacity(this.isEnable ? 1 : 0.5).onClick(() => {// 点击字体时的业务处理this.wait() // 延时this.getVaCode() // 校验代码})}.width("100%")// 延时函数点击重新获取触发wait() {let time = 60let id = setInterval(() => {time--this.isEnable = false // 禁用的状态this.message = '重新获取(' + time + ")s"if (time <= 0) {this.isEnable = truethis.message = '重新获取'}}, 1 * 1000)}
文本
…Text公用组件:TextView
@Component
export default  struct TextView {text:ResourceStr|number= ''fontColor:ResourceStr|Color = Color.BlackfontSize:ResourceStr|number = 16fontWeight:number | FontWeight | string = FontWeight.NormalbackgroundColor2:ResourceColor = Color.Whitedecoration:TextDecorationType= TextDecorationType.NoneonClickCallBack ?:()=>void=()=>{} // 设置默认否则会导致,使用组件不调用导致闪退build() {Row(){Text(''+this.text).fontColor(this.fontColor).fontSize(this.fontSize).fontWeight(this.fontWeight).decoration({ type: this.decoration}).backgroundColor(this.backgroundColor2).onClick(()=>{this.onClickCallBack()})}}
}
使用方式:
例:
TextView({text: "详细信息",fontColor: "#ff2a24e5",fontSize: 25,fontWeight: FontWeight.Bold,})
按钮
…Button公用组件:ButtonView
@Component
export  default struct ButtonView {text:ResourceStrcomWidth:number|string|Resource = "100%"comHeight:number|string|Resource = 50onClickCallback ?:()=>void=()=>{} // 回调函数type:ButtonType =ButtonType.Capsule // 默认胶囊backgroundColor2:ResourceColor = Color.BlueisEnabled:boolean = true // 启用build() {Column(){Button(this.text,{type:this.type}).width(this.comWidth).height(this.comHeight).onClick(()=>{this.onClickCallback()}).backgroundColor(this.backgroundColor2).enabled(this.isEnabled)}}
}
使用方式:
例:
ButtonView({text: "修改",comWidth: 50,comHeight: 30,backgroundColor2: item.getUserType() === UserType.Admin ? Color.Grey : "#ff0f9107",type: ButtonType.Normal,isEnabled: item.getUserType() === UserType.Admin ? false : true,onClickCallback: () => {this.changUserState(Operate.UpdateUser, item)}})
…单选按钮公用组件:RadioView
import { Status } from '../entity/User'
@Component
export default struct RadioView {group:string='group'text: stringradiosValue: Array<number>radiosStr: Array<string>checked: number = -1onClickCallBack ?:(value?:number)=>void=()=>{}isEnabled:Status = Status.Enablebuild() {Row({ space: 10 }) {if (this.text) {Text(this.text+':')}ForEach(this.radiosValue, (item: number, index: number) => {Row(){Radio({ value: item.toString(), group: this.group }) // 枚举值.onClick(() => {this.onClickCallBack(item)}).checked(this.checked == item).enabled(!this.isEnabled) // false: 禁用Text(this.radiosStr[index]) // 对应的文本}.margin({right:10}).width("80")})}}
}
使用方式:(需要自己定义枚举)
例:
Row() {RadioView({group: 'sex',text: '性别',isEnabled: Status.Enable,radiosValue: [UserSex.Girl, UserSex.Boy],radiosStr: ['女', '男'],onClickCallBack: (val: number) => {this.user.setUserSex(val)}})}.width("100%")
组件工具包
(图片样式+代码) ,结合组件UI进行使用
…输入框(矩形)

@Preview
@Component// 文本输入框矩形
export default struct TextInputRectangleView {text ?: stringplaceholder?: stringinPutType ?: InputType = InputType.NormalonClickCallBack : (value: string) => void = () => { // 回调函数}width2?: ResourceStr | number = "100%"height2?: ResourceStr | number = 50backgroundColor2?: ResourceColor = "#ddd"borderRadius2 ?: number = 10build() {Row() {TextInput({ placeholder: this.placeholder, text: this.text }).type(this.inPutType).onChange((val: string) => {this.onClickCallBack(val)}).backgroundColor(this.backgroundColor2).placeholderColor(Color.Grey) // 提示信息颜色}.width(this.width2).height(this.height2).backgroundColor(this.backgroundColor2).borderRadius(this.borderRadius2)}
}
…登录延时效果

wait() {let time = 60let id = setInterval(() => {time--this.isEnable = false // 禁用的状态this.message = '重新获取(' + time + ")s"if (time <= 0) {this.isEnable = truethis.message = '重新获取'}}, 1 * 1000)}
…UI分页查询的实现
1.UI渲染思路:(定义所需变量)@State page: number = 1 // 默认当前页@State totalPage: number = 1 // 总页数@State size: number = 10 // 显示业务---一般可以定义至常量: static readonly LIST_SIZE:number = 102.初始化数据:根据声明周期,获取数据和查询总数并计算总页数this.totalPage = 数据总数/ 每页显示数量size3.UI和分页按钮的组建: (见例3)4.UI加载页面优化: 为了提升用户体验,应显示加载动画,或者当没有数据时,提示暂无数据: (见例4)5.数据库查询分页公式:需要参数:const sizes = CommonConstants.LIST_SIZE // 每页显示数量const pages = (page - 1) * sizes // 计算查询列表数量在limit时使用格式:select * from tableName where ..... limit pages ,sizes // 从第几个开始,显示多少sizes数量
例: 例3// 数据列表
ForEach(this.list, (item: User, index: number) => {// 仅能创建UIRow() {TextView({ text: item.getAccountName(),fontColor: Color.Blue,onClickCallBack: () => {// 自定义弹框页面// 存放位置目的主要获取item传参this.dialog = new CustomDialogController({// 自定义组件 使用@CustomDialog装饰器 和  controller:CustomDialogControllerbuilder: UserDetailDialog({ item: item }), //自定义组件或者函数,并可以传入想要的值autoCancel: false, // 是否任意点击取消弹出框alignment: DialogAlignment.Center, // 样式cancel: () => {// 自定义弹框页面this.dialog.close()}})// 开启this.dialog.open()}}).layoutWeight(1)TextView({ text: item.getUserType() ? '管理员' : '普通',fontColor: item.getUserType() ? Color.Red : Color.Grey}).layoutWeight(1).align(Alignment.Center)TextView({ text: item.getUserState() ? '正常' : '禁用',fontColor: item.getUserState() ? Color.Grey : Color.Blue }).layoutWeight(1).align(Alignment.Center)Row({ space: 5 }) {ButtonView({text: "删除",comWidth: 50,comHeight: 30,backgroundColor2: item.getUserType() === UserType.Admin ? Color.Grey : "#fff35454",type: ButtonType.Normal,isEnabled: item.getUserType() === UserType.Admin ? false : true,onClickCallback: () => {this.changUserState(Operate.Delete, item)}})ButtonView({text: (item.getUserType() === UserType.Admin) ? '禁用' : ((item.getUserState()) ? '禁用' : '启用'),comWidth: 50,comHeight: 30,backgroundColor2: item.getUserType() === UserType.Admin ? Color.Grey : (item.getUserState() ? "#ffe3da46" : "#ff0b95e0"),type: ButtonType.Normal,isEnabled: item.getUserType() === UserType.Admin ? false : true,onClickCallback: () => {item.setUserState(item.getUserState() ? UserState.Disable : UserState.Enable)this.list[index] = new User() // 保证页面的即使刷新,用户感受this.list[index] = itemthis.changUserState(Operate.Update, item) // 处理业务}})ButtonView({text: "修改",comWidth: 50,comHeight: 30,backgroundColor2: item.getUserType() === UserType.Admin ? Color.Grey : "#ff0f9107",type: ButtonType.Normal,isEnabled: item.getUserType() === UserType.Admin ? false : true,onClickCallback: () => {this.changUserState(Operate.UpdateUser, item)}})}.layoutWeight(2).align(Alignment.Center)}.width("100%").padding({ bottom: 5, top: 5 }).border({ width: { bottom: 1 }, color: { bottom: "#ddd" } })}// ==============================================================================
// 分页UIRow({ space: 30 }) {Row() {Text(`页数: ${this.page}/${this.totalPage}`).fontColor("#ff0b95e0")}.padding({ left: 30 })Row({ space: 10 }) {ButtonView({text: "|<",comWidth: 50,comHeight: 30,backgroundColor2: "#ff0b95e0",type: ButtonType.Normal,onClickCallback: () => {if (this.page != 1) {this.page = 1this.onClickCallBack()}}})ButtonView({text: "<<",comWidth: 50,comHeight: 30,backgroundColor2: "#ff0b95e0",type: ButtonType.Normal,onClickCallback: () => {if (this.page > 1) {this.page--this.onClickCallBack()}}})ButtonView({text: ">>",comWidth: 50,comHeight: 30,backgroundColor2: "#ff0b95e0",type: ButtonType.Normal,onClickCallback: () => {if (this.page < this.totalPage) {this.page++this.onClickCallBack()}}})ButtonView({text: ">|",comWidth: 50,comHeight: 30,backgroundColor2: "#ff0b95e0",type: ButtonType.Normal,onClickCallback: () => {if (this.totalPage != this.page) {this.page = this.totalPagethis.onClickCallBack()}}})}}.padding({ top: 20, right: 20 }).justifyContent(FlexAlign.SpaceBetween).width("100%")
例: 例4
if (this.loading) {// 加载LoadingProgress() // 加载动画.width(50).height(50)Text("数据加载中.....").fontColor("#bbb").margin({top:20})} else if (this.list.length==0){Text("暂无数据").fontColor("#bbb").margin({top:20})} else  {// 正常业务处理}
…弹框和短通知工具包
import promptAction from '@ohos.promptAction'
// 短通知
export  function showToast(info:string,time:number = 3*1000){promptAction.showToast({message:info,duration:time})
}// 消息弹窗
export  function  showDialog(msg:string,title:string='系统提示',callback:()=>void=()=>{}){ // callback 赋值的为默认值promptAction.showDialog({title:title,message:msg}).catch(callback)
}// 确认弹框
export  function  AlterDialog(title:string,message:string,submit:()=>void=()=>{},cancel:()=>void=()=>{}){AlertDialog.show({title:title,message:message,primaryButton:{value:"取消",action:()=>{cancel()}},secondaryButton:{value:'确定',action: () => {submit()}},})
}// log和err日志
export  function  loggerInfo(str:string){console.info('system===>',str)
}
export  function  loggerError(str:string){console.error('system===>',str)
}
成形UI
…聊天界面UI

思路:
代码组件
类、接口、枚举工具包
进程间通讯(IPC)
import commonEventManager from '@ohos.commonEventManager'// Publisher通讯事件类型
enum PublishEventType {APP_PUBLISH = "APP_PUBLISH",CARD_PUBLISH = "CARD_PUBLISH"
}class IPCManagerClass {static publishCount:number = 1// 发布者static publish(eventType:PublishEventType,data:string){// commonEventManager作用:可用于进程间通讯commonEventManager.publish(eventType,{data},(err)=>{if(err){// 失败只发3次if(this.publishCount<=3){this.publish(eventType,data)}else{this.publishCount = 1}}else{this.publishCount = 1}})}// 订阅者static subscribe(eventType:PublishEventType,subscriber,callback:(event:string)=>void){commonEventManager.createSubscriber({ events: [eventType] }, (err, data) => {if (err) {return console.log('common-->', `创建订阅者error ${JSON.stringify(err)}`)}console.log('common-->', `创建订阅者success`)subscriber = dataif (subscriber !== null) {//订阅事件commonEventManager.subscribe(subscriber, (err, data) => {if (err) {return console.error(`logData`, '订阅事件失败')}console.log('common-->',`接受订阅事件:${data.data}`)callback(data.data)})} else {console.error('common-->',`需要创建subscriber`);}})}
}export {IPCManagerClass,PublishEventType}
设计模式
单例模式
单例模式分为: 懒汉式和饿汉式,懒汉式常用。
创建步骤:
1.将构造器私有化:   private constructor() {} // 可以修改为传参,定义一个私有属性,在new Class时,赋值即可
2.定义私有静态实例,但不创建:  private static clsss: Class
3.创建共用的静态函数:
public static initialization():Class{
if(!clsss){
Class.class = new Class() // 不存在是才会创建
//若有参数 Class.class = new Class('参数') // 不存在是才会创建
}
return Class.class
}
