Vue 推荐在绝大多数情况下使用模板来创建你的 HTML。然而在一些场景中,你真的需要 JavaScript 的完全编程的能力。这时你可以用render渲染函数,它比模板更接近编译器
。
在Vue2中,render函数是一个可选的、用于生成虚拟DOM的特殊函数。它是Vue实例的一个选项,允许开发者使用JavaScript编写模板,而不是使用HTML模板。render函数接收一个h函数(h函数是createElement的别名。很多人喜欢用createElement,形参不过是个名称而已)作为参数,该函数用于创建虚拟节点(VNode)。
下面是一个render函数简单示例:
render(h) {return h('h1', 'Hello, Vue!')
}
上面是一个简单写法,完整来说,h函数接受三个参数:
第一个参数:可以是字符串(表示HTML标签名或组件名)、组件对象或函数。如果是自定义组件,需要确保组件已经在当前实例或全局注册。
第二个参数:属性对象,包含传递给子组件的props、attrs、class、style等。
第三个参数:子节点,可以是字符串、数组或对象。
当第一个参数为HTML标签名的时候,常用配置如下:
const vnode = h('div', {id: 'my-id', // 设置id属性class: 'my-class', // 设置class属性style: { color: 'red' }, // 设置内联样式onClick: function() { // 设置点击事件处理程序console.log('Clicked!');}
}, [h('p', { class: 'text' }, 'Hello, World!') // 子节点
]);
当第一个参数为组件名称时,配置如下:
const vnode = h('my-component', {// 组件的类名  使用同 :class  语法class: {aaa: true},// 组件的内联样式  使用同 :style  语法style: {color: 'blue'},// 一个对象,包含组件所需的属性。这些属性将被传递给组件,并在组件内部作为props进行访问。props: {msg: 'Hello, World!',},//一个对象,包含组件的非prop属性(例如,class、style等)。这些属性将被添加到组件的根元素上。attrs: {class: 'my-class',style: { color: 'red' }},// 一个对象,包含组件的事件处理程序。on: {click() {console.log('Clicked!!!')}},// 一个对象,包含组件的原生事件处理程序。与on类似,但用于监听原生DOM事件。nativeOn: {click() {console.log('Clicked!!!')}},// 一个对象,包含组件的DOM属性。domProps: {innerHTML: 'Hello, World!'},// 一个对象,包含组件的作用域插槽。scopedSlots: {default: () => h('h1', null, '我是标题1')},// 一个字符串或数组,表示组件的插槽内容slot: 'slot container',// 一个字符串或数字,表示组件的唯一标识符。key: 'unique-key',// 一个字符串,表示组件的引用标识符。ref: 'myComp',// 一个函数,返回组件实例的数据对象。data() {return {name: 'wft'}},// 一个对象,包含组件的指令。directives: [{ name: 'my-directive', value: 'Hello, World!' }],// 一个对象,包含组件的生命周期钩子。hooks: {created() {console.log('created!!')},mounted() {console.log('mounted!!')}},// 一个布尔值,表示是否将父组件的属性继承到子组件。inheritAttrs: true,// 一个字符串,表示组件的真实标签名。这在渲染组件时非常有用,因为它允许Vue跳过验证过程。is: 'my-component'
}, {default: () => h('p', null, '我是默认插槽')
});
我们在给子组件传递数据的时候,也就是父传子,一般写在props中, 其实也可以写在attrs中,如果写在attrs中,我们也可以在子组件中props中接受attrs中的变量,如果props中没写的变量都会在attrs中,我们在组件中通过this.$attrs中可以拿到。
下面是一个示例:
先使用render函数封装一个组件,注意写了render函数就不要写template了,不然render函数不起作用
@/components/BasicRender.vue
<script>
import { deepClone } from '@/utils'
export default {props: {tag: {type: String,default: 'div'},option: {type: Object,default: () => null},children: {type: [String, Array, Object],default: ''}},render(h) {const opt = deepClone(this.option)console.log(opt, 'opt-->.')return h(this.tag, opt, this.children)}
}
</script>
上面是一个vue组件,也可以写一个.js文件,写render函数,那么它也可以跟组件一样使用(注册使用):
@/components/Render.js
import { deepClone } from '@/utils'
export default {props: {tag: {type: String,default: 'div'},option: {type: Object,default: () => null},children: {type: [String, Array, Object],default: ''}},render(h) {const opt = deepClone(this.option)console.log(opt, 'opt  对象 obj -->.')return h(this.tag, opt, this.children)}
}
然后是main.vue,引入封装的render组件
<template><div class="wft-main"><BasicRender:tag="tag":option="option":children="children"/></div>
</template>
<script>
// import BasicRender from '@/components/Render'
import BasicRender from '@/components/BasicRender'
export default {data() {return {// tag: 'div',// option: {//   id: 'WFT',//   class: 'wft',//   style: {//     border: '1px solid red',//     width: '350px',//     height: '350px',//     display: 'flex',//     justifyContent: 'center',//     alignItems: 'center'//   },//   onClick() {//     console.log('onClicked!!!')//   },//   attrs: {//     msg: '456 msg'//   }// },// children: '呵呵呵'tag: 'G1',option: {class: {'G1-class': true},style: {display: 'flex',flexDirection: 'column',justifyContent: 'center',alignItems: 'center'},props: {title: 'wwwfffttt',age: 18,info: {name: 'wft'}},attrs: {customData: {id: '0000',name: 'JAY'}},scopedSlots: {default: () => (<BasicRender tag={'h1'} children={'66611'} />),content: () => '我是content'}},children: {default: '666',content: '我是content插槽内容'}}},components: { BasicRender }
}
</script>
<style scoped>
.wft-main {width: 100%;height: 100%;display: flex;justify-content: center;align-items: center
}
</style>
这是加载组件G1,注意:我们加载的组件一定是引入、注册之后的,我这里全局注册了,
然后是G1组件:
<template><div class="wft-w-h-100"><slot></slot><h1>我是G1 全局组件</h1><h3>{{ title }}--{{ age }}--{{ info }}</h3><slot name="content"></slot></div>
</template>
<script>
export default {data() {return {}},props: {customData: {type: Object,default: () => ({})},title: {type: String,default: ''},age: {type: Number,default: 0},info: {type: Object,default: () => ({})}}
}
</script>
<style scoped>
.wft-w-h-100 {width: 100%;height: 100%;
}
</style>
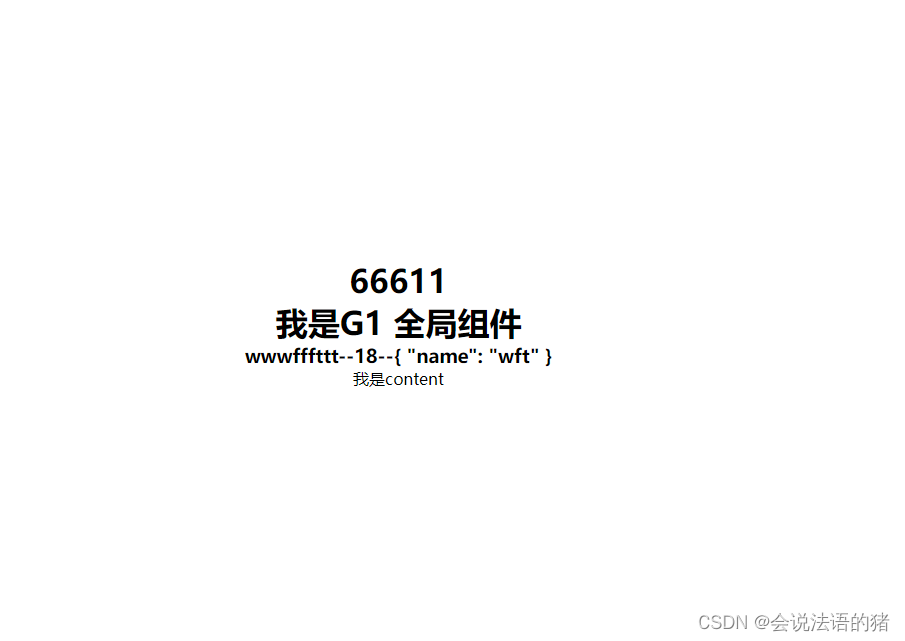
下面是运行的效果图:
