设计模式介绍
概念
- 设计模式是我们在解决问题的时候针对特定的问题给出的简洁而优化的处理方案
- 在JS设计模式中,最核心的思想:封装变化
- 将变与不变分离,确保变化的部分灵活、不变的部分稳定
注意:下面文章介绍的设计模式,并非全部设计模式、准确性也不保证,只是我个人理解
设计模式分类
构造器模式
简单例子就是
// 平常哦我们创建两个对象,可能会这样写
const obj1 = {name: "xx",age: 15
}const obj2 = {name: "yyy",age: 16
}// 利用构造器设计模式
function CreateObj(name, age){this.name = name;this.age = age;this.say = function(){console.log(`${this.anme}-${this.age}`)}
}const obj1 = new CreateObj("xxx", 15)
const obj2 = new CreateObj("yyy", 16)
优点:减少创建对象的冗余代码
缺点:如果构造器有方法,则每次new 都会创建方法,会消耗内存
解决: 可以将方法放到原型上、现在比较流行的就是使用es6 class 代替
class Employee {constructor(name, age) {this.name = name;this.age = age;}sayHello() {console.log(`姓名:${this.name},年龄:${this.age}`);}
}
工厂模式
由一个工厂对象决定创建某一种产品对象类的实例,主要用来创建同一类对象
class User {constructor(role, pages) {this.role = name;this.pages = pages;}static userFactory() {switch (role) {case 'admin':return new User("admin", ["dashboard", "users", "pages"]);case 'editor':return new User("editor", ["dashboard", "pages"]);default:return new User("user", ["dashboard"]);}}}优点: 只需要一个正确的参数,就可以获取到你所需要的对象,而无需知道创建的具体细节。
缺点:函数内包含了所有对象的创建和判断逻辑的代码,每增加新的构造函数还需要修改判断逻辑代码,当我们的对象不是上面3个而是是个或更多时,这个函数会成为一个庞大的超级函数,使得难以维护,所以简单工厂模式只能作用于创建数量较少,对象的创建逻辑不复杂时使用
抽象工厂模式
抽象工厂模式并不直接生成实例,而是用于对产品类的创建
// 基础父类class User {constructor(name, role, pages) {this.name = name;this.role = role;this.pages = pages;}welcome() {console.log(`Welcome, ${this.role}!`);}// 抽象方法dataShow() {throw new Error("抽象方法需被实现");}}// superAdmin类class SuperAdmin extends User {constructor(name) {super(name, "superAdmin", ["dashboard", "users", "pages"]);}dataShow() {console.log("superAdmin", this.pages);}}// admin类class Admin extends User {constructor(name) {super(name, "admin", ["dashboard", "pages"]);}dataShow() {console.log("superAdmin", this.pages);}}// editor类class Editor extends User {constructor(name) {super(name, "editor", ["dashboard"]);}dataShow() {console.log("superAdmin", this.pages);}}// 获取类function getUserClass(role) {switch (role) {case 'superAdmin':return SuperAdmin;case 'admin':return Admin;case 'editor':return Editor;default:throw new Error("参数错误");;}}let UserClass = getUserClass("superAdmin")console.log(new UserClass("mrx").dataShow());抽象工厂要是的一个类,工厂要的是具体的对象实例,需要注意两者的区别
建造者模式
建造者模式属于创建模型的一种,提供一种创建复杂对象的方式。它将一个复杂的对象构建与它的表示分离,使得同样的构建过程可以创建不同的表示。
建造者模式是一步一步的创建一个复杂对象,它允许用户通过指定复杂的对象的类型和内容就可以构建它们,用户不需要指定内部具体构建细节
class Test1 {init() {console.log("Test1");}getData() {return new Promise((resolve) => {setTimeout(() => {resolve("Test1 getData");})})}render(data) {console.log(`${data}`);}}class Test2 {init() {console.log("Test2");}getData() {return new Promise((resolve) => {setTimeout(() => {resolve("Test2 getData");})})}render(data) {console.log(`${data}`);}}// 建造者class TestCreate {async create(builder) {builder.init();// 可以根据返回值做一些处理const res = await builder.getData();builder.render(res);}}const op = new TestCreate();op.create(new Test1());op.create(new Test2());建造者模式将一个复杂对象的构建层与其表示层分离,同样的构建过程可采用不同的表示,工厂模式主要是为了创建对象实例或者类(抽象工厂),关心的是最终产出(创建)的是什么,而不关心过程,而建造者模式关心的是创建这个对象的整个过程,甚至于创建对象的每一个细节。
单例模式
保证一个类仅有一个实例,并提供一个访问它的全局访问点
主要解决一个全局使用的类频繁地创建和销毁,占用内容
class Singleton {constructor() {console.log("创建实例");}static getInstance() {if(!this.instance){this.instance = new Singleton()return this.instance}return this.instance}}const instance1 = Singleton.getInstance();const instance2 = Singleton.getInstance();// true 证明两次创建的对象是同一个console.log(instance1 === instance2);装饰器模式
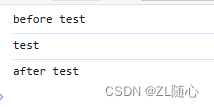
Function.prototype.before = function(beforeFn) {const _this = this;return function() {// beforeFn前置方法,也就是test.before(callback)里面这个callbackbeforeFn.apply(this, arguments);return _this.apply(this, arguments);}}Function.prototype.after = function(afterFn) {const _this = this;return function() {const result = _this.apply(this, arguments);afterFn.apply(this, arguments);return result;}}function test() {console.log('test');}// 给test增加前置后置方法、也可以只增加前置或者后置方法、或者不增加、就是可插拔的了const testCallback = test.before(()=>{console.log("before test");}).after(function() {console.log('after test');})testCallback();打印结果

适配器模式
将一个类的接口转换成客户希望的另一个接口,适配器模式让那些不兼容的类可以一起工作
/*需求:我们是需要使用多个类型的地图,但是这些地图的接口并不相同,我们需要对这些地图进行适配,使其能够统一使用。然后我们定义一个renderMap 方法去统一使用这两个地图,但是由于两个地图的展示方法不一样,所以需要对另一个类做适配*/class AMap {show() {console.log('显示A地图');}}class BMap {display() {console.log('显示B地图');}}// a地图的适配器class AMapAdapter extends AMap {constructor(map) {super()}display() {super.show();}}/*统一使用地图*/function renderMap(map) {map.display();}renderMap(new AMapAdapter());renderMap(new BMap());策略模式
策略模式,可以替换那种很多ifelse那种场景,可以在一定程度上较少复杂度,是代码看起来更优雅
不使用策略模式的情况下的代码
// 不使用策略模式// 假设我们有一个计算折扣的函数function calculateDiscount(price, discountType) {if (discountType === 'regular') {return price * 0.9;} else if (discountType === 'senior') {return price * 0.85;} else if (discountType === 'student') {return price * 0.95;} else {return price;}}console.log(calculateDiscount(100, 'regular')); // 90console.log(calculateDiscount(100, 'senior')); // 85console.log(calculateDiscount(100, 'student')); // 95console.log(calculateDiscount(100, 'other')); // 100使用策略模式的代码
// 基于上面的代码使用策略模式重写// 定义一个策略类const discountStrategies = {regular: (price) => price * 0.9,senior: (price) => price * 0.85,student: (price) => price * 0.95,other: (price) => price}// 定义一个计算折扣的函数function calculateDiscount(price, discountType) {return (discountStrategies[discountType] || discountStrategies.other)(price);}console.log(calculateDiscount(100, 'regular')); // 90console.log(calculateDiscount(100, 'senior')); // 85console.log(calculateDiscount(100, 'student')); // 95console.log(calculateDiscount(100, 'other')); // 100观察者模式
观察这模式包含观察目标和观察者两类对象
一个目标可以有任意数目与之相依赖的观察者
一旦观察目标的状态发生改变,所有的观察者都将得到通知
当一个对象状态发生改变时,所有依赖它的对象都得到通知并被被动自动更新,解决了主体对象与观察者之间功能的耦合,即一个对象状态改变给其他兑现通知的问题

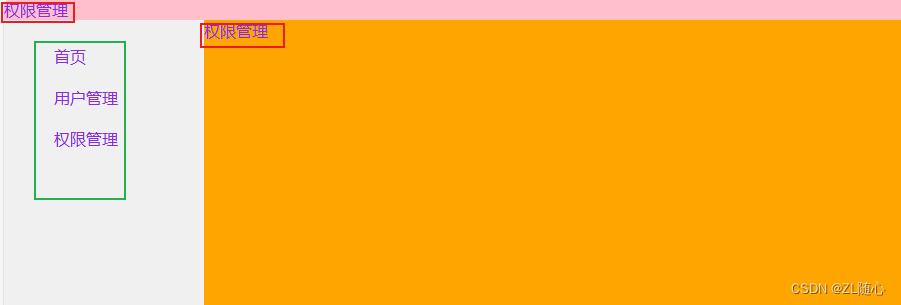
效果:红色圈圈的内容,更具绿色框框点击内容改变 ,下面是demo代码
<!DOCTYPE html>
<html lang="en">
<head><meta charset="UTF-8"><meta name="viewport" content="width=device-width, initial-scale=1.0"><title>观察者</title><style>body {padding: 0;margin: 0;color: blueviolet;}.box {display: flex;width: 100vw;height: 100vh;}.left {width: 200px;background-color: #f0f0f0;}.right {background: orange;flex: 1;}ul>li {list-style: none;padding: 10px;cursor: pointer;}.header {background-color: pink;}</style>
</head>
<body><div class="header">头部</div><div class="box"><div class="left"><ul><li>首页</li><li>用户管理</li><li>权限管理</li></ul></div><div class="right"><div class="content">内容</div></div></div><script>// 被观察目标类-这里左侧的内容当做被观察目标class Target {constructor() {this.observers = [];}// 增加观察者subscribe(observer) {this.observers.push(observer);}// 移除观察者unsubscribe(observer) {this.observers = this.observers.filter(item => item !== observer);}// 通知观察者notify(data) {this.observers.forEach(observer => observer.update(data));}}// 观察者类-右侧显示的内容当做观察者、还有头部也当做观察者class Observer {constructor(dom) {this.dom = dom;}// 更新update(data) {this.dom.innerText = data;}}// 实例化观察者const observer1 = new Observer(document.querySelector('.header'));const observer2 = new Observer(document.querySelector('.content'));// 实例化被观察目标const target = new Target();// 订阅target.subscribe(observer1);target.subscribe(observer2);// 监听ul点击事件const ul = document.querySelector('ul');ul.addEventListener('click', function(e) {console.log(e.target.tagName);if (e.target.tagName === 'LI') {const text = e.target.innerText;target.notify(text);}})</script>
</body>
</html>优势:目标与观察者,功能耦合度降低,专注耦合度降低,专注自身工能逻辑,观察者被动光接收更新,时间解耦,实时接受目标这更新状态
缺点:观察者模式虽然实现了对象间依赖的低耦合度,单却不能对事件通知进行细分管控,如筛选通知,指定主题事件通知
发布订阅模式
观察者和目标要相互知道
发布者和订阅者不用相互知道,通过第三方实现调度,属于经过解耦的观察者模式
下面是简单使用案例
<!DOCTYPE html>
<html lang="en">
<head><meta charset="UTF-8"><meta name="viewport" content="width=device-width, initial-scale=1.0"><title>发布订阅者模式</title>
</head>
<body><script>class PublishSubscriber {constructor() {// 存放事件及其对应的回调函数this.subscribers = {};}// 订阅subscribe(type, callback) {if (!this.subscribers[type]) {this.subscribers[type] = [callback];}else{this.subscribers[type].push(callback);}}// 取消订阅unsubscribe(type, callback) {if (!this.subscribers[type]) {return;}// 取消订阅所有事件if (!callback) {this.subscribers[type] = [];return;}// 取消订阅单个事件this.subscribers[type] = this.subscribers[type].filter(item => item !== callback);}// 发布publish(type, data) {if (!this.subscribers[type]) {return;}this.subscribers[type].forEach(callback => callback(data))}}// 创建发布订阅者实例const publishSubscriber = new PublishSubscriber();function subscribe1(data) {console.log('subscribe1', data);}function subscribe2(data) {console.log('subscribe2', data);}function subscribe3(data) {console.log('subscribe3', data);}// 订阅事件publishSubscriber.subscribe('event1', subscribe1);publishSubscriber.subscribe('event1', subscribe2);publishSubscriber.subscribe('event2', subscribe3);// 发布事件publishSubscriber.publish('event1', 'Hello World'); // 输出 subscribe1 Hello World 和 subscribe2 Hello WorldpublishSubscriber.publish('event2', 'Hello PublishSubscriber'); // 输出 subscribe3 Hello PublishSubscriber</script>
</body>
</html>
桥接模式
桥接模式:将抽象部分与它的实现部分分离,使他们都可以独立地变化
使用场景:一个类存在两个或多个独立变化的维度,且这两个维度都需要进行扩展
<!DOCTYPE html>
<html lang="en">
<head><meta charset="UTF-8"><meta name="viewport" content="width=device-width, initial-scale=1.0"><title>桥接模式</title>
</head>
<body><script>// 定义抽象类,将抽象与具体的实现隔离开来class AbstractClass {constructor(animation) {this.animation = animation;}onShow() {this.animation.onShow()}onHide() {this.animation.onHide()}}const animations = {slide: {onShow() {console.log('Slide animation on show');},onHide() {console.log('Slide animation on hide');}},bounce: {onShow() {console.log('bounce animation on show');},onHide() {console.log('bounce animation on hide');}},fade: {onShow() {console.log('fade animation on show');},onHide() {console.log('fade animation on hide');}}}// slide-桥接单元const abstractClass = new AbstractClass(animations.slide);abstractClass.onShow();abstractClass.onHide();// bounce-桥接单元const abstractClass2 = new AbstractClass(animations.bounce);abstractClass2.onShow();abstractClass2.onHide();// fade-桥接单元const abstractClass3 = new AbstractClass(animations.fade);abstractClass3.onShow();abstractClass3.onHide();</script>
</body>
</html>优点:把抽象与实现隔离开,有助于独立地管理各组成部分
缺点:每使用一个桥接元素都要增加一次函数调用,这对应用程序的性能会有些=一些负面影响---提高系统的复杂程度
模板方法模式
模板方法模式由两部分组成,第一部分是抽象父类,第二部分是具体的实现子类,通常在抽象父类中封装子类的算法框架,包括实现一些公共方法以及封装子类中所有方法的执行顺序,子类通过继承这个抽象类,也继承了整个算法结构,并且可以选择重写父类的方法
<!DOCTYPE html>
<html lang="en">
<head><meta charset="UTF-8"><meta name="viewport" content="width=device-width, initial-scale=1.0"><title>模板模式</title>
</head>
<body><script>// 抽象模板class TemplateClass {constructor(params){this.params = params;}// 确定好执行顺序init(){this.getData();this.render();}getData(){if(!this.params?.getData){throw new Error("必须实现getData方法");return}this.params.getData();}// 渲染render(){console.log("渲染那方法");}};// 传入参数const params = {getData(){console.log("获取数据6666");}}// 实例化const instance = new TemplateClass(params);instance.init();// 实例化const instance2 = new TemplateClass({getData(){console.log("获取数据222");}});instance2.init();</script>
</body>
</html>总结:以上便是部分设计模式,个人感觉前端,可能会用到多一点的,其他设计模式感觉用得极少,当然,也可能是我接触的业务不复杂。
