声明
1. 本工具主要针对png、jpg、jpeg格式图片进行压缩,由于png图片的特殊性,压缩过程中会将png转换成jpg再压缩
2. 考虑到jdk环境的问题,所以本工具需要运行在docker容器中,使用时你需要有个docker环境
3. 若符合你的需求,请继续看下面使用步骤
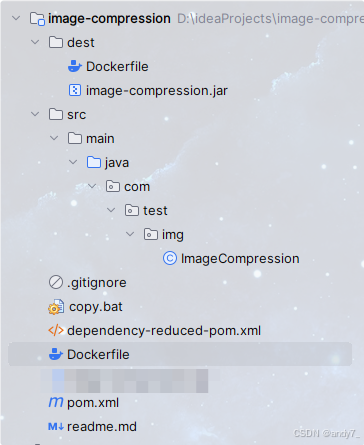
1. 新建maven项目,pom文件中加入
<dependencies><dependency><groupId>net.coobird</groupId><artifactId>thumbnailator</artifactId><version>0.4.8</version></dependency><dependency><groupId>commons-io</groupId><artifactId>commons-io</artifactId><version>2.11.0</version></dependency></dependencies><build><finalName>image-compression</finalName><plugins><plugin><groupId>org.apache.maven.plugins</groupId><artifactId>maven-shade-plugin</artifactId><version>3.2.4</version><executions><execution><phase>package</phase><goals><goal>shade</goal></goals><configuration><transformers><transformer implementation="org.apache.maven.plugins.shade.resource.ManifestResourceTransformer"><mainClass>com.test.img.ImageCompression</mainClass></transformer></transformers></configuration></execution></executions></plugin></plugins></build>
说明:项目依赖了thumbnailator、commons-io,若获取jar包失败,可尝试将jar下载本地,然后打入本地仓库
2.源码
package com.test.img;import net.coobird.thumbnailator.Thumbnails;
import org.apache.commons.io.FileUtils;
import org.apache.commons.io.FilenameUtils;import java.io.File;
import java.io.IOException;
import java.nio.file.Files;
import java.nio.file.Path;
import java.nio.file.Paths;
import java.util.Collection;
import java.util.concurrent.ExecutorService;
import java.util.concurrent.Executors;
import java.util.concurrent.TimeUnit;import java.util.Scanner;public class ImageCompression {public static void main(String[] args) {Scanner scanner = new Scanner(System.in);System.out.println("请输入图片源路径:");String inputDirPath = scanner.nextLine();if (inputDirPath == null || inputDirPath.isEmpty() || inputDirPath.trim().isEmpty()) {System.out.println("输入路径不能为空,请重新输入!");return;}System.out.println("请输入图片输出路径:");String outputDirPath = scanner.nextLine();if (outputDirPath == null || outputDirPath.isEmpty() || outputDirPath.trim().isEmpty()) {System.out.println("输入路径不能为空,请重新输入!");return;}compressImages(inputDirPath, outputDirPath);}public static void compressImages(String inputDirPath, String outputDirPath) {Path inputDir = Paths.get(inputDirPath);Path outputDir = Paths.get(outputDirPath);try {// 创建输出目录Files.createDirectories(outputDir);// 获取输入目录下的所有文件Collection<File> files = FileUtils.listFiles(new File(inputDir.toString()), null, true);ExecutorService executor = Executors.newFixedThreadPool(6); // 根据需要调整线程数for (File file : files) {if (file.isFile() && isImageFile(file.getName()) && isValidFileName(file.getName())) {String relativePath = inputDir.relativize(file.toPath()).toString();String outputPath = outputDir.resolve(relativePath).toString();// 创建输出目录结构Files.createDirectories(Paths.get(outputPath).getParent());// 提交任务到线程池executor.submit(() -> {try {Thumbnails.Builder<File> builder = Thumbnails.of(file).scale(1f).outputQuality(getQuality(file.length()));String extension = FilenameUtils.getExtension(file.getName());if ("png".equals(extension)) {builder.outputFormat("jpg");}builder.toFile(outputPath);} catch (Exception e) {System.err.println("发生错误:" + e.getMessage());e.printStackTrace();}});}}// 关闭线程池executor.shutdown();executor.awaitTermination(1, TimeUnit.HOURS);System.out.println("图片压缩完成!");} catch (IOException | InterruptedException e) {System.err.println("发生错误:" + e.getMessage());e.printStackTrace();}}// 排除掉名称以blob_开头的文件private static boolean isValidFileName(String fileName) {return !fileName.startsWith("blob_");}private static boolean isImageFile(String fileName) {String extension = fileName.substring(fileName.lastIndexOf(".") + 1).toLowerCase();return extension.equals("jpg") || extension.equals("jpeg") || extension.equals("png") || extension.equals("gif");}private static double getQuality(long size) {if (size < 900) {return 0.85;} else if (size < 2047) {return 0.6;} else if (size < 3275) {return 0.44;}return 0.3;}
}
说明:使用时根据实际需要调整源码
3.将项目打成jar包
mvn clean package
4.Dockerfile
# 使用java8镜像作为基础镜像
FROM java:8RUN mkdir /test# 设置工作目录
WORKDIR /testADD /image-compression.jar .VOLUME /test# 设置容器启动命令,这里传递命令行参数
CMD ["java", "-jar", "image-compression.jar", "param1", "param2"]
5.新建copy.bat
@echo off
setlocal:: Step 1: Determine the path to the generated JAR file
set JAR_FILE=target\image-compression.jar
if not exist %JAR_FILE% (echo Error: JAR file not found.exit /b 1
):: Step 2: Create the dest directory if it doesn't exist
echo Creating dest directory...
mkdir dest 2>nul:: Step 3: Copy the JAR file to the dest directory
echo Copying the JAR file to dest directory...
xcopy /F /I /Y "%JAR_FILE%" "dest\":: Step 4: Copy the Dockerfile to the dest directory
echo Copying the Dockerfile to dest directory...
xcopy /F /I /Y "Dockerfile" "dest\"echo Done!
endlocal
6.执行copy.bat
完成后

7.将生成的dest目录上传至目标服务器,进入dest目录,构建镜像
cd /dest
docker build -t image-compression:v1 .
8.运行容器
docker run -it --rm -v /test/upload/2023/:/2023 -v /test/upload/2023bak/:/2023bak -v /test/upload/2024/:/2024 -v /test/upload/2024bak/:/2024bak --name image-compression image-compression:v1
说明:运行容器时需要执行目录,防止在容器内部找不到目录,程序报错
-v就是为了指定目录挂载,这里将宿主机器的/test/upload/2023映射到容器内的/2023,其它路径挂在同理-it使容器采用交互式运行,--rm会在容器退出后自动删除容器
9.分别输入图片源路径、图片输出路径,将进行压缩,压缩完成后容器自动删除
